ansible自动化运维管理工具
1.Ansible介绍
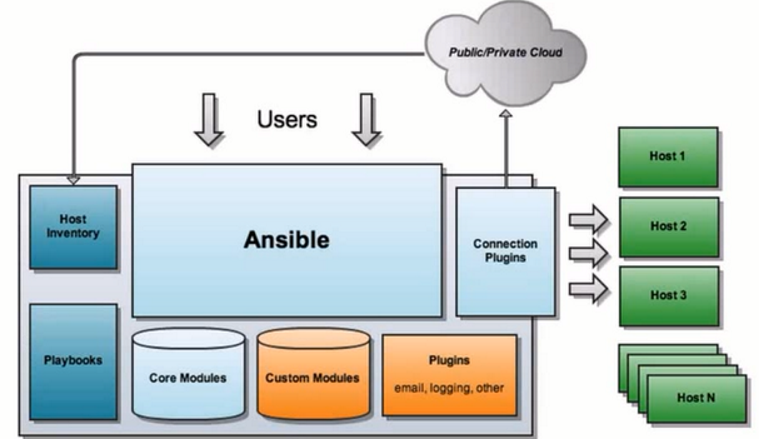
1)Ansible:Ansible的核心程序
2)Host Inventory:(默认路径:/etc/ansible/hosts)记录了每一个由Ansible管理的主机信息,信息包括ssh端口,root帐号密码,ip地址等等。可以通过file来加载,可以通过CMDB加载
3)Playbooks:YAML格式文件,多个任务定义在一个文件中,使用时可以统一调用,“剧本”用来定义那些主机需要调用那些模块来完成的功能.
4)Core Modules:Ansible执行任何管理任务都不是由Ansible自己完成,而是由核心模块完成;Ansible管理主机之前,先调用core Modules中的模块,然后指明管理Host Lnventory中的主机,就可以完成管理主机。
5)Custom Modules:自定义模块,完成Ansible核心模块无法完成的功能,此模块支持任何语言编写。
6)Connection Plugins:连接插件,Ansible和Host通信使用
2.ansible三种调用方式
1)hoc:命令行
2)playbooks:剧本/脚本
3)roles:角色
3.ansible配置客户端
1)安装:
yum install epel-release
yum install anisble
2)配置客户端
(1)server:ssh-keygen
scp id_rsa.pub root@192.168.254.25:/root/.ssh/authorized_keys
(2)vim /etc/ansible/hosts
ansible_ssh_user=root ansible_ssh_port=22 ansible_ssh_pass=root
4.ansible默认并发数:5
ansible -f 修改
5.ansible常用命令
ansible-doc -l #查看支持的模块
ansible-doc -s MODEL_NAME #查看模块用法
ansible命令应用基础
ansible all -m ping #查看client端是否正常ping通
ansible webserver -m setup #查看客户端信息
ansible webserver -m copy -a 'src=/root/git_test/code.txt dest=/root/test' #copy文件到cient端
ansible webserver -m user -a "name=test state=present" #创建test用户
ansible webserver -m user -a "name=test state=absent" #删除test用户
ansible webserver -m yum -a ‘name=epel-relese state=latest‘ #yum安装
ansible webserver -m service -a ‘name=httpd state=stopped enabled=no‘ #停止httpd服务
ansible webserver -m script -a ‘/tmp/test.sh‘ #运行脚本
ansible webserver -m command 'date' #查看时间
6.连接报错解决
使用ansible连接主机时出现Using a SSH password instead of a key is not possible because Host Key checking is enabled and sshpass does not support this. Please add this host's fingerprint to your known_hosts file to manage this host.报错则把/etc/ansible/ansible.cfg配置文件中host_key_checking = False行注释打开
7.playbooks
1)
如果用模块形式一般有幂等性,如果用shell或者command没有幂等性
playbooks相当于是shell脚本,可以把要执行的任务写到文件当中,一次执行,方便调用
tasks:一个task相当于是一个play
varibles: 变量,一定定义,多处调用
template:模板,可以区分不同主机的特点
handlers:触发器,依赖于前一个任务,前一个任务如果执行改变,那么就会触发handlers
2)定义playbook任务
- hosts: testhosts  -与关键字之间必须有空格

  remote_user: root   与hosts对齐

  vars:  定义变量

  - file: httpd.conf

  tasks: 定义任务

  - name: copy httpd.conf  任务名

    copy: src=/root/{{ file }} dest=/etc/httpd/conf/{{ file }}  调用copy模块

  - name: restart httpd  定义多个任务

    service: name=httpd state=restarted
3)定义变量
在yaml文件当中传入模板变量
{{变量名}}
第一种:
vars:
- file: httpd.conf
第二种:
vim /etc/ansible/hosts
[testhosts:vars]
file=httpd.conf
packages=tree
第三种
执行playbook文件时候给与变量 --extra-vars
ansible-playbook test.yaml --extra-vars "touch_file=test.txt"
4)注册变量:
register注册变量:把date命令输出的结果赋予给date_output
- hosts: 192.168.254.10

  remote_user: root

  tasks:

  - name: get date

    command: date

    register: date_output

  - name: echo date_output

    shell: "echo {{date_output.stdout}}>/tmp/a.txt"
5)when语句
when条件语句:可以根据setup显示出客户端信息为依据来判断
- hosts: 192.168.254.12

  remote_user: root

  tasks:

  - name: echo date_output

    shell: "touch /tmp/a.txt"

    when: ansible_distribution=='CentOS' and ansible_distribution_major_version=='8'
6)异常处理
ignore_errors:如果任务出错,直接跳过,不会影响其他任务
- hosts: 192.168.254.12

  remote_user: root

  tasks:

  - name: add several user

    command: touch1 a.txt

    ignore_errors: yes
7)循环语句:
第一种:
{{ item }}:循环创建
- hosts: 192.168.254.12

  remote_user: root

  tasks:

  - name: add many users

    user: name={{ item }} state=present

    with_items:

    - user1

    - user2

    - user3

    - user4
第二种:
- hosts: 192.168.254.12

  remote_user: root

  tasks:

  - name: add several user

    user: name={{item.name}} state=present groups={{item.groups}}

    with_items:

    - { name: 'testuser1', groups: 'wheel'}

    - { name: 'testuser2', groups: 'root'}
8)触发器:
handlers:如果执行的任务被改变那么会触发handlers的任务
- hosts: testhosts

  remote_user: root

  tasks:

  - name: copy httpd.conf

    copy: src=/root/httpd.conf dest=/etc/httpd/conf/httpd.conf

    notify:

    - restarted httpd service

  handlers:

  - name: restarted httpd service

    service: name=httpd state=restarted
9)模板拷贝:
template,用来区分不同客户端上的特性
- hosts: testhosts

  remote_user: root

  tasks:

  - name: copy httpd.conf

    template: src=/root/httpd.conf dest=/etc/httpd/conf/httpd.conf  将copy改为template

    notify:

    - restarted httpd service

  handlers:

  - name: restarted httpd service

    service: name=httpd state=restarted
将要修改的文件内的区域改为变量,如把Listen 80 改为Listen {{ port }}
在组文件中添加变量的值
[testhosts]

192.168.52.234·······port=1111

192.168.52.235·······port=2222
8.roles:角色
1)创建目录
[root@localhost ~]# tree playbooks/

playbooks/  根据需要命名

├── roles

│   ├── dbservers  根据需要命名

│   │   ├── files  存放要复制的文件

│   │   │   └── httpd.conf

│   │   ├── handlers  存放触发器任务文件

│   │   │   └── main.yaml

│   │   ├── tasks  存放任务文件

│   │   │   └── main.yaml

│   │   ├── templates  存放模板文件

│   │   │   └── httpd.conf

│   │   └── vars  存放变量定义文件

│   │       └── main.yaml

│   └── webservers

│       ├── files

│       ├── handlers

│       ├── tasks

│       ├── templates

│       └── vars

└── site.yaml  主调用文件
编辑主调用文件:
vim playbooks/site.yaml

- hosts: webservers

  remote_user: root

  roles:

  - webservers

  - dbservers
2)按照playbooks语句进行编辑
