dubbo[2]_XML配置
本文介绍了zookeeper的下载安装以及用xml配置服务消费者和提供者的例子。
1. zookeeper下载安装
本文的例子使用zookeeper作为注册中心。
首先,从官网下载zookeeper,我选择的是Apache ZooKeeper 3.6.3版本。下载完成后,解压到自己的目录。https://zookeeper.apache.org/releases.html
然后,从conf文件夹找到zoo_sample.cfg配置文件,复制一份副本,重命名为zoo.cfg。重命名后打开,找到dataDir=/tmp/zookeeper这一行,可修改为自定义的文件夹: dataDir=../data。然后返回根目录,建一个data文件夹即可。
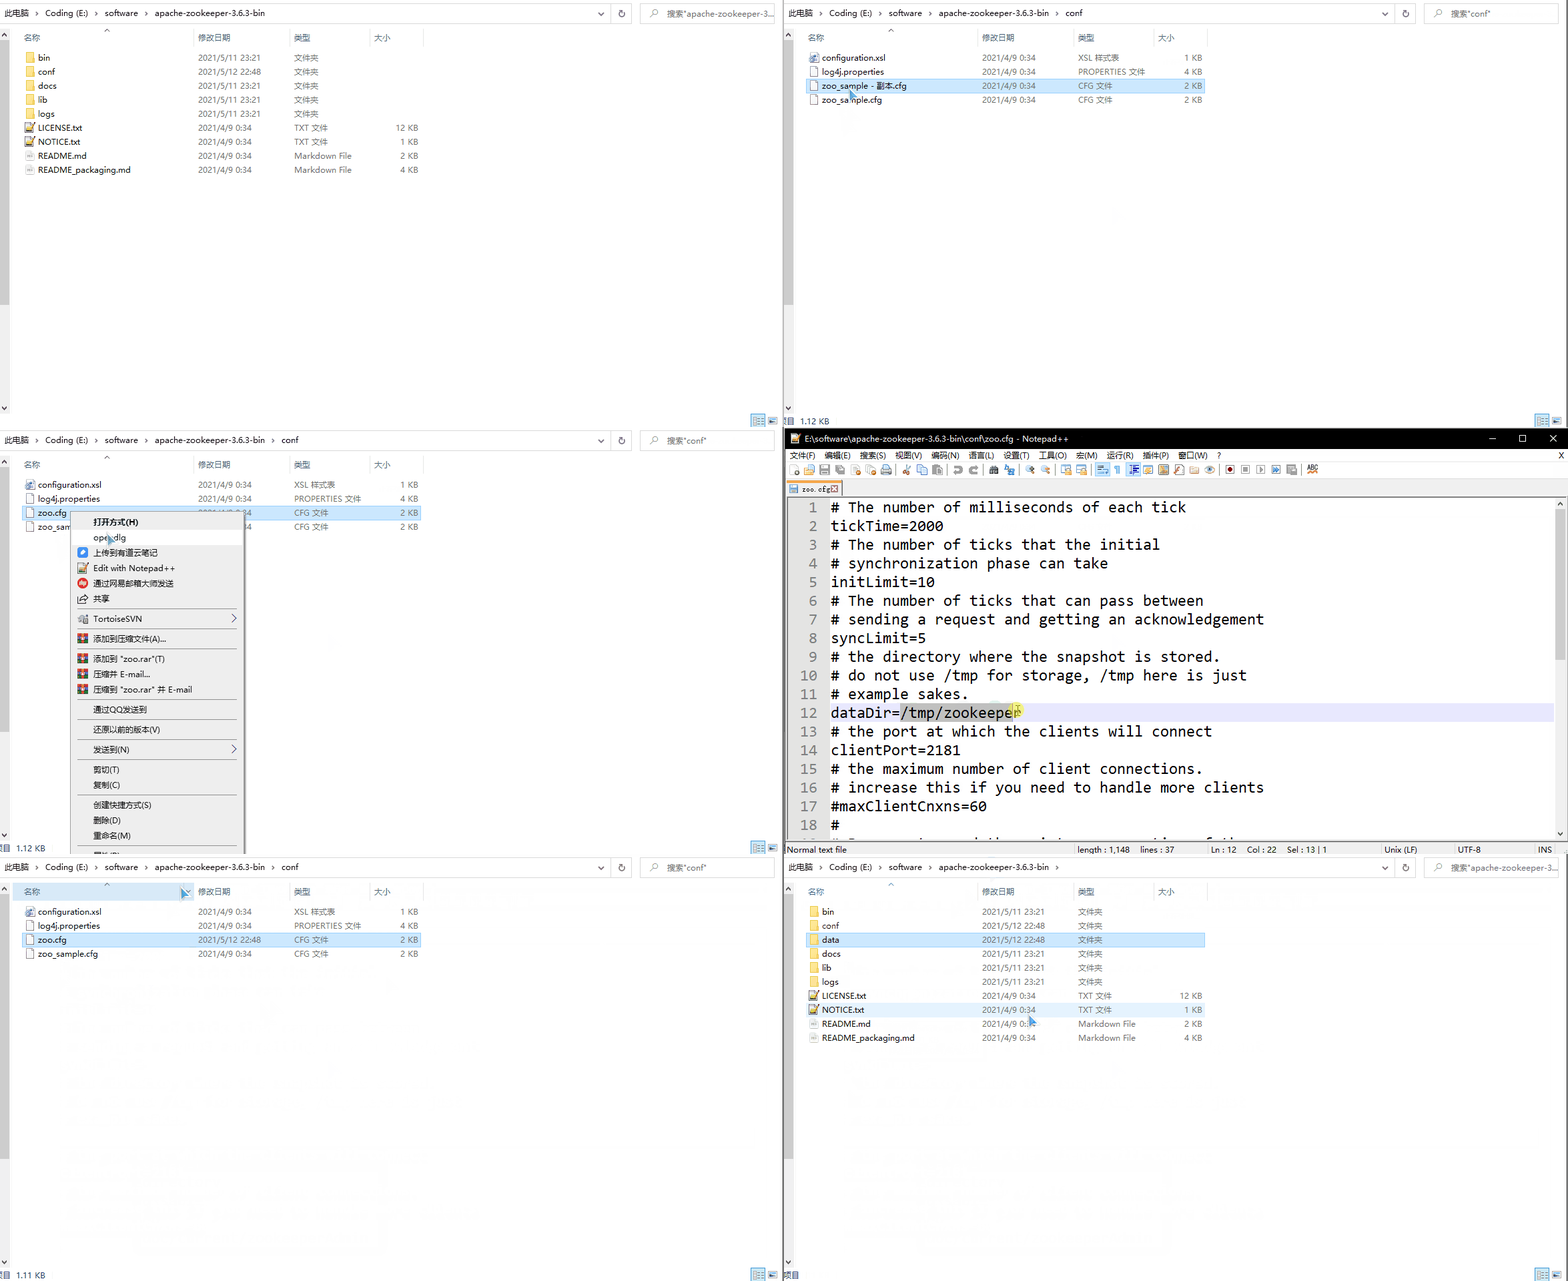
最后,启动bin目录下的zkServer.cmd,即可启动zookeeper。注意输出内容可能会有端口信息,默认2181。
2021-05-12 22:54:09,460 [myid:] - INFO [main:NIOServerCnxnFactory@674] - binding to port 0.0.0.0/0.0.0.0:2181
2.dubbo例子
1)新建项目
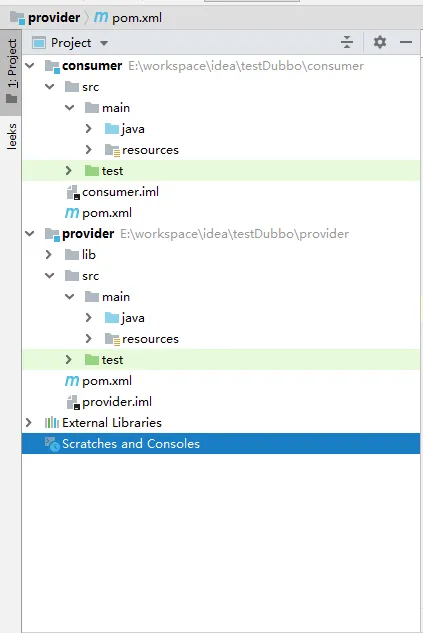
新建两个项目,服务消费consumer模块和服务提供provider模块 。添加对应的maven支持和spring支持。
项目结构如下:
2)服务提供provider
- 在pom.xml中添加dubbo相关的依赖。
<dependencies>
        <!-- https://mvnrepository.com/artifact/com.alibaba/dubbo -->
        <dependency>
            <groupId>com.alibaba</groupId>
            <artifactId>dubbo</artifactId>
            <version>2.6.6</version>
        </dependency>
        <dependency>
            <groupId>org.apache.zookeeper</groupId>
            <artifactId>zookeeper</artifactId>
            <version>3.4.10</version>
        </dependency>
        <dependency>
            <groupId>com.101tec</groupId>
            <artifactId>zkclient</artifactId>
            <version>0.5</version>
        </dependency>
        <dependency>
            <groupId>io.netty</groupId>
            <artifactId>netty-all</artifactId>
            <version>4.1.32.Final</version>
        </dependency>
        <dependency>
            <groupId>org.apache.curator</groupId>
            <artifactId>curator-framework</artifactId>
            <version>2.8.0</version>
        </dependency>
        <dependency>
            <groupId>org.apache.curator</groupId>
            <artifactId>curator-recipes</artifactId>
            <version>2.8.0</version>
        </dependency>
    </dependencies>
- 定义接口Animal。
/**
 * 动物接口
 */
public interface Animal {
    /**
     * 描述: 返回动物的叫声
     */
    String sound();
}
- 定义具体类Cat实现Animal接口
public class Cat implements Animal {
    public String sound() {
        return "喵";
    }
}
- 在resources 下新建provider.xml。
<?xml version="1.0" encoding="UTF-8"?>
<beans xmlns="http://www.springframework.org/schema/beans"
       xmlns:xsi="http://www.w3.org/2001/XMLSchema-instance"
       xmlns:dubbo="http://code.alibabatech.com/schema/dubbo"
       xsi:schemaLocation="http://www.springframework.org/schema/beans http://www.springframework.org/schema/beans/spring-beans.xsd
       http://code.alibabatech.com/schema/dubbo http://code.alibabatech.com/schema/dubbo/dubbo.xsd">

    <!--整个dubbo应用的名称和所属者-->
    <dubbo:application name="myApp" owner="yt"/>

    <!-- 监控中心配置 -->
    <dubbo:monitor protocol="registry"/>

    <!--dubbo这个服务所要暴露的服务地址所对应的注册中心-->
    <!--<dubbo:registry address="N/A"/>-->
    <dubbo:registry address="zookeeper://localhost:2181" check="false"/>

    <!--当前服务发布所依赖的协议;webserovice、Thrift、Hessain、http-->
    <dubbo:protocol name="dubbo" port="20880"/>

    <!--服务发布的配置,需要暴露的服务接口-->
    <dubbo:service interface="com.yt.provider.Animal" ref="cat"/>

    <!--Bean bean定义-->
    <bean id="cat" class="com.yt.provider.Cat"/>
</beans>
- 新建一个Provider类,用来启动项目
public class Provider {
    public static void main(String[] args) throws IOException {
        // xml配置文件的路径
        ClassPathXmlApplicationContext context = new ClassPathXmlApplicationContext("META-INF/spring/provider.xml");
        context.start();
        // 任意键退出
        System.in.read();
    }
}
项目结构:
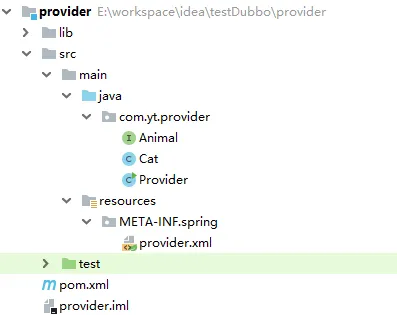
至此整个服务端就启动完成了。
3)服务消费consumer
- 在pom.xml中添加dubbo相关的依赖。这一步和provider的依赖类似,只是多了要导入provider的依赖这一块。
<dependencies>
        <!-- 依赖于服务提供者的包 -->
        <dependency>
            <groupId>com.yt</groupId>
            <artifactId>provider</artifactId>
            <version>1.0-SNAPSHOT</version>
        </dependency>

    	...
    	<!-- 其他的就是provider的依赖,就省略了-->
    	....

    </dependencies>
- 在resources 下新建consumer.xml。
<?xml version="1.0" encoding="UTF-8"?>
<beans xmlns="http://www.springframework.org/schema/beans"
       xmlns:xsi="http://www.w3.org/2001/XMLSchema-instance"
       xmlns:dubbo="http://code.alibabatech.com/schema/dubbo"
       xsi:schemaLocation="http://www.springframework.org/schema/beans http://www.springframework.org/schema/beans/spring-beans.xsd
       http://code.alibabatech.com/schema/dubbo http://code.alibabatech.com/schema/dubbo/dubbo.xsd">

    <!-- 应用配置 -->
    <dubbo:application name="myApp" owner="yt"/>

    <!-- 监控中心配置 -->
    <dubbo:monitor protocol="registry"/>

    <!--dubbo这个服务所要暴露的服务地址所对应的注册中心-->
    <!-- <dubbo:registry address="N/A"/> -->
    <dubbo:registry address="zookeeper://localhost:2181" check="false" />

    <!-- 引用配置 -->
    <dubbo:reference id="animal" interface="com.yt.provider.Animal"/>
</beans>
- 新建Consumer类,用来调用provider提供的接口
package com.yt.consumer;

import com.yt.provider.Animal;
import org.springframework.context.support.ClassPathXmlApplicationContext;

/**
 * 消费consumer
 */
public class Consumer {
    public static void main(String[] args) {
        // 配置文件路径
        ClassPathXmlApplicationContext context = new ClassPathXmlApplicationContext("/spring/consumer.xml");
        context.start();
        // 暴露的是接口Animal,多态。
        Animal animal = (Animal) context.getBean("animal");
        System.out.println(animal.sound());
    }
}
- 输出结果:
喵
项目结构:
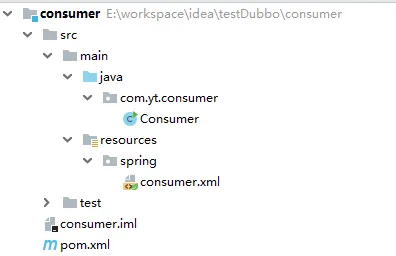
至此,一个简单的dubbo例子就完成了。
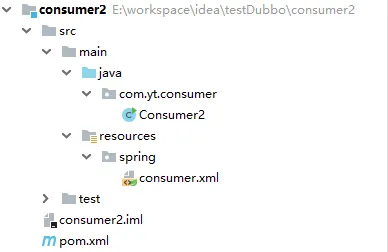
当然,一个提供者可以供多个消费者消费。所以将consumer拷一份命名为consumer2,依然可以同时获取到provider暴露出的接口。


 浙公网安备 33010602011771号