Spring Cloud Sleuth 整合 Zipkin 进行服务链路追踪
原文链接:https://www.jianshu.com/p/8396aedbb1a5
为何要进行服务链路追踪?
在一个微服务系统架构中,一个完整的请求可能涉及到多个微服务的调用,这个调用形成一个链路。
比如,下单的请求,需要经过网关去调用业务服务,业务服务去调用订单服务,而订单服务同步调用商品服务和用户服务,用户服务又去调用积分服务:
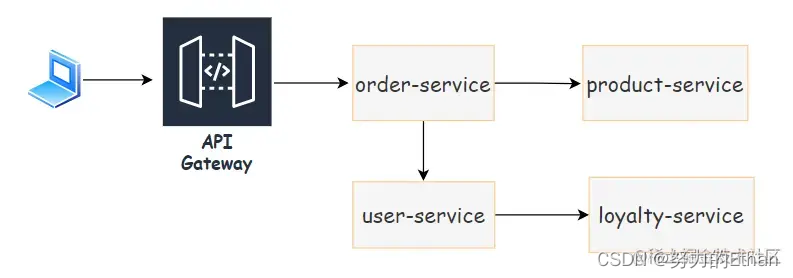
业务要求整个下单的请求要在 1s 内完成,测试发现请求下单接口耗时超过 2s ,这时我们就需要去定位发现是调用链路上的哪个环节耗时异常,进而去解决问题。
Spring Cloud 就有这样一个组件专门做链路追踪,那就是 Spring Cloud Sleuth ,有如下功能:
- 跟踪请求的调用情况并将它发送到日志系统,从而可以从日志收集其中看到相关的调用情况。 检测请求来自 Spring
- 应用程序的公共入口和出口点(servlet 过滤器、rest 模板、计划操作、消息通道、feign 客户端)。 如果使用了 Zipkin
- 结合 Sleuth ,则应用程序将通过 HTTP 或者其他方式将 Sleuth 跟踪的请求情况发送到 Zipkin。
这里提到的另一个组件 Zipkin 是一个能够收集所有服务监控数据的跟踪系统。有了 Zipkin 我们可以直观的查看调用链路,并且可以方便的看出服务之间的调用关系以及调用耗时。
Spring Cloud Sleuth 和 Zipkin 的使用非常简单,官网上有很详细的文档:
下面我们来实操一下。
微服务调用链路环境搭建
我们以开篇举的例子来搭建这样一个环境:
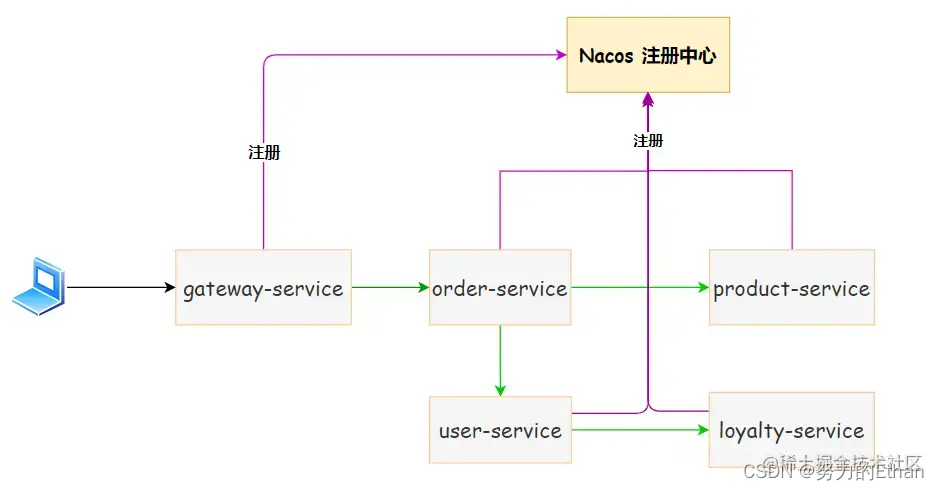
还是以本 Spring Cloud Alibaba 系列文章的代码 SpringCloudAlibabaDemo 为例,目前已有 gatwway-service ,order-service 和 user-service ,我们再创建两个微服务项目 product-service 和 loyalty-service ,并形成一个调用链路。
为了展示,这里贴出了调用逻辑上的关键代码,调用关系如下所示:
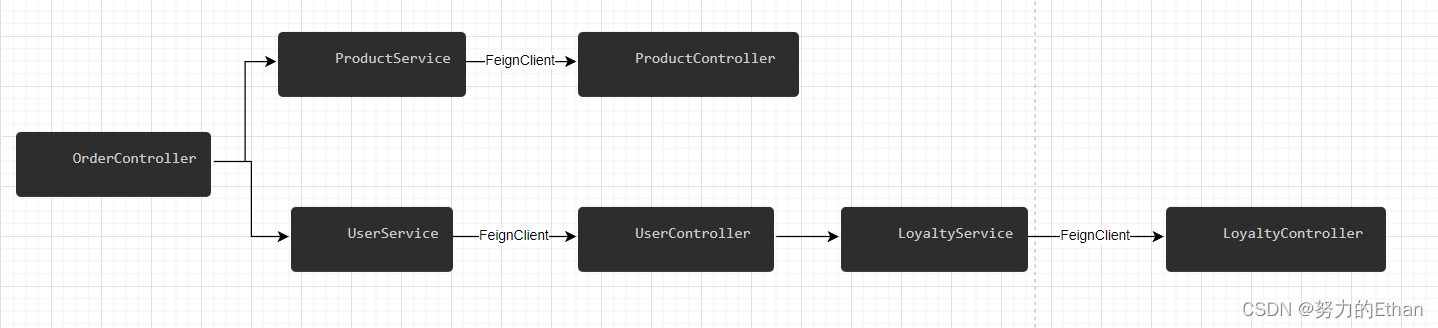
product-service 查询商品信息:
@RestController
@RequestMapping("/product")
public class ProductController {
    @GetMapping("/price/{id}")
    public BigDecimal getPrice(@PathVariable("id") Long id) {
        if (id == 1) {
            return new BigDecimal("5899");
        }
        return new BigDecimal("5999");
    }
}
loyalty-service 积分服务中获取用户积分和增加积分的 API :
@RestController
@Slf4j
public class LoyaltyController {

    /**
     * 获取用户当前积分
     * @param id 用户id
     */
    @GetMapping("/score/{id}")
    public Integer getScore(@PathVariable("id") Long id) {
        log.info("获取用户 id={} 当前积分", id);
        return 1800;
    }

    /**
     * 为当前用户增加积分
     * @param id 用户id
     * @param lastScore 用户当前积分
     * @param addScore 要增加的积分
     */
    @GetMapping("/addScore")
    public Integer addScore(@RequestParam(value = "id") Long id,
                            @RequestParam(value = "lastScore") Integer lastScore,
                            @RequestParam(value = "addScore") Integer addScore) {
        log.info("用户 id={} 增加 {} 积分", id, addScore);
        return lastScore + addScore;
    }
}
user-service 通过 OpenFeign 调用积分服务:
FeignClient 类:
@Service
@FeignClient("loyalty-service")
public interface LoyaltyService {

    @GetMapping("/score/{id}")
    Integer getScore(@PathVariable("id") Long id);

    @GetMapping("/addScore")
    Integer addScore(@RequestParam(value = "id") Long id,
                     @RequestParam(value = "lastScore") Integer lastScore,
                     @RequestParam(value = "addScore") Integer addScore);
}
Controller 调用:
@Slf4j
@RestController
@RequestMapping("/user")
public class UserController {

    private LoyaltyService loyaltyService;

    @GetMapping("/score/{id}")
    public Integer getScore(@PathVariable("id") Long id) {
        return loyaltyService.getScore(id);
    }

    @GetMapping("/addScore")
    public Integer addScore(@RequestParam Long id,
                            @RequestParam Integer lastScore,
                            @RequestParam Integer addScore) {
        return loyaltyService.addScore(id, lastScore, addScore);
    }

    @Autowired
    public void setLoyaltyService(LoyaltyService loyaltyService) {
        this.loyaltyService = loyaltyService;
    }
}
order-service 订单服务通过 OpenFeign 调用 user-service 和 product-service :
FeignClient 类 :
@Service
@FeignClient("product-service")
public interface ProductService {
    BigDecimal getPrice(@PathVariable("id") Long id);
}
@Service
@FeignClient("user-service")
public interface UserService {
    /**
     * 由于 user-service 使用了统一返回结果,所以此处的返回值是 ResponseResult
     * @param id 用户id
     * @return ResponseResult<Integer>
     */
    @GetMapping("/user/score/{id}")
    ResponseResult<Integer> getScore(@PathVariable("id") Long id);

    /**
     * 由于 user-service 使用了统一返回结果,所以此处的返回值是 ResponseResult
     */
    @GetMapping("/user/addScore")
    ResponseResult<Integer> addScore(@RequestParam(value = "id") Long id,
                     @RequestParam(value = "lastScore") Integer lastScore,
                     @RequestParam(value = "addScore") Integer addScore);
}
Controller 调用 :
@Slf4j
@RestController
@RequestMapping("/order")
public class OrderController {

    private UserService userService;

    private ProductService productService;

    @GetMapping("/create")
    public String createOrder(@RequestParam("userId") Long userId, @RequestParam("productId") Long productId) {
        log.info("创建订单参数,userId={}, productId={}", userId, productId);
        // 商品服务-获取价格
        BigDecimal price = productService.getPrice(productId);
        log.info("获得 price={}", price);
        // 用户服务-查询当前积分,增加积分
        Integer currentScore = userService.getScore(userId).getData();
        log.info("获得 currentScore={}", price);
        // 增加积分
        Integer addScore = price.intValue();
        Integer finalScore = userService.addScore(userId, currentScore, addScore).getData();
        log.info("下单成功,用户 id={} 最终积分:{}", userId, finalScore);
        return "下单成功,用户 id=" + userId + " 最终积分:" + finalScore;
    }

    @Autowired
    public void setUserService(UserService userService) {
        this.userService = userService;
    }

    @Autowired
    public void setProductService(ProductService productService) {
        this.productService = productService;
    }
}
网关 gateway-service 配置 Nacos 注册中心和路由:
spring:
  cloud:
    nacos:
      discovery:
        server-addr: 192.168.242.112:81
    gateway:
      routes:
        - id: order-service
          uri: lb://order-service
          predicates:
            - Path=/order/**
启动网关以及其他四个服务,
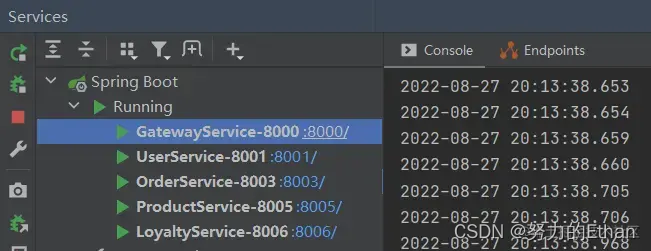
然后可以在 Nacos 中看到注册进来的实例:
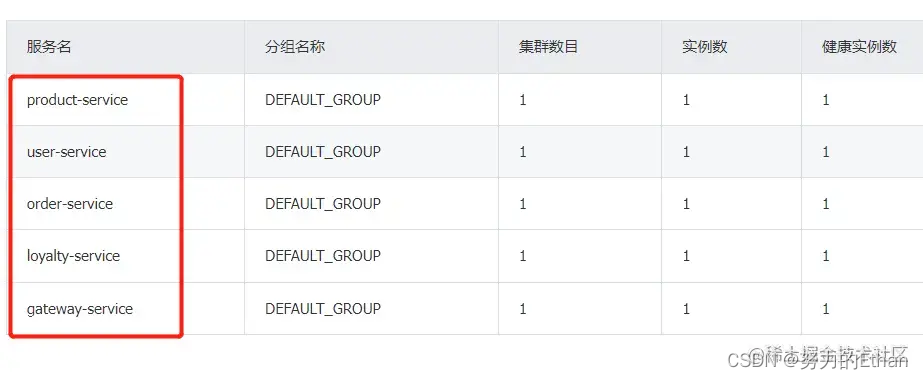
所有服务启动成功之后,通过网关调用下单 API :
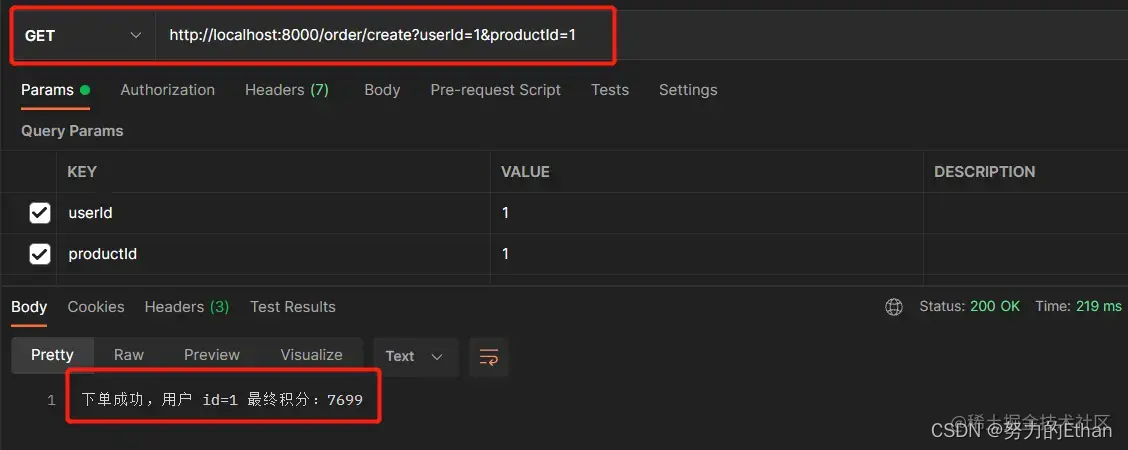
整个调用链路没有问题。
Spring Cloud Sleuth 的使用
要想使用 Sleuth ,只需简单几个操作即可。
除了 gateway-service 网关服务,其他四个服务均执行以下步骤:
1, 导入 spring-cloud-starter-sleuth 依赖:
<dependency>
    <groupId>org.springframework.cloud</groupId>
    <artifactId>spring-cloud-starter-sleuth</artifactId>
</dependency>
2, org.springframework.web.servlet.DispatcherServlet 日志级别调整为 DEBUG :
logging:
  level:
    org.springframework.web.servlet.DispatcherServlet: DEBUG
然后重启这四个服务,再次通过网关访问下单 API ,看到每个服务都打印了这样的日志:
- user-service :
![在这里插入图片描述]()
- product-service :
![在这里插入图片描述]()
- loyalty-service :
![在这里插入图片描述]()
- order-service :
![在这里插入图片描述]()
这样形式的日志:


# [服务名,总链路ID,子链路ID]
[order-service,5eda5d7bdcca0118,5eda5d7bdcca0118]
就是整体的一个调用链路信息。
Zipkin 服务部署与使用
部署 Zipkin 服务
简单来说, Zipkin 是用来图形化展示 Sleuth 收集来的信息的。
Zipkin 需要单独安装,它是一个 Java 编写的 Web 项目,我们使用 Docker Compose 进行部署安装 Zipkin 。
部署步骤:
1, 创建 /usr/local/zipkin 目录,进入到该目录:
mkdir /usr/local/zipkin
cd /usr/local/zipkin
2, 创建 docker-compose.yml 文件,文件内容如下:
version: "3"
services:
  zipkin:
   image: openzipkin/zipkin
   restart: always
   container_name: zipkin
   ports:
     - 9411:9411
这是简化版的 docker-compose.yml 配置文件,这样的配置就能启动 Zipkin 。
3, 使用 docker-compose up -d 命令(-d 表示后台启动)启动:

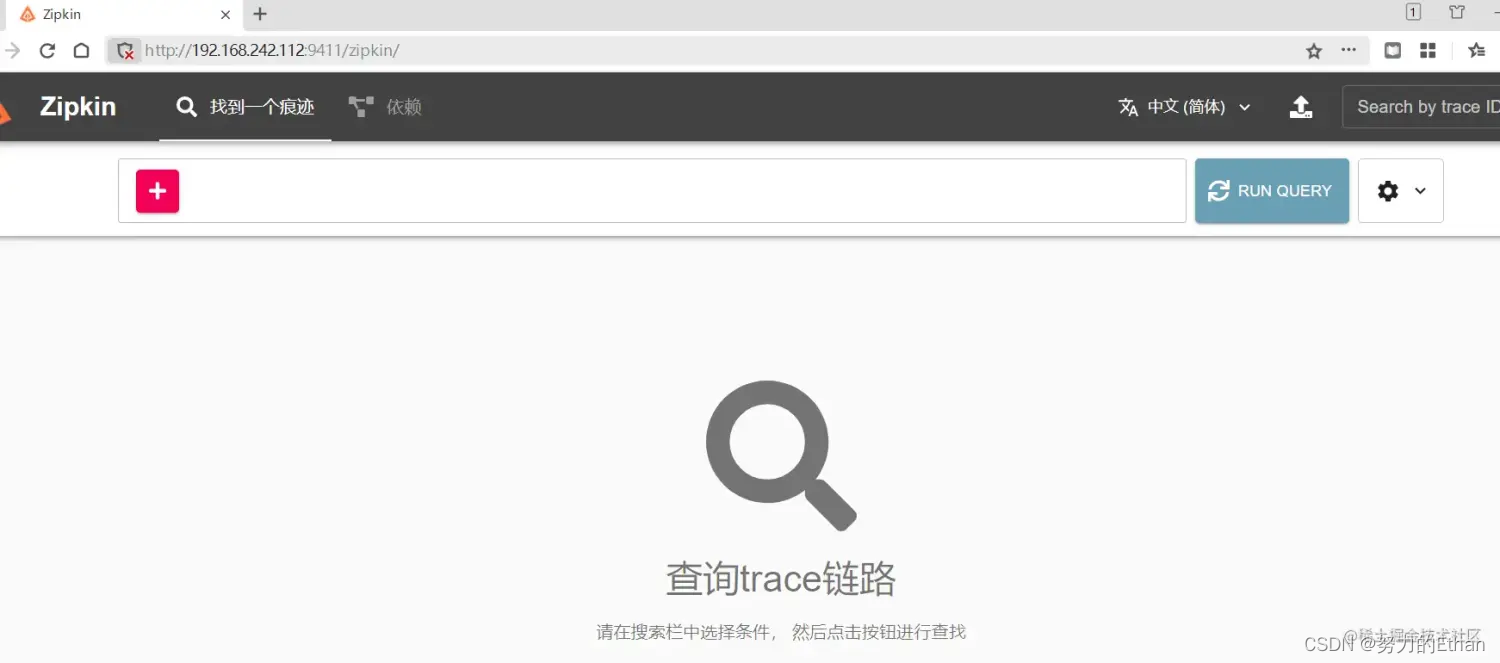
部署成功后,访问 Zipkin ,端口为 9411 ,访问地址:http://ip地址:9411/zipkin/
这样,一个 Zipkin 服务就部署完成了。
将 Sleuth 收集到的日志信息发送到 Zipkin
首先,还是需要在微服务项目中导入 spring-cloud-sleuth-zipkin 的依赖:
<dependency>
    <groupId>org.springframework.cloud</groupId>
    <artifactId>spring-cloud-starter-sleuth</artifactId>
</dependency>
<dependency>
    <groupId>org.springframework.cloud</groupId>
    <artifactId>spring-cloud-sleuth-zipkin</artifactId>
</dependency>
然后,增加一些配置,让 Sleuth 收集的信息发送到 Zipkin 服务上:
spring:
  cloud:
    nacos:
      discovery:
        server-addr: 192.168.242.112:81
  sleuth:
    enabled: true
    sampler:
      # 设置 Sleuth 收集信息的百分比,一般情况下,10%就够用了,这里设置100%观察
      rate: 100
  zipkin:
    sender:
      type: web
    base-url: http://192.168.242.112:9411/
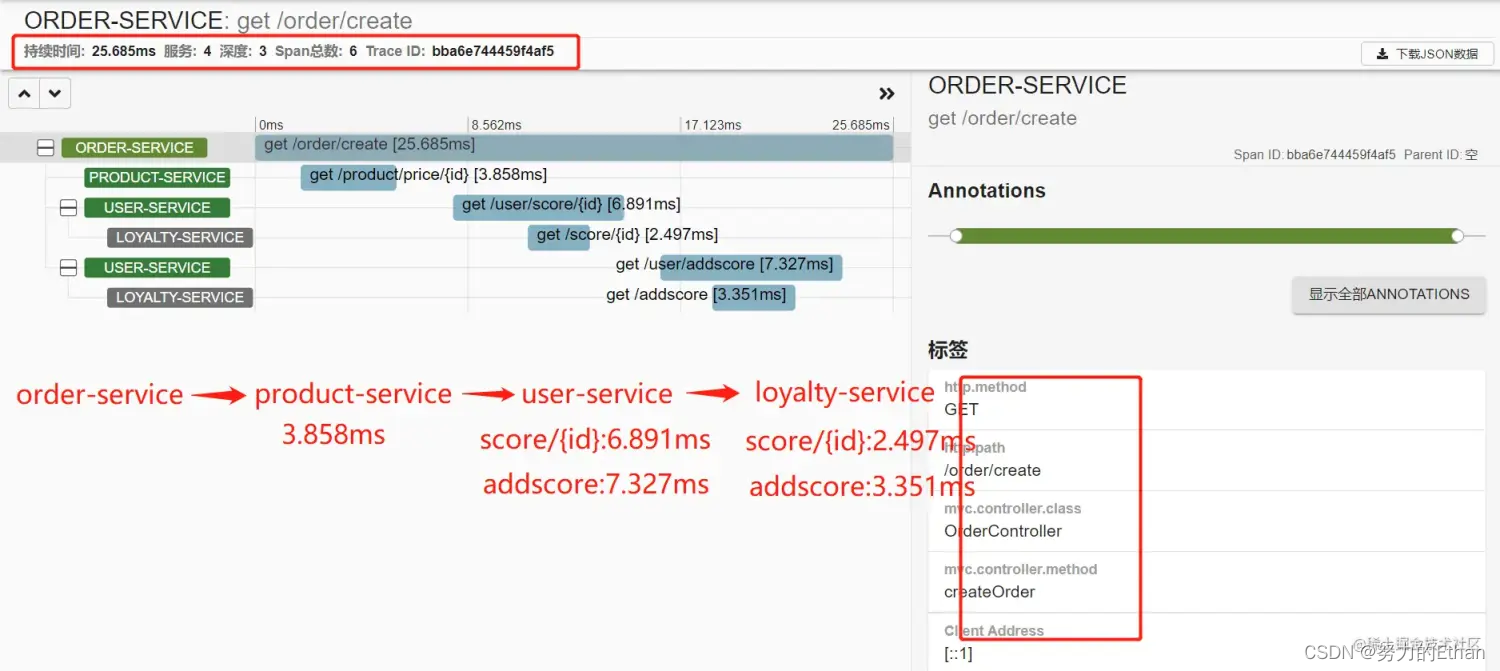
好了,再来启动每个服务,然后访问下单接口再看下 Zipkin 的面板。访问 http://ip地址:9411/zipkin/
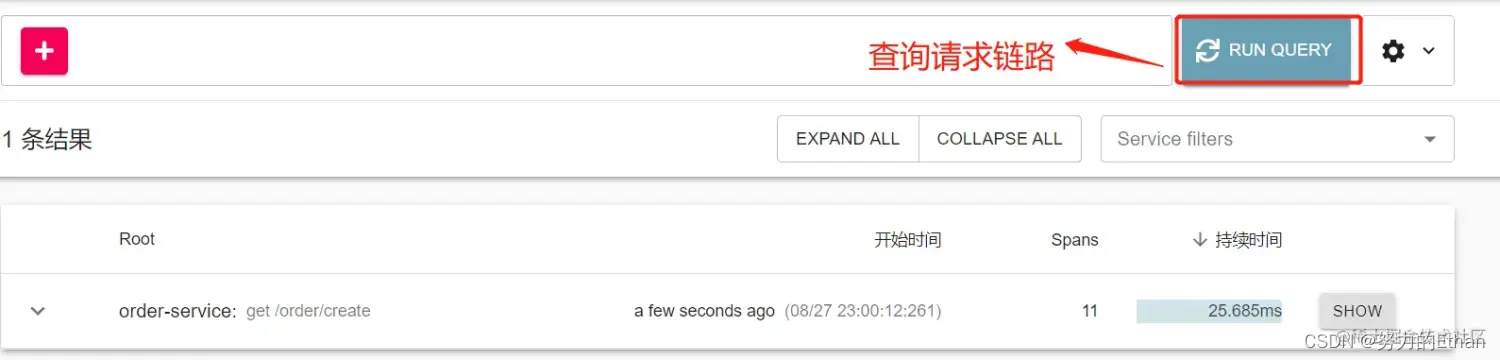
以看到有一个请求出来了,点击 SHOW在这里插入代码片 查看详情:
小结
Spring Cloud Sleuth 结合 Zipkin 可以对每个微服务进行链路追踪,从而帮助我们分析服务间调用关系以及调用耗费的时间。
本文只简单介绍了通过 web 方式(配置项:spring.zipkin.sender.type=web):
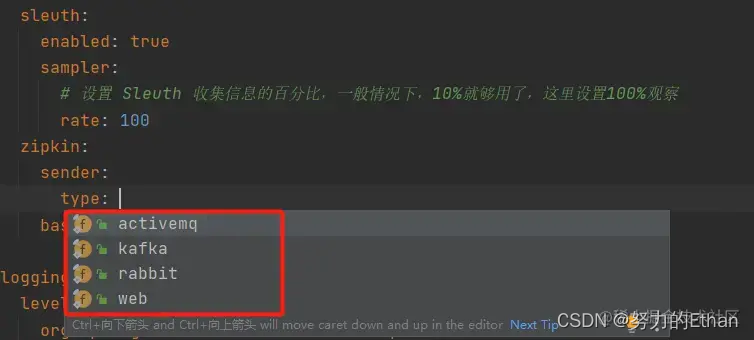
也就是通过 HTTP 的方式发送数据到 Zipkin ,如果请求量比较大,这种方式其实性能是比较低的,一般情况下我们都是通过消息中间件来发送,比如 RabbitMQ 。
如果日志数据量比较大,一般推荐拥有更高吞吐量的 Kafka 来进行日志推送。
这种方式就是让服务将 Sleuth 收集的日志推给 MQ ,让 Zipkin 去监控 MQ 的信息,通过 MQ 的队列获取到服务的信息。这样就提高了性能。
而日志的存储则可以采用 Elasticsearch 对数据进行持久化,这样可以保证 Zipkin 重启后,链路信息不会丢失。

 浙公网安备 33010602011771号