Cloud-Platform 学习——Part02 登录流程分析
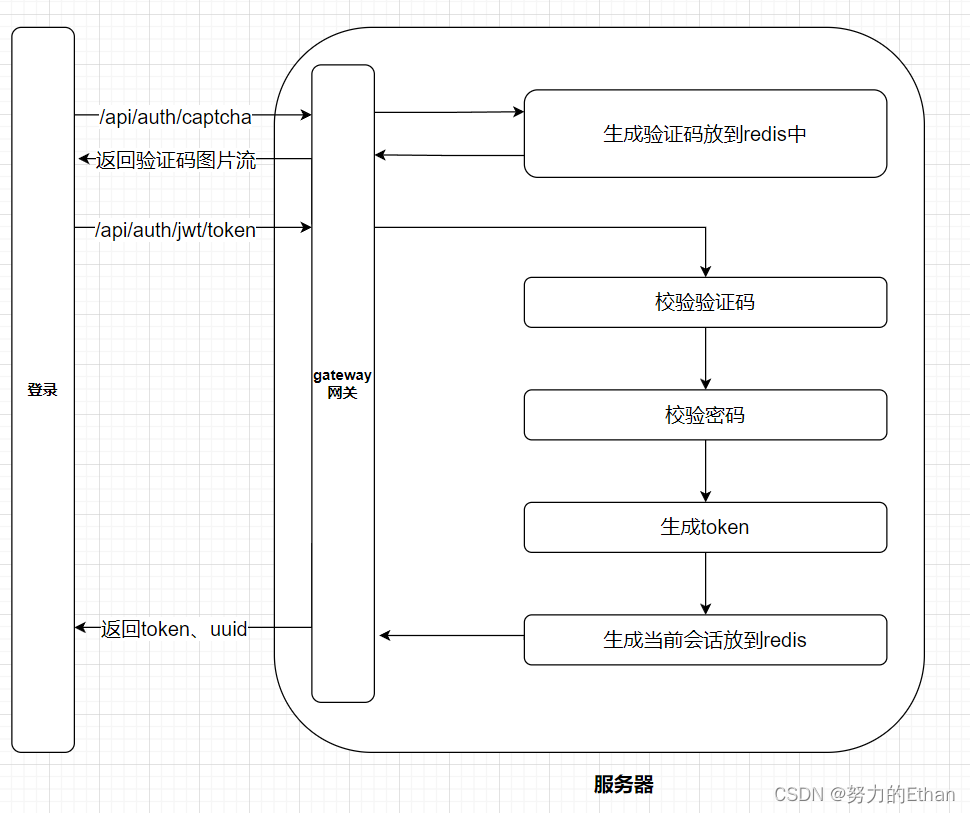
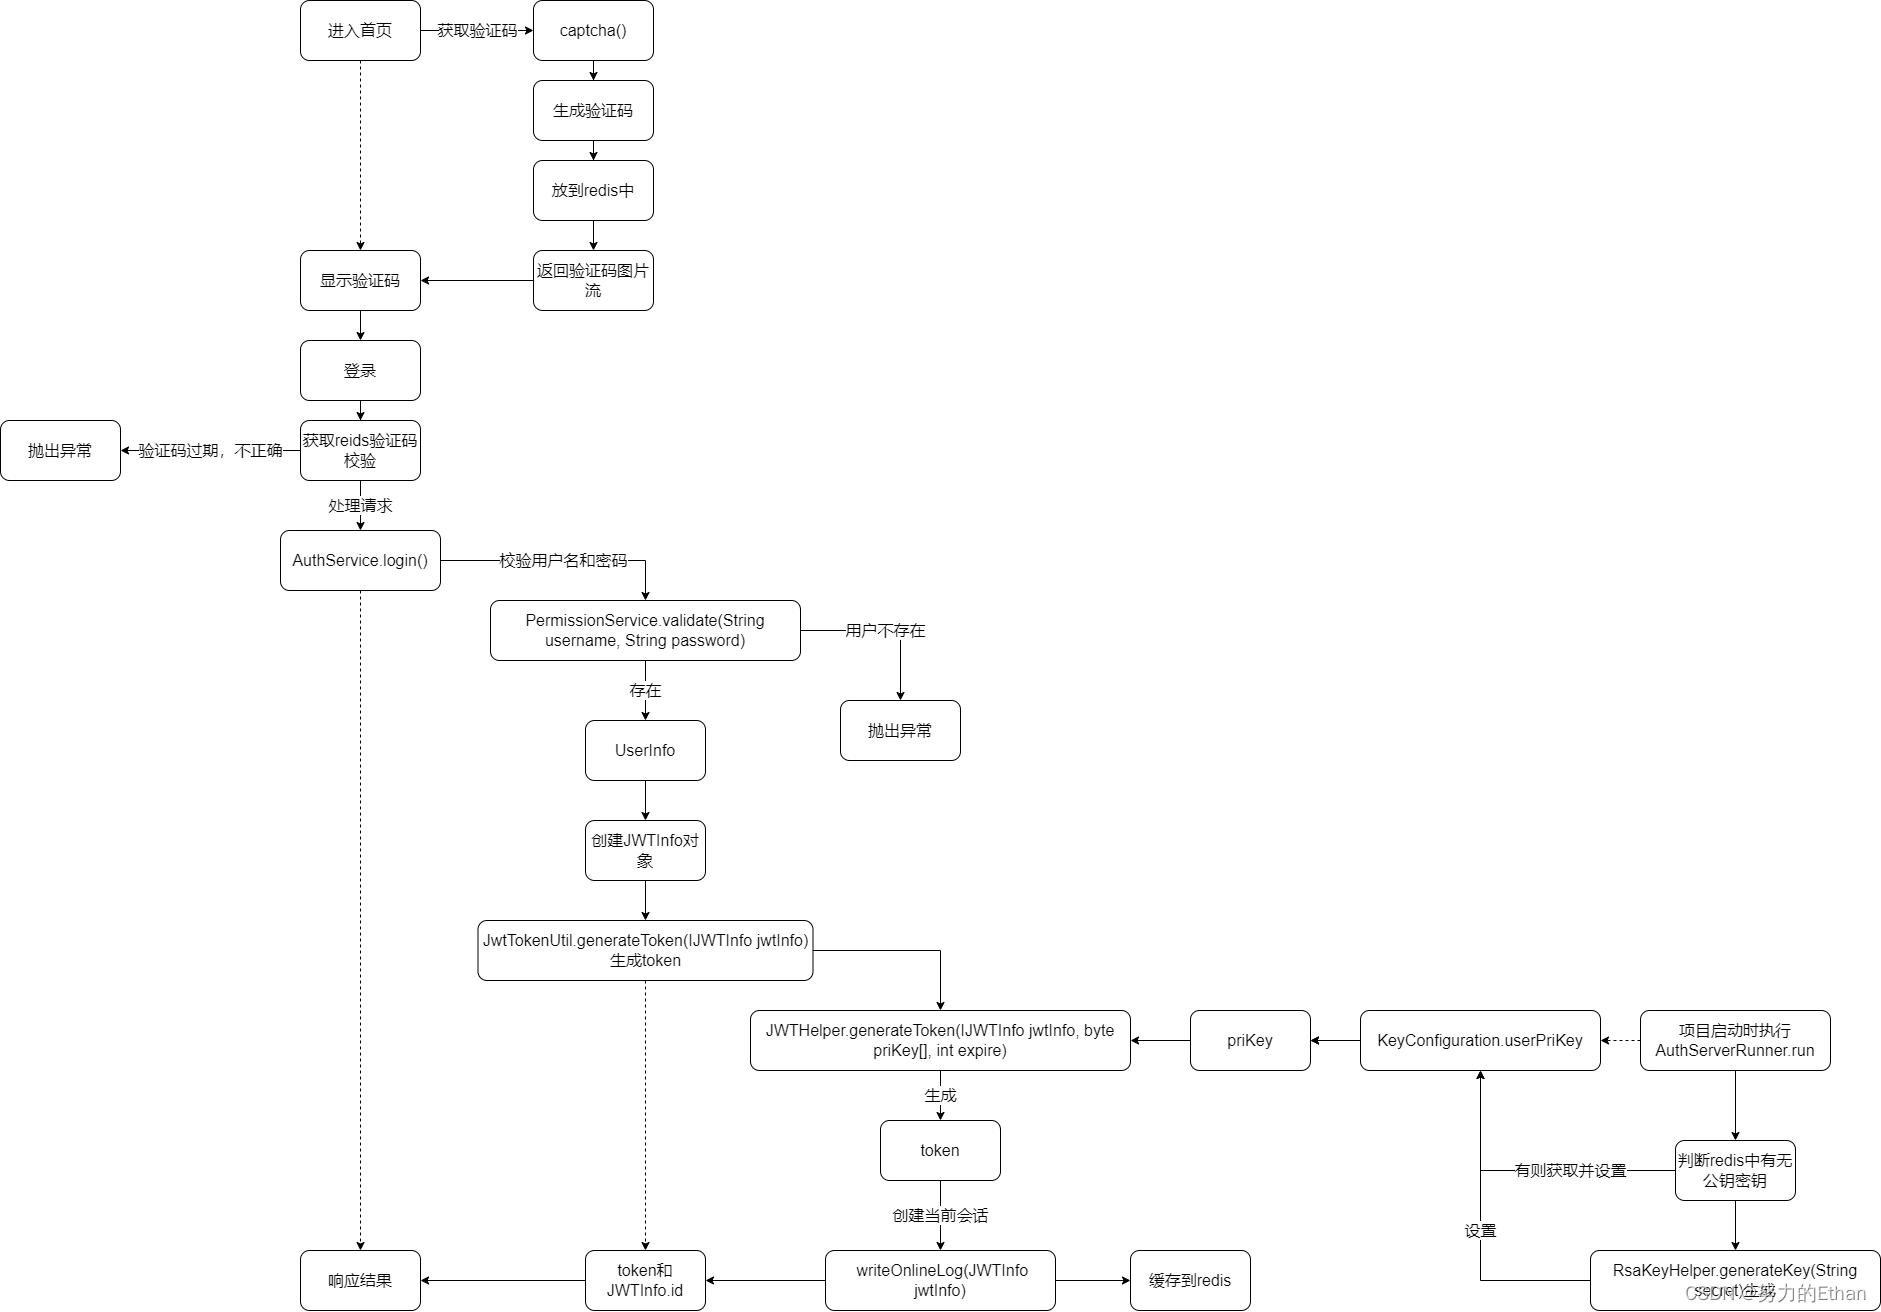
1.前端请求验证码
getCodeImg().then(response => {
        this.codeUrl = "data:image/gif;base64," + response.captcha;
        this.formLogin.uuid = response.uuid;
      });
export function getCodeImg (data) {
  return request({
    url: '/api/auth/captcha',
    method: 'get'
  })
}
2.后端生成验证码
@RequestMapping("/captcha")
    public ObjectRestResponse captcha() throws Exception {
        // 三个参数分别为宽、高、位数
        SpecCaptcha specCaptcha = new SpecCaptcha(130, 48, 4);
        // 设置字体
        specCaptcha.setFont(new Font("Verdana", Font.PLAIN, 32));  // 有默认字体,可以不用设置
        // 设置类型,纯数字、纯字母、字母数字混合
        specCaptcha.setCharType(Captcha.TYPE_ONLY_NUMBER);

        String uuid = UUIDUtils.generateShortUuid();
        String text = specCaptcha.text().toLowerCase();
        //缓存到 redis,2分钟过期
        stringRedisTemplate.opsForValue().set(String.format(REDIS_KEY_CAPTCHA, uuid), text, LOGIN_CAPTCHA_EXPIRATION, TimeUnit.MINUTES);

        ByteArrayOutputStream stream = new ByteArrayOutputStream();
        // 输出图片流
        specCaptcha.out(stream);
        String captcha = Base64.byteArrayToBase64(stream.toByteArray());
        Map map = new HashMap<>();
        map.put("captcha", captcha);
        map.put("uuid", uuid);
        return new ObjectRestResponse().data(map);
    }
3.前端携带参数请求登录
AccountLogin({
  username,
  password,
  uuid,
  verCode
})
export function AccountLogin (data) {
  return request({
    url: '/api/auth/jwt/token',
    method: 'post',
    data,
    loading: {
      type: 'loading',
      options: {
        fullscreen: true,
        lock: true,
        text: '正在登陆...',
        spinner: 'el-icon-loading',
        background: 'rgba(0, 0, 0, 0.8)'
      }
    }
  })
}
4.后端接受请求进行处理
4.1校验验证码
// 获取redis中的验证码
String sessionCode = stringRedisTemplate.opsForValue().get(String.format(REDIS_KEY_CAPTCHA, authenticationRequest.getUuid()));
if(sessionCode == null){
    throw new UserInvalidException("验证码已过期");
}
// 判断验证码
if (authenticationRequest.getVerCode() == null || !sessionCode.equals(authenticationRequest.getVerCode().trim().toLowerCase())) {
    throw new UserInvalidException("验证码不正确");
}
4.2校验用户/密码
UserInfo info = permissionService.validate(authenticationRequest.getUsername(), authenticationRequest.getPassword());
public UserInfo validate(String username, String password) {
        UserInfo info = new UserInfo();
        User user = userBiz.getUserByUsername(username);
        if (encoder.matches(password, user.getPassword())) { //使用SHA-256匹配密码
            BeanUtils.copyProperties(user, info);
            info.setId(user.getId().toString());//类型不同 copyProperties没法复制,需要单独设置
        }
        return info;
    }
getUserByUsername 获取用户信息
@Service
@Transactional(rollbackFor = Exception.class)
public class UserBiz extends BaseBiz<UserMapper,User> {
/**
     * 根据用户名获取用户信息
     * @param username
     * @return
     */
    public User getUserByUsername(String username){
        User user = new User();
        user.setUsername(username);
        return mapper.selectOne(user);
    }
}
BaseBiz 类
BaseZiz类注入 Mapper对象,并通过 Mapper对象调用方法,进而可以在方法调用前后添加一些额外的操作
public abstract class BaseBiz<M extends Mapper<T>, T> {
	@Autowired
    protected M mapper;
    public void setMapper(M mapper) {
        this.mapper = mapper;
    }

    public T selectOne(T entity) {
        return mapper.selectOne(entity);
    }
4.3校验通过生成 token
创建 JWTInfo 类
JWTInfo jwtInfo = new JWTInfo(info.getUsername(), info.getId() + "", info.getName());
public JWTInfo(String username, String userId, String name) {
  this.username = username;
    this.userId = userId;
    this.name = name;
    this.tokenId = UUIDUtils.generateShortUuid();
}
通过 JWT工具类生成 token
String token = jwtTokenUtil.generateToken(jwtInfo);
/**
 * 生成密钥加密的 token
 * @param jwtInfo 包含用户名、用户id、用户名称、tokenId
 * @param priKey 密钥
 * @param expire token过期时间
 * @return
 * @throws Exception
 */
public static String generateToken(IJWTInfo jwtInfo, byte priKey[], int expire) throws Exception {
    String compactJws = Jwts.builder()
            .setSubject(jwtInfo.getUniqueName())
            .claim(CommonConstants.JWT_KEY_USER_ID, jwtInfo.getId())
            .claim(CommonConstants.JWT_KEY_NAME, jwtInfo.getName())
            .claim(CommonConstants.JWT_ID, jwtInfo.getTokenId())
            .setExpiration(DateTime.now().plusSeconds(expire).toDate())
            .signWith(SignatureAlgorithm.RS256, rsaKeyHelper.getPrivateKey(priKey))
            .compact();
    return compactJws;
}
密钥生成
@Configuration
@Data
public class KeyConfiguration {
    @Value("${jwt.rsa-secret}") //获取配置文件 secret
    private String userSecret;
    private byte[] userPubKey;
    private byte[] userPriKey;
}
项目启动时生成公钥和密钥并放到redis中
//CommandLineRunner 常用于项目启动后,(也就是ApringApplication.run()执行结束),立马执行某些逻辑
@Configuration
public class AuthServerRunner implements CommandLineRunner {
    @Autowired
    private RedisTemplate<String, String> redisTemplate;
    private static final String REDIS_USER_PRI_KEY = "CLOUD_V1:AUTH:JWT:PRI";
    private static final String REDIS_USER_PUB_KEY = "CLOUD_V1:AUTH:JWT:PUB";

    @Autowired
    private KeyConfiguration keyConfiguration;

    @Override
    public void run(String... args) throws Exception {
        if (redisTemplate.hasKey(REDIS_USER_PRI_KEY)&&redisTemplate.hasKey(REDIS_USER_PUB_KEY)) {
            keyConfiguration.setUserPriKey(RsaKeyHelper.toBytes(redisTemplate.opsForValue().get(REDIS_USER_PRI_KEY).toString()));
            keyConfiguration.setUserPubKey(RsaKeyHelper.toBytes(redisTemplate.opsForValue().get(REDIS_USER_PUB_KEY).toString()));
        } else {
            Map<String, byte[]> keyMap = RsaKeyHelper.generateKey(keyConfiguration.getUserSecret());
            keyConfiguration.setUserPriKey(keyMap.get("pri"));
            keyConfiguration.setUserPubKey(keyMap.get("pub"));
            redisTemplate.opsForValue().set(REDIS_USER_PRI_KEY, RsaKeyHelper.toHexString(keyMap.get("pri")));
            redisTemplate.opsForValue().set(REDIS_USER_PUB_KEY, RsaKeyHelper.toHexString(keyMap.get("pub")));

        }
    }
}
根据 rsa-secret 生成公钥密钥
/**
     * 生成rsa公钥和密钥
     * @param password rsa-secret
     * @return
     * @throws IOException
     * @throws NoSuchAlgorithmException
     */
    public static Map<String, byte[]> generateKey(String password) throws IOException, NoSuchAlgorithmException {
        KeyPairGenerator keyPairGenerator = KeyPairGenerator.getInstance("RSA");
        SecureRandom secureRandom = new SecureRandom(password.getBytes());
        keyPairGenerator.initialize(1024, secureRandom);
        KeyPair keyPair = keyPairGenerator.genKeyPair();
        byte[] publicKeyBytes = keyPair.getPublic().getEncoded();
        byte[] privateKeyBytes = keyPair.getPrivate().getEncoded();
        Map<String, byte[]> map = new HashMap<String, byte[]>();
        map.put("pub", publicKeyBytes);
        map.put("pri", privateKeyBytes);
        return map;
    }
4.4创建当前会话并缓存到redis
writeOnlineLog(jwtInfo);
/**
     * 创建当前会话
     * @param jwtInfo
     */
    @Async
    public void  writeOnlineLog(JWTInfo jwtInfo) {
        final UserAgent userAgent = UserAgent.parseUserAgentString(WebUtils.getRequest().getHeader("User-Agent"));
        final String ip = IpUtils.getRemoteIP(WebUtils.getRequest());
        String address = AddressUtils.getRealAddressByIP(ip);

        OnlineLog onlineLog = new OnlineLog();
        // 获取客户端操作系统
        String os = userAgent.getOperatingSystem().getName();
        // 获取客户端浏览器
        String browser = userAgent.getBrowser().getName();
        onlineLog.setBrowser(browser);
        onlineLog.setIpaddr(ip);
        onlineLog.setTokenId(jwtInfo.getTokenId());
        onlineLog.setLoginTime(System.currentTimeMillis());
        onlineLog.setUserId(jwtInfo.getId());
        onlineLog.setUserName(jwtInfo.getName());
        onlineLog.setLoginLocation(address);
        onlineLog.setOs(os);
        //设置当前会话过期时间
        stringRedisTemplate.opsForValue().set(RedisKeyConstant.REDIS_KEY_TOKEN + ":" + jwtInfo.getTokenId(), JSON.toJSONString(onlineLog, false), expire, TimeUnit.MINUTES);
        //zset 不允许重复的成员。zset 的每个元素都会关联一个分数(分数可以重复),redis 通过分数来为集合中的成员进行从小到大的排序
        stringRedisTemplate.opsForZSet().add((RedisKeyConstant.REDIS_KEY_TOKEN), jwtInfo.getTokenId(), 0);
    }
5.登录响应成功,跳转首页
.then(async res => {
          // 设置 cookie 一定要存 uuid 和 token 两个 cookie
          // 整个系统依赖这两个数据进行校验和存储
          // uuid 是用户身份唯一标识 用户注册的时候确定 并且不可改变 不可重复
          // token 代表用户当前登录状态 建议在网络请求中携带 token
          // 如有必要 token 需要定时更新,默认保存一天
          util.cookies.set('uuid', res.id)
          util.cookies.set('token', res.accessToken)
          // 设置 vuex 用户信息
          await dispatch('d2admin/user/set', {
            name: res.name
          }, { root: true })
          // 用户登录后从持久化数据加载一系列的设置
          await dispatch('load')
          // 更新路由 尝试去获取 cookie 里保存的需要重定向的页面完整地址
          const path = util.cookies.get('redirect')
          // 根据是否存有重定向页面判断如何重定向
          vm.$router.replace(path ? { path } : route) //route 即跳转到 index页面
          // 删除 cookie 中保存的重定向页面
          util.cookies.remove('redirect')
        })
        .catch(err => {
          console.log('err: ', err)
        })
登录流程大致图

 浙公网安备 33010602011771号