

ElasticSearc安装配置使用
转载:相关概念解释
1、Docker安装ES
-
拉取安装镜像
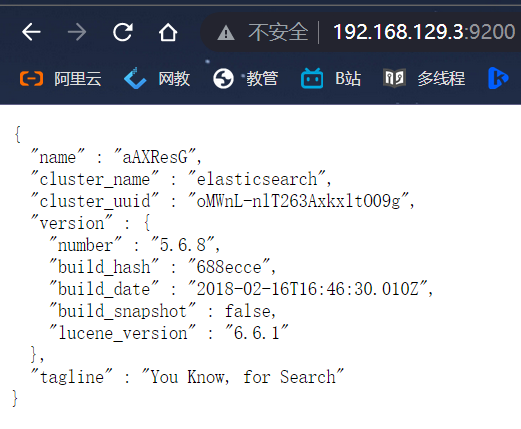
docker pull elasticsearch:5.6.8 #安装镜像 docker run -id --name=myEs -p 9200:9200 -p 9300:9300 elasticsearch:5.6.8 #运行容器,配置名字和端口映射(9200是web端访问端口,9300是客户端软件访问接口) 运行起来之后就可以在浏览器访问到 elasticsearch 了
-
配置跨域访问
-
准备apt 源,下载vim
-
由于 elasticsearch 容器内部不带 vi 等编辑器,所以需要先下载。下载前需要更新 apt 源。容器内部使用的是国外的源,速度很慢甚至无法使用。替换为 aliyun 的源
-
在当前目录下准备 sources.list 里面是 aliyun 的 apt 源
deb http://mirrors.aliyun.com/ubuntu/ focal main restricted deb http://mirrors.aliyun.com/ubuntu/ focal-updates main restricted deb http://mirrors.aliyun.com/ubuntu/ focal universe deb http://mirrors.aliyun.com/ubuntu/ focal-updates universe deb http://mirrors.aliyun.com/ubuntu/ focal multiverse deb http://mirrors.aliyun.com/ubuntu/ focal-updates multiverse deb http://mirrors.aliyun.com/ubuntu/ focal-backports main restricted universe multiverse deb http://mirrors.aliyun.com/ubuntu/ focal-security main restricted deb http://mirrors.aliyun.com/ubuntu/ focal-security universe deb http://mirrors.aliyun.com/ubuntu/ focal-security multiverse -
复制到容器内部
docker cp ./sources.list myEs:/etc/apt/sources.list -
下载 vim
apt-get update #更新 apt 源 apt-get install vim # 下载vim (无脑 yes 即可)
-
-
修改 elasticsearch.yml 配置文件
-
haha
http.host: 0.0.0.0 # Uncomment the following lines for a production cluster deployment # 开放任意 ip 访问(添加) transport.host: 0.0.0.0 #discovery.zen.minimum_master_nodes: 1 #修改集群名字 cluster.name: my-application #配置跨域访问(添加) http.cors.enabled: true http.cors.allow-origin: "*" #宿主机 ip network.host: 192.168.129.3
3、es 占用的资源比较多,所以还需要修改宿主机的以下配置文件
-
修改允许单个进程打开的最大文件个数的软限制和硬限制 vim /etc/security/limits.conf 追加以下内容:
* soft nofile 65536 * hard nofile 65536 -
修改限制一个进程可以拥有的最大虚拟存储区域的数量 vim /etc/sysctl.conf 追加:
vm.max_map_count=655360 -
修改内核参数生效
sysctl -p -
重启虚拟机和容器
reboot
4、可能遇到容器起来又挂掉的情况,解决办法:
-
先查看日志:
docker logs myEs -
可能的问题:
1、没有设置 vm.max_map_count=655360 这个的最小限制是 262144 要大于这个值 2、配置文件写错了,无法进入容器。这时可以使用 docker cp 将容器里面的配置文件 copy 出来,修改后再 copy 回去。
-
-
2、常用的查询语句
#查询所有索引 GET /_cat/indices?v #增加索引 PUT /user #给索引添加 mapping PUT /user/userinfo/_mapping { "properties": { "name":{ "type": "text", "analyzer": "standard", "search_analyzer": "standard" }, "city":{ "type": "text", "analyzer": "standard", "search_analyzer": "standard" }, "age":{ "type": "long" }, "description":{ "type": "text", "analyzer": "standard", "search_analyzer": "standard" } } } #添加数据 PUT /user/userinfo/1 { "name":"李四", "city":"哈尔滨", "age":19, "decrption":"哈尔滨李四" } PUT /user/userinfo/2 { "name":"王五", "city":"四川", "age":29, "decrption":"王五是四川的" } PUT /user/userinfo/3 { "name":"赵子龙", "city":"常山" , "age":39, "decrption":"常山赵子龙" } PUT /user/userinfo/4 { "name":"老六", "city":"四川", "age":29, "decrption":"老六是四川的", "address":"赛博坦" } PUT /user/userinfo/5 { "name":"老五", "city":"四川", "age":29, "decrption":"老五是四川的", "address":"赛博坦" } #修改数据 POST /user/userinfo/5 { "name":"哈哈" } #查询单个 GET /user/userinfo/5 #查询所有 GET /user/userinfo/_search #排序 GET /user/userinfo/_search { "query": { "match_all": {} }, "sort": [ { "age": { "order": "desc" } } ] } #分页 GET /user/userinfo/_search { "query": { "match_all": {} }, "sort": [ { "age": { "order": "desc" } } ], "from": 0, "size": 3 } #match 查询 分词 GET /user/userinfo/_search { "query": { "match": { "city": "四川" } } } #term 查询 不 分词 GET /user/userinfo/_search { "query": { "term": { "city":{ "value":"四川" } } } } #querystring 查询suo 有索引 GET _search { "query": { "query_string": { "default_field": "city", "query": "四川" } } } #范围查询 GET _search { "query": { "range": { "age": { "gte": 20, "lte": 30 } } } } #存在exists 属性 address GET /user/userinfo/_search { "query": { "exists":{ "field":"address" } } } #布尔查询 #should(or)、must(and)、must_not(not) should 里面是两个对象 GET _search { "query": { "bool": { "should": [ { "term": { "city": { "value": "四川" } } }, { "range": { "age": { "gte": 20, "lte": 30 } } } ] } } } #前缀查询 GET /user/userinfo/_search { "query": { "prefix": { "name": { "value": "老" } } } } #多域匹配 fields里面含有query的都是 GET /user/userinfo/_search { "query": { "multi_match":{ "query": "哈尔滨", "fields": [ "city", "decrption" ] } } } #使用过滤,在单次查询全部后,之后的查询应尽量使用过滤 GET /user/userinfo/_search { "query": { "bool": { "must": [ { "match": { "city": "四川" } } ], "filter": { "range": { "age": { "gte": 10, "lte": 30 } } } } } } #聚合查询 #按颜色聚合 GET /car_index/car/_search { "query": {"match_all": {}}, "aggs": { "group_by_color": { "terms": { "field": "color" } } } } #按颜色、均价聚合 GET /car_index/car/_search { "query": {"match_all": {}}, "aggs": { "group_by_color": { "terms": { "field": "color" }, "aggs": { "avg_price": { "avg": { "field": "price" } } } } } }
3、JAVA 整合 ES
3.1、普通整合
- 创建文档实体类,就是一条记录的实体。这里有个小注意点,如果添加了带参数的构造方法,要再添加一个无参的构造方法。否则查询到的数据转化为实体类时会报 ClassNotFound 的异常。
public class Article { private Integer id; private String title; private String content; public Article(Integer id, String title, String content) { this.id = id; this.title = title; this.content = content; } public Integer getId() { return id; } public void setId(Integer id) { this.id = id; } public String getTitle() { return title; } public void setTitle(String title) { this.title = title; } public String getContent() { return content; } public void setContent(String content) { this.content = content; } }
-
创建测试。依次创建索引、映射、记录
public class testIndex { Settings settings; PreBuiltTransportClient client; @Before public void before() throws Exception{ //1、创建 setting settings = Settings.builder().put("cluster.name", "my-application").build(); //2、产生客户端 client = new PreBuiltTransportClient(settings); client.addTransportAddress(new InetSocketTransportAddress(InetAddress.getByName("192.168.129.3"),9300)); } /*创建索引*/ @Test public void createIndex(){ //3、创建索引 client.admin().indices().prepareCreate("test_index").get(); } /*创建 mapping 映射*/ @Test public void createMapping() throws IOException { XContentBuilder xContentBuilder = XContentFactory.jsonBuilder(). startObject() .startObject("article") .startObject("properties") .startObject("id") .field("type", "integer").field("store", "yes") .endObject() .startObject("title") .field("type", "string").field("store", "yes").field("analyzer", "standard") .endObject() .startObject("content") .field("type", "string").field("store", "yes").field("analyzer", "standard") .endObject() .endObject() .endObject() .endObject(); /*创建映射*/ client.admin().indices().preparePutMapping("test_index").setType("article").setSource(xContentBuilder).get(); } /*创建文档*/ @Test public void createContent() throws Exception{ XContentBuilder builder = XContentFactory.jsonBuilder() .startObject() .field("id", "2") .field("title", "北方入秋速度明显加快,多地降温可达10到20度") .field("content", "阿联酋一架客机在纽约机场被隔离,10名乘客病倒") .endObject(); /*把文档对象加入索引库*/ client.prepareIndex() .setIndex("test_index") .setType("article") .setId("2") .setSource(builder) .get(); } /*使用实体类转换 json 字符 进行文档添加*/ @Test public void createContentByBean() throws JsonProcessingException { Article article = new Article(3,"MH370坠毁在柬埔寨密林?中国一公司调十颗卫星去拍摄","警惕荒唐的死亡游戏!俄15岁少年输掉游戏后用电锯自杀"); String json = new ObjectMapper().writeValueAsString(article); client.prepareIndex() .setIndex("test_index") .setId("3") .setType("article") .setSource(json, XContentType.JSON) .get(); } /*批量添加测试数据*/ @Test public void createMany() throws JsonProcessingException { for (int i = 4; i <=100 ; i++) { Article article = new Article(i,"女护士路遇昏迷男子跪地抢救:救人是职责更是本能"+ i,"江西变质营养餐事件已致24人就医多名官员被调查" + i); String json = new ObjectMapper().writeValueAsString(article); client.prepareIndex("test_index","article",""+article.getId()) .setSource(json,XContentType.JSON) .get(); } } @After public void end(){ //4、关闭连接 client.close(); } } -
查询测试。依次进行 term、queryString、 match、主键、分页、高亮查询
public class testSearch { Settings settings; PreBuiltTransportClient client; @Before public void before() throws Exception{ //1、创建 setting settings = Settings.builder().put("cluster.name", "my-application").build(); //2、产生客户端 client = new PreBuiltTransportClient(settings); client.addTransportAddress(new InetSocketTransportAddress(InetAddress.getByName("192.168.129.3"),9300)); } /*term 查询--*/ @Test public void testTerm(){ //1、构建 queryBuilder QueryBuilder query = QueryBuilders.termQuery("title", "女"); search(query); } /* queryString 查询--*/ @Test public void testQueryString(){ //1、构建 queryBuilder QueryBuilder query = QueryBuilders.queryStringQuery("女护士").defaultField("title"); search(query); } /* match 查询--*/ @Test public void testMatch(){ //1、构建 queryBuilder QueryBuilder query = QueryBuilders.matchQuery("title", "美丽的女护士"); search(query); } /* id 查询*/ @Test public void testQueryById(){ IdsQueryBuilder builder = QueryBuilders.idsQuery().addIds("1", "2"); search(builder); } /*分页查询 只需要在查询条件里面加入 from 和 size 即可*/ @Test public void testPage(){ MatchAllQueryBuilder allQuery = QueryBuilders.matchAllQuery(); SearchResponse response = client.prepareSearch("test_index").setTypes("article").setQuery(allQuery).setFrom(0).setSize(5).get(); //3、遍历输出结果 SearchHits searchHits = response.getHits(); Iterator<SearchHit> hitIterator = searchHits.iterator(); System.out.println("total columns: " + searchHits.getTotalHits()); while (hitIterator.hasNext()) { SearchHit hit = hitIterator.next(); System.out.println(hit.getSourceAsString()); System.out.println("document fields : -----------"); Map<String, Object> map = hit.getSourceAsMap(); System.out.println(map.get("id")); System.out.println(map.get("title")); System.out.println(map.get("content")); } } /*高亮显示*/ @Test public void testHighLight(){ //1、创建 builders (多个属性查寻) MultiMatchQueryBuilder allQuery = QueryBuilders.multiMatchQuery("4","title","content"); //2、创建 HighLight Builder HighlightBuilder highlightBuilder = new HighlightBuilder(); highlightBuilder.field("title"); highlightBuilder.field("content"); highlightBuilder.preTags("<em>"); highlightBuilder.postTags("</em>"); //执行查询 SearchResponse response = client.prepareSearch("test_index") .setTypes("article") .setQuery(allQuery) .highlighter(highlightBuilder) .get(); //3、遍历输出结果 对每一个 hitIterator 都有 SearchHits searchHits = response.getHits(); Iterator<SearchHit> hitIterator = searchHits.iterator(); System.out.println("total columns: " + searchHits.getTotalHits()); while (hitIterator.hasNext()) { SearchHit hit = hitIterator.next(); System.out.println(hit.getSourceAsString()); System.out.println("highlight fields : -----------"); Map<String, HighlightField> highlightFields = hit.getHighlightFields(); highlightFields.entrySet().forEach(set ->{ System.out.println(set.getKey()+"\t" + Arrays.toString(set.getValue().getFragments())); }); } } /*提取出的公共部分,组成一个方法*/ private void search(QueryBuilder query) { //2、执行查询 SearchResponse response = client.prepareSearch("test_index").setTypes("article").setQuery(query).get(); //3、遍历输出结果 SearchHits searchHits = response.getHits(); Iterator<SearchHit> hitIterator = searchHits.iterator(); System.out.println("total columns: " + searchHits.getTotalHits()); while (hitIterator.hasNext()) { SearchHit hit = hitIterator.next(); System.out.println(hit.getSourceAsString()); System.out.println("document fields : -----------"); Map<String, Object> map = hit.getSourceAsMap(); System.out.println(map.get("id")); System.out.println(map.get("title")); System.out.println(map.get("content")); } } @After public void end(){ //4、关闭连接 System.out.println("连接关闭了------"); client.close(); } }
3.2 spring-boot 整合
-
相对于原始的整合方法,spring-boot 提供了 spring-data,自带的 elasticsearch API 可以提供更简便姐的查询方式。
创建时使用 。我这里使用的是 spring-boot 2.1.2 。更高版本的可能不适用,一些 api 已经改变了。创建时记得加 NOSQl 的 elasticsearch 组件
-
引入依赖
<parent> <groupId>org.springframework.boot</groupId> <artifactId>spring-boot-starter-parent</artifactId> <version>2.1.2.RELEASE</version> <relativePath/> <!-- lookup parent from repository --> </parent> <groupId>com.kkb</groupId> <artifactId>spring-data-elasticsearch</artifactId> <version>0.0.1-SNAPSHOT</version> <name>spring-data-elasticsearch</name> <description>Demo project for Spring Boot</description> <properties> <java.version>11</java.version> </properties> <dependencies> <dependency> <groupId>org.springframework.boot</groupId> <artifactId>spring-boot-starter-data-elasticsearch</artifactId> </dependency> <dependency> <groupId>org.springframework.boot</groupId> <artifactId>spring-boot-starter-test</artifactId> <scope>test</scope> </dependency> </dependencies> <build> <plugins> <plugin> <groupId>org.springframework.boot</groupId> <artifactId>spring-boot-maven-plugin</artifactId> </plugin> </plugins> </build> -
添加配置文件 application.yml 来配置 elasticsearch
spring: data: elasticsearch: cluster-name: my-application cluster-nodes: 192.168.129.3:9300 -
创建文档实体类。
-
通过 @Document 注解来指定索引名 和 类型名。相当于库名和表名。@Id 指定主键,@Field 来指定该属性的存储类型、持久化策略、分词器等信息。这里也不要忘记无参构造的问题
@Document(indexName = "scm_index",type="article") public class Article { @Id @Field(type = FieldType.Long,store = true) private long id; @Field(type = FieldType.Text,store = true,analyzer = "standard") private String title; @Field(type = FieldType.Text,store = true,analyzer = "standard") private String content; public long getId() { return id; } public void setId(long id) { this.id = id; } public String getTitle() { return title; } public void setTitle(String title) { this.title = title; } public Article(long id, String title, String content) { this.id = id; this.title = title; this.content = content; } public Article() { } public String getContent() { return content; } public void setContent(String content) { this.content = content; } @Override public String toString() { return "Article{" + "id=" + id + ", title='" + title + '\'' + ", content='" + content + '\'' + '}'; } } -
使用 自带的 API 进行查询 。继承 ElasticsearchRepository<T,K>
/*命名规则查询 findBy 属性名+连接词+属性名+(参数)*/ public interface ArticleDao extends ElasticsearchRepository<Article,Long> { /*根据 title 查询*/ public List<Article> findByTitle(String title); /*根据 title 或 content 查询 like 代表该属性使用 match 查询,否则是 term,两者的区别在于是否分词*/ public List<Article> findByTitleLikeOrContent(String title,String content); /*分页查询*/ public List<Article> findByTitle(String title, Pageable pageable); } -
测试:
@RunWith(SpringRunner.class) @SpringBootTest /*这个类竟然要是 public 的*/ public class SpringDataElasticsearchApplicationTests { @Autowired private ElasticsearchTemplate template; @Autowired private ArticleDao dao; /*创建索引*/ @Test public void testAddIndex() { //使用带参数的 构造方法会自己创建 mapping, template.createIndex(Article.class); //template.putMapping(Article.class); } /*添加、修改数据*/ @Test public void testAddDocument(){ for (int i = 0; i < 10; i++) { Article article = new Article((long) i,"女护士路遇昏迷男子跪地抢救:救人是职责更是本能"+i,"这是一个美丽的护士妹妹"+i); dao.save(article); } } /*查询单个数据 删除也差不多*/ @Test public void testFindById(){ System.out.println(dao.findById(0L)); } /*like 查询*/ /*使用 like 是 match 分词查询,不使用是 term 不分词查询 */ @Test public void testLike(){ dao.findByTitleLikeOrContent("女护","女护士").forEach(System.out::println); } /*分页查询*/ @Test public void testPage(){ Pageable pageable =PageRequest.of(1,5); dao.findByTitle("女护士",pageable).forEach(System.out::println); } /*使用本地查询*/ /*外加添加分页*/ @Test public void testNative(){ NativeSearchQuery nativeSearchQuery = new NativeSearchQueryBuilder() .withQuery(QueryBuilders.queryStringQuery("女护士").defaultField("title")) .withPageable(PageRequest.of(1, 5)) .build(); template.queryForList(nativeSearchQuery,Article.class).forEach(System.out::println); } } -
聚合查询也就是分组查询
-
创建一个索引实体 car
@Document(indexName = "car_index",type = "car") public class Car { @Id @Field(type = FieldType.Long,store = true) private Long id; @Field(type = FieldType.Text,store = true,analyzer = "standard") private String name; @Field(type = FieldType.Text,store = true,analyzer = "standard",fielddata = true) private String brand; @Field(type = FieldType.Text,store = true,analyzer = "standard",fielddata = true) private String color; @Field(type = FieldType.Double,store = true) private double price; public Car() { } public Car(Long id, String name, String brand, String color, double price) { this.id = id; this.name = name; this.brand = brand; this.color = color; this.price = price; } public Long getId() { return id; } public void setId(Long id) { this.id = id; } public String getName() { return name; } public void setName(String name) { this.name = name; } public String getBrand() { return brand; } public void setBrand(String brand) { this.brand = brand; } public String getColor() { return color; } public void setColor(String color) { this.color = color; } public double getPrice() { return price; } public void setPrice(double price) { this.price = price; } @Override public String toString() { return "Car{" + "id=" + id + ", name='" + name + '\'' + ", brand='" + brand + '\'' + ", color='" + color + '\'' + ", price=" + price + '}'; } } -
继承 ElasticsearchRepository
public interface carDAO extends ElasticsearchRepository<Car,Long> { } -
测试:
@RunWith(SpringRunner.class) @SpringBootTest public class unitSearchTest { @Autowired private carDAO dao; /*添加数据*/ @Test public void addData(){ for (int i = 0; i < 10; i=i+2) { dao.save(new Car((long) i,"s1","奔驰"+i,"白色",20+i)); dao.save(new Car((long) i+1,"A4L","奥迪"+(i+1),"白色",10+i)); } } /*聚合查询 复杂的查询都使用本地查询*/ @Test public void testUnit(){ NativeSearchQueryBuilder queryBuilder = new NativeSearchQueryBuilder().withQuery(QueryBuilders.matchAllQuery()); //添加过滤条件 不查询 brand 字段 queryBuilder.withSourceFilter(new FetchSourceFilter(new String[]{},new String[]{"brand"})); //添加聚合 queryBuilder.addAggregation(AggregationBuilders.terms("group_by_color").field("color") .subAggregation(AggregationBuilders.avg("avg_price").field("price"))); //转换结果 AggregatedPage<Car> aggPage = (AggregatedPage<Car>) dao.search(queryBuilder.build()); //从结果中获取 bucket 对应的名字的聚合 StringTerms agg = (StringTerms)aggPage.getAggregation("group_by_color"); List<StringTerms.Bucket> buckets = agg.getBuckets(); //遍历结果 buckets.forEach(b->{ InternalAvg avg = (InternalAvg) b.getAggregations().getAsMap().get("avg_price"); System.out.println("color : "+b.getKeyAsString()+" count :"+b.getDocCount()+"avg_price : "+avg.getValue()); }); } } -
效果同于:
#按颜色、均价聚合 GET /car_index/car/_search { "query": {"match_all": {}}, "aggs": { "group_by_color": { "terms": { "field": "color" }, "aggs": { "avg_price": { "avg": { "field": "price" } } } } } }
-


【推荐】国内首个AI IDE,深度理解中文开发场景,立即下载体验Trae
【推荐】编程新体验,更懂你的AI,立即体验豆包MarsCode编程助手
【推荐】抖音旗下AI助手豆包,你的智能百科全书,全免费不限次数
【推荐】轻量又高性能的 SSH 工具 IShell:AI 加持,快人一步
· 无需6万激活码!GitHub神秘组织3小时极速复刻Manus,手把手教你使用OpenManus搭建本
· C#/.NET/.NET Core优秀项目和框架2025年2月简报
· Manus爆火,是硬核还是营销?
· 终于写完轮子一部分:tcp代理 了,记录一下
· 【杭电多校比赛记录】2025“钉耙编程”中国大学生算法设计春季联赛(1)