第一节
@注意
千万注意格式、标签名字;
浏览器开发者模式修改页面不显示:在开发者模式下(F12进入),打开设置页面(F1),勾选 Disable cache (while DevTools is open)即可;
提示没有修改页面的权限,在pycharm的debug里面勾选allow unsigned requests;
html用chrome演示;
pycharm显示pip19版本但是turminal是9版本:进入第三方库目录,删掉pip19info文件夹,重新python -m pip install --upgrade pip;
@坑
php建站后使用比较麻烦
计算机基础
英语基础
@前后端分离
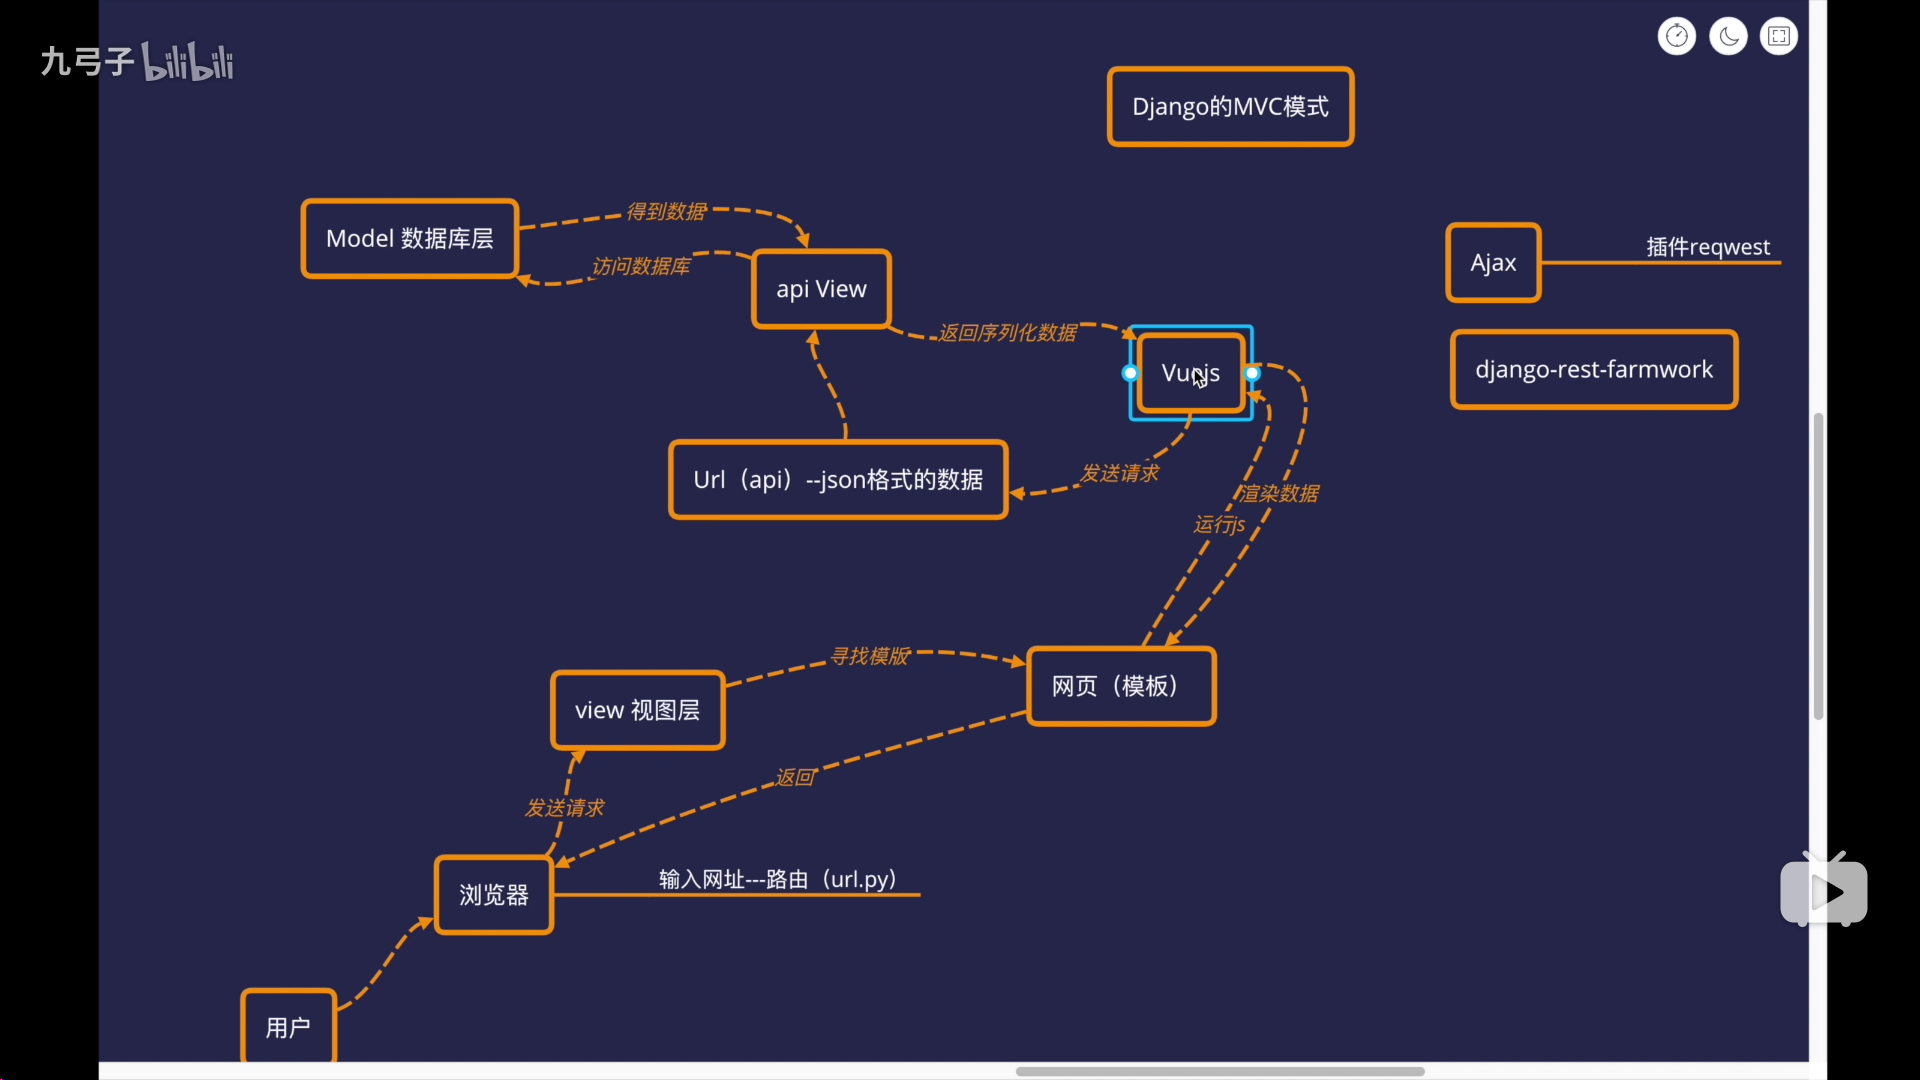
vuejs框架和django,vuejs接管django的views模块;
django打开页面是不停刷新,用vuejs可以不用太多跳转;
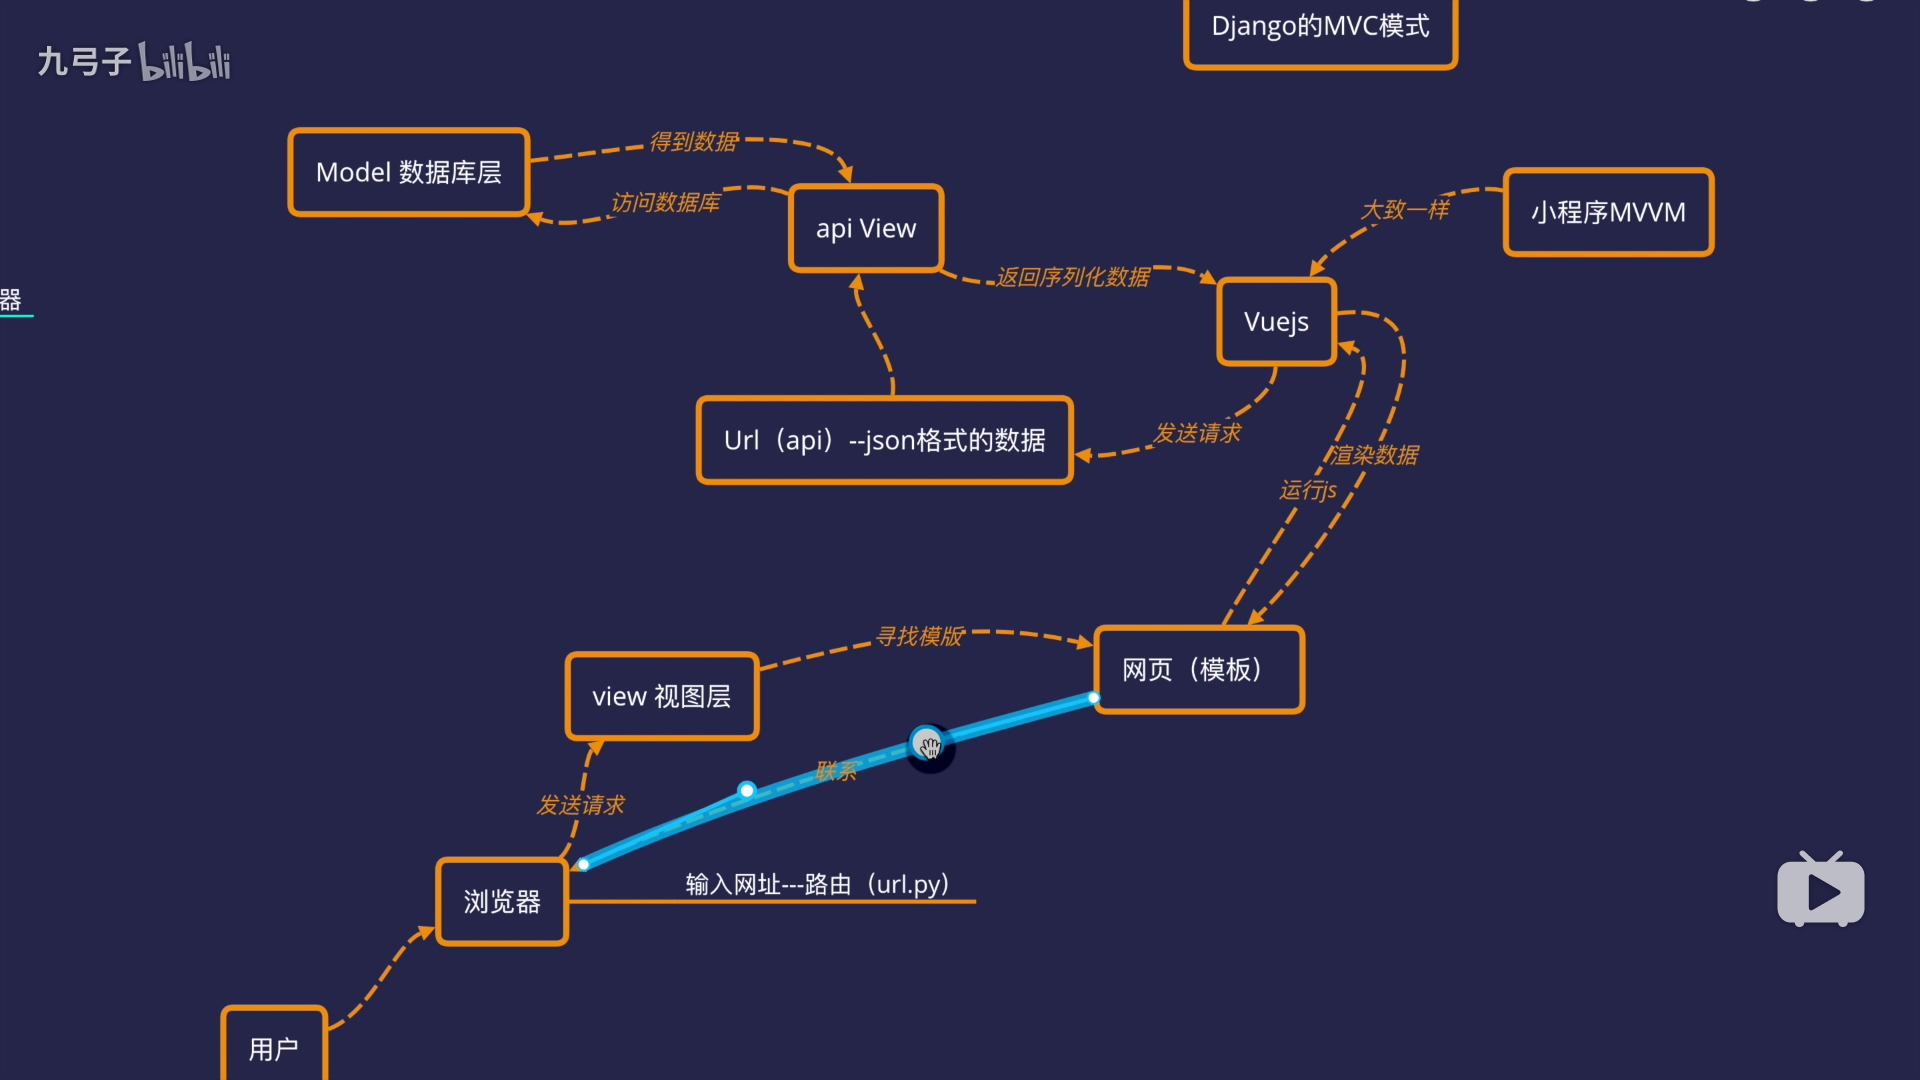
@django的MTV
models
templates
views
@升级pip
python -m pip install --upgrade pip
@设计(Adobe xd 没有Linux版本,找个ui设计软件)
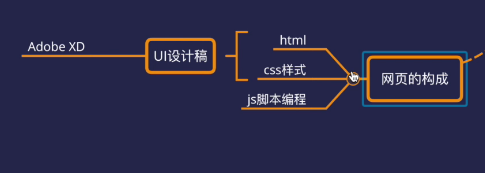
1.https://semantic-ui.com/ 源代码里找到dist/semantic.min.css,即打开view-source:https://semantic-ui.com/dist/semantic.min.css并复制,保存到semantic.min.css文件中,删除@import那一行(从@到;删掉,删多了会显示错误);
2.在html的head里面添加<link rel="stylesheet" href="项目内路径">
增加自己的mystyle.css,也添加到head引用;
3.设置四个导航栏(课程里四列,但是我四列就变两行了?)
<body>
    <div class="top-menu">
        <div class="ui container">
            <div class="ui five column grid">
                <div class="column">
                    首页
          </div>
                <div class="column">
                    blog
                </div>
                <div class="column">
                    作品
          </div>
                <div class="column">
                    联系
          </div>
            </div>
        </div>
    </div>

</body>
4.打开网页,f12,点击手机方式浏览,在head连加入以下,实现移动设备优先
<meta name="viewport" content="width=device-width,initial-scale=1,user-scalable=no">
5.修改mystyle.css文件
html{
    font-size:10px;
}
.top-menu{
    background:#000;
    color:#fff;
    padding-top:1rem;/*1rem表示根元素的大小*/
}
.top-menu .column{
    text-align:center;
}
6.首页幻灯
https://www.swiper.com.cn/
找案例,看源代码,找css引用文件并点击打开,复制到新建的swiper.css文件中,并在html中引入样式;从案例中复制body里面的html内容到我的html中;复制案例中的js内容并保存到我的js文件里,在html的body结束前插入引用(django里面不用这种路径就)<script src="../statics/swiper.css" charset="utf-8"></script>
增加js自主添加的编码,也是复制案例里面的

<script>
    var swiper = new Swiper('.swiper-container', {
      spaceBetween: 30,
      centeredSlides: true,
      autoplay: {
        delay: 2500,
        disableOnInteraction: false,
      },
      pagination: {
        el: '.swiper-pagination',
        clickable: true,
      },
      navigation: {
        nextEl: '.swiper-button-next',
        prevEl: '.swiper-button-prev',
      },
    });
  </script>
调整网页
<div class="swiper-slide">Slide 6</div>
替换为
<div class="swiper-slide"><img src="路径" alt=''></div>
调整mystyle.css
positon:fixed;位置为悬浮
heigh:3000px;框架高度
top:0;上边距
z-index:999;位于最高
width:100%;
height:3rem;(html{}里面font-size:10px;rem是font-size的倍数)
发现导航栏挡了一部分banner图(用一下方法,或直接在html里面将导航栏的透明度更改一下)
在之间创建一个div,id=’banner'
css里面创建
#banner{
margin-top:5rem
}
删除轮播图的箭头(删掉“<!-- Add Arrows --><div class="swiper-button-next"></div><div class="swiper-button-prev"></div>”)
7.做功能按钮
图片来源https://www.iconfont.cn/ 新浪微博登录 图片都改为拼音不用中文;
文章简图 创客贴;
8.放入django
@创建项目,创建app,配置settings:
注册app;
STATIC_URL = '/statics/'
MEDIA_URL='/upload/'
MEDIA_ROOT=os.path.join(BASE_DIR,'upload').replace('//','/')
@修改urls
from django.contrib import admin
from django.urls import path,include
from django.conf import settings
from django.conf.urls.static import static
from myblog import views

urlpatterns = [
    path('admin/', admin.site.urls),
    path('', views.index),

]+ static(settings.STATIC_URL, document_root=settings.STATIC_ROOT) \
+ static(settings.MEDIA_URL, document_root=settings.MEDIA_ROOT)
@migrate一下
@配置views.py里面的index
def index(request):
    return render(request,'index.html')
@处理载入问题
引入模板{% load static %}
配置链接
<link href="{% static "css/semantic.min.css" %}" rel="stylesheet">
<link href="{% static "css/mystyle.css" %}" rel="stylesheet">
<link href="{% static "css/swiper.min.css" %}" rel="stylesheet">
相关的图片和js的引用也用类似格式修改
9.配置admin后台
配置models,创建首页模块
class Topmenu(models.Model):
    #blank就是空的也可以存,default默认为空
    title=models.CharField(default='',blank=True,null=True,max_length=20)
    url=models.CharField(default='',blank=True,null=True,max_length=20)
    def __str__(self):
        return self.title
@创建超级用户python manage.py createsuperuser(用户名字前俩,密码s)
@注册首页模块
from django.contrib import admin
from myblog.models import Topmenu

admin.site.register(Topmenu)
注册了账户就需要合并数据库,add首页导航栏几个名字,只写title
@处理views
from django.shortcuts import render
from .models import Topmenu
# Create your views here.
def index(request):
    topmenu=Topmenu.objects.all()
    content={
        'topmenu':topmenu
    }
    return render(request,'index.html',content)
@处理html,载入数据库中的导航栏名称
                {% for item in topmenu %}
                <div class="column">
                    {{ item.title }}
                </div>
                {% endfor %}
10.vue.js
@两种方式引入,开发用开发版本,会有报错提示
<!-- 开发环境版本,包含了有帮助的命令行警告 -->
<script src="https://cdn.jsdelivr.net/npm/vue/dist/vue.js"></script>
或者:
<!-- 生产环境版本,优化了尺寸和速度 -->
<script src="https://cdn.jsdelivr.net/npm/vue"></script>
@引用vue.js
复制第一个引用链接,浏览器打开,复制所有,在项目中创建vue.js文件;
html的head中插入
<script src="{% static 'js/vue.js' %}" charset="utf-8"></script>
刷新页面,查看开发者模式控制台,有()表示引用成功。
创建index.js并引用,先空着。
@编辑index.js
new Vue({
    // el就是element
    el:'#index',
    data:{
        // js语法:数组表示为中括号,对象用大括号
        topmenu:[{title:'首页'},{title:'blog'},{title:'作品'},{title:'联系'},]
    },
})
提示vue不能获取id,则说明页面中script加入的位置太靠前,应该放在要显示的位置的后面。
提示,则说明script放在</div>前面了。
html中用<div v-for='item in topmenu' class="column">代替原来的for循环,此时不显示,body和script之间加入{% verbatim %}接管django,
@django模式的标签地址属性改为vuejs用的。
原为:
<img src="{static ‘image/77263a9a-6416-4131-a10e-c43ba516170d.jpg’}">
后为:
<img src="static/image/77263a9a-6416-4131-a10e-c43ba516170d.jpg">
@Ajax
https://www.npmjs.com/package/reqwest
@创建路由,在myblog子app里面创建api.py,下载djangorestframework,并在settings里面注册子app 'rest_framework'
@修改api.py
from rest_framework import serializers
from rest_framework.response import Response
from rest_framework.decorators import api_view
from myblog.models import Topmenu


class Topmenuxuliehua(serializers.ModelSerializer):
    class Meta:
        depth=1
        model=Topmenu
        fields='__all__'
@api_view(['GET'])
def indexData(request):
    print('ok')
    return Response('ok')
@增加路由
path('api/index', api.indexData),
刷线如下图
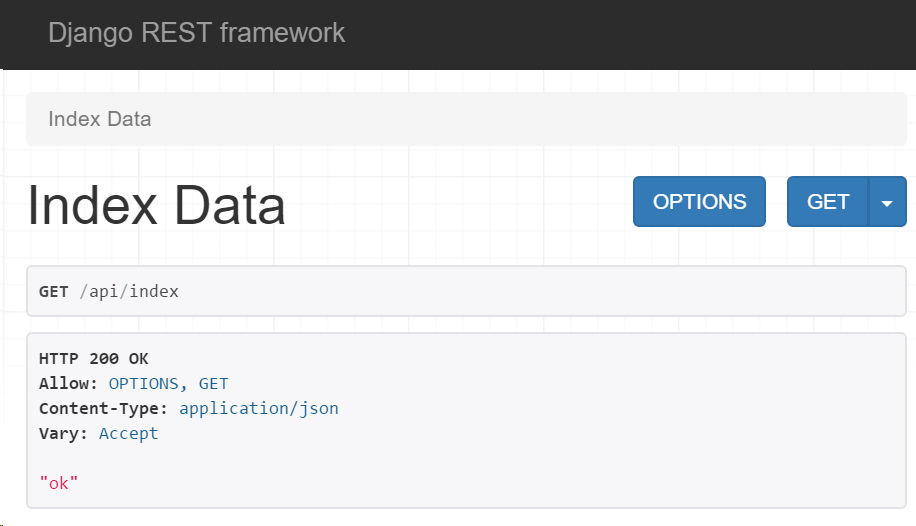
这就是rest_framework为django提供的json格式界面,点击get里面的json可查看json格式数据。
@页面载入js数据
def indexData(request):
    topmenu=Topmenu.objects.all()
    topmenuData=Topmenuxuliehua(topmenu,many=True)
    return Response({'topmenu':topmenuData.data})
此时页面就可以读取js数据
@引用reqwest.js
复制reqwest文件到js文件夹中,引入到index页面的头部。
修改index.js
new Vue({
    // el就是element
    el:'#index',
    data:{
        // js语法:数组表示为中括号,对象用大括号
        topmenu:[{title:'首页'},{title:'blog'},{title:'作品'},{title:'联系'},]
    },
    methods:{
        getData:function(){
            reqwest({
                url:'/api/index',
                method:'get',
                success:function(data){
                    console.log(data)
                }
            })
        }
    }
})
此时页面可在开发者模式的console页看到没有成功执行console.log(data),需要添加方法
    // mounted方法是载入html时最先执行的方法
    mounted(){
        console.log('ok')
        this.getData()
    },
js可以正常工作
@修改index.js
new Vue({
    // el就是element
    el:'#index',
    data:{
        // js语法:数组表示为中括号,对象用大括号
        topmenu:[]
    },
    // mounted方法是载入html时最先执行的方法
    mounted(){
        this.getData()
    },
    methods:{
        getData:function(){
            // 避免this指向错误,设置self
            var self=this
            reqwest({
                url:'/api/index',
                method:'get',
                type:'json',
                success:function(data){
                    console.log(data)
                    self.topmenu=data.topmenu
                    console.log(self.topmenu)
                }
            })
        }
    }
})
网站基础应用搭建完毕,接下来丰富网站
完整项目流程:
11.丰富网站内容
@找b站封面图片
右击视频审核元素,找到上面的pic的class,复制里面的图片地址如‘//i0.hdslb.com/bfs/archive/91ca6962927787a14e6c0043d84db702ab14bb74.jpg@160w_100h.jpg’
链接前面加上‘http://’,后面改下w和h的值为1140,717,依次获得三张图片
@修改models.py(一旦修改model层,就要更新数据库),新增:
class Banner(models.Model):
    img=models.ImageField(blank=True,null=True)
    def __str__(self):
        return self.id
在admin.py 里面增加对Banner的引用,并注册,此时admin后台页面就显示增加了Banner;
此时在Banner处增加图片,报错,提示__str__ returned non-string (type int);
将Banner里面的__str__改为__int__,网页还不对的话,就重新启动服务器;
因为之前配置了MEDIA_URL为‘/upload/’所以在整个项目第一层会将所有新上传媒体文件收录到upload文件夹中。
@将上传图片返回到网页
原先models层返回到views.py,现在是返回到api.py;
新增bannerData
#Author:Wen
from rest_framework import serializers
from rest_framework.response import Response
from rest_framework.decorators import api_view
from myblog.models import Topmenu,Banner


class Topmenuxuliehua(serializers.ModelSerializer):
    class Meta:
        depth=1
        model=Topmenu
        fields='__all__'

class BannerData(serializers.ModelSerializer):
    class Meta:
        # 设置depth标记,方便数据关联
        depth=1
        model=Banner
        # 就一个img字段,所以可以用__all__,如果都选择型显示,可以fields=(['img','lala'])
        fields='__all__'
@api_view(['GET'])
def indexData(request):
    # 首页的导航栏
    topmenu=Topmenu.objects.all()
    topmenuData=Topmenuxuliehua(topmenu,many=True)
    # 首页的Banner
    banner=Banner.objects.all()
    bannerData=BannerData(banner,many=True)
    return Response({'topmenu':topmenuData.data,'banner':bannerData.data})
此时刷新http://127.0.0.1:8000/api/index,可以看到返回的json数据
@api(即rest_framework)的json数据被vuejs(即index.js)获取:index.js里面新增banner数组,设置变量获取数据,mounted方法中新增console.log(this)
查看页面的返回信息
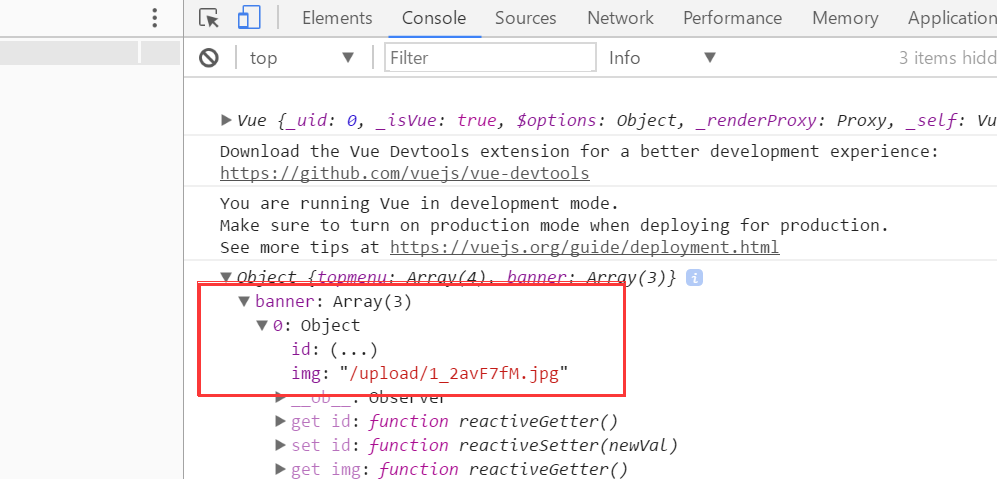
可见页面渲染需要调取banner的img属性
@用vuejs渲染index.html
<div v-for='item in banner' class="swiper-slide">
<img :src="item.img" alt="" style="width:100%">
</div>
刷新就显示banner图
12.用户账号
@用户的前端制作
models里面新增用户模型
from django.contrib.auth.models import User
html修改,在{% endverbatim %}上面的</div>的上面新增
<div id="login">
    <div class="userui">
        <div class="ui container" style="background: #fff2f2">
            <h3>登录</h3>
            <div class="input">
                <div class="item">
                    <input type="text" name="" value="" placeholder="用户名">
                </div>
                <div class="item">
                    <input type="text" name="" value="" placeholder='密码'>
                </div>
            </div>
            <button type="button" name="button">取消</button>
            <button type="button" name="button" style="background: #0d71bb;color: #ffffff">确定</button>
        </div>
    </div>


</div>
修改css
#login{

}

#login .userui{
    position:fixed;
    top:30rem;
    width:100%;
    height: 20rem;

}
#login .userui .ui.container{
    background: #fff;
    padding:1rem 1rem 1rem 1rem;
    border:1px solid #efefef;
    text-align: center;
}

#login .userui .ui.container .item{
    width:100%;
    height:4rem;
    margin-bottom: 1rem;
}
/*div下面的div用点,div下面不是div用空格*/
#login .userui .ui.container .item input{
    width:100%;
    height:100%;
    border:1px solid #a96216;
    border-radius:2rem;
    text-align: center;
}

#login .userui .ui.container button{
    background: #FFFFFF;
    width:8rem;
    height:3rem;
    margin-left:1rem;
    border:1px solid #0f0f10;

}
@交互
修改api.py,新增
# 用户管理
from django.contrib.auth import login
from django.contrib.auth.models import User
@让登陆框默认隐藏
index.js--data--新增userui:false,
index.html里面找到要设置为点击打开登陆页面的div,新增@click='showuserui()'
index.js--methods新增(别忘了前面加逗号)
showuserui:function(){
    this.userui=!this.userui
}
@前端捕获用户账号密码
index.js--data新增‘username’和‘password’两个空数据;
index.html--input标签中新增‘v-model='username'’;
@向后台发送
index.html确定按钮新增@click='userlogin()'
index.js新增方法
userlogin:function(){
    var self=this
    reqwest({
        url:'/api/index',
        method:'post',
        data:{
            username:self.username,
            password:self.password
        },
        success:function() {
            console.log('ok')
        },
        error:function(err){
            console.log(err)
        },
    })
},
api.py装饰器中增加‘POST’方法
注意:出现favicon.ico缺失错误
<link rel="icon" href="data:;base64,=">
@后台验证账号
api.py
from django.contrib.auth import login,authenticate
#函数中新增
        username=request.POST['username']
        password=request.POST['password']

        user=authenticate(username=username,password=password)
        print(user)
        if user!=None:
            login(request,user)
            return Response({'loginType':'ok'})
@处理跨站请求csrftoken
js.cookies.js文件复制到static/js文件夹中
html--在index.js引入前插入
<script type="text/javascript">
    var csrftoken=Cookies.get('csrftoken')
    console.log(csrftoken)
</script>
index.js--在userlogin方法下加入
type:'json',
headers:{
    'X-CSRFTOKEN':csrftoken
},
此时前端账号登录就能保证打开后台页面后台也可以登录。
@
@登录就关闭登录框,并且登录按钮改为“我的”
index.js--method-userlogin-reqwest-seccess里面新增
if(data.loginType=='ok'){
    self.userui=false
index.html
<div v-if='loginButton' @click='showuserui()' class="column">
    登陆
</div>
<div v-else class="column">
    我的
</div>
index.js--data--新增loginButton:true,
index.js--method-userlogin-reqwest-seccess里面if下面新增loginButton:false,
@后台验证是否登录
因为登录失败,django捕获的request.user.id都为none,所以用此判断登录状态
if userid!=None:
    loginType='ok'
index.js新增loginType:true??
if(data.loginType=='ok'){
    self.loginType=true
}else{self.loginType=false}
@13.多app的关联
@13p
在app的templates路径下新建app同名文件夹,将html放进去;render()后面的渲染页面路径为app名称/html文件名;
在app的static路径下新建app同名文件夹,把存放静态文件的文件夹放进去;
新增的静态文件需要settings内注册地址:
STATICFILES_DIRS=[
    os.path.join(BASE_DIR,'ak','static'),
    os.path.join(BASE_DIR,'myblog','static'),
]
html中引入静态文件夹,修改静态文件引入路径为django模式路径
14.MYSQL
@准备
pip install mysqlclient;
配置settings
下载workbench,输入数据库密码,创建数据库库名与django里的settings一致;
创建django超级用户;
数据迁移;
刷新页面发现banner图和导航栏不见了,在django官方后台提交材料;
@
15.15p
@include
15-10
@可以右键复制整体HTML;注意引用网页模板的时候别落下js的引用。
@ 
@
@
@


【推荐】编程新体验,更懂你的AI,立即体验豆包MarsCode编程助手
【推荐】博客园携手 AI 驱动开发工具商 Chat2DB 推出联合终身会员
【推荐】抖音旗下AI助手豆包,你的智能百科全书,全免费不限次数
【推荐】轻量又高性能的 SSH 工具 IShell:AI 加持,快人一步