VUE3.0+Vite 多页面应用配置
VUE3.0+Vite 多页面应用配置
核心原理
多页面应用的核心是使用vite指定多个.html文件作为入口点即可,需要注意在vite中配置好input,否则build以后无法正常使用。
多页面应用模式(核心)
假设你有下面这样的项目文件结构
├── package.json
├── vite.config.js
├── index.html
├── main.js
└── nested
    ├── index.html
    └── nested.js
在开发过程中,简单地导航或链接到 /nested/ - 将会按预期工作,与正常的静态文件服务器表现一致。
在构建过程中,你只需指定多个 .html 文件作为入口点即可:
// vite.config.js
import { resolve } from 'path'
import { defineConfig } from 'vite'

export default defineConfig({
  build: {
    rollupOptions: {
      input: {
        main: resolve(__dirname, 'index.html'),
        nested: resolve(__dirname, 'nested/index.html'),
      },
    },
  },
})
如果你指定了另一个根目录,请记住,在解析输入路径时,__dirname 的值将仍然是 vite.config.js 文件所在的目录。因此,你需要把对应入口文件的 root 的路径添加到 resolve 的参数中。
Vue路由配置(示例)
使用createWebHistory模式创建,会抛出一个警告提示无法找到指定html,但不影响软件运行,使用createWebHashHistory模式创建则没有,也可以通过封装自己的跳转。
import { createRouter, createWebHistory ,createWebHashHistory} from 'vue-router'
import HomeView from '../views/HomeView.vue'

const router = createRouter({
  history: import.meta.env.DEV ? createWebHashHistory() : createWebHistory(),
  routes: [
    {
      path: '/',
      name: 'home',
      component: HomeView
    },
    {
      path: '/about',
      name: 'about',
      // route level code-splitting
      // this generates a separate chunk (About.[hash].js) for this route
      // which is lazy-loaded when the route is visited.
      component: () => import('../views/AboutView.vue')
    }
  ]
})

export default router
vite.config.js(示例)
vite.config.js 配置
import { fileURLToPath, URL } from 'node:url'

import { defineConfig } from 'vite'
import vue from '@vitejs/plugin-vue'
import path from 'node:path'
import AutoImport from 'unplugin-auto-import/vite'
import Components from 'unplugin-vue-components/vite'
import { ElementPlusResolver } from 'unplugin-vue-components/resolvers'
import viteCompression from "vite-plugin-compression";

// https://vitejs.dev/config/
export default defineConfig({
  plugins: [
    vue(),
    // gzip压缩 生产环境生成 .gz 文件
    viteCompression({
      verbose: true,
      disable: false,
      threshold: 10240,
      algorithm: "gzip",
      ext: ".gz",
    }),
    AutoImport({
      resolvers: [ElementPlusResolver()],
    }),
    Components({
      resolvers: [ElementPlusResolver()],
    }),
  ],
  resolve: {
    alias: {
      '@':fileURLToPath(new URL('./pages/client',import.meta.url)),
      '@1': fileURLToPath(new URL('./pages/admin', import.meta.url)),
    }
  },
  server: {
  proxy: {
    "/api": {
      target: "http://localhost:5072/api", // 凡是遇到 /api 路径的请求,都映射到 target 属性
      changeOrigin: true,
      rewrite: (path) => path.replace(/^\/api/, ""), // 重写 api 为 空,就是去掉它
    },
  },
  },
  build: {
    chunkSizeWarningLimit: 1500,
    rollupOptions: {
       input: {
        index: path.resolve(__dirname, 'index.html'),
        admin:path.resolve(__dirname,'admin.html')
      },
      output: {
        manualChunks(id) {
          if (id.includes("node_modules")) {
            return id
              .toString()
              .split("node_modules/")[1]
              .split("/")[0]
              .toString();
          }
        },
      },
    },
  },
})
多页面跳转
使用a标签跳转即可
<a href="admin.html">后台管理</a>
构建流程
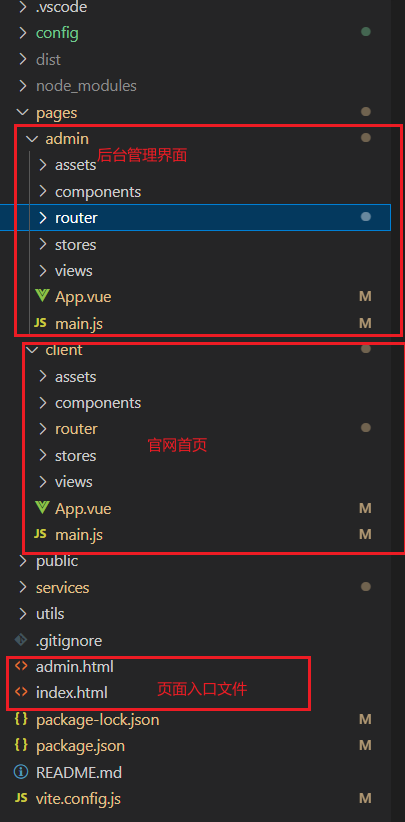
代码结构
构建流程
文字简单叙述下构建流程,最好的方式还是直接看源码,gitee、github链接放在下面。核心的操作步骤就是vite配置,构建的原理也是基于vite。
npm init vue@latest创建一个单页面应用项目- 根目录下创建pages文件夹存放多页面应用,pages下创建两个page1、page2文件夹,存放对应的页面
- src文件中的内容复制到page1、page2中
- 根目录下创建对应的分页入口文件,例如:我打算创建一个官网首页(入口文件就是自带的index.html),后台管理界面(admin.html)
- 配置page1、page2中的App.vue,main.js 方式和单页面一样
源码链接
登峰造极的成就源于自律

 浙公网安备 33010602011771号