Mybatis学习笔记(二)
Mybatis笔记(二)
输入映射和输出映射
parameterType(输出类型)
1.传递简单类型
<select id="findUserById" parameterType="Integer" resultType="com.mybatis.pojo.User">
    select * from user where id = #{v}
</select>
<select id="findUserByUsername" parameterType="String" resultType="com.mybatis.pojo.User">
    select * from user where username like "%"#{haha}"%"
</select>
 <!-- //根据用户名称模糊查询用户列表
    #{}    select * from user where id = ?    占位符  ? ==  '五'
    #{}  {}里随便写,参数是从上面的parameterType中传进来的
    ${}    select * from user where username like '%五%'  字符串拼接
    ${}  {}里面只用value
     -->
2.传递pojo对象
Mybatis使用ognl表达式解析对象字段的值,#{}或者${}括号中的值为pojo属性名称。
<!--     添加用户 -->
<!-- selectKey 标签实现主键返回 -->
<!-- keyColumn:主键对应的表中的哪一列 -->
<!-- keyProperty:主键对应的pojo中的哪一个属性 -->
<!-- order:设置在执行insert语句前执行查询id的sql,孩纸在执行insert语句之后执行查询id的sql -->    <!-- resultType:设置返回的id的类型 -->
<insert id="insertUser" parameterType="com.mybatis.pojo.User">
    <selectKey keyProperty="id" resultType="Integer" order="AFTER">
        <!--执行完保存数据并自动生成id-->
        select LAST_INSERT_ID()
    </selectKey>
    insert into user (username,birthday,address,sex)
    values (#{username},#{birthday},#{address},#{sex})
</insert>
<!--    更新 -->
<update id="updateUserById" parameterType="com.mybatis.pojo.User">
    update user
    set username = #{username},sex = #{sex},birthday = #{birthday},address = #{address}
    where id = #{id}
</update>
3.传递pojo包装对象
开发中通过可以使用pojo传递查询条件。
查询条件可能是综合的查询条件,不仅包括用户查询条件还包括其它的查询条件(比如查询用户信息的时候,将用户购买商品信息也作为查询条件),这时可以使用包装对象传递输入参数。
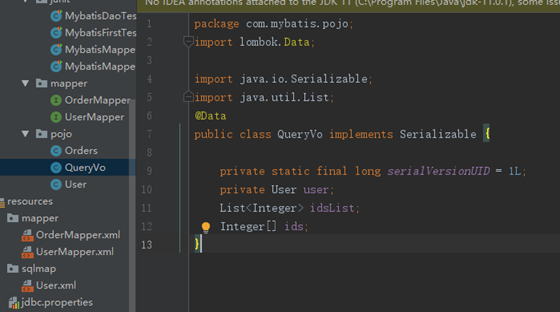
包装对象:Pojo类中的一个属性是另外一个pojo。
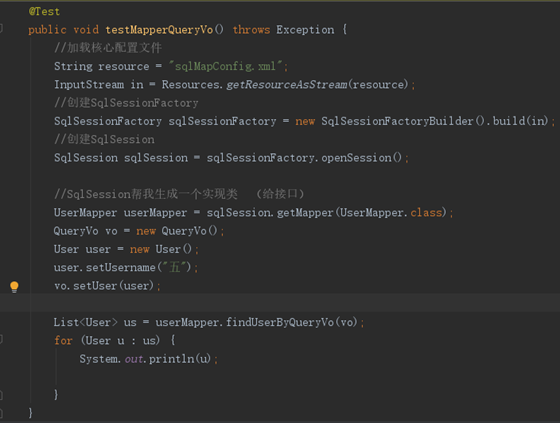
如:需求:根据用户名模糊查询用户信息,查询条件放到QueryVo的user属性中。
- QueryVo编写
- Mapper.xml文件
<!--使用包装类型查询用户 -->
<select id="findUserByQueryVo" parameterType="com.mybatis.pojo.QueryVo" resultType="com.mybatis.pojo.User">
       select * from user where username like "%"#{user.username}"%"
</select>
- Mapper接口
  public interface Mapper{
public List<User> findUserByQueryVo(QueryVo vo);
}
- 测试方法
- 测试结果

4. resultType(输出类型)
- 输出简单类型
如:查询用户表数据条数
sql:SELECT count(*) FROM user
mapper.xml文件
<select id="queryUserCount" resultCount="int">
    SELECT count(*) FROM 'user'
</select>
mapper接口
int queryUserCount();
- 输出pojo对象
- 输出pojo列表
与上面差不多
5.resultMap
resultType可以指定将查询结果映射为pojo,但需要pojo的属性名和sql查询的列名一致方可映射成功。
如果sql查询字段名和pojo的属性名不一致,可以通过resultMap将字段名和属性名作一个对应关系 ,resultMap实质上还需要将查询结果映射到pojo对象中。
resultMap可以实现将查询结果映射为复杂类型的pojo,比如在查询结果映射对象中包括pojo和list实现一对一查询和一对多查询。
1. 声明pojo对象
数据库表

orders对象
import lombok.Data;
import java.io.Serializable;
import java.util.Date;
@Data
public class Orders  implements Serializable {
    private static final long serialVersionUID = 1L;
    private Integer id;
    private Integer userId;
    private String number;
    private Date createtime;
    private String note;
    //附加对象  用户对象
    private User user;
}
#### 2. mapper.xml文件
<resultMap type="com.mybatis.pojo.Orders" id="orders">
    <result column="user_id" property="userId"/>
</resultMap>   <!--只有user_id不一致-->
<select id="selectOrdersList" resultMap="orders">
    SELECT id, user_id, number, createtime, note FROM orders
</select>
3. Mapper接口
// 查询订单表order的所有数据
public List<Orders> selectOrdersList();
4. 使用resultMap
由于上边的mapper.xml中sql查询列(user_id)和orders类属性(userId)不一致,所以查询结果不能映射到pojo中。
需要定义resultMap,把ordersResultMap将sql查询列(user_id)和Order类属性(userId)对应起来
<?xml version="1.0" encoding="UTF-8" ?>
<!DOCTYPE mapper
PUBLIC "-//mybatis.org//DTD Mapper 3.0//EN"
"http://mybatis.org/dtd/mybatis-3-mapper.dtd">
<!-- namespace:命名空间,用于隔离sql,还有一个很重要的作用,Mapper动态代理开发的时候使用,需要指定Mapper的类路径 -->
<mapper namespace="com.mybatis.mapper.OrderMapper">
    <!-- resultMap最终还是要将结果映射到pojo上,type就是指定映射到哪一个pojo -->
    <!-- id:设置ResultMap的id -->
    <resultMap type="com.mybatis.pojo.Orders" id="orders">
       <!-- 定义主键 ,非常重要。如果是多个字段,则定义多个id -->
       <!-- property:主键在pojo中的属性名 -->
       <!-- column:主键在数据库中的列名 -->
       <id property="id" column="id" />
       <!-- 定义普通属性 -->
       <result property="userId" column="user_id" />
       <result property="number" column="number" />
       <result property="createtime" column="createtime" />
       <result property="note" column="note" />
    </resultMap>
    <!-- 查询所有的订单数据 -->
    <select id="queryOrderAll" resultMap="orders">
        SELECT id, user_id,
       number,
       createtime, note FROM `order`
    </select>

</mapper>
动态sql
if
动态 SQL 通常要做的事情是根据条件包含 where 子句的一部分。比如:
<select id="findActiveBlogWithTitleLike"
     resultType="Blog">
  SELECT * FROM BLOG
  WHERE state = ‘ACTIVE’
  <if test="title != null">
    AND title like #{title}
  </if>
</select>
这条语句提供了一种可选的查找文本功能。如果没有传入“title”,那么所有处于“ACTIVE”状态的BLOG都会返回;反之若传入了“title”,那么就会对“title”一列进行模糊查找并返回 BLOG 结果(细心的读者可能会发现,“title”参数值是可以包含一些掩码或通配符的)。
如果希望通过“title”和“author”两个参数进行可选搜索该怎么办呢?首先,改变语句的名称让它更具实际意义;然后只要加入另一个条件即可。
<select id="findActiveBlogLike"
     resultType="Blog">
  SELECT * FROM BLOG WHERE state = ‘ACTIVE’
  <if test="title != null">
    AND title like #{title}
  </if>
  <if test="author != null and author.name != null">
    AND author_name like #{author.name}
  </if>
</select>
choose, when, otherwise
有时我们不想应用到所有的条件语句,而只想从中择其一项。针对这种情况,MyBatis 提供了 choose 元素,它有点像 Java 中的 switch 语句。
还是上面的例子,但是这次变为提供了“title”就按“title”查找,提供了“author”就按“author”查找的情形,若两者都没有提供,就返回所有符合条件的 BLOG(实际情况可能是由管理员按一定策略选出 BLOG 列表,而不是返回大量无意义的随机结果)。
<select id="findActiveBlogLike"
     resultType="Blog">
  SELECT * FROM BLOG WHERE state = ‘ACTIVE’
  <choose>
    <when test="title != null">
      AND title like #{title}
    </when>
    <when test="author != null and author.name != null">
      AND author_name like #{author.name}
    </when>
    <otherwise>
      AND featured = 1
    </otherwise>
  </choose>
</select>
trim, where, set
前面几个例子已经合宜地解决了一个臭名昭著的动态 SQL 问题。现在回到“if”示例,这次我们将“ACTIVE = 1”也设置成动态的条件,看看会发生什么。
<select id="findActiveBlogLike"
     resultType="Blog">
  SELECT * FROM BLOG
  WHERE
  <if test="state != null">
    state = #{state}
  </if>
  <if test="title != null">
    AND title like #{title}
  </if>
  <if test="author != null and author.name != null">
    AND author_name like #{author.name}
  </if>
</select>
如果这些条件没有一个能匹配上会发生什么?最终这条 SQL 会变成这样:
SELECT * FROM BLOG
WHERE
这会导致查询失败。如果仅仅第二个条件匹配又会怎样?这条 SQL 最终会是这样:
SELECT * FROM BLOG
WHERE
AND title like ‘someTitle’
这个查询也会失败。这个问题不能简单地用条件句式来解决,如果你也曾经被迫这样写过,那么你很可能从此以后都不会再写出这种语句了。
MyBatis 有一个简单的处理,这在 90% 的情况下都会有用。而在不能使用的地方,你可以自定义处理方式来令其正常工作。一处简单的修改就能达到目的:
<!-- where 可以去掉前 and 即如:and sex = #{sex},而不是sex = #{sex} and-->
<select id="findActiveBlogLike"
     resultType="Blog">
  SELECT * FROM BLOG
  <where>
    <if test="state != null">
         state = #{state}
    </if>
    <if test="title != null">
        AND title like #{title}
    </if>
    <if test="author != null and author.name != null">
        AND author_name like #{author.name}
    </if>
  </where>
</select>
where 元素只会在至少有一个子元素的条件返回 SQL 子句的情况下才去插入“WHERE”子句。而且,若语句的开头为“AND”或“OR”,where 元素也会将它们去除。
如果 where 元素没有按正常套路出牌,我们可以通过自定义 trim 元素来定制 where 元素的功能。比如,和 where 元素等价的自定义 trim 元素为:
<trim prefix="WHERE" prefixOverrides="AND |OR ">
  ...
</trim>
prefixOverrides 属性会忽略通过管道分隔的文本序列(注意此例中的空格也是必要的)。它的作用是移除所有指定在 prefixOverrides 属性中的内容,并且插入 prefix 属性中指定的内容。
类似的用于动态更新语句的解决方案叫做 set。set 元素可以用于动态包含需要更新的列,而舍去其它的。比如:
<update id="updateAuthorIfNecessary">
  update Author
    <set>
      <if test="username != null">username=#{username},</if>
      <if test="password != null">password=#{password},</if>
      <if test="email != null">email=#{email},</if>
      <if test="bio != null">bio=#{bio}</if>
    </set>
  where id=#{id}
</update>
这里,set 元素会动态前置 SET 关键字,同时也会删掉无关的逗号,因为用了条件语句之后很可能就会在生成的 SQL 语句的后面留下这些逗号。(译者注:因为用的是“if”元素,若最后一个“if”没有匹配上而前面的匹配上,SQL 语句的最后就会有一个逗号遗留)
若你对 set 元素等价的自定义 trim 元素的代码感兴趣,那这就是它的真面目:
<trim prefix="SET" suffixOverrides=",">
  ...
</trim>
注意这里我们删去的是后缀值,同时添加了前缀值。
foreach
动态 SQL 的另外一个常用的操作需求是对一个集合进行遍历,通常是在构建 IN 条件语句的时候。比如:
<select id="selectPostIn" resultType="domain.blog.Post">
  SELECT *
  FROM POST P
  WHERE ID in
  <foreach item="item" index="index" collection="list"
      open="(" separator="," close=")">
        #{item}
  </foreach>
</select>
foreach 元素的功能非常强大,它允许你指定一个集合,声明可以在元素体内使用的集合项(item)和索引(index)变量。它也允许你指定开头与结尾的字符串以及在迭代结果之间放置分隔符。这个元素是很智能的,因此它不会偶然地附加多余的分隔符。
注意 你可以将任何可迭代对象(如 List、Set 等)、Map 对象或者数组对象传递给 foreach 作为集合参数。当使用可迭代对象或者数组时,index 是当前迭代的次数,item 的值是本次迭代获取的元素。当使用 Map 对象(或者 Map.Entry 对象的集合)时,index 是键,item 是值。
Sql片段


关联查询
1.商品订单数据模型

2.一对一查询
注意:因为一个订单信息只会是一个人下的订单,所以从查询订单信息出发关联查询用户信息为一对一查询。如果从用户信息出发查询用户下的订单信息则为一对多查询,因为一个用户可以下多个订单。
1.方法一:使用resultType
使用resultType,改造订单pojo类,此pojo类中包括了订单信息和用户信息
这样返回对象的时候,mybatis自动把用户信息也注入进来了
- 改造pojo类
OrderUser类继承Order类后OrderUser类包括了Order类的所有字段,只需要定义用户的信息字段即可

- mapper.xml
      <!-- 查询订单,同时包含用户数据 -->
<select id="queryOrderUser" resultType="UserOrders">
   SELECT
   o.id,
   o.user_id
   userId,
   o.number,
   o.createtime,
   o.note,
   u.username,
   u.address
   FROM
   `order` o
   LEFT JOIN `user` u ON o.user_id = u.id
</select>
- mapper接口
List<UserOrders> queryOrderUser();
2.方法二:使用resultMap
使用resultMap,定义专门的resultMap用于映射一对一查询结果。
- 改造pojo类
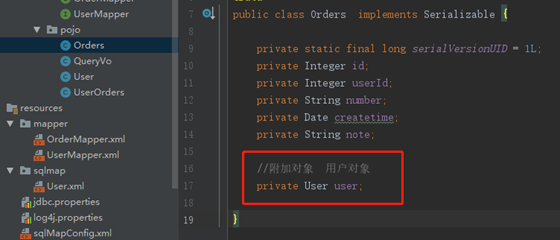
在Orders类中加入User属性,user属性中用于存储关联查询的用户信息,因为订单关联查询用户是一对一关系,所以这里使用单个User对象存储关联查询的用户信息。
- mapper.xml
      <!--      //一对一关联 查询  以订单为中心 关联用户  public List<Orders> selectOrders();   -->  <resultMap type="com.mybatis.pojo.Orders" id="order">
    <result column="id" property="id"/>
    <result column="user_id" property="userId"/>
    <result column="number" property="number"/>
    <!-- 一对一 关联 -->
    <!-- association :配置一对一属性 -->
   <!-- property:orders里面的User属性名 -->
   <!-- javaType:属性类型 -->
    <association property="user" javaType="com.mybatis.pojo.User">
        <!-- id:声明主键,表示user_id是关联查询对象的唯一标识-->
        <id column="user_id" property="id"/>
        <result column="username" property="username"/>
    </association>  </resultMap>
<select id="selectOrders" resultMap="order">
    SELECT
    o.id,
    o.user_id,
    o.number,
    o.createtime,
    u.username
    FROM orders o
    left join user u
    on o.user_id = u.id
</select>
- mapper接口
public List<Orders> selectOrders();
3.一对多查询
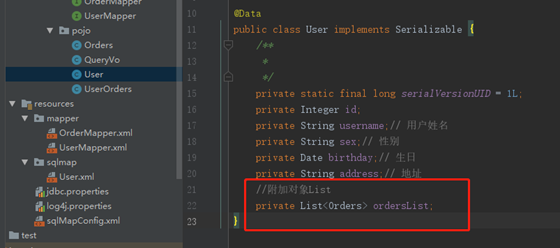
1. 修改pojo
2.mapper.xml
<!--       //一对多关联  public List<User> selectUserList(); -->
<resultMap type="com.mybatis.pojo.User" id="user">
    <id column="user_id" property="id"/>
    <result column="username" property="username"/>
    <!-- 一对多 -->
    <collection property="ordersList" ofType="com.mybatis.pojo.Orders">
        <!-- 配置主键,是关联Orders的唯一标识 -->
        <id column="id" property="id"/>
        <result column="number" property="number"/>
    </collection>
</resultMap>
<select id="selectUserList" resultMap="user">
    SELECT
    o.id,
    o.user_id,
    o.number,
    o.createtime,
    u.username
    FROM user u
    left join orders o
    on o.user_id = u.id
</select>
3.mapper接口
public List<User> selectUserList();
Mybatis整合spring
1.整合思路
- SqlSessionFactory对象应该放到spring容器中作为单例存在。
- 传统dao的开发方式中,应该从spring容器中获得sqlsession对象。
- Mapper代理形式中,应该从spring容器中直接获得mapper的代理对象。
- 数据库的连接以及数据库连接池事务管理都交给spring容器来完成。
2.整合步骤
1. 导入jar包(有的版本比较旧,可以到相应的官网下载,或者maven导入)

2.spring的jar包
3. Mybatis的jar包
4.Spring+mybatis的整合包。
5.Mysql的数据库驱动jar包。
6.数据库连接池的jar包。
7.加入配置文件
- mybatisSpring的配置文件
- 的配置文件sqlmapConfig.xml
a) 数据库连接及连接池
b) 事务管理(暂时可以不配置)
c)sqlsessionFactory对象,配置到spring容器中
d)mapeer代理对象或者是dao实现类配置到spring容器中。
8. sqlMapConfig.xml

9.applictionContext.xml
SqlSessionFactoryBean属于mybatis-spring这个jar包
对于spring来说,mybatis是另外一个架构,需要整合jar包。
<?xml version="1.0" encoding="UTF-8"?>
<beans xmlns="http://www.springframework.org/schema/beans"
xmlns:context="http://www.springframework.org/schema/context"
xmlns:p="http://www.springframework.org/schema/p"
xmlns:aop="http://www.springframework.org/schema/aop"
xmlns:tx="http://www.springframework.org/schema/tx"
xmlns:xsi="http://www.w3.org/2001/XMLSchema-instance"
xsi:schemaLocation="http://www.springframework.org/schema/beans
http://www.springframework.org/schema/beans/spring-beans-4.0.xsd
 http://www.springframework.org/schema/context
http://www.springframework.org/schema/context/spring-context-4.0.xsd
http://www.springframework.org/schema/aop
http://www.springframework.org/schema/aop/spring-aop-4.0.xsd
http://www.springframework.org/schema/tx
http://www.springframework.org/schema/tx/spring-tx-4.0.xsd
http://www.springframework.org/schema/util
http://www.springframework.org/schema/util/spring-util-4.0.xsd">
    <!--加载配置文件-->
    <context:property-placeholder location="classpath:jdbc.properties"/>
    <!-- 数据库连接池 -->
    <bean id="dataSource" class="org.apache.commons.dbcp.BasicDataSource"
      destroy-method="close">
        <property name="driverClassName" value="${jdbc.driver}" />
        <property name="url" value="${jdbc.url}" />
        <property name="username" value="${jdbc.username}" />
        <property name="password" value="${jdbc.password}" />
        <property name="maxActive" value="10" />
        <property name="maxIdle" value="5" />
    </bean>
    <!-- Mybatis的工厂  配置sqlSessionFactory -->
    <bean id="sqlSessionFactoryBean" class="org.mybatis.spring.SqlSessionFactoryBean">

<property name="dataSource" ref="dataSource"/>
        <!-- 核心配置文件的位置 -->
        <property name="configLocation" value="classpath:sqlMapConfig.xml"/>
    </bean>
    <!--     Dao原始Dao -->
    <bean id="userDao" class="com.mybatis.dao.UserDaoImpl">
        <property name="sqlSessionFactory" ref="sqlSessionFactoryBean"/>
    </bean>
    <!-- Mapper动态代理开发 -->
   <bean id="userMapper" class="org.mybatis.spring.mapper.MapperFactoryBean">
       <property name="sqlSessionFactory" ref="sqlSessionFactoryBean"/>
       <property name="mapperInterface" value="com.mybatis.mapper.UserMapper"/>
    </bean>-->
    <!-- Mapper动态代理开发   扫描 -->
    <bean class="org.mybatis.spring.mapper.MapperScannerConfigurer">
        <!-- 基本包 -->
        <property name="basePackage" value="com.mybatis.mapper"/>
    </bean>
</beans>
3.Dao开发
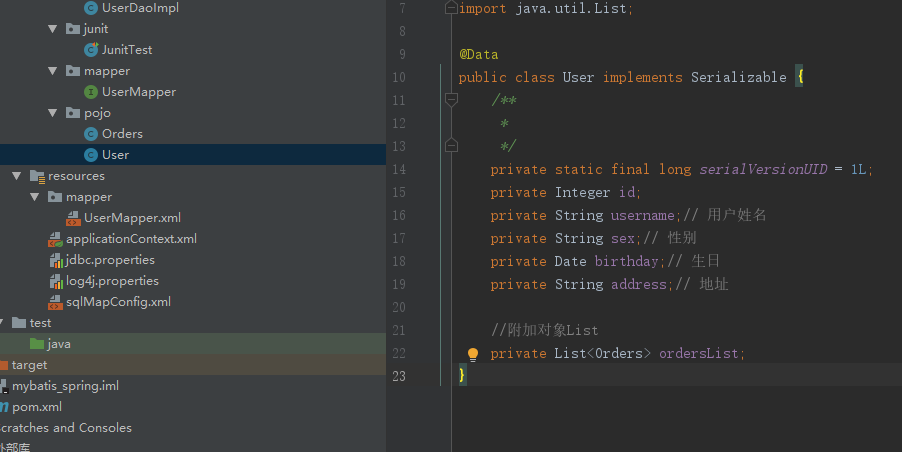
1. 创建pojo
2.传统的Dao开发方式
原始的DAO开发接口+实现类来完成。
需要dao实现类需要继承SqlsessionDaoSupport类
- mapper.xml
      <?xml version="1.0" encoding="UTF-8" ?>
<!DOCTYPE mapper        PUBLIC "-//mybatis.org//DTD Mapper 3.0//EN"        "http://mybatis.org/dtd/mybatis-3-mapper.dtd">
<mapper namespace="com.mybatis.mapper.UserMapper">
    <!-- 通过ID查询一个用户 -->
    <select id="findUserById" parameterType="Integer" resultType="User">
        select * from user where id = #{v}
    </select>
</mapper>
- 加载mapper.xml

- 实现UserDao接口和实现UserDaoImpl实现类
- 配置dao
    <!--     原始方式开发Dao,配置Dao到spring中 -->
<bean id="userDao" class="com.mybatis.dao.UserDaoImpl">
    <!--配置sqlSessionFactory-->
        <property name="sqlSessionFactory" ref="sqlSessionFactoryBean"/>
    </bean>
- 测试方法
      public class UserDaoTest {
   private ApplicationContext context;

   @Before
   public void setUp() throws Exception {
       this.context = new ClassPathXmlApplicationContext("classpath:applicationContext.xml");
   }

   @Test
   public void testQueryUserById() {
       // 获取userDao
       UserDao userDao = this.context.getBean(UserDao.class);

       User user = userDao.findUserById(1);
       System.out.println(user);
   }
}
3.mapper代理形式开发dao
- 实现mapper.xml和UserMapper接口类
- 方法一:配置mapper代理
 <!-- Mapper代理的方式开发方式一,配置Mapper代理对象 -->
<bean id="userMapper" class="org.mybatis.spring.mapper.MapperFactoryBean">
   <!-- 配置Mapper接口 -->
   <property name="mapperInterface" value="cn.mybatis.mapper.UserMapper" />
   <!-- 配置sqlSessionFactory -->
   <property name="sqlSessionFactory" ref="sqlSessionFactory" />
</bean>
- 方法二:扫描包形式配置mapper
      <!-- Mapper代理的方式开发方式二,扫描包方式配置代理 -->
<bean class="org.mybatis.spring.mapper.MapperScannerConfigurer">
   <!-- 配置Mapper接口 -->
   <property name="basePackage" value="cn.mybatis.mapper" />
</bean>
- 测试方法
      public class UserMapperTest {
   private ApplicationContext context;
   @Before
   public void setUp() throws Exception {
       this.context = new ClassPathXmlApplicationContext("classpath:applicationContext.xml");
   }

   @Test
   public void testQueryUserById() {
       // 获取Mapper
       UserMapper userMapper = this.context.getBean(UserMapper.class);
       User user = userMapper.queryUserById(1);
       System.out.println(user);
   }
   @Test
   public void testQueryUserByUsername() {
       // 获取Mapper
       UserMapper userMapper = this.context.getBean(UserMapper.class);
       List<User> list = userMapper.queryUserByUsername("张");
       for (User user : list) {
          System.out.println(user);
       }
参考
(http://www.mybatis.org/mybatis-3/zh/index.html)


【推荐】编程新体验,更懂你的AI,立即体验豆包MarsCode编程助手
【推荐】凌霞软件回馈社区,博客园 & 1Panel & Halo 联合会员上线
【推荐】抖音旗下AI助手豆包,你的智能百科全书,全免费不限次数
【推荐】博客园社区专享云产品让利特惠,阿里云新客6.5折上折
【推荐】轻量又高性能的 SSH 工具 IShell:AI 加持,快人一步