编写连接ESP8266 WiFi模块(ESP8266-01S芯片)WiFi的Android客户端APP控制单片机外围LED灯亮灭
一、编写连接ESP8266 WiFi模块(ESP8266-01S芯片)WiFi的Android客户端APP控制单片机外围LED灯亮灭的原理
二、编写连接ESP8266 WiFi模块(ESP8266-01S芯片)WiFi的Android客户端APP控制单片机外围LED灯亮灭的步骤
1、借助USB-TTL串口使用PC端串口调试助手软件对ESP8266 WiFi模块(ESP8266-01S芯片)发送激活ESP8266 WiFi模块(ESP8266-01S芯片)WiFi功能AT指令调试
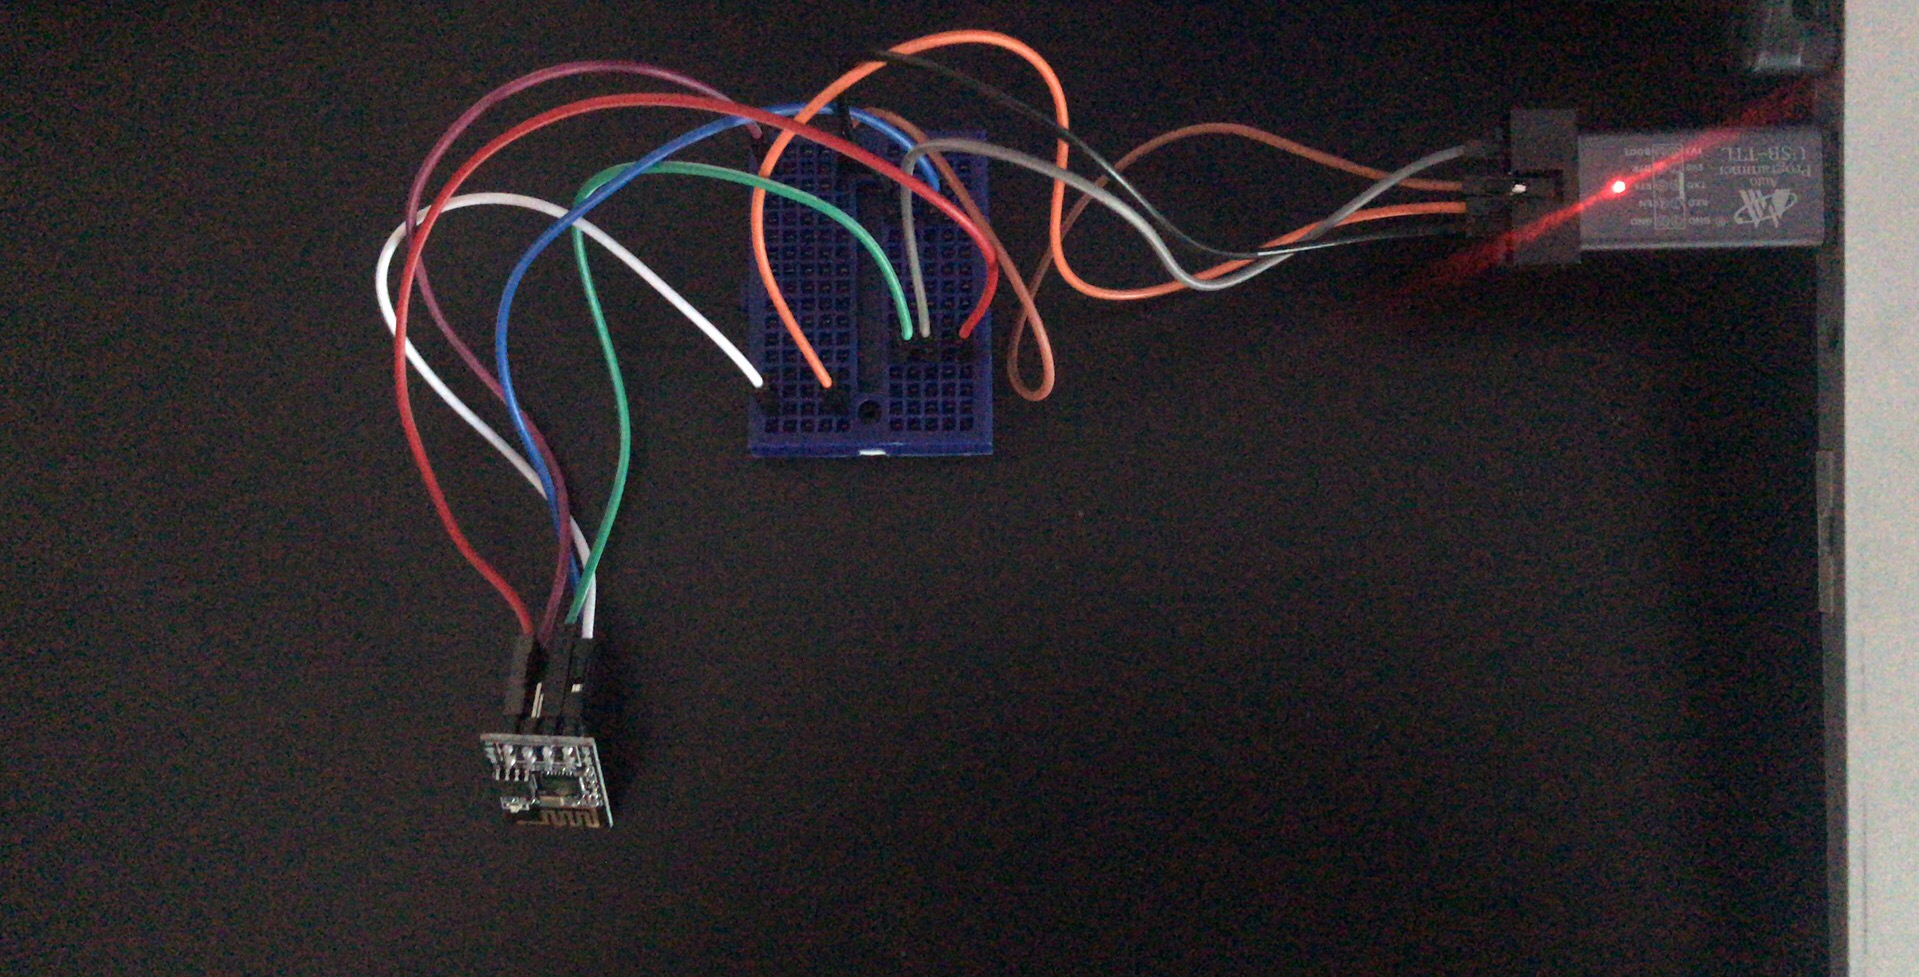
(1)、USB-TTL串口与ESP8266 WiFi模块(ESP8266-01S芯片)接线图

 (2)、使用PC端串口调试助手软件(如:安信可串口调试助手软件)对ESP8266 WiFi模块(ESP8266-01S芯片)发送激活ESP8266 WiFi模块(ESP8266-01S芯片)WiFi功能AT指令调试
<1>、在安信可官网下载安信可串口调试助手软件

<2>、双击打开安信可串口调试助手软件,弹出以下界面。
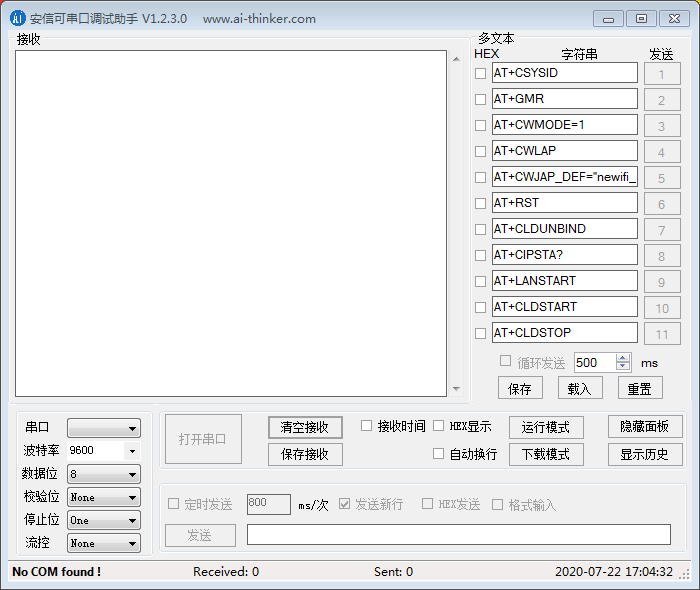
<3>、USB转TTL串口与ESP8266 WiFi模块(ESP8266-01S芯片)相互连线后再与电脑连接。
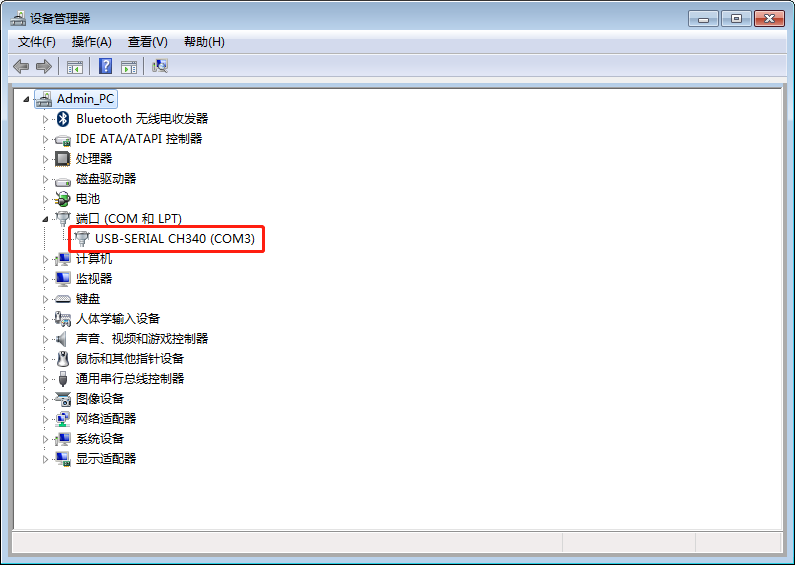
<4>、USB转TTL串口与ESP8266 WiFi模块(ESP8266-01S芯片)相互连线再与电脑连接后,右键点击电脑上的计算机,在弹出列表中选中属性,此时弹出一个关于电脑控制面板的信息界面,点击左上边设备管理器,弹出设备管理器界面,找到端口项点开,出现新增一个通信串口:COM3。
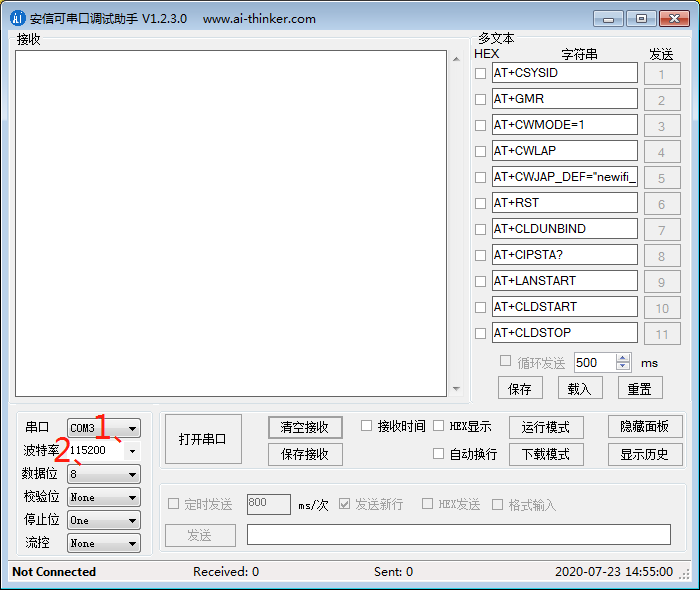
<5>、回到安信可串口调试助手软件界面端口处选COM3端口,在波特率处将4800改为115200,如以下界面。
<6>、在安信可串口调试助手软件界面点击“打开串口”后,弹出以下界面。

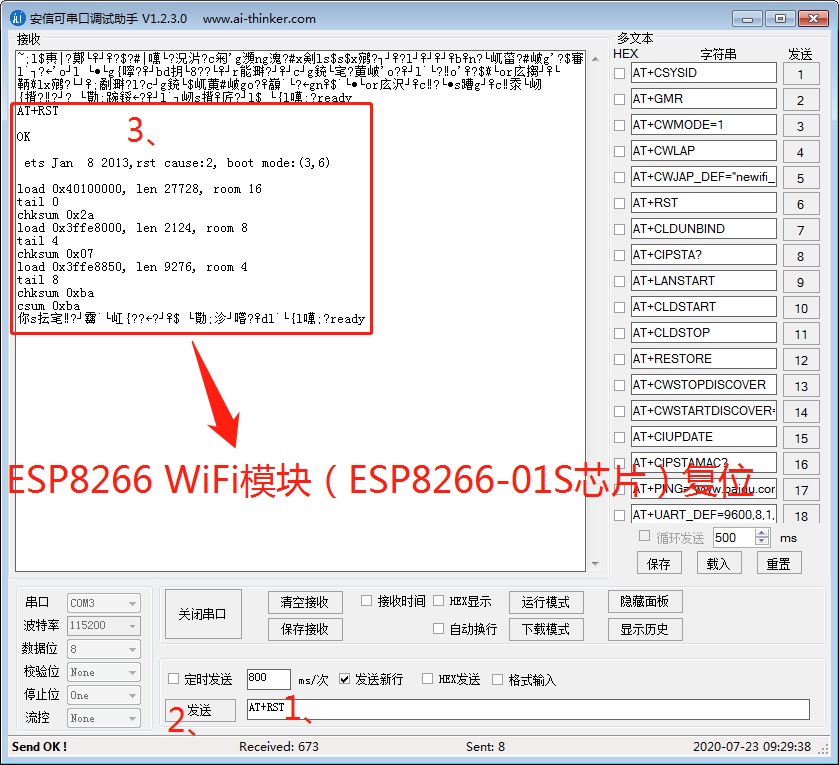
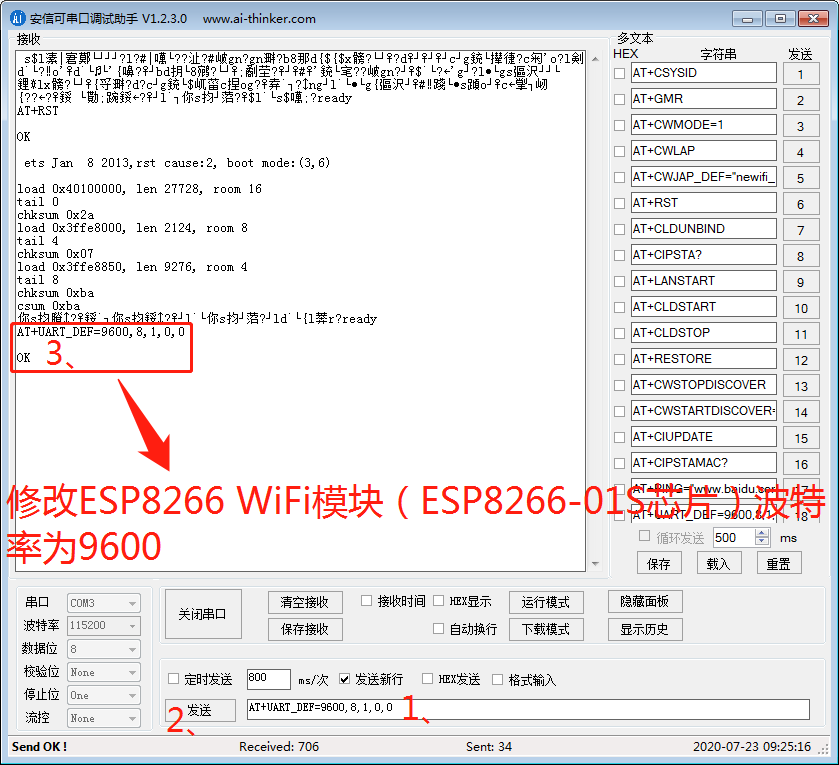
<7>、由于STC系列单片机与ESP8266 WiFi模块(ESP8266-01S芯片)是在波特率为9600下进行通信,而ESP8266 WiFi模块(ESP8266-01S芯片)默认波特率是115200,因此需要使用安信可串口调试助手软件来修改ESP8266 WiFi模块(ESP8266-01S芯片)波特率为9600,操作如下所示。
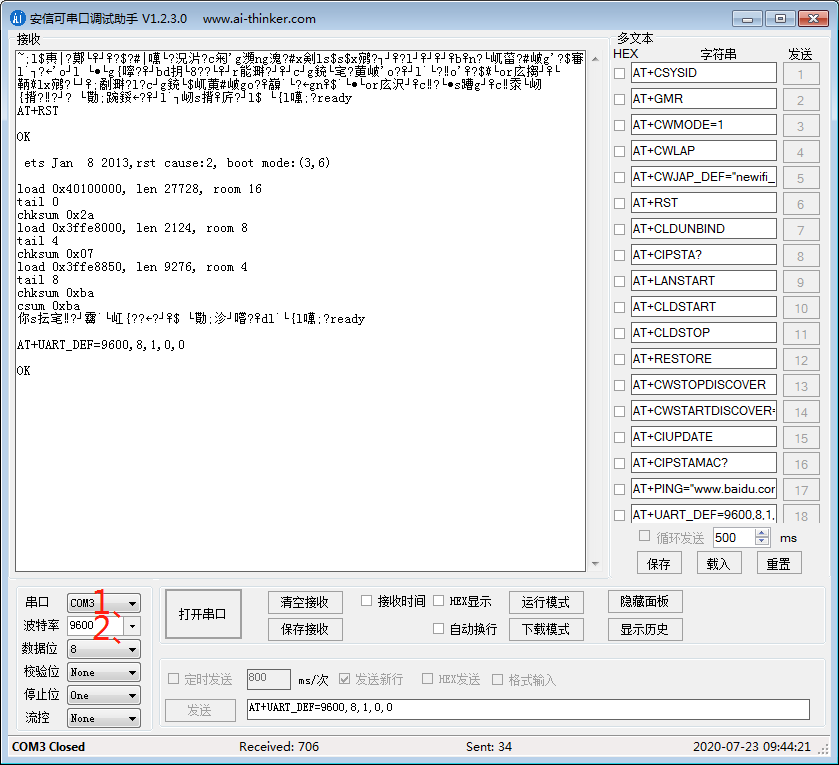
<8>、使用安信可串口调试助手软件来修改ESP8266 WiFi模块(ESP8266-01S芯片)波特率为9600后,在安信可串口调试助手软件界面点击“关闭串口”,回到安信可串口调试助手软件界面端口处选COM3端口不变,在波特率处将115200改为9600,如以下界面。
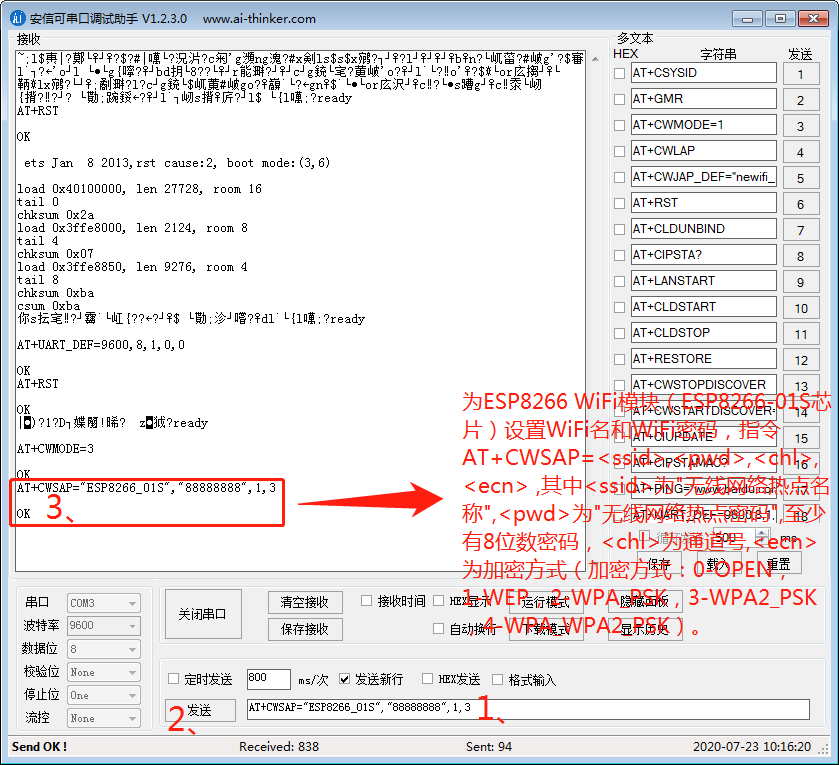
<9>、在安信可串口调试助手软件界面点击“打开串口”,发送项右侧空白栏输入“AT+RST”验证安信可串口调试助手软件在修改ESP8266 WiFi模块(ESP8266-01S芯片)波特率为9600后,是否能与ESP8266 WiFi模块(ESP8266-01S芯片)正常通信,否则安信可串口调试助手软件界面无信息返回,操作如下所示。

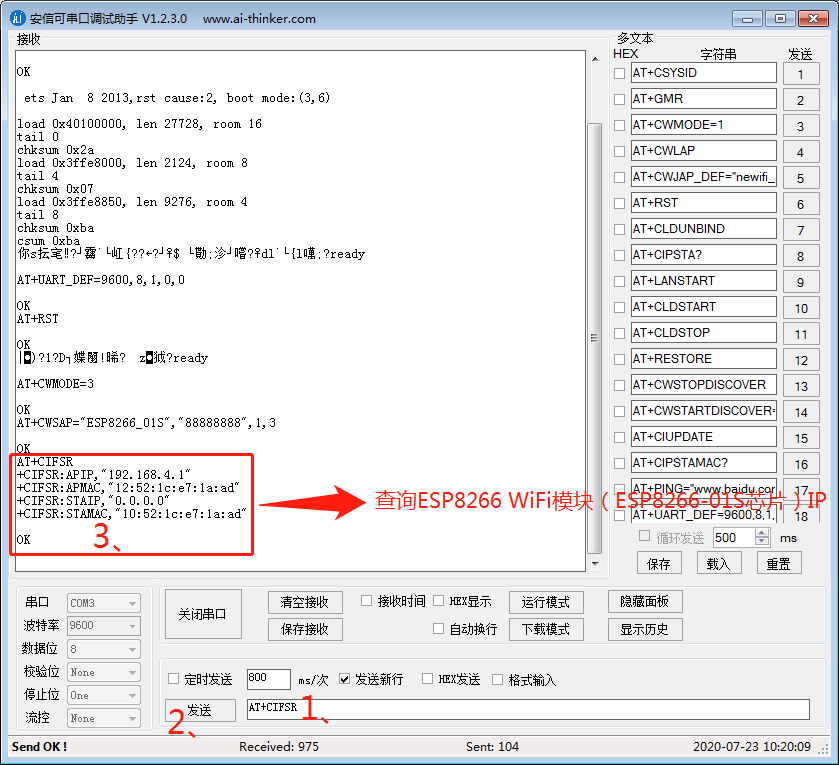
<10>、使用安信可串口调试助手软件对ESP8266 WiFi模块(ESP8266-01S芯片)发送激活ESP8266 WiFi模块(ESP8266-01S芯片)WiFi功能AT指令调试,操作如下所示。



2、用手机端安卓编程软件AIDE编写连接ESP8266 WiFi模块(ESP8266-01S芯片)WiFi的Android客户端APP安卓程序(也可用Eclipse集成安卓开发环境或Android Studio软件编写连接ESP8266 WiFi模块(ESP8266-01S芯片)WiFi的Android客户端APP安卓程序,使用手机端安卓编程软件AIDE编写连接ESP8266 WiFi模块(ESP8266-01S芯片)WiFi的Android客户端APP安卓程序可以减少错误发生,还可以直接生成连接ESP8266 WiFi模块(ESP8266-01S芯片)WiFi的Android客户端APP,十分方便。)
(1)、编写连接ESP8266 WiFi模块(ESP8266-01S芯片)WiFi的Android客户端APP安卓主程序
package com.example.esp8266androidclient;
import java.io.IOException;
import java.io.PrintStream;
import java.net.Socket;
import android.os.Bundle;
import android.support.v7.app.ActionBarActivity;
import android.view.View;
import android.widget.Button;
import android.widget.EditText;
import android.widget.Toast;
  public class ESP8266AndroidClientMainActivity extends ActionBarActivity implements View.OnClickListener
{
   private EditText IP;//IP
   private EditText PORT;//端口号
   private String stringip;//字符串类型IP
   private int stringport;//字符类型端口号
   private Button connect;//连接
   private Socket socket;//套接字
   private PrintStream out;//打印输出流
   private ConnectThread connectthread;//连接线程
   private Button open;//按钮LED灯开
   private Button close;//按钮LED灯关
   @Override
   protected void onCreate(Bundle savedInstanceState)
 {
    super.onCreate(savedInstanceState);
    setContentView(R.layout.activity_esp8266_android_client_main);
    connect=(Button)findViewById(R.id.button1);
    open=(Button)findViewById(R.id.button2);
    close=(Button)findViewById(R.id.button3);
    IP=(EditText)findViewById(R.id.editextip);
    PORT=(EditText)findViewById(R.id.editextport);
    connect.setOnClickListener(this);
    open.setOnClickListener(this);
    close.setOnClickListener(this);
   }
    @Override
    public void onClick(View v)
  {
     switch(v.getId())
   {
      case R.id.button1:
                          if( socket == null || ! socket.isConnected())
                        {
                           stringip = IP.getText().toString();
                           stringport = Integer.valueOf(PORT.getText().toString());
                           connectthread = new ConnectThread(stringip, stringport);
                           connectthread.start();
                          }
                          if(socket != null && socket.isConnected())
                        {
                           try
                         {
                            socket.close();
                            socket=null;   //  清空mSocket
                            connect.setText("连接");
                            Toast.makeText(ESP8266AndroidClientMainActivity.this,"连接已关闭", Toast.LENGTH_LONG).show();
                           }
                           catch (IOException e)
                         {
                            e.printStackTrace();
                           }
                         }
                          break;
     case R.id.button2:
                         if(out!=null)
                       {
                          out.print("0");
                          out.flush();
                         }
                         break;
     case R.id.button3:
                         if (out!=null)
                       {
                          out.print("1");
                          out.flush();
                         }
                         break;
    }
   }
   private class ConnectThread extends Thread
 {
    private String ip;
    private int port;
    public ConnectThread(String ip,int port){
    this.ip=ip;
    this.port=port;
   }
   @Override
   public void run()
 {
    try
  {
     socket=new Socket(ip,port);
     out = new PrintStream(socket.getOutputStream());
     runOnUiThread(new Runnable()
   {
      @Override
      public void run()
    {
       connect.setText("断开");
       Toast.makeText(ESP8266AndroidClientMainActivity.this,"连接成功",Toast.LENGTH_LONG).show();
      }
     });
    }
    catch (IOException e)
  {
     e.printStackTrace();
     runOnUiThread(new Runnable()
   {
      @Override
      public void run()
    {
       connect.setText("断开");
       Toast.makeText(ESP8266AndroidClientMainActivity.this,"连接失败",Toast.LENGTH_LONG).show();
      }
     });
    }
   }
  }
 }
(2)、编写连接ESP8266 WiFi模块(ESP8266-01S芯片)WiFi的Android客户端APP安卓界面布局程序
<RelativeLayout
  xmlns:android="http://schemas.android.com/apk/res/android"
  xmlns:tools="http://schemas.android.com/tools"
  android:layout_width="match_parent"
  android:layout_height="match_parent"
  android:orientation="vertical"
  android:paddingBottom="@dimen/activity_vertical_margin"
  android:paddingLeft="@dimen/activity_horizontal_margin"
  android:paddingRight="@dimen/activity_horizontal_margin"
  android:paddingTop="@dimen/activity_vertical_margin"
  tools:context="com.example.esp8266androidclient.ESP8266AndroidClientMainActivity" >
  <LinearLayout
    android:id="@+id/linearLayout1"
    android:layout_width="match_parent"
    android:layout_height="wrap_content"
    android:layout_alignParentLeft="true"
    android:layout_alignParentTop="true" >
    <TextView
      android:id="@+id/textView1"
      android:layout_width="wrap_content"
      android:layout_height="wrap_content"
      android:text="服务器地址:"
      android:textSize="20dp" />
    <EditText
      android:id="@+id/editextip"
      android:layout_width="wrap_content"
      android:layout_height="wrap_content"
      android:layout_weight="1"
      android:ems="10"
      android:hint="ESP8266 WiFi模块WiFi地址号"
      android:inputType="textPersonName" />
   </LinearLayout>
   <LinearLayout
     android:id="@+id/linearLayout2"
     android:layout_width="match_parent"
     android:layout_height="wrap_content"
     android:layout_alignLeft="@+id/linearLayout1"
     android:layout_below="@+id/linearLayout1" >
     <TextView
       android:id="@+id/textView2"
       android:layout_width="wrap_content"
       android:layout_height="wrap_content"
       android:text="服务器端口:"
       android:textSize="20dp" />
     <EditText
       android:id="@+id/editextport"
       android:layout_width="wrap_content"
       android:layout_height="wrap_content"
       android:layout_weight="1"
       android:ems="10"
       android:hint="ESP8266 WiFi模块WiFi端口号"
       android:inputType="textPersonName" />
    </LinearLayout>
    <Button
      android:id="@+id/button1"
      android:layout_width="match_parent"
      android:layout_height="wrap_content"
      android:layout_alignLeft="@+id/linearLayout2"
      android:layout_below="@+id/linearLayout2"
      android:layout_marginTop="30dp"
      android:text="连接"/>
    <Button
      android:id="@+id/button2"
      android:layout_width="match_parent"
      android:layout_height="wrap_content"
      android:layout_alignLeft="@+id/button1"
      android:layout_below="@+id/button1"
      android:layout_marginTop="30dp"
      android:text="打开" />
    <Button
      android:id="@+id/button3"
      android:layout_width="match_parent"
      android:layout_height="wrap_content"
      android:layout_alignLeft="@+id/button2"
      android:layout_below="@+id/button2"
      android:layout_marginTop="30dp"
      android:text="关闭" />
</RelativeLayout>
(3)、编写连接ESP8266 WiFi模块(ESP8266-01S芯片)WiFi的Android客户端APP安卓属性权限程序
<?xml version="1.0" encoding="utf-8"?>
<manifest xmlns:android="http://schemas.android.com/apk/res/android"
  package="com.example.esp8266androidclient"
  android:versionCode="1"
  android:versionName="1.0" >
  <uses-sdk
    android:minSdkVersion="8"
    android:targetSdkVersion="21" />
  <uses-permission android:name="android.permission.INTERNET"></uses-permission>
  <uses-permission android:name="android.permission.WRITE_EXTERNAL_STORAGE"></uses-permission>
  <uses-permission android:name="android.permission.READ_EXTERNAL_STORAGE"></uses-permission>
  <application
    android:allowBackup="true"
    android:icon="@drawable/ic_launcher"
    android:label="@string/app_name"
    android:theme="@style/AppTheme" >
    <activity
      android:name=".ESP8266AndroidClientMainActivity"
      android:label="@string/app_name" >
      <intent-filter>
        <action android:name="android.intent.action.MAIN" />
        <category android:name="android.intent.category.LAUNCHER" />
      </intent-filter>
    </activity>
   </application>
</manifest>
(4)、编写连接ESP8266 WiFi模块(ESP8266-01S芯片)WiFi的Android客户端APP字符串资源程序
<?xml version="1.0" encoding="utf-8"?>
<resources>
  <string name="app_name">ESP8266AndroidClient</string>
  <string name="action_settings">Settings</string>
</resources>
(5)、生成连接ESP8266 WiFi模块(ESP8266-01S芯片)WiFi的Android客户端APP
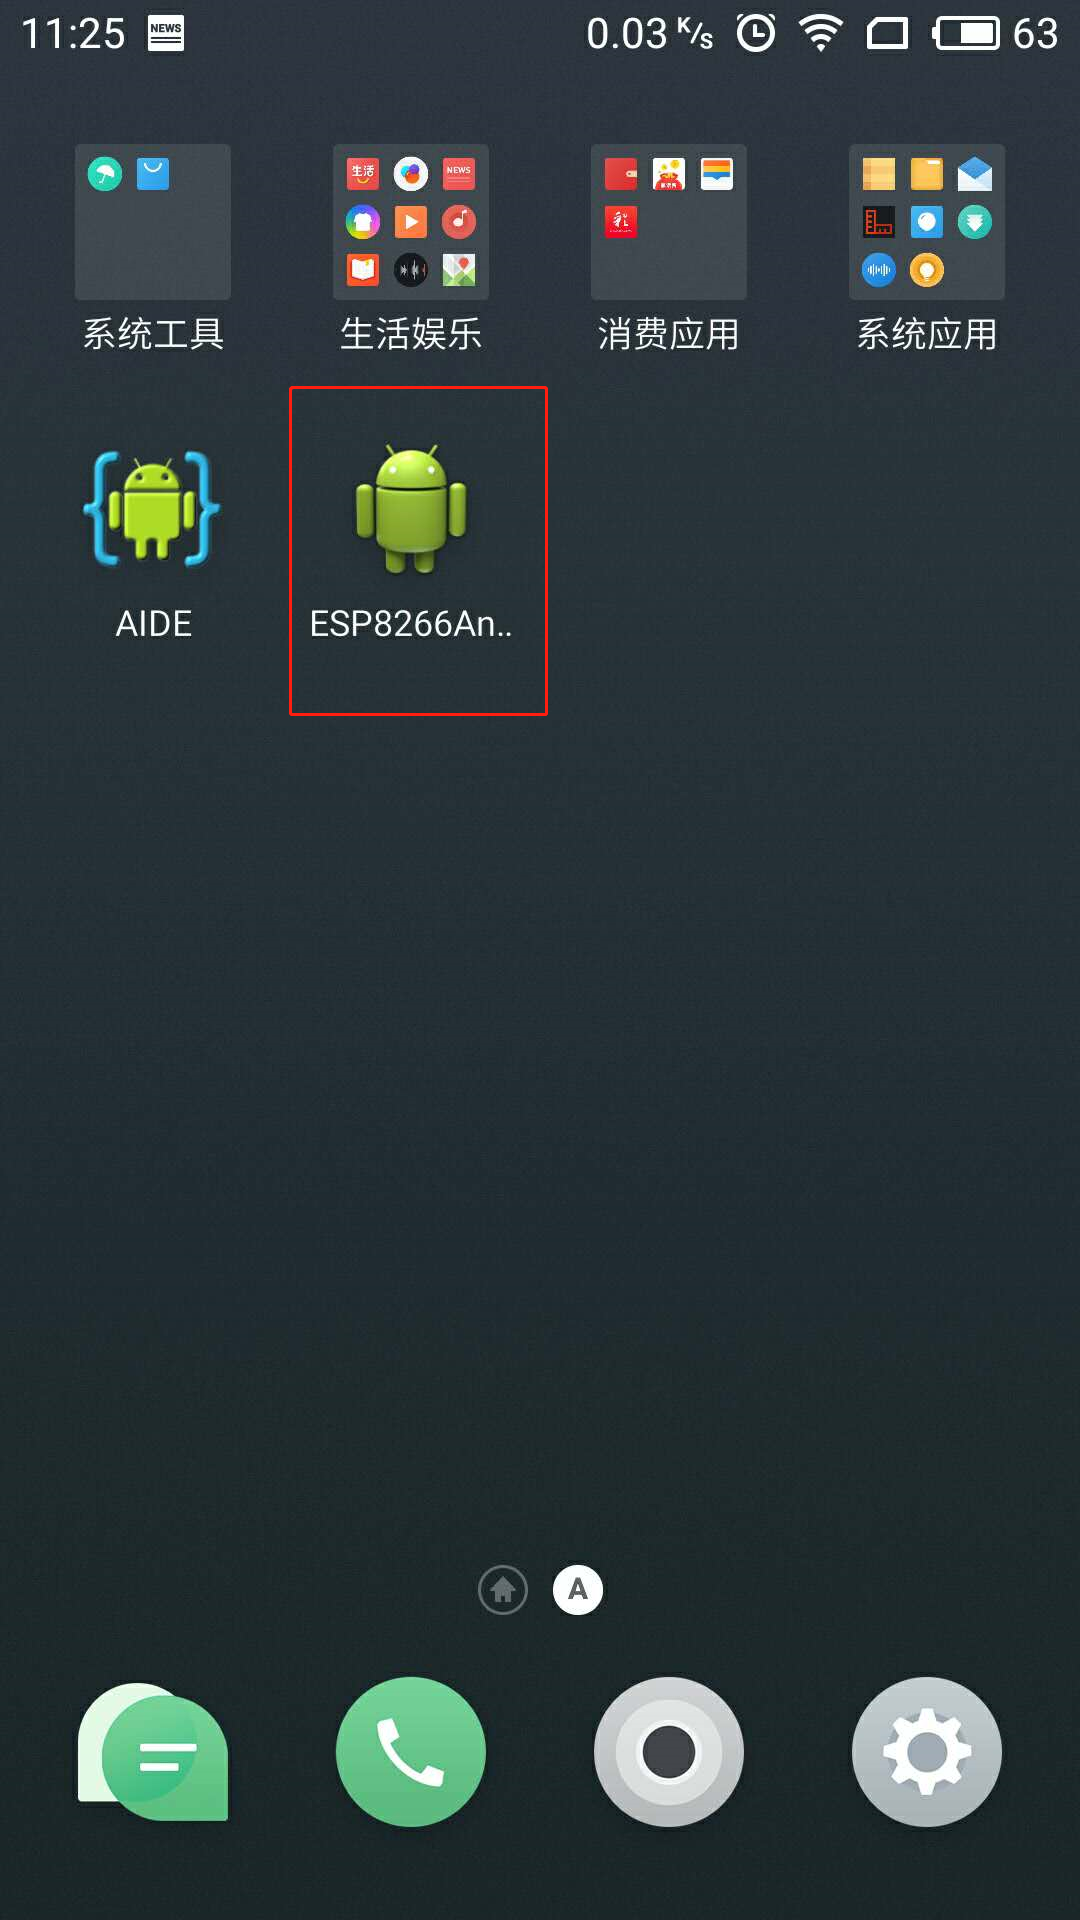
3、激活ESP8266 WiFi模块(ESP8266-01S芯片)WiFi功能后,将编写好连接ESP8266 WiFi模块(ESP8266-01S芯片)WiFi的Android客户端APP对ESP8266 WiFi模块(ESP8266-01S芯片)进行连接调试。
<1>、点开手机端设置,找到无线网络并点开,弹出以下界面。

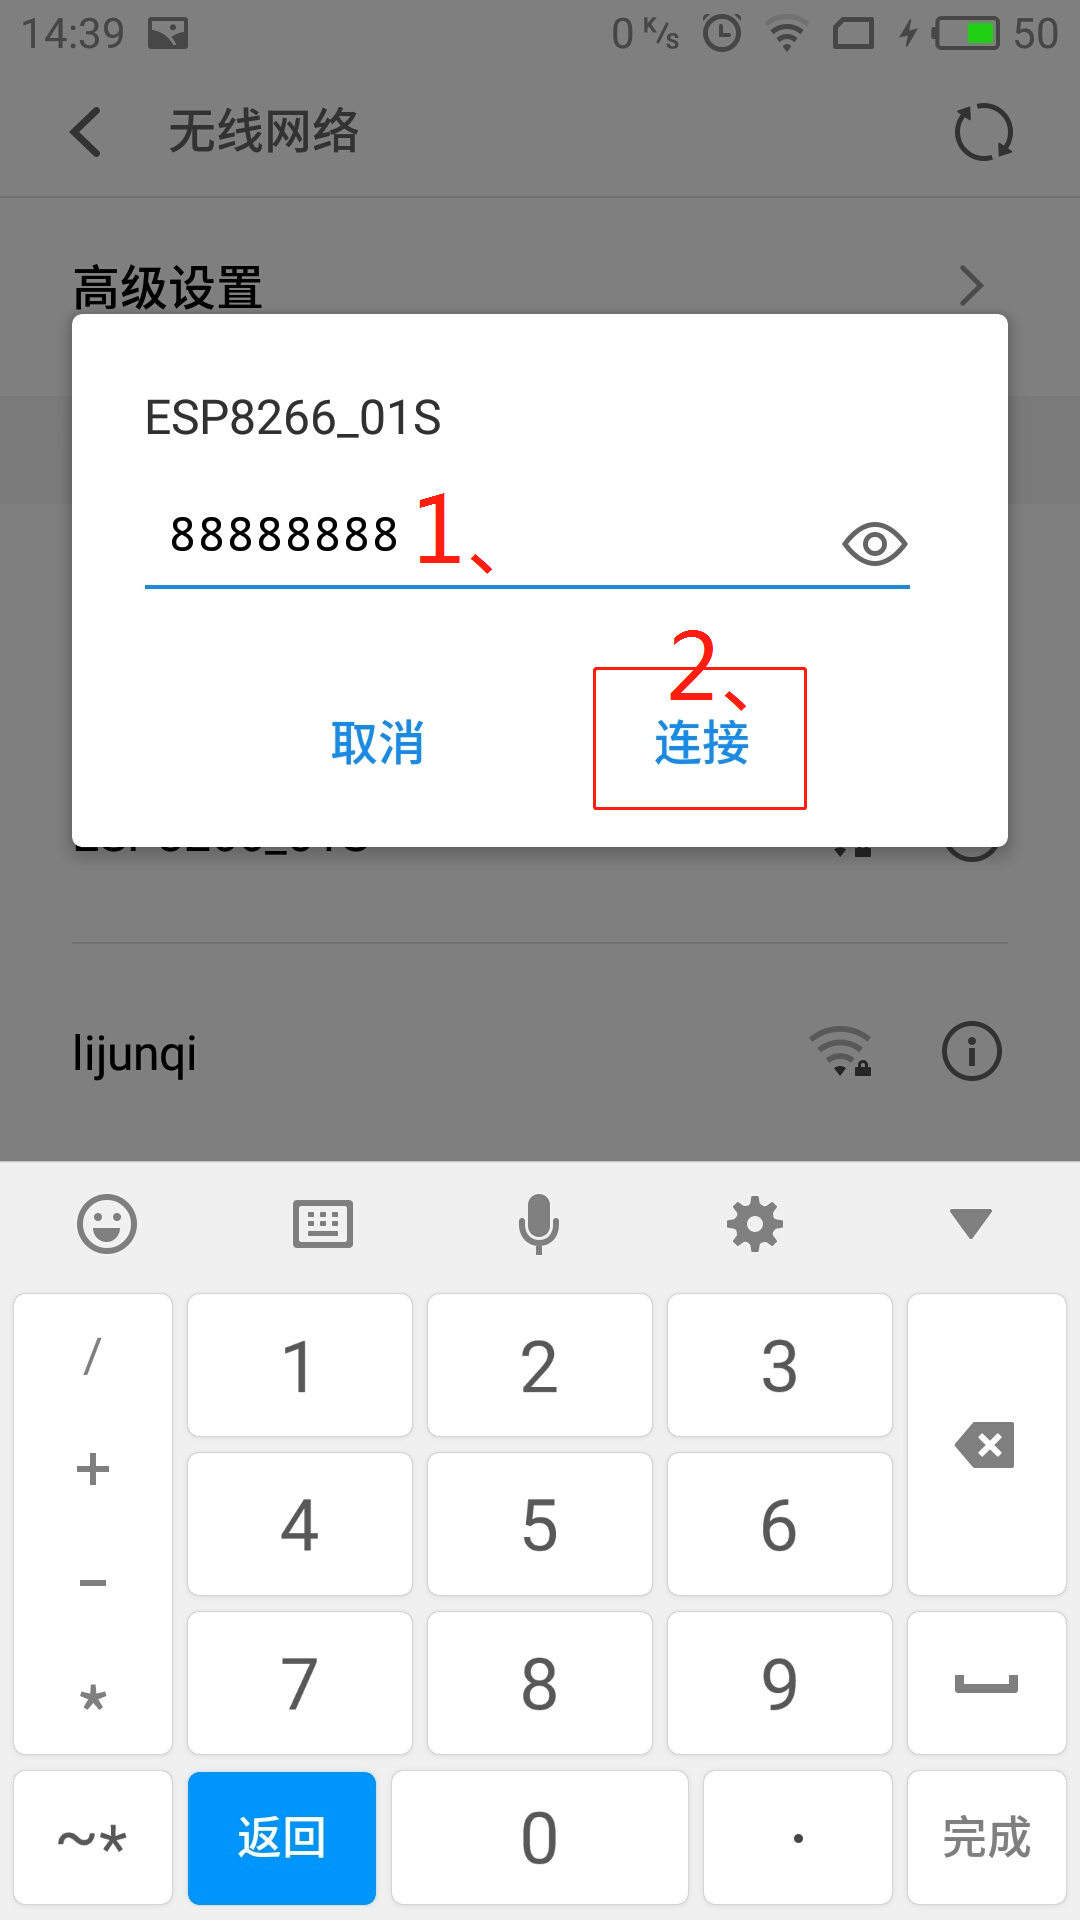
<2>、点开被激活的ESP8266 WiFi模块WiFi,输入密码,点击连接,操作如下所示。
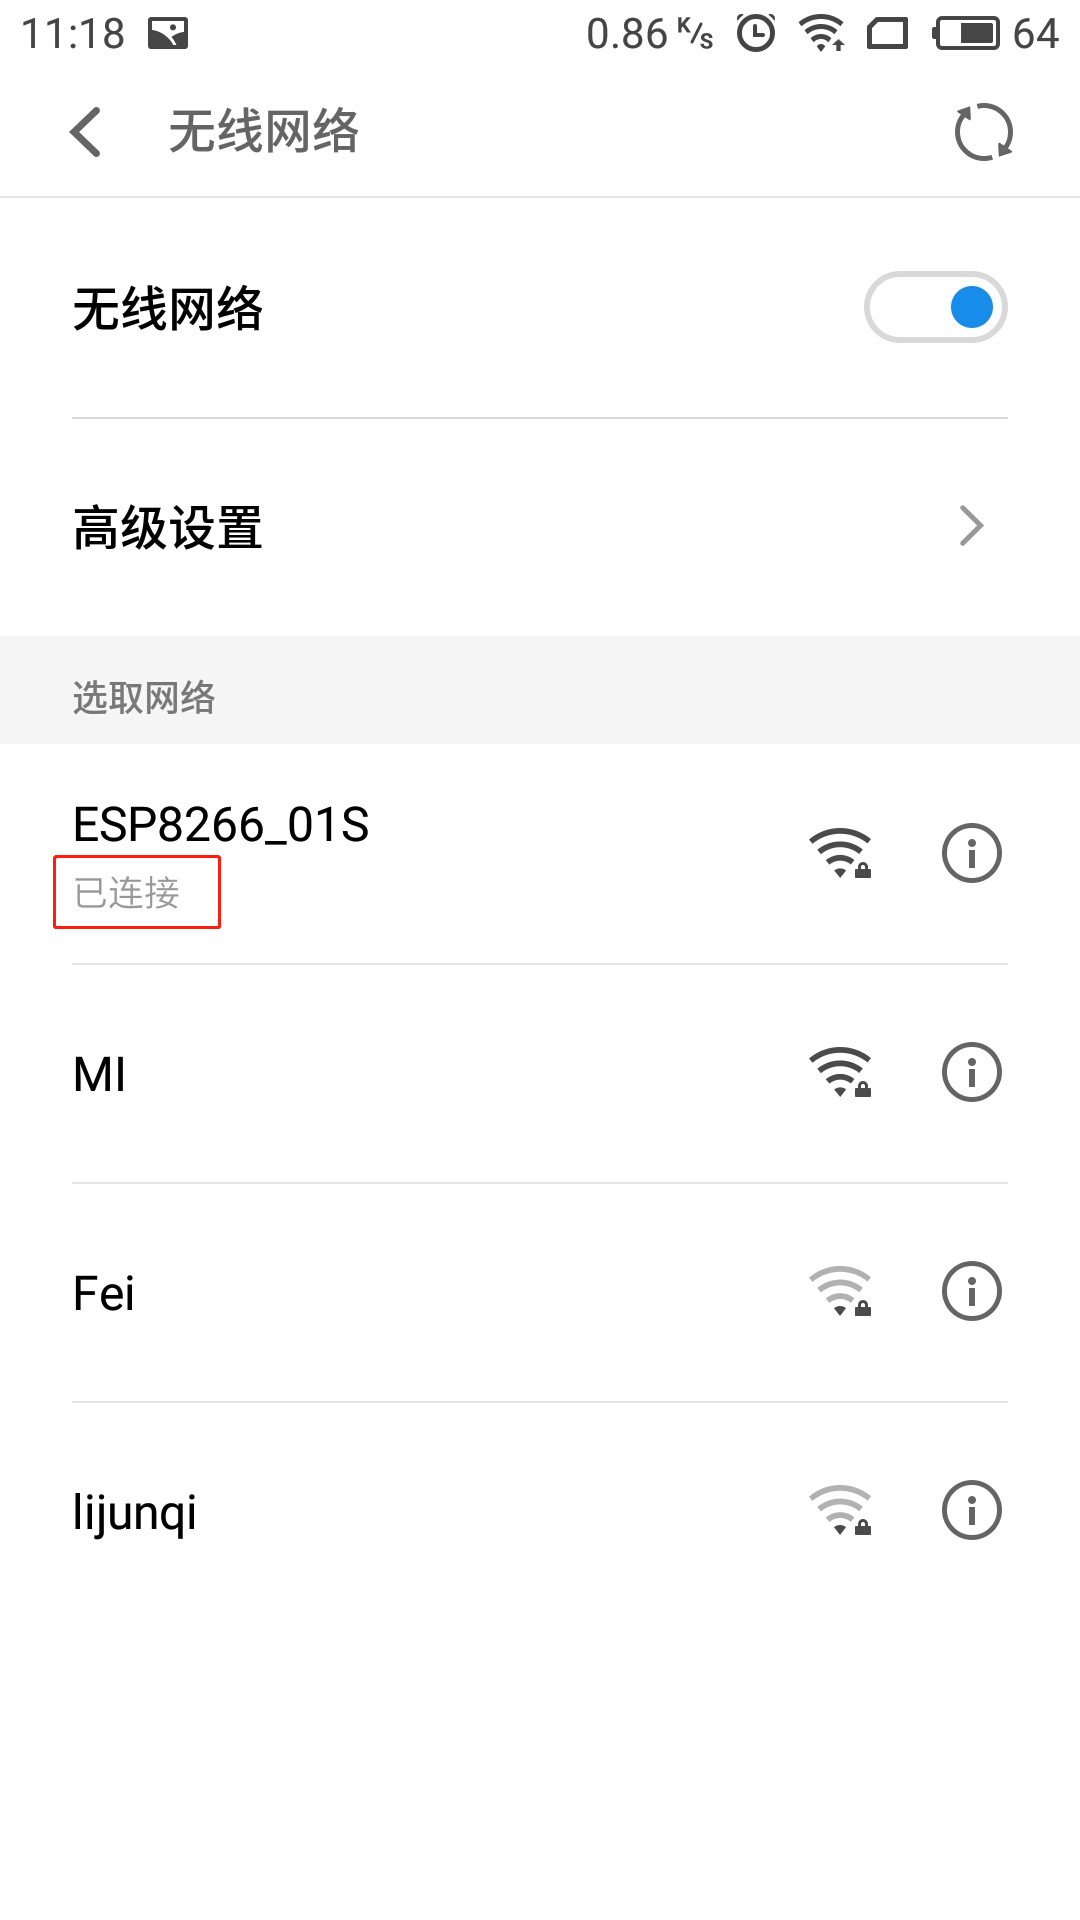
<3>、点击连接后,若连接成功,弹出以下界面。
<4>、查看连接ESP8266 WiFi模块(ESP8266-01S芯片)WiF成功后WiFi相关信息,如以下界面。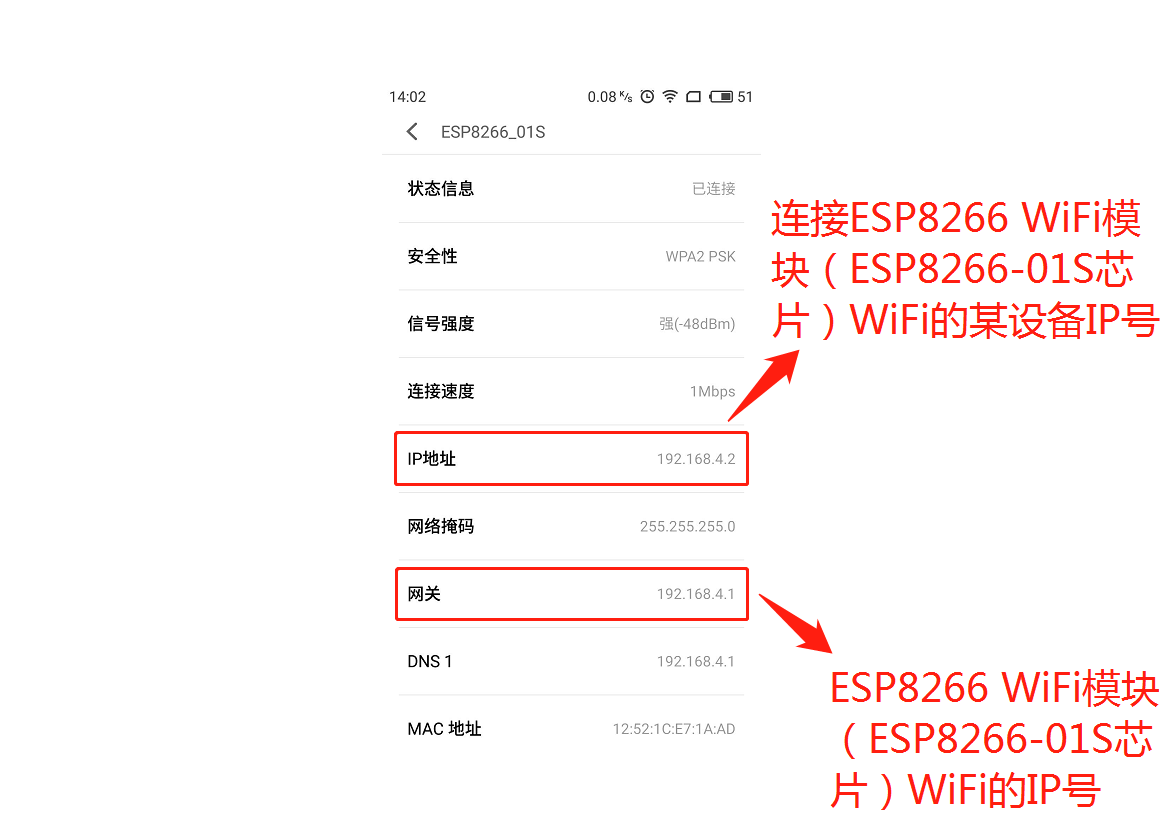
<5>、点开所生成连接ESP8266 WiFi模块(ESP8266-01S芯片)WiFi的Android客户端APP“ESP8266AndroidClient”,弹出以下界面。
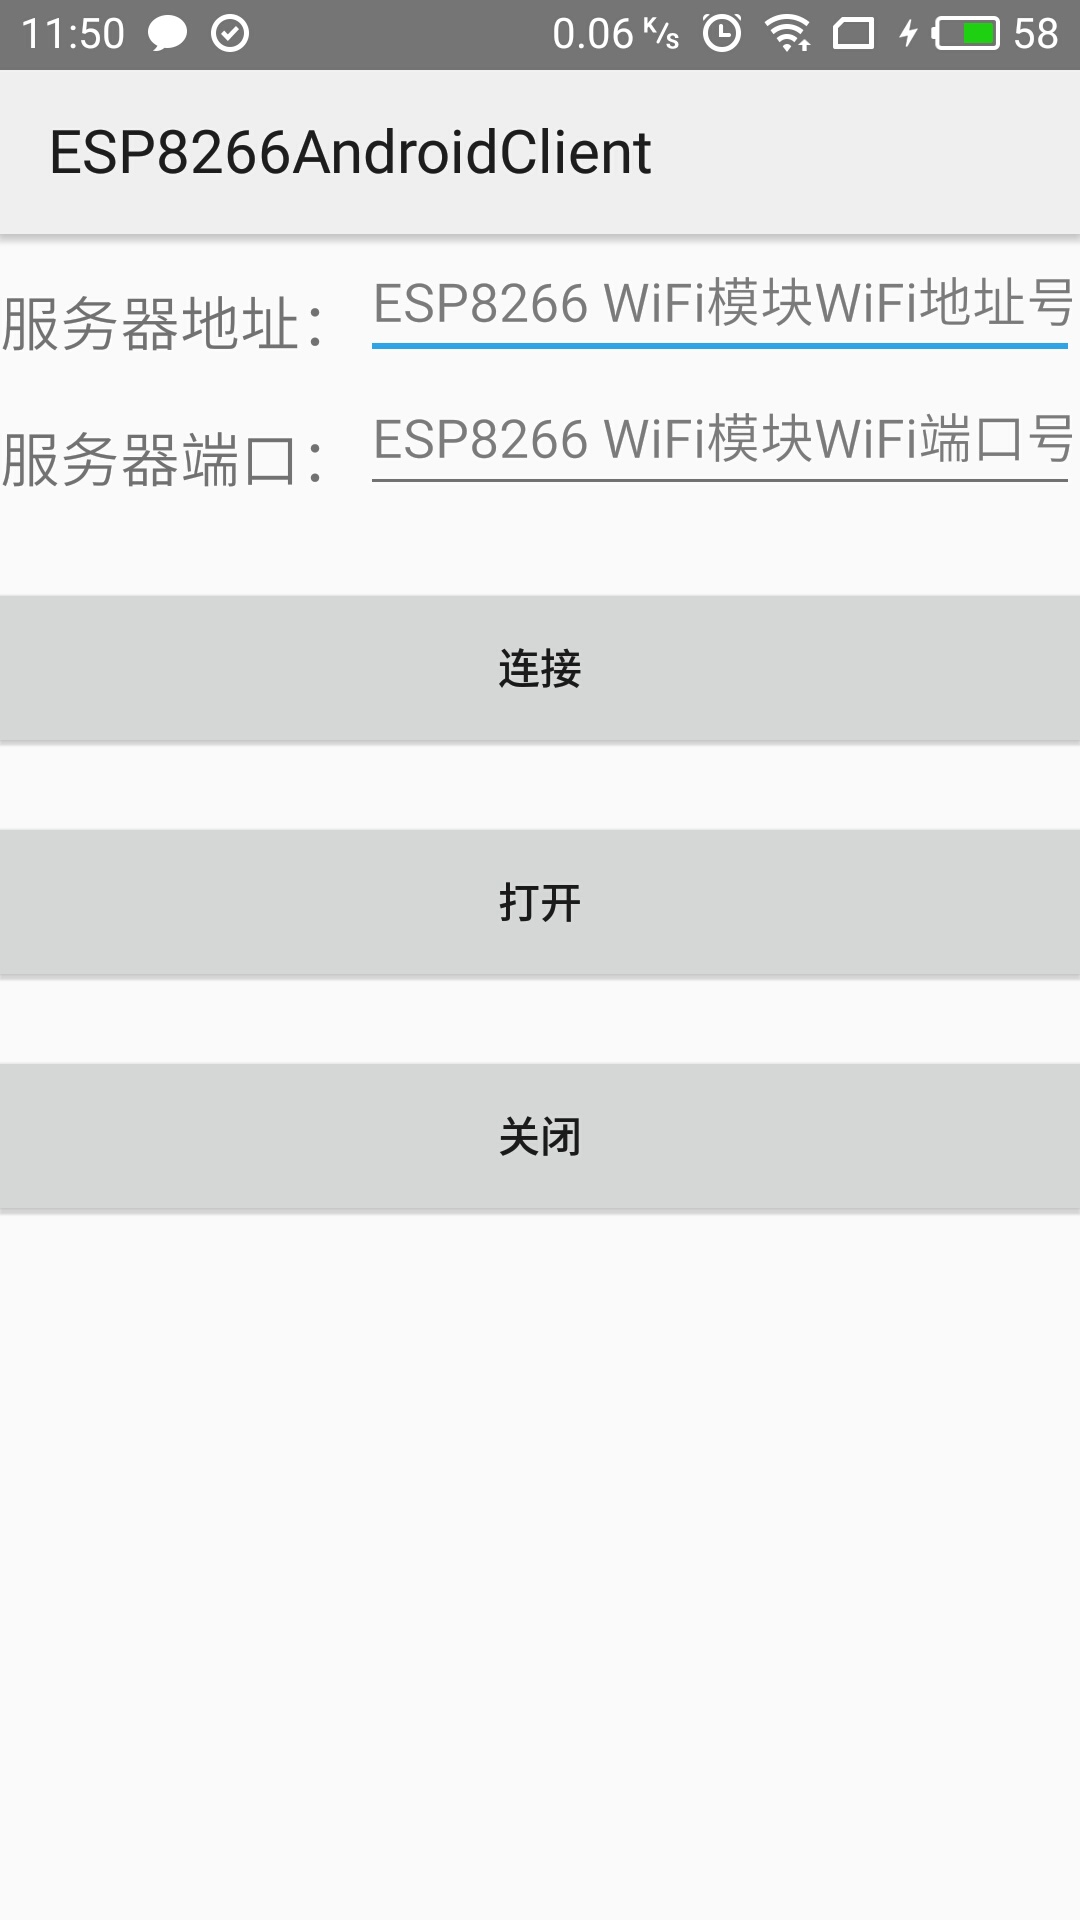
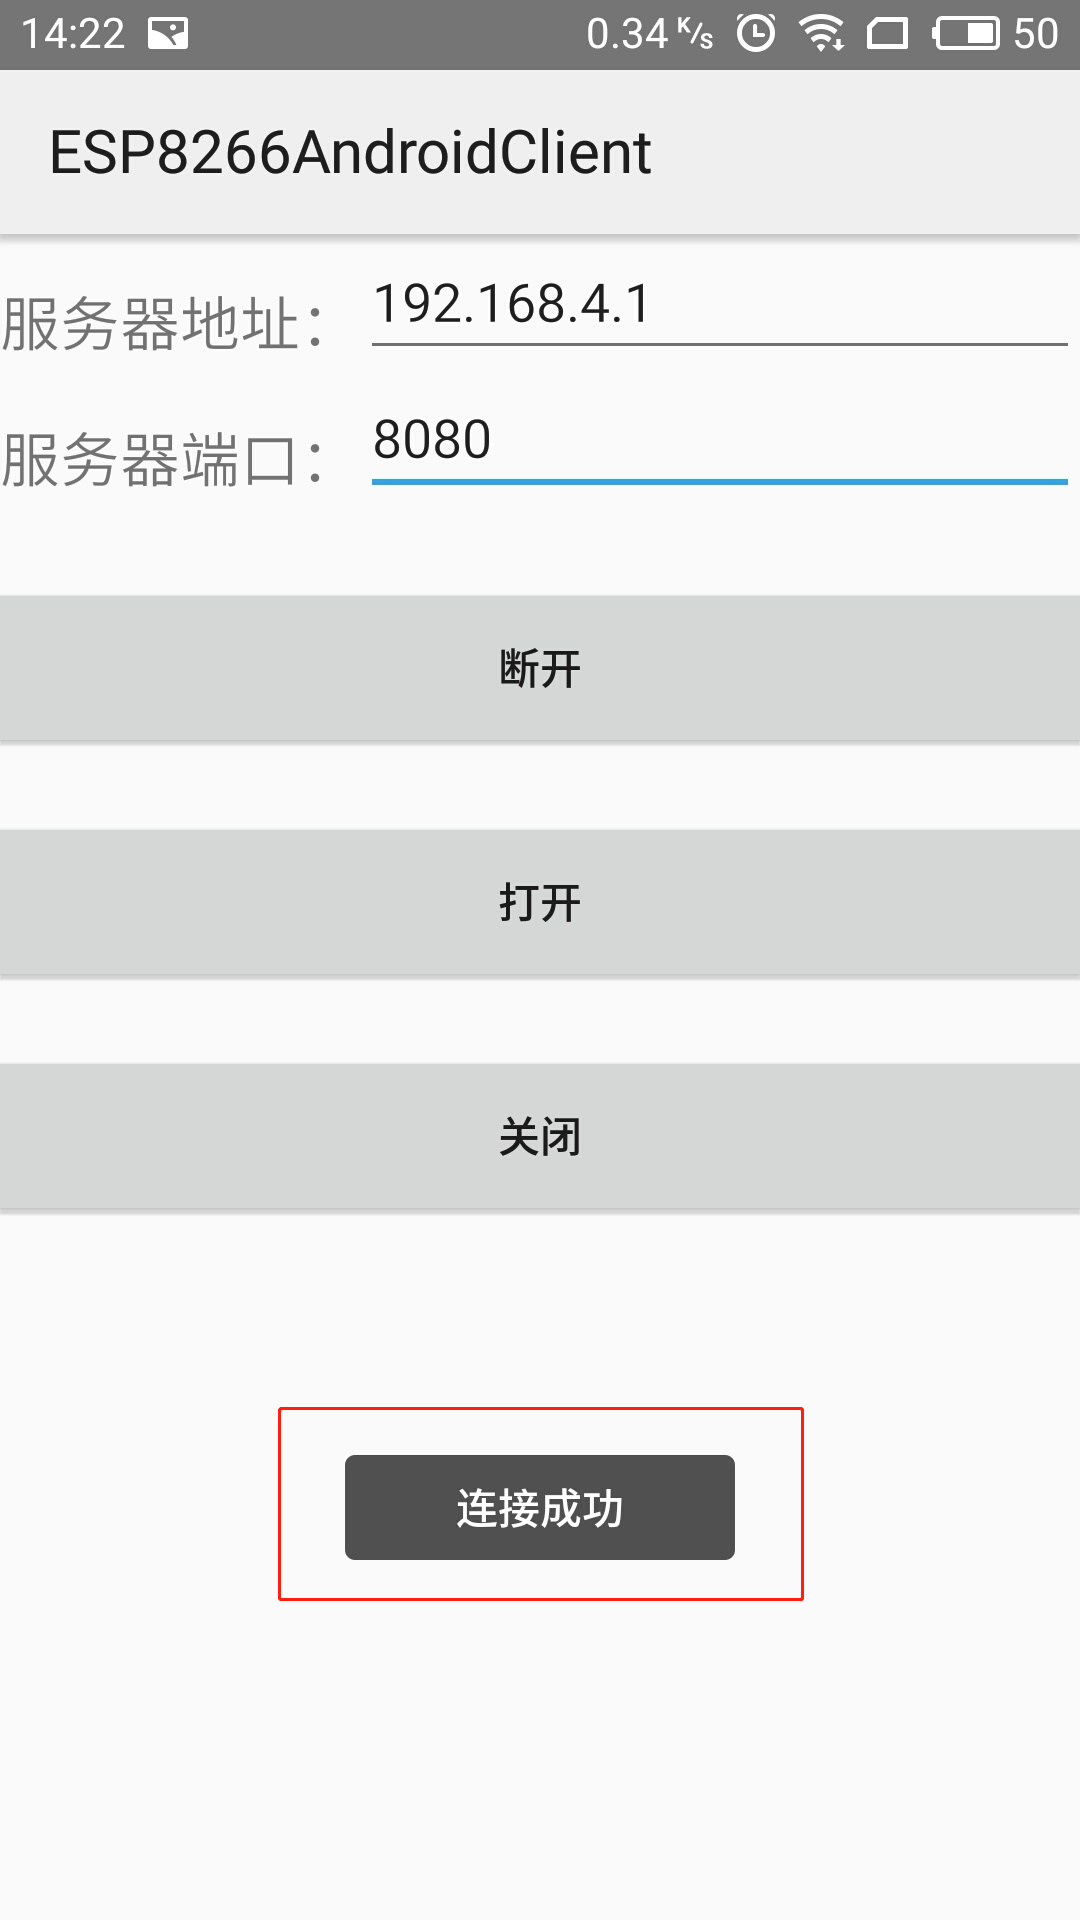
<6>、在连接ESP8266 WiFi模块(ESP8266-01S芯片)WiFi的Android客户端APP“ESP8266AndroidClient”界面,输入ESP8266 WiFi模块(ESP8266-01S芯片)WiFi的地址号(即IP号)以及ESP8266 WiFi模块(ESP8266-01S芯片)WiFi的端口号,再点击连接,操作如下所示。

<7>、在连接ESP8266 WiFi模块(ESP8266-01S芯片)WiFi的Android客户端APP“ESP8266AndroidClient”界面,点击连接后,若连接成功,弹出以下界面。
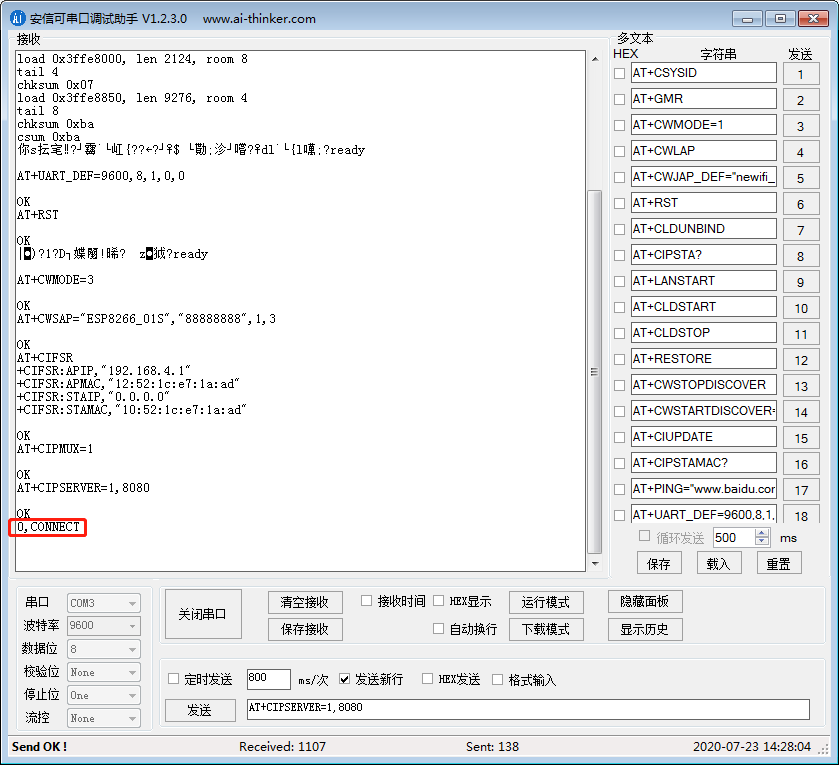
4、结合使用PC端串口调试助手软件对ESP8266 WiFi模块(ESP8266-01S芯片)发送激活ESP8266 WiFi模块(ESP8266-01S芯片)WiFi功能AT指令调试情况编写单片机C语言程序
#include <reg52.h>
#include <string.h>
#include <stdio.h>
sbit led=P2^0;//位定义P2^0为LED灯端口
//sbit send=P3^2;//位定义P3^2为发送端口
char Recive_table[20]="";//接收数据数组变量
char reciveflag = 0;//接收标志位变量
  void UART_Init(void)//单片机串口初始化函数
{
   TMOD=0x20;//0010 0000定时器工作方式为方式2,8位自动重装。
   TH1=0xfd;//初始化计数器高8位:1111 1101
   TL1=0xfd;//初始化计数器低8位
   TR1=1;//启动定时器1
   SM0=0;//设定串口工作方式为方式1(10位异步通信)
   SM1=1;//设定串口工作方式
   REN=1;//打开串口中断接收允许
   EA=1;//打开全局中断
   ES=1;//打开串口中断允许位
  }
  void UART_Interrupt() interrupt 4//单片机串口中断函数
{
//   static char i=0;
//   if(RI==1)//判断串口接收中断标志位是否为1,若串口接收中断标志位为1,表示单片机接收数据缓存寄存器接收数据结束。
// {
//    ES = 0;//关闭串口中断允许位,阻止进入串口中断服务程序。为什么要设置ES=0?由于单片机接收数据缓存寄存器接收ESP8266 WiFi模块从某设备获取的数据结束后,RI(即串口接收中断标志位)=1,申请串口中断,若ES不设置为0,在RI(即串口接收中断标志位)=1时,申请串口中断进入串口中断服务程序,形成固定循环,导致无法运行其他程序。
//    RI=0;//表示单片机接收数据缓存寄存器可重新接收数据,不可申请串口中断。
//    Recive_table[i]=SBUF;//单片机接收缓存器接收ESP8266 WiFi模块从某设备获取的数据赋给数组变量Recive_table[]
//    i++;
//    if((Recive_table[i-1] == '\n'))//判断单片机接收缓存器接收ESP8266 WiFi模块从某设备获取的数据是否有换行。
//  {
//     Recive_table[i]='\0';//单片机接收缓存器接收ESP8266 WiFi模块从某设备获取的数据在i这个位置结束。
//     i=0;
//     reciveflag = 1;//接收标志位变量置1
//    }
//    ES = 1;//打开串口中断允许位,允许进入串口中断服务程序。
//  }
//   else
//   TI = 0;//TI(即串口发送中断标志位)=0,表示单片机发送数据缓存寄存器可重新给PC端串口调试助手发送数据,不可申请串口中断。
 }
  void Delay(int t)//延时函数
{
   int i,j;
   for(i=t;i>0;i--)
    for(j=110;j>0;j--);
  }
  void LED(void)//LED灯指示函数,用来提示单片机是在给ESP8266 WiFi模块发送激活WiFi功能的AT指令。
{
   P2 = 0;
   Delay(100);
   P2 = 0xff;
   Delay(100);
  }
  void WiFi_Init(void)//ESP8266 WiFi模块发射WiFi初始化函数,相当于在PC端串口调试助手软件界面输入激活ESP8266 WiFi模块发射WiFi的AT指令这一过程。
{
   ES = 0;//关闭串口中断允许位,阻止进入串口中断服务程序。为什么要设置ES=0?由于单片机发送数据缓存寄存器给PC端串口调试助手发送数据结束后,TI(即串口发送中断标志位)=1,若ES不设置为0,在TI(即串口发送中断标志位)=1时,申请串口中断进入串口中断服务程序执行串口中断服务程序。
   TI = 1;//TI(即串口发送中断标志位)=0,表示单片机发送数据缓存寄存器可给PC端串口调试助手发送数据结束,申请串口中断。
   printf("AT+RST\r\n");//复位ESP8266 WiFi模块(ESP8266-01S芯片)
   LED();
   Delay(1000) ;
   printf("AT+CWMODE=3\r\n");//为ESP8266 WiFi模块(ESP8266-01S芯片)设置工作模式,指令AT+CWMODE=<mode>,其中<mode>:1:Station模式(充当客户端,用来连接其他无线网络热点。),2:AP模式(充当服务器,用来发射无线网络热点,供其他设备连接。),3:Station模式+AP模式混合模式(即可充当服务器又可充当客户端,可用来发射无线网络热点,供其他设备连接,也可用来连接其他无线网络热点。)
   LED();
   Delay(1000);
   printf("AT+CWSAP=\"ESP8266_01S\",\"88888888\",1,3\r\n");//为ESP8266 WiFi模块(ESP8266-01S芯片)设置WiFi名和WiFi密码,指令AT+CWSAP=<ssid>,<pwd>,<chl>,<ecn> ,其中<ssid>为"无线网络热点名称",<pwd>为"无线网络热点密码",至少有8位数密码,<chl>为通道号,<ecn>为加密方式(加密方式:0-OPEN,1-WEP,2-WPA_PSK,3-WPA2_PSK,4-WPA_WPA2_PSK)。
   LED();
   Delay(1000) ;
   printf("AT+CIFSR\r\n"); //查询ESP8266 WiFi模块(ESP8266-01S芯片)IP
   LED();
   Delay(1000) ;
//   printf("AT+CWLIF\r\n");//查看接入ESP8266 WiFi模块(ESP8266-01S芯片)WiFi热点的某设备IP
//   LED();
//   Delay(1000) ;
   printf("AT+CIPMUX=1\r\n");//为ESP8266 WiFi模块(ESP8266-01S芯片)开启多连接模式,指令AT+CIPMUX=1,0:单路连接,1:多路连接。
   LED();
   Delay(1000) ;
   printf("AT+CIPSERVER=1,8080\r\n");//为ESP8266 WiFi模块(ESP8266-01S芯片)开启服务器模式,指令AT+CIPSERVER=1(0:关闭服务器模式,1:开启服务器模式),8080(端口号,缺省值为333)。注意:当AT+CIPMUX=1时才能开启服务器,关闭服务器模式需要重启。开启服务器后自动建立服务器监听,当有客户端接入会自动按顺序占用一个连接。
   LED();
   Delay(1000) ;
//   printf("AT+UART_DEF=9600,8,1,0,0\r\n");//修改ESP8266 WiFi模块波特率为9600
//   LED();
//   Delay(1000);
//   printf("AT+CIPSTATUS\r\n"); //查询ESP8266 WiFi模块当前连接情况,指令AT+CIPSTATUS;响应:+ CIPSTATUS:<id>,<type>,<addr>,<port>,<tetype>,其中<id>为连接的id号,有0-4,<type>为字符串参数,类型TCP或UDP,<addr>为字符串参数,IP地址,<port>为端口号,<tetype>: 0-本模块作客户端连接,1-本模块作服务器连接。
//   LED();
//   Delay(1000) ;
   while(!TI);//判断串口发送中断标志位是否为1,若为1则单片机发送数据缓存寄存器给PC端串口调试助手发送数据结束。为什么在此编写while(!TI)?由于需要把单片机发送数据缓存寄存器保存的数据发送给PC端串口调试助手。
   TI = 0;//TI(即串口发送中断标志位)=0,表示单片机发送数据缓存寄存器可重新给PC端串口调试助手发送数据,不可申请串口中断。
   ES = 1;//打开串口中断允许位,允许进入串口中断服务程序。
  }
  int main (void)
{
   UART_Init();//串口初始化,波特率为9600
   Delay(1000) ;
   WiFi_Init(); //wifi初始化
   led=0;
   while(1)
 {
    Delay(10) ;
   if(reciveflag == 1)//判断接收标志位变量是否为1,接收标志位变量为1时,单片机通过串口通信接收ESP8266 WiFi模块从某终端获取的数据。
 {
    ES=0;//关闭串口中断允许位,阻止进入串口中断服务程序。为什么要设置ES=0?由于单片机接收数据缓存寄存器接收ESP8266 WiFi模块从某终端获取的数据后,RI(即串口接收中断标志位)=1,申请串口中断,若ES不设置为0,在RI(即串口接收中断标志位)=1时,申请串口中断进入串口中断服务程序执行reciveflag=1,又得回来再次判断if(reciveflag==1),形成固定循环,导致无法运行其他程序。
    if((Recive_table[0]=='+')&&(Recive_table[1]=='I')&&(Recive_table[2]=='P'))//判断单片机接收数据缓存寄存器接收ESP8266 WiFi模块从某终端获取的数据赋给数组变量Recive_table[]中第1、第2、第3、第4、第7的数据是否为:+IPD,x,x:y
  {
     if((Recive_table[3]=='D')&&(Recive_table[6]==','))
   {
      if(Recive_table[9]=='0')//判断单片机接收数据缓存寄存器接收ESP8266 WiFi模块从某终端获取的数据赋给数组变量Recive_table[]中第10的数据是否为0
      led = 0;//点亮LED灯
      if(Recive_table[9]=='1')//判断单片机接收数据缓存寄存器接收ESP8266 WiFi模块从某终端获取的数据赋给数组变量Recive_table[]中第10的数据是否为1
      led = 1;//熄灭LED灯
     }
    }
    memset(Recive_table,'\0',20);//将数组Recive_table[]中的数据全部置空
    reciveflag = 0;//接收标志位变量置0
    ES=1;//打开串口中断允许位,允许进入串口中断服务程序。
   }
  /*if(0 == send)//通过串口给手机发送字符串hello
 {
     Delay(400);
     if(0 == send)
  {
      ES = 0;
      TI = 1;
      printf("AT+CIPSEND=?\r\n");
      LED();
      Delay(1000) ;
      printf("AT+CIPSEND=0,10\r\n");
      LED();
      Delay(1000) ;
      printf("hello\r\n");
      LED();
      Delay(1000) ;
      LED();
      Delay(1000) ;
      LED();
      Delay(1000) ;
      while(!TI);
      TI = 0;
      ES = 1;
     }
     while(0 == send);
   } */
  }
 }
5、给STC系列单片机烧写单片机C语言程序
(1)、给STC系列单片机烧写单片机C语言程序的接线图
(2)、STC系列单片机烧写单片机C语言程序成功表示图
6、将编写好连接ESP8266 WiFi模块(ESP8266-01S芯片)WiFi的Android客户端APP通过PC端串口调试助手软件借助USB-TTL串口对ESP8266 WiFi模块(ESP8266-01S芯片)及STC系列单片机进行通讯调试
(1)、USB-TTL串口、ESP8266 WiFi模块(ESP8266-01S芯片)及STC系列单片机通讯接线图


(2)、使用连接ESP8266 WiFi模块(ESP8266-01S芯片)WiFi的Android客户端APP通过PC端串口调试助手软件借助USB-TTL串口对ESP8266 WiFi模块(ESP8266-01S芯片)及STC系列单片机进行通讯调试
(3)、
7、
8、
9、
10、


