【项目学习】谷粒商城学习记录2
【项目学习】谷粒商城学习记录2
1、商品服务-API-三级分类
1.查询-递归树形结构数据获取
2.配置网关路由 & 路径重写
3.网关统一配置跨域
4. 树形展示三级分类数据
- 首先在gulimall-gateway下的application.yml中添加新的路由,转发所有商品服务的api调用:将统一的前端api调用
http://localhost:88/api/product/category/list/tree-> 转到gulimall-product模块下去处理http://localhost:10000/product/category/list/tree- id: product_route uri: lb://gulimall-product predicates: - Path=/api/product/** filters: - RewritePath=/api/(?<segment>.*),/$\{segment} - 由于需要转到商品模块,所以要将商品模块在注册中心进行注册,下面进行nacos配置中心配置:
- nacos中添加新的命名空间:product, 商品服务配置
- gulimall-product下添加
bootstrap.properties文件,写nacos配置中心相关配置信息:(如果需要配置抽取,可以在nacos的配置列表中选择product命名空间,添加配置信息)# 配置发现名 spring.application.name=gulimall-product # 配置中心地址 spring.cloud.nacos.config.server-addr=nacos的ip地址:8848 # 选择命名空间: product spring.cloud.nacos.config.namespace=product命名空间ID
- nacos注册中心配置:
- 在
application.yml文件中添加:spring.application.name=gulimall-product spring.cloud.nacos.config.server-addr=ip地址:8848 - 在
GulimallProductApplication中添加注册发下注解@EnableDiscoveryClient。
- 在
- 这样网关就能发现gulimall-product服务在哪里,并负载均衡路由到这里
- 【问题】: 这时admin_route路由由于过滤范围是
/api/**并在product_route路由前面,所以被admin_route路由提前生效。通过将精确路由放在高优先级,模糊路由放在低优先级来解决。 - 通过修改
category.vue前端代码实现三级数据显示
5. 删除-页面效果
- 前端知识,使用element ui 树形结构删除实现
6. 新增效果
- 使用element ui中的对话框Dialog, 获得数据然后通过post请求调用后端/save请求。
7. 拖拽效果
- 开启很容易,添加一个属性。主要实现了对拖拽禁用规则的实现:
:allow-drop="allowDrop"。 - 第二步要拖拽成功后修改数据库中的层级,排序信息。
- 首先要监听拖拽成功事件(node-drop事件):具体使用:
@node-drop="handleDrop"绑定事件处理方法 - 具体看视频吧,就是一些前端知识和取数据排序之类的。
- 把需要修改的节点信息发给后端进行更新,写一个根据id批量修改的请求
/update/sort - 注意:刷新和清空等操作都要放在成功的then()方法里 不然可能会有混乱
- 首先要监听拖拽成功事件(node-drop事件):具体使用:
- 实现批量修改,批量删除,体会前后端的http post请求。
2、商品服务-API-品牌管理
-
直接使用逆向生成的代码实现增删改查
-
使用开关来控制是否显示,一旦改变开关状态就更新数据库信息,就是调用/update请求
-
oss对象存储:
- 1、通过maven安装SDK依赖:(放在gulimall-product的pom.xml中)
<dependency> <groupId>com.aliyun.oss</groupId> <artifactId>aliyun-sdk-oss</artifactId> <version>3.15.1</version> </dependency> - 2、创建bucket, 开通好权限,获得AccessKey信息。
- 3、通过下面测试代码测试oss上传:
@Test public void testUpload() throws FileNotFoundException { // Endpoint以华北1(北京)为例,其它Region请按实际情况填写。 String endpoint = "https://oss-cn-beijing.aliyuncs.com"; // 阿里云账号AccessKey拥有所有API的访问权限,风险很高。强烈建议您创建并使用RAM用户进行API访问或日常运维,请登录RAM控制台创建RAM用户。 String accessKeyId = "<自己的accessKeyId >"; String accessKeySecret = "<自己的accessKeySecret >"; // 填写Bucket名称,例如examplebucket。 String bucketName = "自己的bucket名称"; // 填写Object完整路径,完整路径中不能包含Bucket名称,例如exampledir/exampleobject.txt。 String objectName = "a.png"; // 填写本地文件的完整路径, // 如果未指定本地路径,则默认从示例程序所属项目对应本地路径中上传文件流。 String filePath= "要上传的文件地址"; // 创建OSSClient实例。 OSS ossClient = new OSSClientBuilder().build(endpoint, accessKeyId, accessKeySecret); InputStream inputStream = new FileInputStream(filePath); // 创建PutObject请求。 ossClient.putObject(bucketName, objectName, inputStream); ossClient.shutdown(); System.out.println("上传成功...."); } - 更快的方式是直接使用Alibaba封装好的工具:Aliyun Spring Boot OSS Simple
- 添加依赖时遇到一点问题:找不到start那个依赖, or运行后测试报错解决:解决方法博客
- 在application.yml中添加相关配置
spring: cloud: alicloud: access-key: xxx secret-key: xxx oss: endpoint: xxx - 修改测试代码,测试成功(相当于通过配置和注入替代了声明OSSClient对象的过程,当需要使用时直接用就行)
- 1、通过maven安装SDK依赖:(放在gulimall-product的pom.xml中)
-
创建新模块(第三方服务)—gulimall-third-party
- 创建模块,pom.xml最好和老师一样,将oss依赖从common转移到第三方服务模块,第三方服务也要引用common依赖。
- 新建bootstrap.properties文件,添加相关配置信息(要在nacos新建一个配置项,管理oss相关配置)。
# 配置发现名 spring.application.name=gulimall-third-party # 配置中心地址 spring.cloud.nacos.config.server-addr=ip地址:8848 # 选择命名空间: product spring.cloud.nacos.config.namespace=xxx #nacos配置 spring.cloud.nacos.config.ext-config[0].data-id=oss.yml spring.cloud.nacos.config.ext-config[0].group=DEFAULT_GROUP spring.cloud.nacos.config.ext-config[0].refresh=true - 添加服务发现注解,启动模块,使用之前的oss测试代码放在新模块中进行测试。
-
实现获取服务端签名:
- 参考博客 实现controller/OssController.java中的policy方法:
package com.atguigu.com.thirdparty.controller; import com.aliyun.oss.OSS; import com.aliyun.oss.common.utils.BinaryUtil; import com.aliyun.oss.model.MatchMode; import com.aliyun.oss.model.PolicyConditions; import org.springframework.beans.factory.annotation.Autowired; import org.springframework.beans.factory.annotation.Value; import org.springframework.web.bind.annotation.RequestMapping; import org.springframework.web.bind.annotation.RestController; import java.text.SimpleDateFormat; import java.util.Date; import java.util.LinkedHashMap; import java.util.Map; @RestController public class OssController { @Autowired OSS ossClient; @Value("${spring.cloud.alicloud.oss.endpoint}") private String endpoint; @Value("${spring.cloud.alicloud.oss.bucket}") String bucket ; @Value("${spring.cloud.alicloud.access-key}") String accessId ; @Value("${spring.cloud.alicloud.secret-key}") String accessKey ; @RequestMapping("/oss/policy") public Map<String, String> policy(){ String host = "https://" + bucket + "." + endpoint; // host的格式为 bucketname.endpoint String format = new SimpleDateFormat("yyyy-MM-dd").format(new Date()); String dir = format; // 用户上传文件时指定的前缀。 Map<String, String> respMap=null; try { long expireTime = 30; long expireEndTime = System.currentTimeMillis() + expireTime * 1000; Date expiration = new Date(expireEndTime); PolicyConditions policyConds = new PolicyConditions(); policyConds.addConditionItem(PolicyConditions.COND_CONTENT_LENGTH_RANGE, 0, 1048576000); policyConds.addConditionItem(MatchMode.StartWith, PolicyConditions.COND_KEY, dir); String postPolicy = ossClient.generatePostPolicy(expiration, policyConds); byte[] binaryData = postPolicy.getBytes("utf-8"); String encodedPolicy = BinaryUtil.toBase64String(binaryData); String postSignature = ossClient.calculatePostSignature(postPolicy); respMap= new LinkedHashMap<String, String>(); respMap.put("accessid", accessId); respMap.put("policy", encodedPolicy); respMap.put("signature", postSignature); respMap.put("dir", dir); respMap.put("host", host); respMap.put("expire", String.valueOf(expireEndTime / 1000)); } catch (Exception e) { // Assert.fail(e.getMessage()); System.out.println(e.getMessage()); } finally { ossClient.shutdown(); } return respMap; } } - 添加网关路由(注意不要添加到最后那个api/**路由后面)
- id: third_party_route
  uri: lb://gulimall-third-party
  predicates:
    - Path=/api/thirdparty/**
  filters:
    - RewritePath=/api/thirdparty/(?<segment>.*),/$\{segment}
- 参考博客 实现controller/OssController.java中的policy方法:
-
接着进行前端联调
- 把资料里的upload文件夹放在前端/src/components目录下,在brand-add-or-update.vue中修改品牌logo地址提交方式,使用提交组件。
- 修改跨域设置
- 修改新增功能,将显示状态开关布尔值转为数字值。
- 修改表格,将链接显示为图片,注意image组件的注入
- 完善新增表单的前台检验功能,箭头函数实现自定义校验器。(限制首字母不能为空,必须在a-zA-Z之间这些规则)
-
JSR303
- 完善后台校验,给实体类对应属性上添加校验规则注解,(如@NotNull表示非空,@size限制大小等),并在方法参数前加上
@Valid注解表示这个字段是需要进行校验的。当校验出错时会有响应提示,这个提示可以通过@Valid(message="xxx")修改。 - 给校验bean后紧跟一个BindingResult,就可以获得校验结果。自定义规则可以通过
@Pattern(regexp="xx")传入正则表达式
- 完善后台校验,给实体类对应属性上添加校验规则注解,(如@NotNull表示非空,@size限制大小等),并在方法参数前加上
-
统一异常处理
- 使用注解
@ControllerAdvice @ControllerAdvice(basePackages = "com.atguigu.gulimall.product.controller")- 步骤1:在product模块下新建一个
exception包,新建一个GulimallExceptionControllerAdvice.java文件,并标注一个注解@ControllerAdvice, 它的作用是统一处理异常,通过@ControllerAdvice(basePackages = "com.atguigu.gulimall.product.controller")指明处理哪个包下的异常。 - 实现方法handleVaildException()来处理异常,为其添加注解
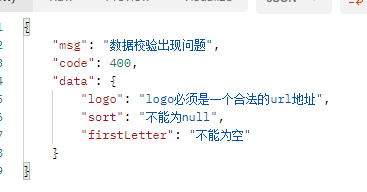
@ExceptionHandler(value=Exception.class), 这个注解告诉springMVC我们实现的这个方法能处理哪些异常,用value来指定。 - 测试代码1:
下面是发送测试请求:/** * 集中处理所有异常 */ @Slf4j //@ResponseBody //@ControllerAdvice(basePackages = "com.atguigu.gulimall.product.controller") //下面注解能同时实现上面两个注解 @RestControllerAdvice(basePackages = "com.atguigu.gulimall.product.controller") public class GulimallExceptionControllerAdvice { //这个注解告诉springMVC我们实现的这个方法能处理哪些异常,用value来指定 @ExceptionHandler(value= MethodArgumentNotValidException.class) public R handleVaildException(MethodArgumentNotValidException e) { log.error("数据校验出现问题:{},异常类型:{}",e.getMessage(), e.getClass()); BindingResult bindingResult = e.getBindingResult(); Map<String, String> errorMap = new HashMap<>(); bindingResult.getFieldErrors().forEach((fieldError)->{ errorMap.put(fieldError.getField(), fieldError.getDefaultMessage()); }); return R.error(400, "数据校验出现问题").put("data", errorMap); } }http://localhost:88/api/product/brand/save, 且数据为{"name": "aab", "logo": "avc"}的测试结果:
- 使用注解
-
统一封装错误状态码
- 目的就是可以统一管理异常码,需要使用时通过调用get方法返回
- 在common模块下新建
exception包,并新建BizCodeEmume.enum枚举文件:
原代码中的返回就改写成如下:public enum BizCodeEnume { UNKNOW_EXCEPTION(10000, "系统未知异常"), VAILD_EXVEPTION(10001, "参数格式校验失败"); private int code; private String msg; BizCodeEnume(int code, String msg) { this.code = code; this.msg = msg; } public int getCode() { return code; } public String getMsg() { return msg; } }//修改后 return R.error(BizCodeEnume.VAILD_EXVEPTION.getCode(), BizCodeEnume.VAILD_EXVEPTION.getMsg()).put("data", errorMap);
-
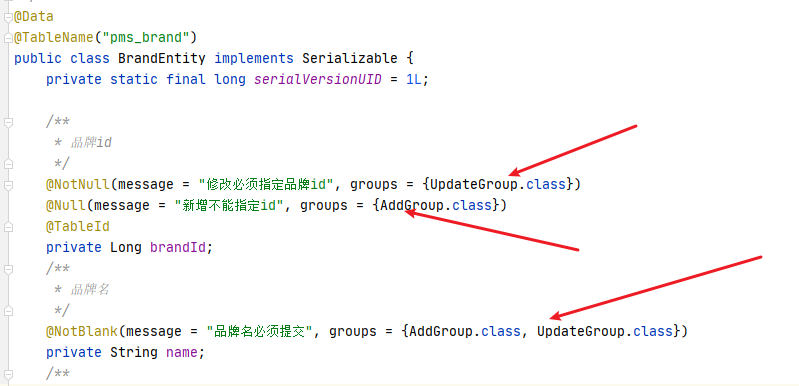
JSR303分组校验
- 分组校验的目的就是区分比如新增和修改对id的规则不同。
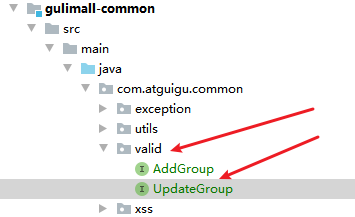
- 1、使用分组校验,首先给校验注解上写上
groups属性。由于groups属性要指定接口,所以在common模块添加valid包,下面存各类校验相关接口。
- 2、使用spring框架提供的
@Validated注解替代写在Controller层的@Valid注解,因为后者无法提供对分组的区分。
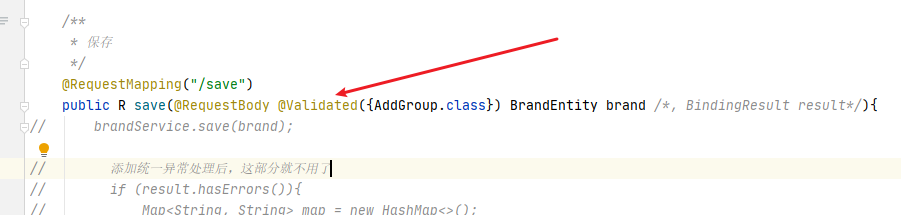
- 进行测试,发现没有标注分组的注解默认是不生效的,只会在@Validated不指定任何分组时生效
-
自定义校验
-
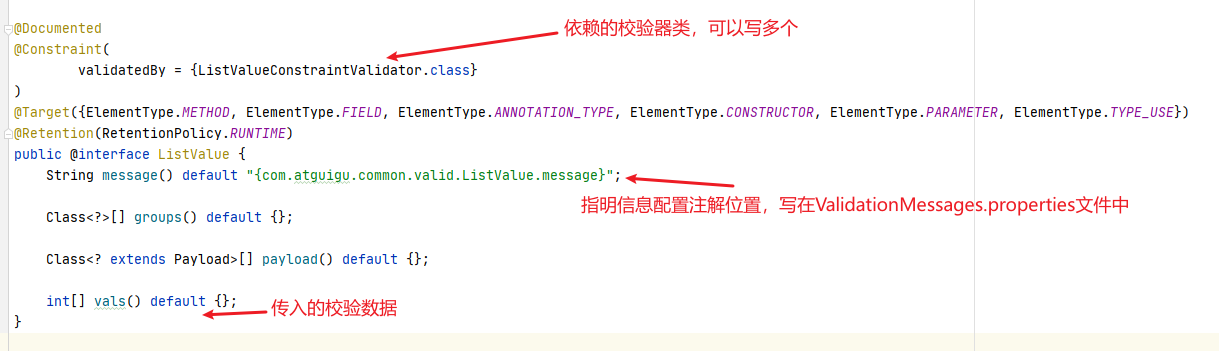
1、自己编写一个自定义校验注解
在common模块的valid校验包下新建ListValue.java文件,它是Annotation类型:
-
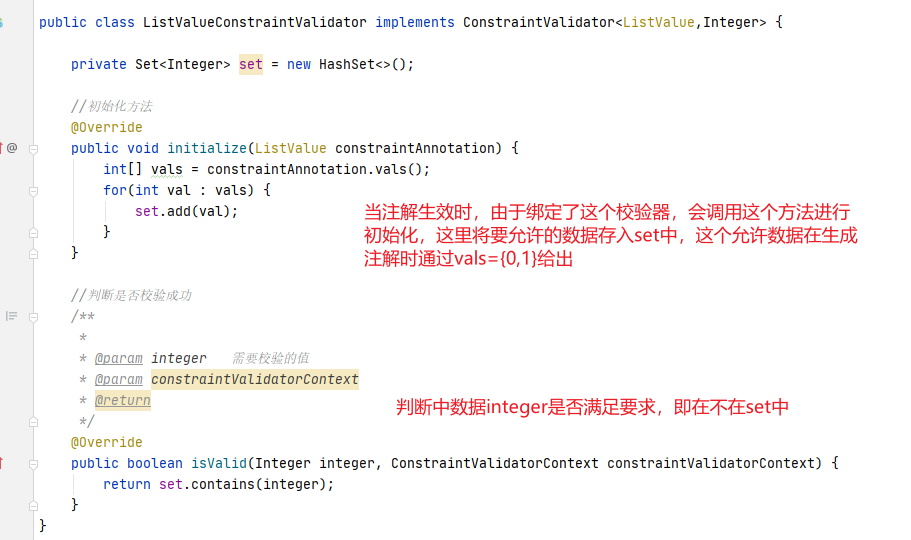
2、自己编写一个自定义的校验器
在common模块的valid包下实现ListValueConstraintValidator.java文件,实现校验器功能。当然上面注解能绑定多个校验器。这里是校验Integet类型,如果后面改成double类型,只需要新建针对double类型的校验器文件,然后注解绑定这个新的校验器即可。
-
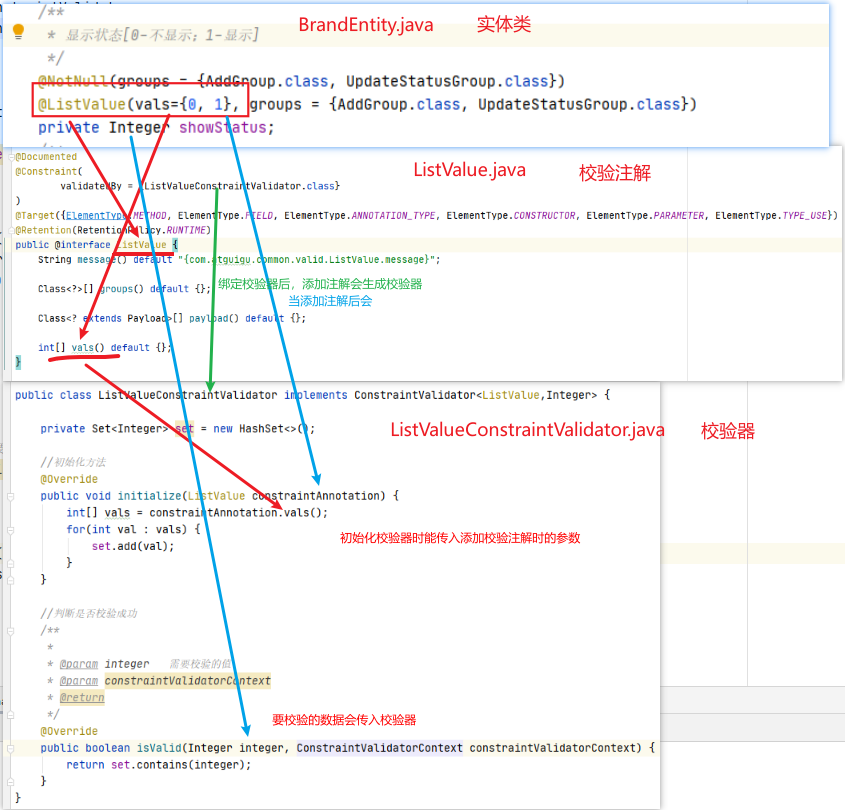
3、关联自定义校验注解和自定义的校验器:
-
3、商品服务-API-属性分组
-
初始准备
-
属性分组
- 抽取左侧菜单,放在common/categroy.vue,成为公共组件。添加逆向生成的attrgroup-add-or-update.vue文件。在modules/product/下创建attrgroup.vue。attrgroup引用组件:categroy,attrgroup-add-or-update。
- 父子组件传递数据
- 子组件->父组件:通过事件机制:
- 子组件绑定响应方法:
@node-click="nodeclick" - 子组件向父组件发送事件:
this.$emit("tree-node-click", data, node, component), 参数为时间名,数据等 - 父组件实现对事件的处理方法:
<Categroy @tree-node-click="treenodeclick"></Categroy>子组件可以给父组件散发事件
- 子组件绑定响应方法:
- 子组件->父组件:通过事件机制:
- 获取分类属性分组接口实现(后端)
- 在AttrGroupController.java文件中修改list方法:
@RequestMapping("/list/{catelogId}") public R list(@RequestParam Map<String, Object> params,@PathVariable("catelogId") Long catelogId){ PageUtils page = attrGroupService.queryPage(params, catelogId); return R.ok().put("page", page); } - 修改
AttrGroupService.java接口: 添加方法:PageUtils queryPage(Map<String, Object> params, Long catelogId); - 修改AttrGroupServiceImpl.java文件:实现queryPage方法具体逻辑
@Override
public PageUtils queryPage(Map<String, Object> params, Long catelogId) {
    //如果没有属性id,就查询所有数据
    if(catelogId == 0) {
        return this.queryPage(params);
    } else {
        String key = (String) params.get("key");
        //主要就是拼接sql语句
        QueryWrapper<AttrGroupEntity> wapper = new QueryWrapper<AttrGroupEntity>().eq("catelog_id", catelogId);
        if(!StringUtils.isEmpty(key)) {
            wapper.and((obj)->{
                obj.eq("attr_group_id", key).or().like("attr_group_name", key);
            });
        }
        IPage<AttrGroupEntity> page = this.page(new Query<AttrGroupEntity>().getPage(params),wapper);
        return new PageUtils(page);
    }
}
- 在AttrGroupController.java文件中修改list方法:
- 前端调整:
- 获取分类属性展示,修改请求url及catId更新即可
- 分组新增功能&级联选择器使用:
-
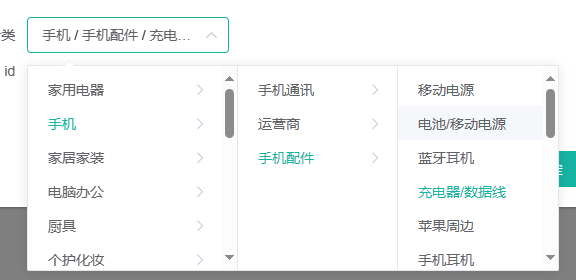
级联效果展示:
-
问题:三级分类中即使children为空,也渲染空页面。解决办法:通过注解
@JsonInclude解决。@TableField(exist = false) @JsonInclude(JsonInclude.Include.NON_EMPTY) private List<CategoryEntity> children; -
级联不能正常回显,修改回显调整
- 修改名称catelogIds -> catelogPath
- 修改
AttrGroupController.java中的info请求,返回catelogpath (后端):
AttrGroupController.java文件中修改info请求
CategoryService.java接口文件中添加方法@RequestMapping("/info/{attrGroupId}") public R info(@PathVariable("attrGroupId") Long attrGroupId){ AttrGroupEntity attrGroup = attrGroupService.getById(attrGroupId); Long catelogId = attrGroup.getCatelogId(); Long[] path = categoryService.findCatelogPath(catelogId); attrGroup.setCatelogPath(path); return R.ok().put("attrGroup", attrGroup); }findCatelogPath:
CategoryServiceImpl.java文件中实现findCatelogPath方法具体逻辑:/** * 找到catelogId的完整路径 * [父/子/孙] * @param catelogId * @return */ Long[] findCatelogPath(Long catelogId);@Override public Long[] findCatelogPath(Long catelogId) { List<Long> paths = new ArrayList<>(); List<Long> parentPath = findParentPath(catelogId, paths); Collections.reverse(parentPath); return parentPath.toArray(new Long[parentPath.size()]); } /** * 递归查询父节点 * @param catelogId * @param paths * @return */ private List<Long> findParentPath(Long catelogId, List<Long> paths) { //手机当前节点id paths.add(catelogId); CategoryEntity byId = this.getById(catelogId); if(byId.getParentCid() != 0) { findParentPath(byId.getParentCid(), paths); } return paths; }
-
修改级联可搜索,关闭窗口后情空等小问题
-
-
品牌管理
- 添加分页插件(后端): 在product模块下新建
config/MyBatisConfig.java配置类@Configuration @EnableTransactionManagement @MapperScan("com.atguigu.gulimall.product.dao") public class MyBatisConfig { //引入分页插件 @Bean public PaginationInterceptor mybatisPlusInterceptor() { PaginationInterceptor paginationInterceptor = new PaginationInterceptor(); //设置请求的页面大于最大页的操作,true回到首页,false,继续请求,默认false paginationInterceptor.setOverflow(true); //设置最大单页限制数量,默认500条,-1不受限制 paginationInterceptor.setLimit(1000); return paginationInterceptor; } } - 添加模糊查询(后端):在
BrandServiceImpl.java中修改queryPage功能。@Override public PageUtils queryPage(Map<String, Object> params) { //1、获取key Object key = (String)params.get("key"); QueryWrapper<BrandEntity> queryWrapper = new QueryWrapper<>(); if(!StringUtils.isEmpty(key)) { queryWrapper.eq("brand_id",key).or().like("name", key); } IPage<BrandEntity> page = this.page( new Query<BrandEntity>().getPage(params), queryWrapper ); return new PageUtils(page); } - 替换资料中的modules和product文件夹,引入前端关联分类功能,接着对照接口文档 完成后端请求功能实现。
- 在
CategoryBrandRelationController.java中添加/list请求,并修改/save请求。
这里的saveDetail()方法是自己在categoryBrandRelationService中实现的:/** * 获取当前品牌关联的所有分类列表 * @param brandId * @return */ @GetMapping("/catelog/list") public R cateloglist(@RequestParam("brandId") Long brandId) { List<CategoryBrandRelationEntity> data = categoryBrandRelationService.list( new QueryWrapper<CategoryBrandRelationEntity>().eq("brand_id",brandId) ); return R.ok().put("data", data); } /** * 保存 */ @RequestMapping("/save") public R save(@RequestBody CategoryBrandRelationEntity categoryBrandRelation){ categoryBrandRelationService.saveDetail(categoryBrandRelation); return R.ok(); }
注意上面要注入dao:@Override public void saveDetail(CategoryBrandRelationEntity categoryBrandRelation) { Long brandId = categoryBrandRelation.getBrandId(); Long catelogId = categoryBrandRelation.getCatelogId(); //查询出数据 BrandEntity brandEntity = brandDao.selectById(brandId); CategoryEntity categoryEntity = categoryDao.selectById(catelogId); categoryBrandRelation.setBrandName(brandEntity.getName()); categoryBrandRelation.setCatelogName(categoryEntity.getName()); this.save(categoryBrandRelation); }@Autowired BrandDao brandDao; @Autowired CategoryDao categoryDao; - 实现修改brand后,同步更新关系表
修改BrandController.java文件,调用自己实现的updateDetail()方法
修改/** * 修改 */ @RequestMapping("/update") public R update(@Validated({UpdateGroup.class}) @RequestBody BrandEntity brand){ brandService.updateDetail(brand); return R.ok(); }BrandServiceImpl.java文件,具体实现updateDetail()方法
在@Override public void updateDetail(BrandEntity brand) { //保证冗余字段的数据一致 this.updateById(brand); if(!StringUtils.isEmpty(brand.getName())) { //同步更新其他关联表中的数据 categoryBrandRelationService.updateBrand(brand.getBrandId(), brand.getName()); } }CategoryBrandRelationService.java中添加updateBrand()方法,用于同步修改@Override public void updateBrand(Long brandId, String name) { CategoryBrandRelationEntity relationEntity = new CategoryBrandRelationEntity(); relationEntity.setBrandId(brandId); relationEntity.setBrandName(name); this.update(relationEntity, new UpdateWrapper<CategoryBrandRelationEntity>().eq("brand_id", brandId)); } - 实现修改分类后,同步更新关系表
CategoryController.java
BrandServiceImpl.java/** * 修改 */ @RequestMapping("/update") public R update(@RequestBody CategoryEntity category){ categoryService.updateCascade(category); return R.ok(); }
CategoryBrandRelationServiceImpl.java@Transactional @Override public void updateCascade(CategoryEntity category) { this.updateById(category); categoryBrandRelationService.updateCategory(category.getCatId(), category.getName()); }
CategoryBrandRelationDao.java@Override public void updateCategory(Long catId, String name) { this.baseMapper.updateCategroy(catId, name); }
CateBrandRelationDao.xmlvoid updateCategroy(@Param("catId") Long catId,@Param("name") String name);<update id="updateCategroy"> UPDATE `pms_category_brand_relation` SET catelog_name=#{name} WHERE catelog_id=#{catId} </update> - 至此修改分类,属性都能同步修改关系表了
- 添加分页插件(后端): 在product模块下新建
4、商品服务-API-平台属性
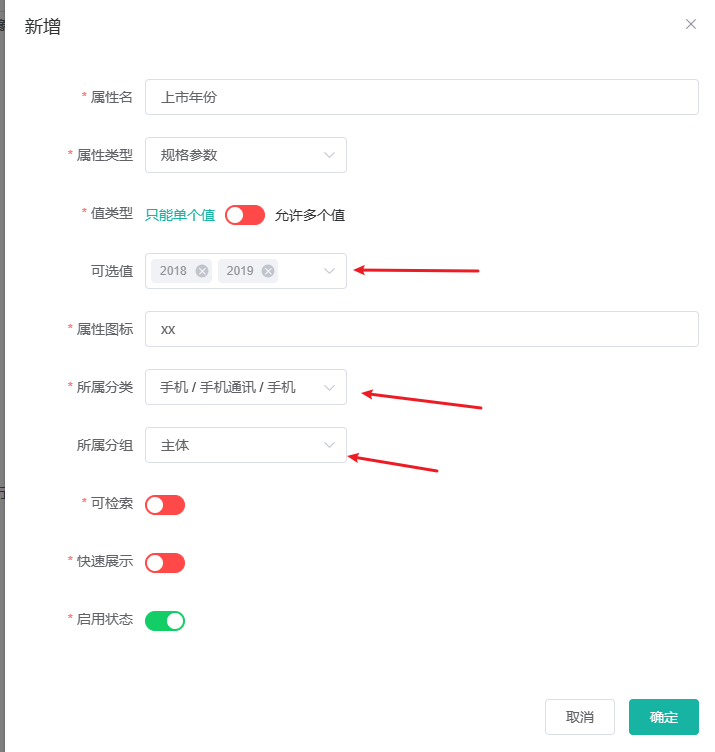
(1) 规格参数新增与vo
- 创建vo包,(value object) 值对象。通常用于业务层之间的数据传递, 和 PO 一样也是仅仅包含数据而已。 但应是抽象出的业务对象 , 可以和表对应 , 也可以不 , 这根据业务的需要 。 用 new 关键字创建, 由GC 回收的。
- 作用:接受页面传递来的数据,封装对象,将业务处理完的数据,封装成页面要用的
- 创建AttrVo,用来接收页面读入数据,为save方法除attr数据库表信息外,还额外提供了记录attr分组信息。相当于vo是面向接口方法的,一个vo包含了调用它的方法内需要的所有数据信息。
- 实现
AttrController.java中的/save请求,能保存规格参数和关系,这里重写了一个saveAttr()方法,传入AttrVo类型对象。AttrServiceImpl.java中的saveAttr()方法如下:@Transactional @Override public void saveAttr(AttrVo attr) { AttrEntity attrEntity = new AttrEntity(); BeanUtils.copyProperties(attr, attrEntity); // 1、保存实体类 this.save(attrEntity); // 2、保存关联关系 AttrAttrgroupRelationEntity relationEntity = new AttrAttrgroupRelationEntity(); relationEntity.setAttrGroupId(attr.getAttrGroupId()); //查询attrid String name = attrEntity.getAttrName(); attrEntity = attrDao.selectOne(new QueryWrapper<AttrEntity>().eq("attr_name", name)); relationEntity.setAttrId(attrEntity.getAttrId()); attrAttrgroupRelationDao.insert(relationEntity); } - 有个bug: 还没保存attr对象,哪来的attrid? (bug以修,在上面代码上添加了查询attr_id的代码)
(2) 规格参数列表查询
- 添加
/product/attr/base/list/{catelogId}请求实现,在AttrController.java中实现@GetMapping("/base/list/{catelogId}") public R baseAttrList(@RequestParam Map<String, Object> params, @PathVariable("catelogId") Long catelogId) { PageUtils page = attrService.queryBaseAttrPage(params, catelogId); return R.ok().put("page", page); } - 在
AttrServiceImpl中实现@Override public PageUtils queryBaseAttrPage(Map<String, Object> params, Long catelogId) { QueryWrapper<AttrEntity> queryWrapper = new QueryWrapper<>(); //根据不同情况封装不同条件 if(catelogId != 0) { queryWrapper.eq("catelog_id", catelogId); } String key = (String) params.get("key"); if(!StringUtils.isEmpty(key)) { // attr_id, attr_name queryWrapper.and((wrapper)->{ wrapper.eq("attr_id", key).or().like("attr_name", key); }); } //封装分页数据 IPage<AttrEntity> page = this.page( new Query<AttrEntity>().getPage(params), queryWrapper ); //封装分页数据 PageUtils pageUtils = new PageUtils(page); //分页数据中加入当前属性的”所属分类“和”所属分组“ //从分页中得到记录 List<AttrEntity> records = page.getRecords(); //将记录重新处理 List<AttrRespVo> respVos = records.stream().map((attrEntity) -> { AttrRespVo attrRespVo = new AttrRespVo(); BeanUtils.copyProperties(attrEntity, attrRespVo); CategoryEntity categoryEntity = categoryDao.selectOne(new QueryWrapper<CategoryEntity>().eq("cat_id", attrEntity.getCatelogId())); if(categoryEntity != null) { attrRespVo.setCatelogName(categoryEntity.getName()); } //查属性分组要从属性与属性分组关联表查 AttrAttrgroupRelationEntity attrgroupRelationEntity = attrAttrgroupRelationDao.selectOne(new QueryWrapper<AttrAttrgroupRelationEntity>().eq("attr_id", attrEntity.getAttrId())); if (attrgroupRelationEntity != null) { AttrGroupEntity attrGroupEntity = attrGroupDao.selectOne(new QueryWrapper<AttrGroupEntity>().eq("attr_group_id", attrgroupRelationEntity.getAttrGroupId())); if(attrGroupEntity!=null)attrRespVo.setGroupName(attrGroupEntity.getAttrGroupName()); } return attrRespVo; }).collect(Collectors.toList()); //把新的数据传送过去 pageUtils.setList(respVos); return pageUtils; }
(3) 规格修改
-
实现请求
/product/attr/info/{attrId},查询属性详情- 修改AttrRespVo.java, 保证能获得级联路径信息
@Data public class AttrRespVo extends AttrVo { private String catelogName; private String groupName; private Long[] catelogpath; } - 创建service方法, 在controller层调用:
@RequestMapping("/info/{attrId}") public R info(@PathVariable("attrId") Long attrId){ AttrRespVo attrRespVo = attrService.getAttrInfo(attrId); return R.ok().put("attr", attrRespVo); } - 方法实现:
@Autowired CategoryService categoryService; @Override public AttrRespVo getAttrInfo(Long attrId) { AttrRespVo attrRespVo = new AttrRespVo(); AttrEntity attrEntity = this.getById(attrId); BeanUtils.copyProperties(attrEntity, attrRespVo); //设置所属分组 AttrAttrgroupRelationEntity attrAttrgroupRelation = attrAttrgroupRelationDao.selectOne(new QueryWrapper<AttrAttrgroupRelationEntity>().eq("attr_id", attrId)); if(attrAttrgroupRelation != null) { attrRespVo.setAttrGroupId(attrAttrgroupRelation.getAttrGroupId()); } //设置所属分类路径 Long[] catelogPath = categoryService.findCatelogPath(attrEntity.getCatelogId()); attrRespVo.setCatelogpath(catelogPath); return attrRespVo; } - 正确回显各类信息:
- 修改AttrRespVo.java, 保证能获得级联路径信息
-
能回显后,我们实现修改属性功能:
- 创建service方法
updateAttr方法,在controller层调用, 注意参数类型改为了AttrVo@RequestMapping("/update") public R update(@RequestBody AttrVo attr){ attrService.updateAttr(attr); return R.ok(); } - 方法实现:
注意问题:
(1)一些属性在新增时没有设置所属分组。因此,同步修改属性和属性分组的关联关系时,要判断此属性是否已关联,未关联时新增关联表数据,已关联时修改关联表数据
(2)修改时如果用QueryWrapper要加条件,防止全部修改@Transactional @Override public void updateAttr(AttrVo attr) { AttrEntity attrEntity = new AttrEntity(); BeanUtils.copyProperties(attr, attrEntity); this.updateById(attrEntity); AttrAttrgroupRelationEntity relationEntity = new AttrAttrgroupRelationEntity(); relationEntity.setAttrGroupId(attr.getAttrGroupId()); relationEntity.setAttrId(attr.getAttrId()); //判断是新增还是删除,属性分组和属性是1对多 Integer count = attrAttrgroupRelationDao.selectCount(new QueryWrapper<AttrAttrgroupRelationEntity>().eq("attr_id", attr.getAttrId())); if(count > 0) { attrAttrgroupRelationDao.update(relationEntity, new QueryWrapper<AttrAttrgroupRelationEntity>().eq("attr_id", attr.getAttrId())); } else { attrAttrgroupRelationDao.insert(relationEntity); } }
- 创建service方法
(4) 销售属性维护
销售属性和规格参数是同一张表维护的,通过attr_type属性来区分
- 实现销售属性分页查询
- 实现请求接口
/product/attr/sale/list/{catelogId}, 修改AttrController:思路: 通过添加路径变量{attrType},同时用一个方法查询销售属性和规格参数
@GetMapping("/{attrType}/list/{catelogId}") public R baseList(@RequestParam Map<String, Object> params, @PathVariable("catelogId") Long catelogId, @PathVariable("attrType") String attrType) { PageUtils page = attrService.queryBaseAttrPage(params, catelogId, attrType); return R.ok().put("page", page); } - 具体方法实现:
注意:销售属性就不用做所有涉及分组的方法
@Override public PageUtils queryBaseAttrPage(Map<String, Object> params, Long catelogId, String attrType) { QueryWrapper<AttrEntity> queryWrapper = new QueryWrapper<AttrEntity>().eq("attr_type", "base".equalsIgnoreCase(attrType)?1:0); //根据不同情况封装不同条件 if(catelogId != 0) { queryWrapper.eq("catelog_id", catelogId); } String key = (String) params.get("key"); if(!StringUtils.isEmpty(key)) { // attr_id, attr_name queryWrapper.and((wrapper)->{ wrapper.eq("attr_id", key).or().like("attr_name", key); }); } //封装分页数据 IPage<AttrEntity> page = this.page( new Query<AttrEntity>().getPage(params), queryWrapper ); //封装分页数据 PageUtils pageUtils = new PageUtils(page); //分页数据中加入当前属性的”所属分类“和”所属分组“ //从分页中得到记录 List<AttrEntity> records = page.getRecords(); //将记录重新处理 List<AttrRespVo> respVos = records.stream().map((attrEntity) -> { AttrRespVo attrRespVo = new AttrRespVo(); BeanUtils.copyProperties(attrEntity, attrRespVo); CategoryEntity categoryEntity = categoryDao.selectOne(new QueryWrapper<CategoryEntity>().eq("cat_id", attrEntity.getCatelogId())); if(categoryEntity != null) { attrRespVo.setCatelogName(categoryEntity.getName()); } //1、设置分类和分组的名字 //查属性分组要从属性与属性分组关联表查 if("base".equalsIgnoreCase(attrType)) { AttrAttrgroupRelationEntity attrId = attrAttrgroupRelationDao.selectOne(new QueryWrapper<AttrAttrgroupRelationEntity>().eq("attr_id", attrEntity.getAttrId())); if (attrId != null) { AttrGroupEntity attrGroupEntity = attrGroupDao.selectOne(new QueryWrapper<AttrGroupEntity>().eq("attr_group_id", attrId.getAttrGroupId())); if(attrGroupEntity!=null)attrRespVo.setGroupName(attrGroupEntity.getAttrGroupName()); } } return attrRespVo; }).collect(Collectors.toList()); //把新的数据传送过去 pageUtils.setList(respVos); return pageUtils; } - 修改saveAttr方法:
@Transactional
@Override
public void saveAttr(AttrVo attr) {
    AttrEntity attrEntity = new AttrEntity();
    BeanUtils.copyProperties(attr, attrEntity);
    // 1、保存实体类
    this.save(attrEntity);
    // 2、保存关联关系
    if(attr.getAttrType() == 1) {
        AttrAttrgroupRelationEntity relationEntity = new AttrAttrgroupRelationEntity();
        relationEntity.setAttrGroupId(attr.getAttrGroupId());
        //查询attrid
        String name = attrEntity.getAttrName();
        attrEntity = attrDao.selectOne(new QueryWrapper<AttrEntity>().eq("attr_name", name));
        relationEntity.setAttrId(attrEntity.getAttrId());
        attrAttrgroupRelationDao.insert(relationEntity);
    }
}
- 实现请求接口
- 在common中添加常量维护包
Constant,并创建针对商品信息管理的ProductConstant- 代码
public class ProductConstant { public enum AttrEnum{ ATTR_TYPE_BASE(1, "基本属性"), ATTR_TYPE_SALE(0, "销售属性"); private int code; private String msg; AttrEnum(int code, String msg) { this.code = code; this.msg = msg; } public int getCode() { return code; } public String getMsg() { return msg; } } } - 重新修改上面
saveAttr,queryBaseAttrPage,getAttrInfo,updateAttr方法//saveAttr方法修改判断 if(attr.getAttrType() == 1) { if(attr.getAttrType() == ProductConstant.AttrEnum.ATTR_TYPE_BASE.getCode()) {//queryBaseAttrPage方法修改new QueryWrapper<AttrEntity>().eq("attr_type", "base".equalsIgnoreCase(attrType)?1:0); new QueryWrapper<AttrEntity>().eq("attr_type", "base".equalsIgnoreCase(attrType)?ProductConstant.AttrEnum.ATTR_TYPE_BASE.getCode():ProductConstant.AttrEnum.ATTR_TYPE_SALE.getCode());
- 代码
(5) 查询分组关联属性&删除关联
- 实现接口
/product/attrgroup/{attrgroupId}/attr/relation, 查询属性分组关联的所有属性- 在AttrGroupController.java文件中实现
@GetMapping("/{attrgroupId}/attr/relation") public R attrRelation(@PathVariable("attrgroupId") Long attrgroupId) { List<AttrEntity> data = attrService.getRelationAttr(attrgroupId); return R.ok().put("data", data); } - 在AttrService属性服务中实现getRelationAttr()方法, 根据分组id查询所有关联的基本属性
@Override
public List<AttrEntity> getRelationAttr(Long attrgroupId) {
    List<AttrAttrgroupRelationEntity> relationEntities = attrAttrgroupRelationDao.selectList(new QueryWrapper<AttrAttrgroupRelationEntity>().eq("attr_group_id", attrgroupId));
    List<Long> attrIds = relationEntities.stream().map((entity) -> {
        return entity.getAttrId();
    }).collect(Collectors.toList());
    if(attrIds == null || attrIds.size() == 0) {
        return null;
    }
    List<AttrEntity> attrEntities = this.baseMapper.selectBatchIds(attrIds);
    return attrEntities;
}
- 在AttrGroupController.java文件中实现
- 实现接口
/product/attrgroup/attr/relation/delete,实现实现移除分组关联属性功能- 在product.vo包下新建AttrGroupRelationVo,接收请求参数:
@Data public class AttrGroupRelationVo { private Long attrId; private Long attrGroupId; } - 在AttrService层实现deleteRelation()方法,在AttrGroupController层调用:
当使用自定义的封装对象类型时,需要加上@RequestBody注解
@PostMapping("/attr/relation/delete") public R attrRelationDelete(@RequestBody AttrGroupRelationVo[] vos) { attrService.deleteRelation(vos); return R.ok(); } - 具体实现:
@Override public void deleteRelation(AttrGroupRelationVo[] vos) { List<AttrGroupRelationVo> relationVos = Arrays.asList(vos); List<AttrAttrgroupRelationEntity> entities = relationVos.stream().map((relationVo) -> { AttrAttrgroupRelationEntity relationEntity = new AttrAttrgroupRelationEntity(); BeanUtils.copyProperties(relationVo, relationEntity); return relationEntity; }).collect(Collectors.toList()); //根据attrId, attrGroupId批量删除关联关系 attrAttrgroupRelationDao.deleteBatchRelation(entities); } - Dao层声明deleteBatchRelation()方法, xml层具体实现sql语句:
注意Dao层用注解@Param声明自定义属性,十分关键
void deleteBatchRelation(@Param("entities") List<AttrAttrgroupRelationEntity> entities);<delete id="deleteBatchRelation"> DELETE FOMR `pms_attr_attrgroup_relation` WHERE <foreach collection="entities" item="item" separator=" OR "> (attr_id=#{item.attrId} AND attr_group_id=#{item.attrGroupId}) </foreach> </delete>
- 在product.vo包下新建AttrGroupRelationVo,接收请求参数:
(6) 查询分组未关联属性
- 实现接口
/product/attrgroup/{attrgroupId}/noattr/relation, 获取属性分组里面还没有关联的本分类里面的其他基本属性,方便添加新的关联- attrService层实现getNoRelationAttr()方法,AttrGroupController层调用:
@GetMapping("/{attrgroupId}/noattr/relation") public R attrNoRelation(@PathVariable("attrgroupId") Long attrgroupId, @RequestParam Map<String, Object> params) { PageUtils page = attrService.getNoRelationAttr(params, attrgroupId); return R.ok().put("page", page); } - 具体实现:
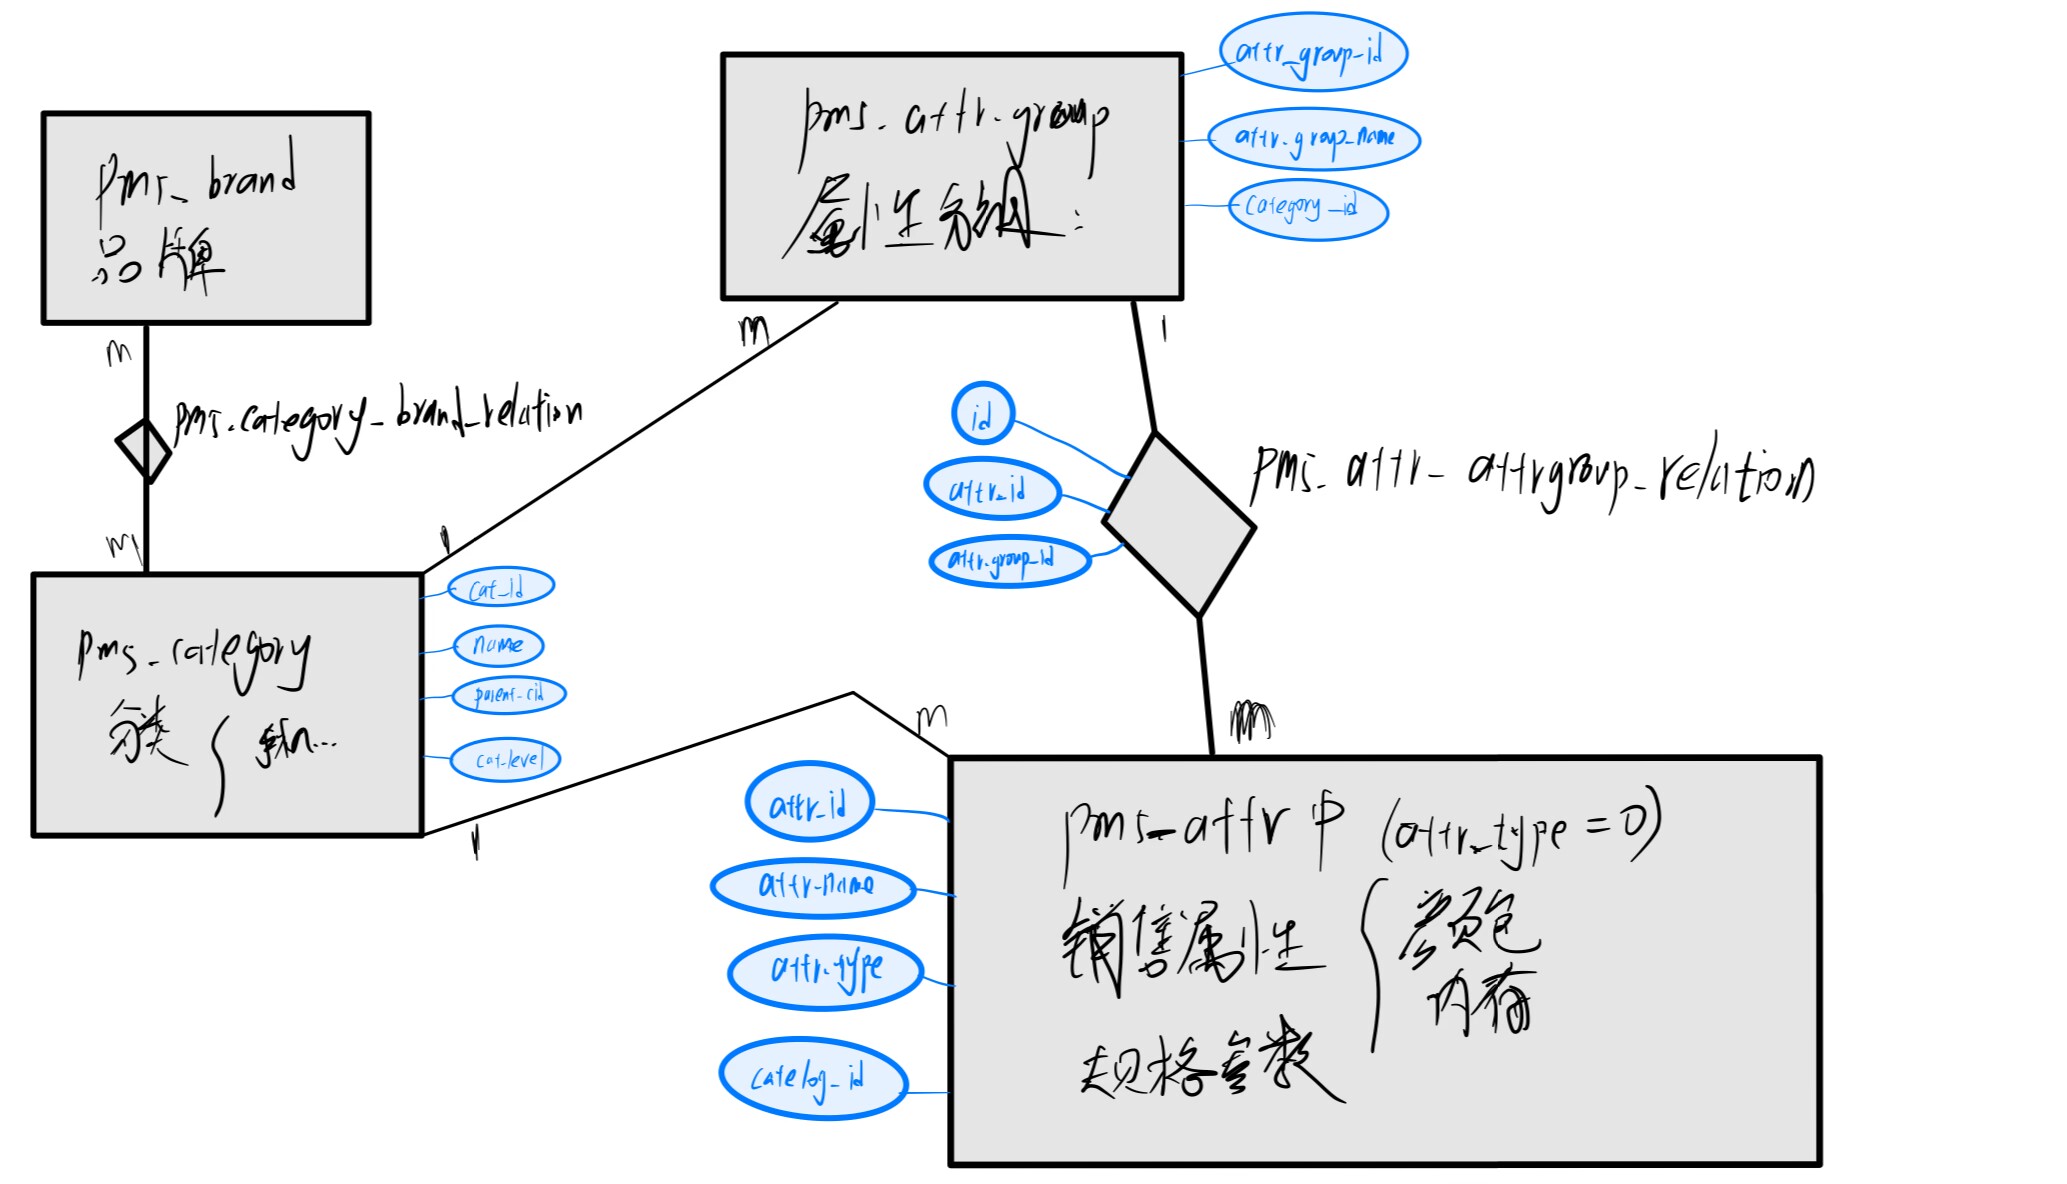
@Override public PageUtils getNoRelationAttr(Map<String, Object> params, Long attrgroupId) { //1、当前分组只能关联自己所属分类里的所有属性 //先查询出当前分组所属分类 AttrGroupEntity attrGroupEntity = attrGroupDao.selectById(attrgroupId); Long categoryId = attrGroupEntity.getCatelogId(); //2、当前分组只能关联别的分组没有引用的属性 //2.1 当前分类下所有分组 List<AttrGroupEntity> attrGroupEntities = attrGroupDao.selectList(new QueryWrapper<AttrGroupEntity>().eq("catelog_id", categoryId)); List<Long> attrGroupIds = attrGroupEntities.stream().map(attrGroupEntity1 -> { return attrGroupEntity1.getAttrGroupId(); }).collect(Collectors.toList()); //2.2 这些分组关联的属性 List<AttrAttrgroupRelationEntity> relationEntities = attrAttrgroupRelationDao.selectList(new QueryWrapper<AttrAttrgroupRelationEntity>().in("attr_group_id", attrGroupIds)); List<Long> attrIds = relationEntities.stream().map((relationEntity) -> { return relationEntity.getAttrId(); }).collect(Collectors.toList()); //2.3从当前分类的所有属性中移除这些属性 QueryWrapper<AttrEntity> wrapper = new QueryWrapper<AttrEntity>().eq("catelog_id", categoryId).eq("attr_type", ProductConstant.AttrEnum.ATTR_TYPE_BASE.getCode()); if(attrIds != null && attrIds.size() > 0) { wrapper.notIn("attr_id", attrIds); } //模糊查询 String key = (String) params.get("key"); if(!StringUtils.isEmpty(key)) { wrapper.and((w)->{ w.eq("attr_id", key).or().like("attr_name", key); }); } IPage<AttrEntity> page = this.page(new Query<AttrEntity>().getPage(params), wrapper); return new PageUtils(page); } - 数据库关系图:
- attrService层实现getNoRelationAttr()方法,AttrGroupController层调用:
(7) 新增的关联
- 实现接口:
/product/attrgroup/attr/relation, 保存新增的分组和属性的关联关系。- AttrAttrgroupRelationService层实现saveBatch方法, AttrGroupController层调用:
@Autowired
private AttrAttrgroupRelationEntity relationService;
@PostMapping("/attr/relation") public R attrRelation(@RequestBody List<AttrGroupRelationVo> vos) { relationService.saveBatch(vos); return R.ok(); } - 具体实现:
@Override
public void saveBatch(List<AttrGroupRelationVo> vos) {
    List<AttrAttrgroupRelationEntity> entities = vos.stream().map((vo) -> {
        AttrAttrgroupRelationEntity relationEntity =  new AttrAttrgroupRelationEntity();
        BeanUtils.copyProperties(vo, relationEntity);
        return relationEntity;
    }).collect(Collectors.toList());
    this.saveBatch(entities);
}
- AttrAttrgroupRelationService层实现saveBatch方法, AttrGroupController层调用:
5、商品服务-API-新增商品
(1) 调试会员等级相关接口
- 由于发布商品时会用到调用会员信息的接口,所以现在member微服务中将会员相关接口调试好
- 首先将用户模块添加到nacos注册中心,然后启动服务
- 配置信息:
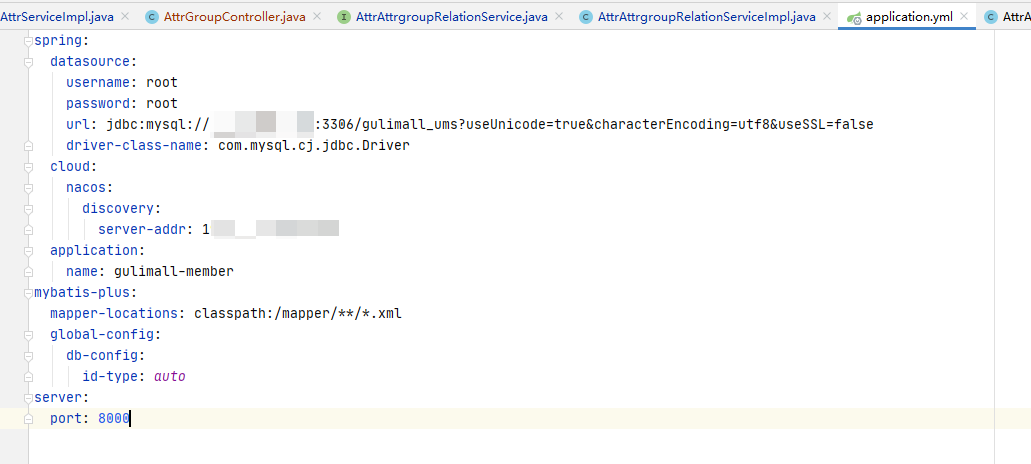
- 配置信息:
- 配置网关
- 在gulimall-gateway服务的application.yml中添加:
- id: member_route
  uri: lb://gulimall-member
  predicates:
    - Path=/api/member/**
  filters:
    - RewritePath=/api/(?<segment>.?),/$\{segment}
- 在gulimall-gateway服务的application.yml中添加:
- 添加前端代码,主要是level.vue页面, 并新增一点数据
- 添加数据:
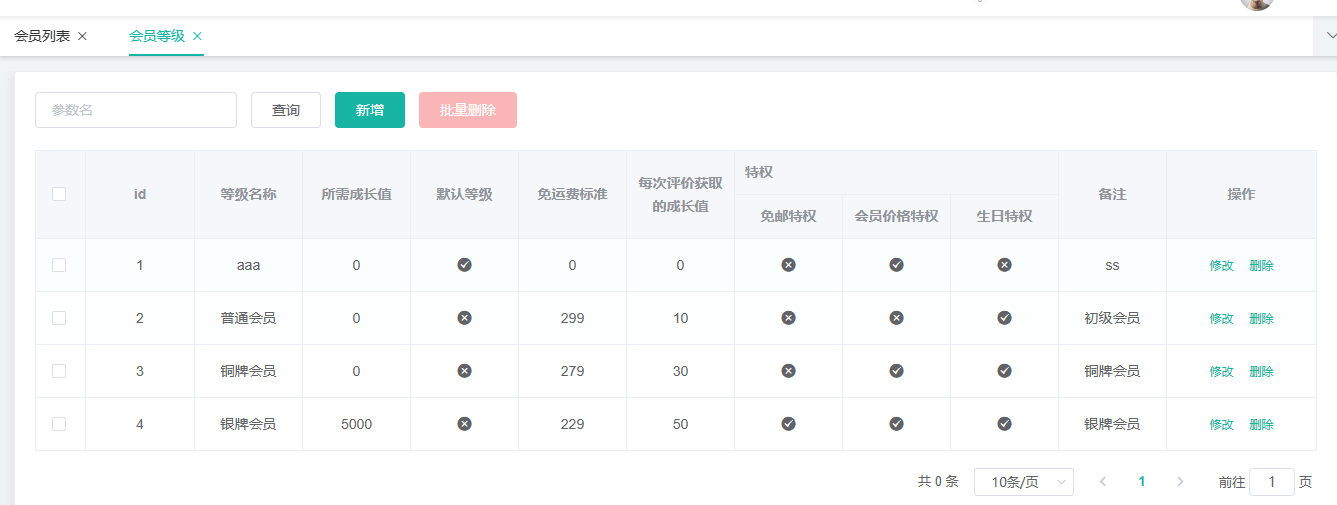
- 添加数据:
(2) 获取当前分类关联的品牌(不用分页)
- 发布商品时,选择分类后,会发请求获取当前分类关联的品牌,所以需要编写这个业务.
- 实现接口
/product/categorybrandrelation/brands/list,- 新建BrandVo,用于返回数据,因为数据只需要id, name
@Data public class BrandVo { private Long brandId; private String brandName; } - categoryBrandRelationService层实现getBrandsByCatId方法,在CategoryBrandRelationController层调用
@GetMapping("/brands/list") public R relationBrandsList(@RequestParam(value = "catId", required = true) Long catId) { List<BrandEntity> vos = categoryBrandRelationService.getBrandsByCatId(catId); List<BrandVo> collect = vos.stream().map(item -> { BrandVo brandVo = new BrandVo(); brandVo.setBrandId(item.getBrandId()); brandVo.setBrandName(item.getName()); return brandVo; }).collect(Collectors.toList()); return R.ok().put("data", collect); } - 具体实现:
@Override
public List<BrandEntity> getBrandsByCatId(Long catId) {
    List<CategoryBrandRelationEntity> relationEntities = this.baseMapper.selectList(new QueryWrapper<CategoryBrandRelationEntity>().eq("catelog_id", catId));
    List<BrandEntity> collect  = relationEntities.stream().map(item -> {
        Long brandId = item.getBrandId();
        BrandEntity brandEntity = brandService.getById(brandId);
        return brandEntity;
    }).collect(Collectors.toList());
    return collect;
}
- 新建BrandVo,用于返回数据,因为数据只需要id, name
- 前端调试
存在问题1:修改分类后,没有发送请求,也没有显示品牌
- 修改:1、删除
category-cascader.vue中第57行的this.; 2、添加import PubSub from 'pubsub-js' - 如果报错就命令下载一下
npm install --save pubsub-js
存在问题2:无法正常上传图片
- 开启后端第三方服务,重新登陆一下阿里云oss
- 修改:1、删除
(3) 获取分类下所有分组以及属性
- 需求分析:录入规格参数时要获取当前分类下所有分组和关联属性,进行选择分组、规格参数
- 实现接口
/product/attrgroup/{catelogId}/withattr- 新建
AttrGroupWithAttrsVo,用来接收数据@Data public class AttrGroupWithAttrsVo extends AttrGroupEntity { private List<AttrEntity> attrs; } - 在AttrGroupService层实现getAttrGroupWithAttrsByCatelogId方法,在AttrGroupController中调用:
@GetMapping("/{catelogId}/withattr") public R getAttrGroupWithAttrs(@PathVariable("catelogId") Long catelogId) { //1、查出当前分类下所有属性分组 //2、查出各属性分组的所有属性 List<AttrGroupWithAttrsVo> vos = attrGroupService.getAttrGroupWithAttrByCatelogId(catelogId); return R.ok().put("data", vos); } - 具体实现:
@Override public List<AttrGroupWithAttrsVo> getAttrGroupWithAttrByCatelogId(Long catelogId) { //查询此分类下所有分组 List<AttrGroupEntity> attrGroupEntities = this.list(new QueryWrapper<AttrGroupEntity>().eq("catelog_id", catelogId)); //每个分组查询规格属性 List<AttrGroupWithAttrsVo> vos = attrGroupEntities.stream().map(item -> { AttrGroupWithAttrsVo vo = new AttrGroupWithAttrsVo(); BeanUtils.copyProperties(item, vo); Long groupId = item.getAttrGroupId(); vo.setAttrs(attrService.getRelationAttr(groupId)); return vo; }).collect(Collectors.toList()); return vos; } - 测试效果:
- 新建
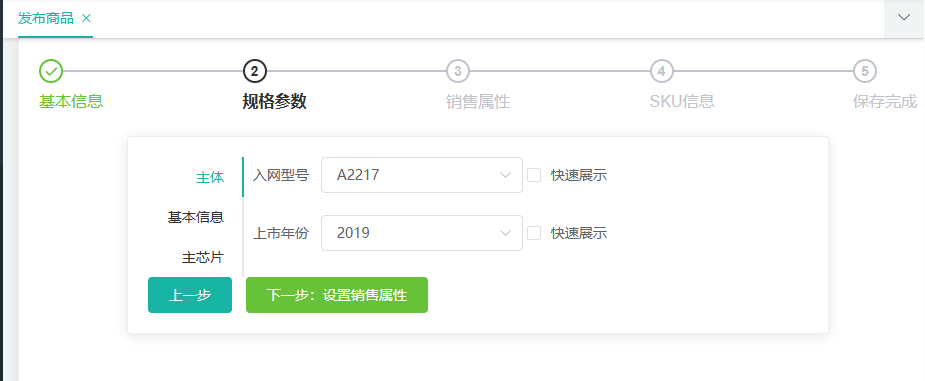
(4) 新增商品
-
实现接口:
/product/spuinfo/save, 保存新增商品 -
创建接收前端发来请求的vo类:
- 注意这里先将前端控制台的打印json信息在在线json格式化工具中生成正确格式,在放在json转java实体类工具 中生成实体类。注意修改名字为
SpuSaveVo,同时修改包名。然后下载代码放到Vo包下。同时修改以下属性数据类型。 - SpuSaveVo的brandId和catelogId改成Long,weight改成BigDecimal。
- Bounds都改成BigDecimal
- BaseAttrs的attrId改成Long;
- Skus的price,discount,fullPrice,reducePrice改成BigDecimal ;
- Attr的attrId改成Long
- MemberPrice的id改成Long,price改成BigDecimal;
- 注意这里先将前端控制台的打印json信息在在线json格式化工具中生成正确格式,在放在json转java实体类工具 中生成实体类。注意修改名字为
-
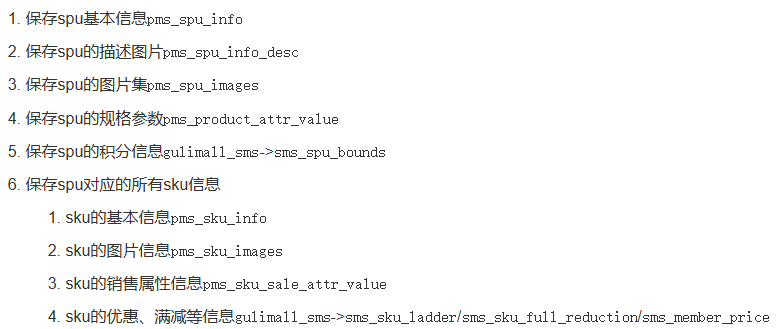
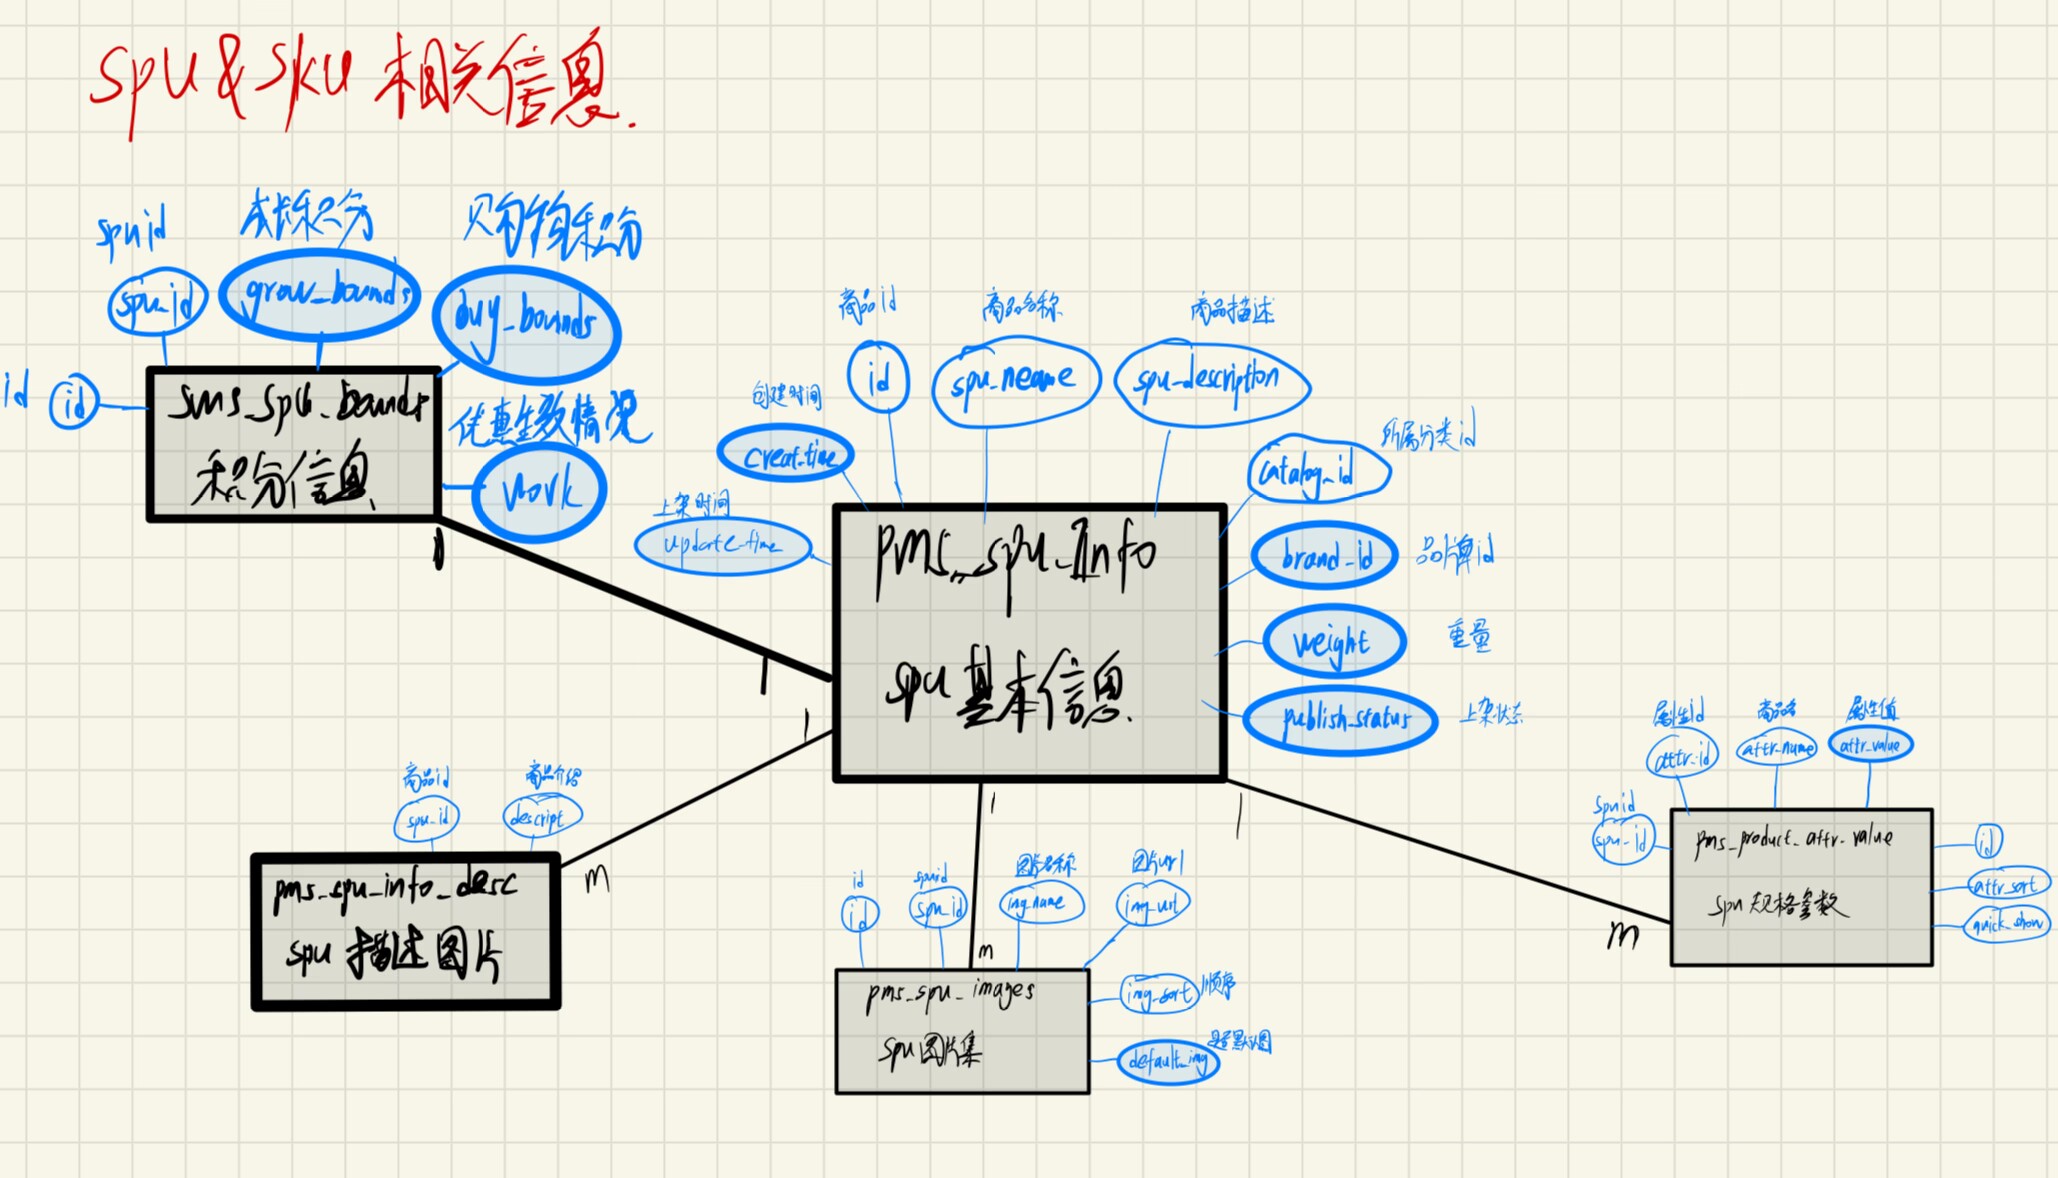
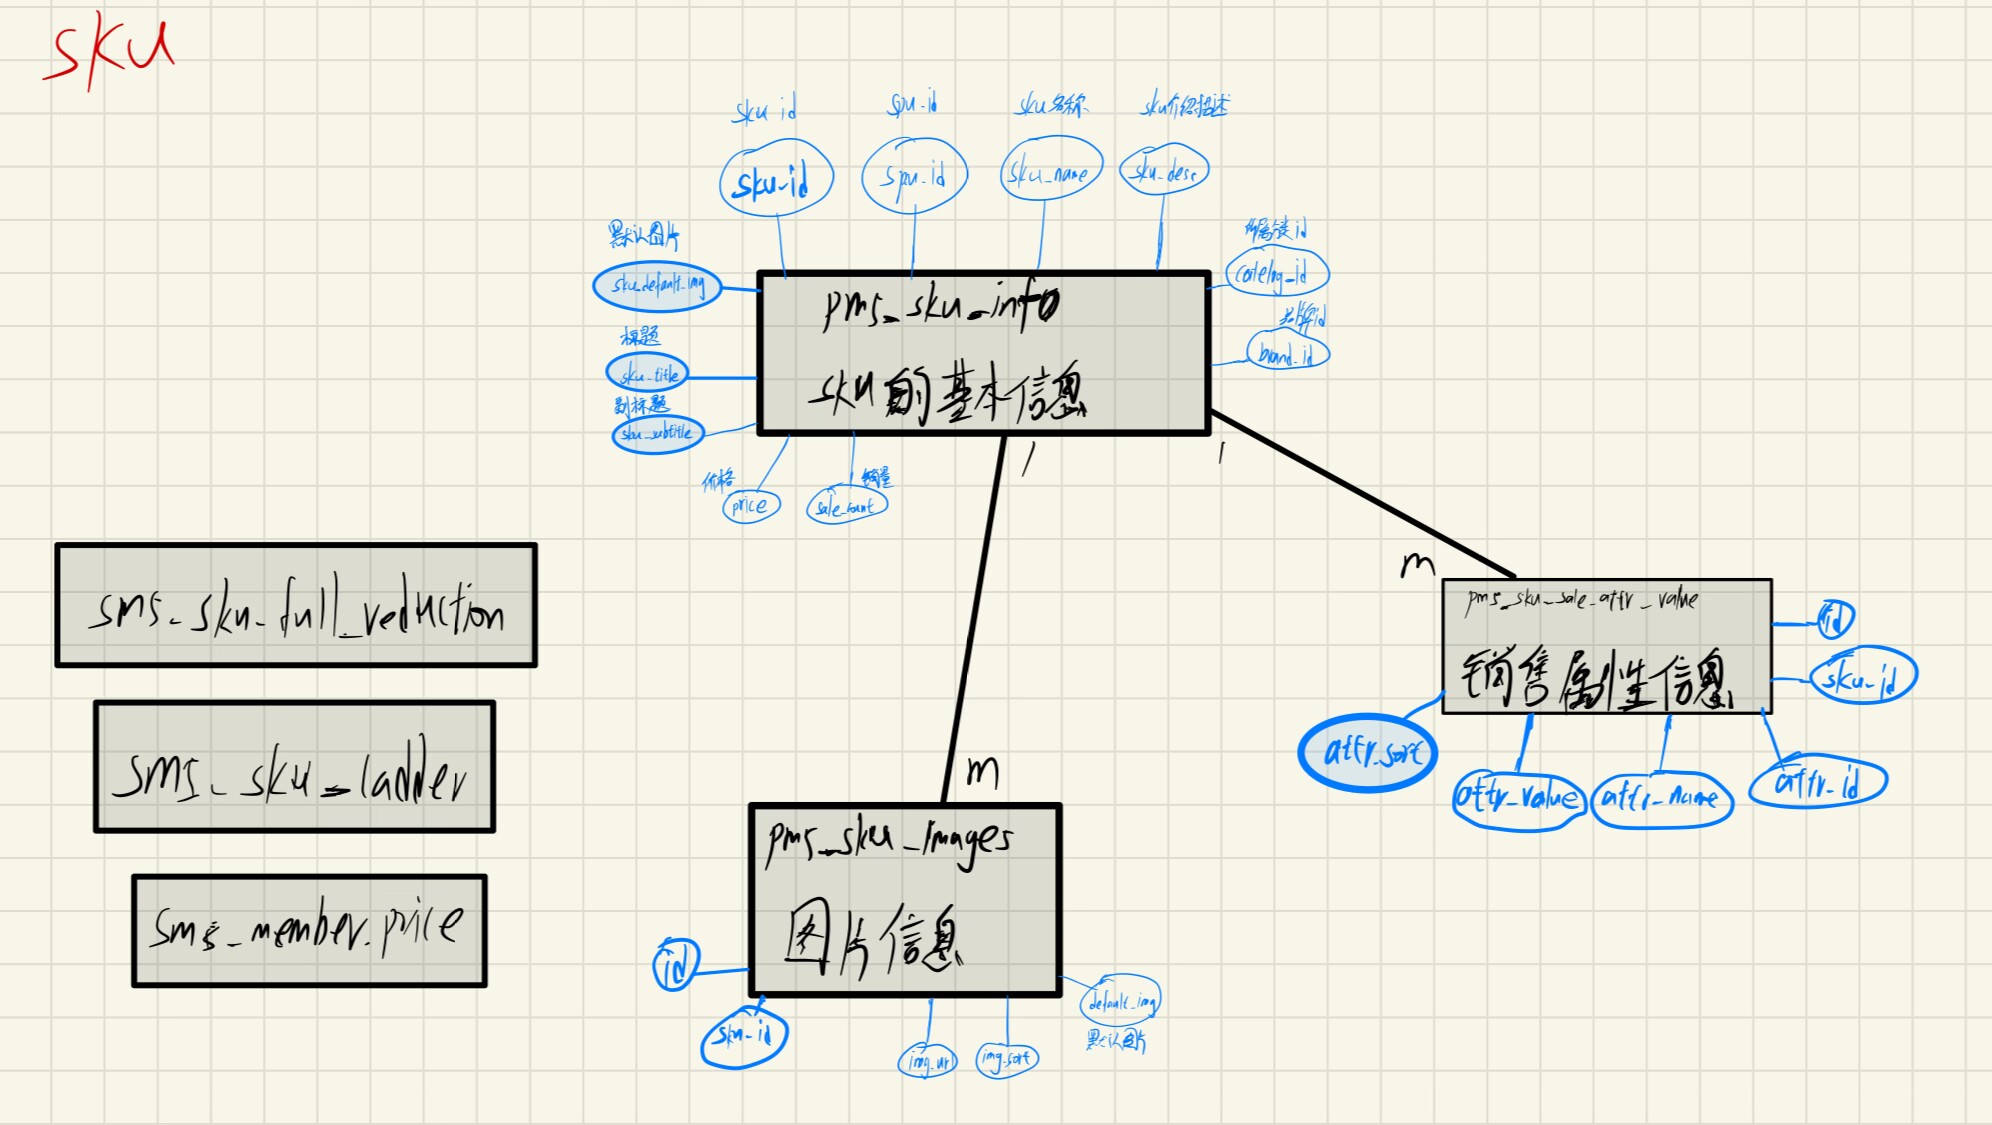
梳理一下用到的表信息:
-
实现
spuInfoService.java的saveSpuInfo方法,SpuInfoController.java下调用方法实现商品保存。 -
由于上面代码中涉及的保存项太多,先介绍以下各部分需要做的准备
- 在common模块创建to包,保存用于跨服务远程保存的信息。
- 在comon模块中创建
common.to.SpuBoundTo用于做远程调用积分传输@Data public class SpuBoundTo { private Long spuId; private BigDecimal buyBounds; private BigDecimal growBounds; } - 在common模块创建
common.to.SkuReductionTo用来做远程满减数据传输@Data public class SkuReductionTo { private Long skuId; private int fullCount; private BigDecimal discount; private int countStatus; private BigDecimal fullPrice; private BigDecimal reducePrice; private int priceStatus; private List<MemberPrice> memberPrice; } - 其中
MemberPrice创建在common包下面@Data public class MemberPrice { private Long id; private String name; private BigDecimal price; } - 在common模块的
R结果类加上获取状态码的方法,方便判断远程调用是否成功public Integer getCode() { return Integer.parseInt((String) this.get("code")); } - 在引导类
GulimallProductApplication加上注解,实现扫描远程调用的包。@EnableFeignClients用于启用Feign客户端,使得该应用能够使用Feign来进行服务间的通信。basePackages属性用于指定Feign客户端接口所在的包路径,这样Feign会扫描该包下的接口并生成代理类,从而使得你可以通过这些接口调用远程服务。@EnableTransactionManagement注解用于启用Spring的事务管理功能。@EnableFeignClients(basePackages = "com.atguigu.gulimall.product.feign") @EnableTransactionManagement - 在product模块的
product.feign包下新建CouponFeignService接口,用来远程调用Coupon服务。总共调用两个服务:coupon/spubounds/save和coupon/skufullreduction/saveInfo,分别是保存积分和满减功能:@FeignClient("gulimall-coupon") public class CouponFeignService { @PostMapping("coupon/spuboounds/save") R saveSpuBounds(@RequestBody SpuBoundTo spuBoundTo); @PostMapping("coupon/skufullreduction/saveInfo") R saveSkuReduction(@RequestBody SkuReductionTo skuReductionTo); } - 在coupon模块的
SkuFullReductionController中新建方法@PostMapping("/saveInfo") public R saveInfo(@RequestBody SkuReductionTo skuReductionTo) { skuFullReductionService.saveSkuReduction(skuReductionTo); return R.ok(); } - 在skuFullReductionService中实现方法
@Override
public void saveSkuReduction(SkuReductionTo reductionTo) {
    SkuLadderEntity skuLadderEntity = new SkuLadderEntity();
    skuLadderEntity.setSkuId(reductionTo.getSkuId());
    skuLadderEntity.setFullCount(reductionTo.getFullCount());
    skuLadderEntity.setDiscount(reductionTo.getDiscount());
    skuLadderEntity.setAddOther(reductionTo.getCountStatus());
    if(reductionTo.getFullCount() > 0) {
        skuLadderService.save(skuLadderEntity);
    }
}
-
实现保存spu信息的
saveSpuInfo功能:@Transactional @Override public void saveSpuInfo(SpuSaveVo vo) { //1、保存spu基本信息`pms_spu_info` SpuInfoEntity spuInfoEntity = new SpuInfoEntity(); BeanUtils.copyProperties(vo, spuInfoEntity); spuInfoEntity.setCreateTime(new Date()); spuInfoEntity.setUpdateTime(new Date()); this.save(spuInfoEntity); //2、保存spu的描述图片`pms_spu_info_desc` Long spuId = spuInfoEntity.getId(); List<String> decript = vo.getDecript(); SpuInfoDescEntity spuInfoDescEntity = new SpuInfoDescEntity(); spuInfoDescEntity.setSpuId(spuId); //String.join方法可以快速拼接list里的字符串 spuInfoDescEntity.setDecript(String.join(",", decript)); spuInfoDescService.save(spuInfoDescEntity); //3、保存spu的图片集`pms_spu_images` List<String> images = vo.getImages(); if(images != null && images.size() != 0) { List<SpuImagesEntity> collect = images.stream().map(image -> { SpuImagesEntity imagesEntity = new SpuImagesEntity(); imagesEntity.setSpuId(spuId); imagesEntity.setImgUrl(image); return imagesEntity; }).filter(item->{ return !StringUtils.isNullOrEmpty(item.getImgUrl()); }).collect(Collectors.toList()); spuImagesService.saveBatch(collect); } //4、保存spu的规格参数`pms_product_attr_value` List<BaseAttrs> baseAttrs = vo.getBaseAttrs(); if(baseAttrs != null && baseAttrs.size() != 0) { List<ProductAttrValueEntity> collect = baseAttrs.stream().map(attr -> { ProductAttrValueEntity valueEntity = new ProductAttrValueEntity(); valueEntity.setAttrId(attr.getAttrId()); valueEntity.setSpuId(spuId); AttrEntity byId = attrService.getById(attr.getAttrId()); valueEntity.setAttrName(byId.getAttrName()); valueEntity.setAttrValue(attr.getAttrValues()); valueEntity.setQuickShow(attr.getShowDesc()); return valueEntity; }).collect(Collectors.toList()); productAttrValueService.saveBatch(collect); } //5、保存spu的积分信息`gulimall_sms`->`sms_spu_bounds` Bounds bounds = vo.getBounds(); SpuBoundTo spuBoundTo = new SpuBoundTo(); BeanUtils.copyProperties(bounds, spuBoundTo); spuBoundTo.setSpuId(spuId); R r = couponFeignService.saveSpuBounds(spuBoundTo); if(r.getCode() != 0) { log.error("远程保存spu积分信息失败"); } //6、保存spu对应的所有sku信息 List<Skus> skus = vo.getSkus(); if(skus != null && skus.size() > 0) { skus.forEach(item -> { String defaultImg = ""; //查出默认图片 for (Images image: item.getImages()) { if(image.getDefaultImg() == 1) { defaultImg = image.getImgUrl(); } } //6.1、sku的基本信息`pms_sku_info` //skus列表中的每个item赋值给sku_info实体类 SkuInfoEntity skuInfoEntity = new SkuInfoEntity(); BeanUtils.copyProperties(item, skuInfoEntity); skuInfoEntity.setSpuId(spuId); skuInfoEntity.setBrandId(spuInfoEntity.getBrandId()); skuInfoEntity.setCatalogId(spuInfoEntity.getCatalogId()); skuInfoEntity.setSaleCount(0L); skuInfoEntity.setSkuDefaultImg(defaultImg); skuInfoService.save(skuInfoEntity); //6.2、sku的图片信息`pms_sku_images` Long skuId = skuInfoEntity.getSkuId(); List<SkuImagesEntity> skuImagesEntities = item.getImages().stream().map(img -> { SkuImagesEntity imagesEntity = new SkuImagesEntity(); imagesEntity.setSkuId(skuId); imagesEntity.setImgUrl(img.getImgUrl()); imagesEntity.setDefaultImg(img.getDefaultImg()); return imagesEntity; }).filter(entity -> { //返回true是需要,返回false是过滤掉 return !StringUtils.isNullOrEmpty(entity.getImgUrl()); }).collect(Collectors.toList()); skuImagesService.saveBatch(skuImagesEntities); //6.3、sku的销售属性信息`pms_sku_sale_attr_value` List<Attr> attr = item.getAttr(); List<SkuSaleAttrValueEntity> skuSaleAttrValueEntities = attr.stream().map(a -> { SkuSaleAttrValueEntity skuSaleAttrValueEntity = new SkuSaleAttrValueEntity(); skuSaleAttrValueEntity.setSkuId(skuId); BeanUtils.copyProperties(a, skuSaleAttrValueEntity); return skuSaleAttrValueEntity; }).collect(Collectors.toList()); skuSaleAttrValueService.saveBatch(skuSaleAttrValueEntities); //6.4、sku的优惠,满减信息`gulimall_sms -> `sms_sku_ladder` / `sms_sku_full_reduction` / `sms_member_price`` SkuReductionTo skuReductionTo = new SkuReductionTo(); BeanUtils.copyProperties(item, skuReductionTo); skuReductionTo.setSkuId(skuId); if (skuReductionTo.getFullCount() > 0 || skuReductionTo.getFullPrice().compareTo(new BigDecimal("0")) == 1){ R r1 = couponFeignService.saveSkuReduction(skuReductionTo); if(r1.getCode() != 0) { log.error("远程保存优惠信息失败"); } } }); } } -
添加复合配置,限制内存
- 新建复合
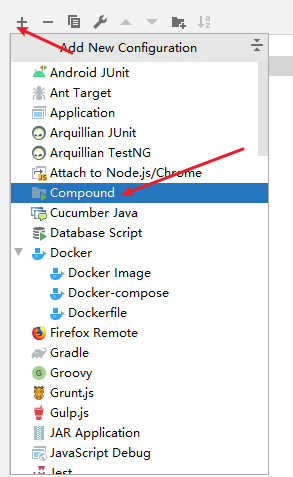
- 添加上如下服务,
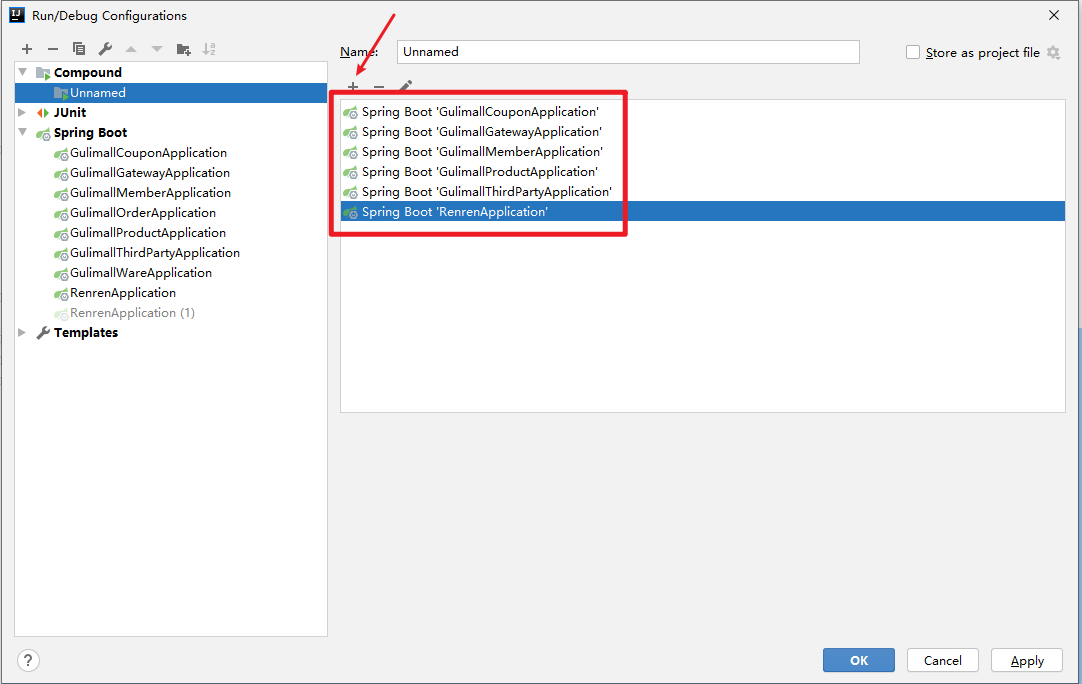
- 对每个服务点击修改按钮,在
VM opeions设置最大100M的限制-Xmx100m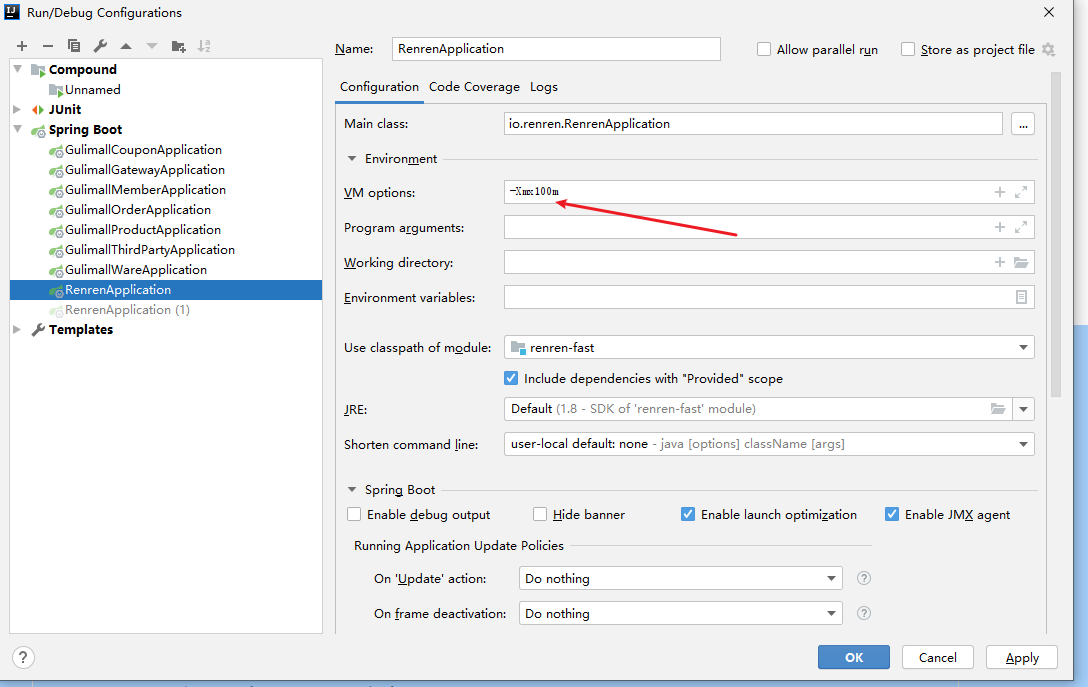
- 新建复合
-
商品信息保存bug调试
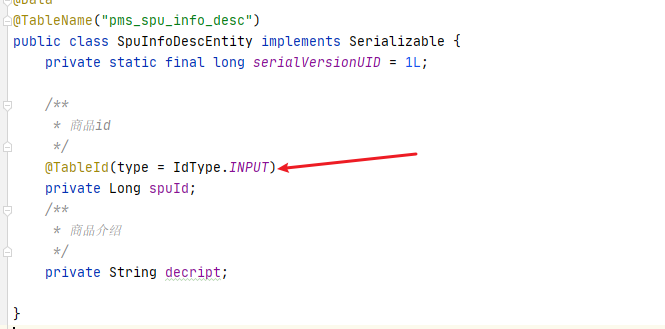
-
1、修改SpuInfoDescEntity.java 中spuId的@TableId注解
-
报错信息:

-
修改:
-
2、修改R结果返回类的getCode()返回
-
报错信息:

-
修改(R.java文件):

-
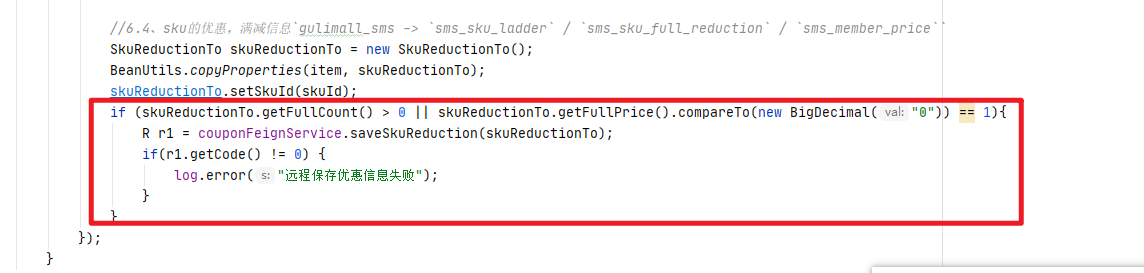
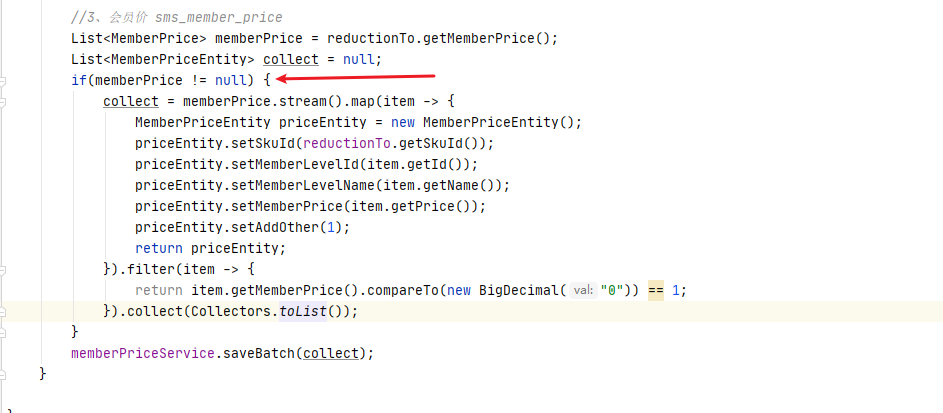
4、保存折扣信息的时候,满0元打0折这种都是无意义的,要过滤掉
-
5、满减保存时报空指针异常,添加判断
-
-
修改完所有bug, 实现保存商品信息,下面给出完整的
saveSpuInfo代码:@Transactional @Override public void saveSpuInfo(SpuSaveVo vo) { //1、保存sku基本信息`pms_spu_info` SpuInfoEntity spuInfoEntity = new SpuInfoEntity(); BeanUtils.copyProperties(vo, spuInfoEntity); spuInfoEntity.setCreateTime(new Date()); spuInfoEntity.setUpdateTime(new Date()); this.save(spuInfoEntity); //2、保存spu的描述图片`pms_spu_info_desc` Long spuId = spuInfoEntity.getId(); List<String> decript = vo.getDecript(); SpuInfoDescEntity spuInfoDescEntity = new SpuInfoDescEntity(); spuInfoDescEntity.setSpuId(spuId); //String.join方法可以快速拼接list里的字符串 spuInfoDescEntity.setDecript(String.join(",", decript)); spuInfoDescService.save(spuInfoDescEntity); //3、保存spu的图片集`pms_spu_images` List<String> images = vo.getImages(); if(images != null && images.size() != 0) { List<SpuImagesEntity> collect = images.stream().map(image -> { SpuImagesEntity imagesEntity = new SpuImagesEntity(); imagesEntity.setSpuId(spuId); imagesEntity.setImgUrl(image); return imagesEntity; }).filter(item->{ return !StringUtils.isNullOrEmpty(item.getImgUrl()); }).collect(Collectors.toList()); spuImagesService.saveBatch(collect); } //4、保存spu的规格参数`pms_product_attr_value` List<BaseAttrs> baseAttrs = vo.getBaseAttrs(); if(baseAttrs != null && baseAttrs.size() != 0) { List<ProductAttrValueEntity> collect = baseAttrs.stream().map(attr -> { ProductAttrValueEntity valueEntity = new ProductAttrValueEntity(); valueEntity.setAttrId(attr.getAttrId()); valueEntity.setSpuId(spuId); AttrEntity byId = attrService.getById(attr.getAttrId()); valueEntity.setAttrName(byId.getAttrName()); valueEntity.setAttrValue(attr.getAttrValues()); valueEntity.setQuickShow(attr.getShowDesc()); return valueEntity; }).collect(Collectors.toList()); productAttrValueService.saveBatch(collect); } //5、保存spu的积分信息`gulimall_sms`->`sms_spu_bounds` Bounds bounds = vo.getBounds(); SpuBoundTo spuBoundTo = new SpuBoundTo(); BeanUtils.copyProperties(bounds, spuBoundTo); spuBoundTo.setSpuId(spuId); R r = couponFeignService.saveSpuBounds(spuBoundTo); if(r.getCode() != 0) { log.error("远程保存spu积分信息失败"); } //6、保存spu对应的所有sku信息 List<Skus> skus = vo.getSkus(); if(skus != null && skus.size() > 0) { skus.forEach(item -> { String defaultImg = ""; //查出默认图片 for (Images image: item.getImages()) { if(image.getDefaultImg() == 1) { defaultImg = image.getImgUrl(); } } //6.1、sku的基本信息`pms_sku_info` //skus列表中的每个item赋值给sku_info实体类 SkuInfoEntity skuInfoEntity = new SkuInfoEntity(); BeanUtils.copyProperties(item, skuInfoEntity); skuInfoEntity.setSpuId(spuId); skuInfoEntity.setBrandId(skuInfoEntity.getBrandId()); skuInfoEntity.setCatalogId(skuInfoEntity.getCatalogId()); skuInfoEntity.setSaleCount(0L); skuInfoEntity.setSkuDefaultImg(defaultImg); skuInfoService.save(skuInfoEntity); //6.2、sku的图片信息`pms_sku_images` Long skuId = skuInfoEntity.getSkuId(); List<SkuImagesEntity> skuImagesEntities = item.getImages().stream().map(img -> { SkuImagesEntity imagesEntity = new SkuImagesEntity(); imagesEntity.setSkuId(skuId); imagesEntity.setImgUrl(img.getImgUrl()); imagesEntity.setDefaultImg(img.getDefaultImg()); return imagesEntity; }).filter(entity -> { //返回true是需要,返回false是过滤掉 return !StringUtils.isNullOrEmpty(entity.getImgUrl()); }).collect(Collectors.toList()); skuImagesService.saveBatch(skuImagesEntities); //6.3、sku的销售属性信息`pms_sku_sale_attr_value` List<Attr> attr = item.getAttr(); List<SkuSaleAttrValueEntity> skuSaleAttrValueEntities = attr.stream().map(a -> { SkuSaleAttrValueEntity skuSaleAttrValueEntity = new SkuSaleAttrValueEntity(); skuSaleAttrValueEntity.setSkuId(skuId); BeanUtils.copyProperties(a, skuSaleAttrValueEntity); return skuSaleAttrValueEntity; }).collect(Collectors.toList()); skuSaleAttrValueService.saveBatch(skuSaleAttrValueEntities); //6.4、sku的优惠,满减信息`gulimall_sms -> `sms_sku_ladder` / `sms_sku_full_reduction` / `sms_member_price`` SkuReductionTo skuReductionTo = new SkuReductionTo(); BeanUtils.copyProperties(item, skuReductionTo); skuReductionTo.setSkuId(skuId); if (skuReductionTo.getFullCount() > 0 || skuReductionTo.getFullPrice().compareTo(new BigDecimal("0")) == 1){ R r1 = couponFeignService.saveSkuReduction(skuReductionTo); if(r1.getCode() != 0) { log.error("远程保存优惠信息失败"); } } }); } }
6、商品服务-API-商品管理
(1) SPU检索
- 实现
/product/spuinfo/list接口- 在service实现
queryPageByCondition方法,在controller层调用@RequestMapping("/list") public R list(@RequestParam Map<String, Object> params){ PageUtils page = spuInfoService.queryPageByCondition(params); return R.ok().put("page", page); } - 具体实现
@Override
public PageUtils queryPageByCondition(Map<String, Object> params) {
    QueryWrapper<SpuInfoEntity> wrapper = new QueryWrapper<>();

    String key = (String) params.get("key");
    if(!StringUtils.isNullOrEmpty(key)) {
        wrapper.and((w) -> {
           w.eq("id", key).or().like("spu_name", key);
        });
    }

    String status = (String) params.get("status");
    if(!StringUtils.isNullOrEmpty(status)) {
        wrapper.eq("publish_status", status);
    }

    String brandId = (String) params.get("brandId");
    if(!StringUtils.isNullOrEmpty(brandId) && !"0".equalsIgnoreCase(brandId)) {
        wrapper.eq("brand_id", brandId);
    }

    String catelogId = (String) params.get("catelogId");
    if(!StringUtils.isNullOrEmpty(catelogId) && !"0".equalsIgnoreCase(catelogId)) {
        wrapper.eq("catalog_id", catelogId);
    }

    IPage<SpuInfoEntity> page = this.page(
            new Query<SpuInfoEntity>().getPage(params),
            wrapper
    );

    return new PageUtils(page);
}
- 在service实现
(2) SKU检索
- 实现
/product/spuinfo/list接口- 按上面的写就行,下面是具体实现
@Override
public PageUtils queryPageByCondition(Map<String, Object> params) {
    QueryWrapper<SkuInfoEntity> wrapper = new QueryWrapper<>();

    String key = (String) params.get("key");
    if(!StringUtils.isNullOrEmpty(key)) {
        wrapper.and((w) -> {
            w.eq("id", key).or().like("spu_name", key);
        });
    }


    String brandId = (String) params.get("brandId");
    if(!StringUtils.isNullOrEmpty(brandId) && !"0".equalsIgnoreCase(brandId)) {
        wrapper.eq("brand_id", brandId);
    }

    String catelogId = (String) params.get("catelogId");
    if(!StringUtils.isNullOrEmpty(catelogId) && !"0".equalsIgnoreCase(catelogId)) {
        wrapper.eq("catalog_id", catelogId);
    }

    String min = (String) params.get("min");
    if(!StringUtils.isNullOrEmpty(min) && !"0".equalsIgnoreCase(min)) {
        wrapper.ge("price", min);
    }

    String max = (String) params.get("max");
    if(!StringUtils.isNullOrEmpty(max) && !"0".equalsIgnoreCase(max)) {
        wrapper.le("price", max);
    }


    IPage<SkuInfoEntity> page = this.page(
            new Query<SkuInfoEntity>().getPage(params),
            wrapper
    );

    return new PageUtils(page);
}
- 按上面的写就行,下面是具体实现
7、仓储服务-API-仓库管理
仓库管理部分主要是管理仓库产品信息,如新增时查询了商品、仓库等列表便于选择。主要内容包括:采购单维护-采购需求, 采购单维护-采购单, 仓库维护,库存工作单,商品库存。
(1) gulimall_wms数据库
(2) 准备工作
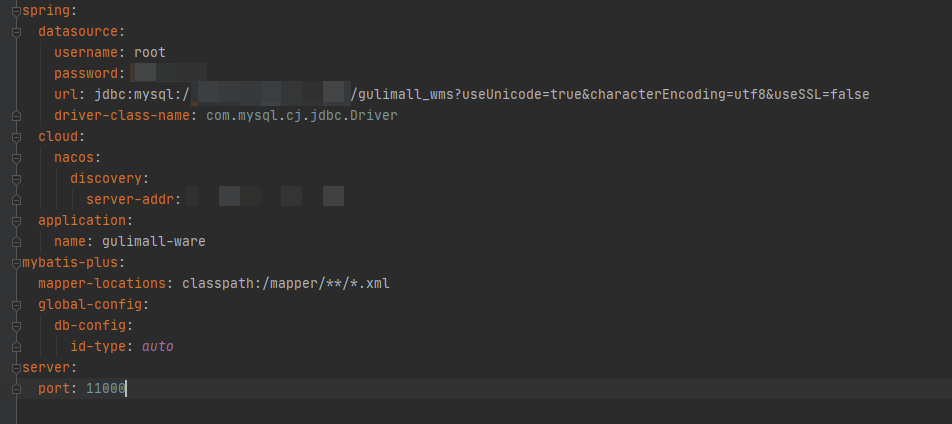
- 将ware服务加入nacos。
application.yml
- 配置网关
- id: ware_route
  uri: lb://gulimall-ware
  predicates:
    - Path=/api/ware/**
  filters:
    - RewritePath=/api/(?<segment>.*),/$\{segment}
(3) 模糊查询
-
实现仓库的模糊查询
- 实现接口
/ware/wareinfo/list@Override public PageUtils queryPageByCondition(Map<String, Object> params) { QueryWrapper<WareInfoEntity> wrapper = new QueryWrapper<>(); String key = (String) params.get("key"); if(!StringUtils.isNullOrEmpty(key)) { wrapper.eq("id", key).or().like("name", key).or().like("address", key).or().like("areacode", key); } IPage<WareInfoEntity> page = this.page( new Query<WareInfoEntity>().getPage(params), wrapper ); return new PageUtils(page); }
- 实现接口
-
实现库存的模糊查询
- 实现接口
/ware/waresku/list, 在WareSkuServiceImpl.java中:@Override public PageUtils queryPageByCondition(Map<String, Object> params) { QueryWrapper<WareSkuEntity> wrapper = new QueryWrapper<>(); String wareId = (String) params.get("wareId"); if(!StringUtils.isNullOrEmpty(wareId)) { wrapper.eq("ware_id", wareId); } String skuId = (String) params.get("skuId"); if(!StringUtils.isNullOrEmpty(skuId)) { wrapper.eq("sku_id", skuId); } IPage<WareSkuEntity> page = this.page( new Query<WareSkuEntity>().getPage(params), ); return new PageUtils(page); }
- 实现接口
-
实现采购需求的模糊查询
- 实现接口
/ware/purchasedetail/list@Override public PageUtils queryPageByCondition(Map<String, Object> params) { QueryWrapper<PurchaseDetailEntity> wrapper = new QueryWrapper<>(); String key = (String) params.get("key"); if(!StringUtils.isNullOrEmpty(key)) { wrapper.eq("id", key).or().eq("purchase_id", key).or().eq("sku_id", key).or().eq("sku_num", key); } String status = (String) params.get("status"); if(!StringUtils.isNullOrEmpty(status)) { wrapper.eq("status", status); } String wareId = (String) params.get("wareId"); if(!StringUtils.isNullOrEmpty(wareId)) { wrapper.eq("ware_id", wareId); } IPage<PurchaseDetailEntity> page = this.page( new Query<PurchaseDetailEntity>().getPage(params), wrapper ); return new PageUtils(page); }
- 实现接口
(4) 合并采购流程
-
这里实现将实现合并采购的流程
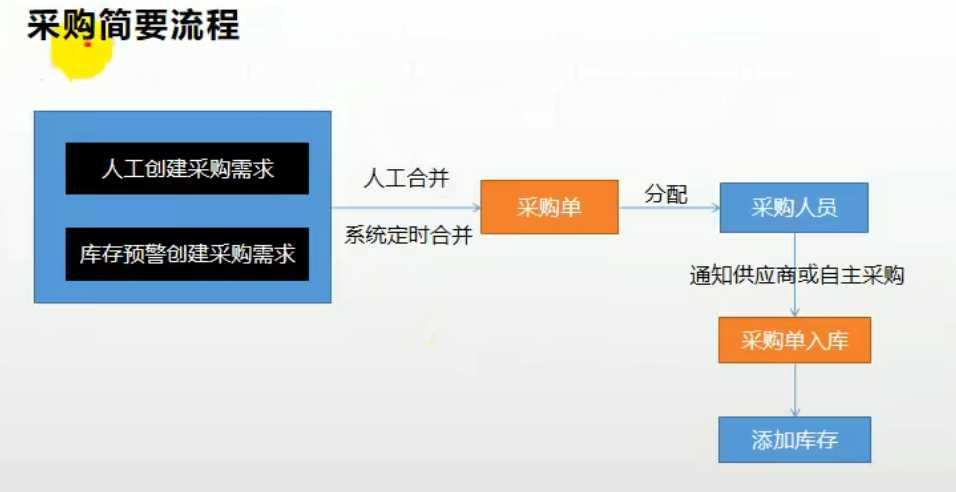
-
首先需要查询未领取的采购单,这样才能将这些采购单进行任务安排
- 创建常量枚举类constant.WareConstant
public class WareConstant { /** 采购单状态枚举*/ public enum PurchaseStatusEnum { CREATED(0, "新建"), ASSIGNED(1, "已分配"), RECEIVE(2, "已领取"), FINISH(3, "已完成"), HASERROR(4, "有异常") private int code; private String msg; PurchaseStatusEnum(int code, String msg) { this.code = code; this.msg = msg; } public int getCode() { return code; } public String getMsg() { return msg; } } /** 采购需求枚举*/ /** 采购需求枚举 */ public enum PurchaseDetailStatusEnum{ CREATED(0,"新建"),ASSIGNED(1,"已分配"), BUYING(2,"正在采购"),FINISH(3,"已完成"), HASERROR(4,"采购失败"); private int code; private String msg; PurchaseDetailStatusEnum(int code,String msg){ this.code = code; this.msg = msg; } public int getCode() { return code; } public String getMsg() { return msg; } } } - 实现接口
/ware/purchase/unreceive/list, 查询未领取的采购单- service层实现queryPageUnreceive方法,controler层实现接口
@GetMapping("/unreceive/list") public R unreceiveList(@RequestParam Map<String, Object> params) { PageUtils page = purchaseService.queryPageUnreceive(params); return R.ok().put("page", page); } - 具体实现
@Override
public PageUtils queryPageUnreceive(Map<String, Object> params) {
    QueryWrapper<PurchaseEntity> wrapper = new QueryWrapper<>();
    wrapper.eq("status", WareConstant.PurchaseStatusEnum.CREATED.getCode()).or().eq("status", WareConstant.PurchaseStatusEnum.ASSIGNED.getCode());

    IPage<PurchaseEntity> page = this.page(
            new Query<PurchaseEntity>().getPage(params),
            wrapper
    );

    return new PageUtils(page);
}
- service层实现queryPageUnreceive方法,controler层实现接口
- 测试:
- 创建常量枚举类constant.WareConstant
(5) 合并采购流程
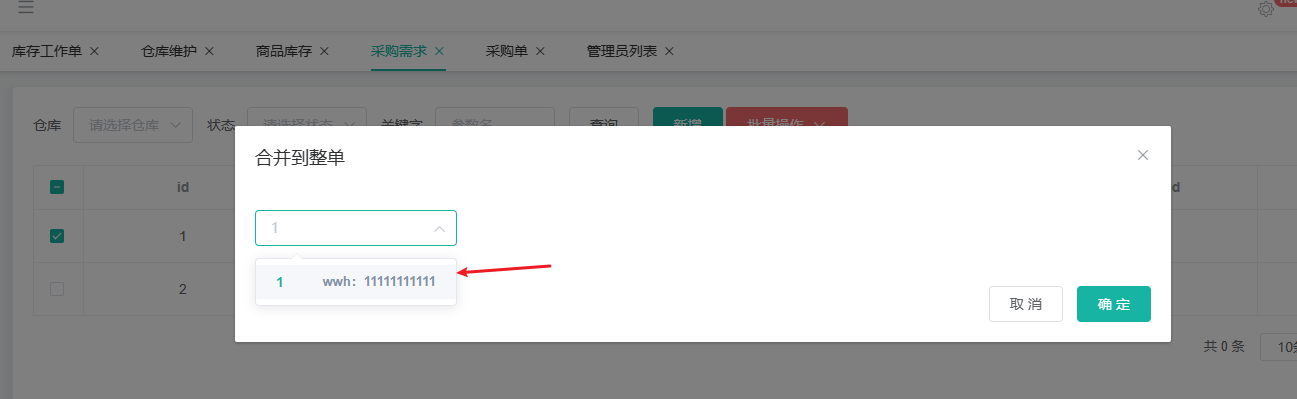
- 实现合并采购需求的接口
/ware/purchase/merge, 且没有选择整单id时将创建新采购单 - 新建MergerVo,接收数据
@Data public class MergeVo { private Long purchaseId; //整单id private List<Long> items; //合并项集合 } - 在PurchaseController.java中实现merge方法
@PostMapping("/merge") public R merge(@RequestBody MergeVo mergeVo) { purchaseService.mergePurchase(mergeVo); return R.ok(); } - 具体实现如下:
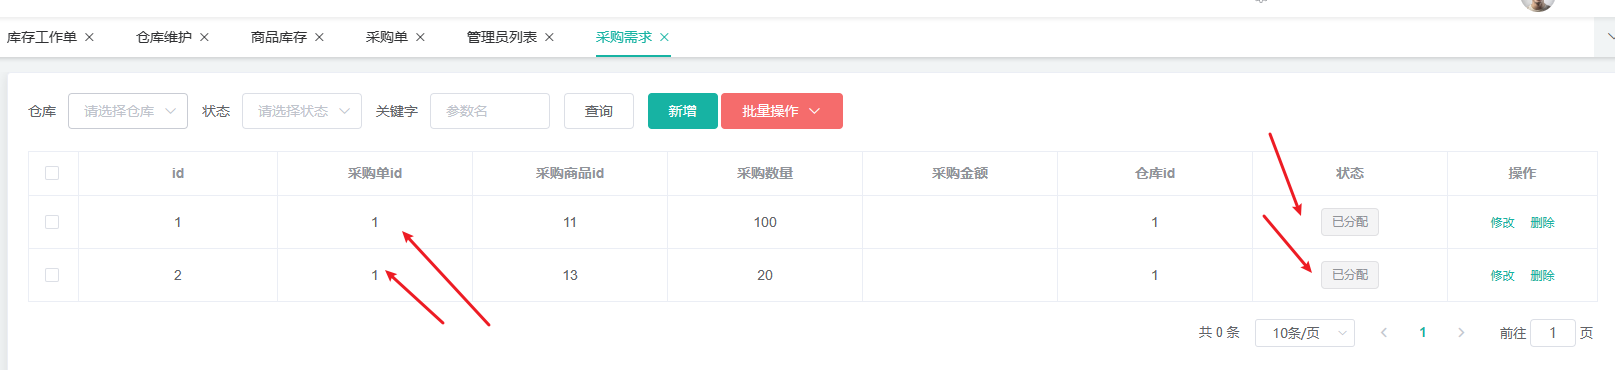
@Transactional @Override public void mergePurchase(MergeVo mergeVo) { Long purchaseId = mergeVo.getPurchaseId(); //如果采购id为null 说明没有选采购单 if(purchaseId == null) { //新建采购单 PurchaseEntity purchaseEntity = new PurchaseEntity(); purchaseEntity.setStatus(WareConstant.PurchaseStatusEnum.CREATED.getCode()); this.save(purchaseEntity); purchaseId = purchaseEntity.getId(); } //合并采购需求 List<Long> items = mergeVo.getItems(); Long finalPurchaseId = purchaseId; List<PurchaseDetailEntity> list = detailService.getBaseMapper().selectBatchIds(items).stream().filter(entity-> { //如果还没有采购或者采购失败,可以修改 return entity.getStatus() < WareConstant.PurchaseDetailStatusEnum.BUYING.getCode() || entity.getStatus() == WareConstant.PurchaseDetailStatusEnum.HASERROR.getCode(); }).map(entity -> { //修改状态,以及采购单Id entity.setStatus(WareConstant.PurchaseDetailStatusEnum.ASSIGNED.getCode()); entity.setPurchaseId(finalPurchaseId); return entity; }).collect(Collectors.toList()); detailService.updateBatchById(list); } - 对采购单添加创建时间、更新时间进行自动填充, 在PurchaseEntity中添加注解
/** * 创建日期 */ @TableField(fill = FieldFill.INSERT) private Date createTime; /** * 更新日期 */ @TableField(fill = FieldFill.INSERT_UPDATE) private Date updateTime; - 测试:

(6) 领取采购单
-
实现接口
/ware/purchase/received, 采购员领取采购任务。 -
在controller实现接口方法
@PostMapping("/received") public R received(@RequestBody List<Long> ids) { purchaseService.received(ids); return R.ok(); } -
具体实现
@Transactional @Override public void received(List<Long> ids) { //没有采购需求直接返回,否则会破坏采购单 if(ids == null || ids.size() == 0) { return; } List<PurchaseEntity> list = this.getBaseMapper().selectBatchIds(ids).stream().filter(entity->{ //确保采购单状态是新建或者已分配 return entity.getStatus() <= WareConstant.PurchaseStatusEnum.ASSIGNED.getCode(); }).map(entity -> { //修改采购单的状态为已领取 entity.setStatus(WareConstant.PurchaseStatusEnum.RECEIVE.getCode()); return entity; }).collect(Collectors.toList()); this.updateBatchById(list); //修改该采购单下所有采购需求的状态为正在采购 UpdateWrapper<PurchaseDetailEntity> updateWrapper = new UpdateWrapper<>(); updateWrapper.in("purchase_id", ids); PurchaseDetailEntity purchaseDetailEntity = new PurchaseDetailEntity(); purchaseDetailEntity.setStatus(WareConstant.PurchaseDetailStatusEnum.BUYING.getCode()); detailService.update(purchaseDetailEntity, updateWrapper); } -
使用Postman进行测试:


(7) 完成采购
-
完成采购步骤:
- 判断尿素有采购需求的状态,采购需求要求全部完成时,采购单状态才能完成
- 采购项完成时,增加库存(调用远程获取skuName)
- 加上分页插件
-
实现完成采购接口
/ware/purchase/done- 新建
PurchaseItemDoneVo,PurchaseDoneVo接收数据@Data public class PurchaseItemDoneVo { private Long itemId; private Integer status; private String reason; }@Data public class PurchaseDoneVo { private Long id; private List<PurchaseItemDoneVo> items; } - 在PurchaseController.java中实现done接口
@PostMapping("/done") public R received(@RequestBody PurchaseDoneVo vo) { purchaseService.done(vo); return R.ok(); } - 具体实现 (addStock方法后面实现)
@Override
public void done(PurchaseDoneVo vo) {
    //1、根据前端发过来的消息,更新采购需求的状态
    List<PurchaseItemDoneVo> items = vo.getItems();
    List<PurchaseDetailEntity> updateList = new ArrayList<>();
    boolean flag = true;
    for(PurchaseItemDoneVo item: items) {
        Long detailId = item.getItemId();
        PurchaseDetailEntity detailEntity = detailService.getById(detailId);
        detailEntity.setStatus(item.getStatus());
        //采购需求失败
        if(item.getStatus() == WareConstant.PurchaseStatusEnum.HASERROR.getCode()) {
            flag = false;
        } else {
            //3、根据采购需求的状态,更新库存
            //sku_id, sku_name, ware_id
            //sku_id, ware_id, stock sku_name(远程调用服务获取), stock_locked(先获取已经有的库存,再加上新购买的数量)
            String skuName = "";
            try {
                R info = productFeignService.info(detailEntity.getSkuId());
                if(info.getCode() == 0) {
                    Map<String, Object> data = (Map<String, Object>) info.get("skuInfo");
                    skuName = (String) data.get("skuName");
                }
            } catch (Exception e) {

            }
            //更新库存
            wareSkuService.addStock(detailEntity.getSkuId(), detailEntity.getWareId(), skuName, detailEntity.getSkuNum());
        }
        updateList.add(detailEntity);
    }
    //保存采购需求
    detailService.updateBatchById(updateList);
    //2、根据采购需求的状态,更新采购单的状态
    PurchaseEntity purchaseEntity = new PurchaseEntity();
    purchaseEntity.setId(vo.getId());
    purchaseEntity.setStatus(flag ? WareConstant.PurchaseStatusEnum.FINISH.getCode() : WareConstant.PurchaseStatusEnum.HASERROR.getCode());
    this.updateById(purchaseEntity);
}
- 新建
-
新建feign.ProductFeignService接口,用来远程获取skuName.(主启动类上加上注解
@EnableFeignClients(basePackages = "com.atguigu.gulimall.ware.feign"))@FeignClient("gulimall-product") public interface ProductFeignService { @RequestMapping("/product/skuinfo/info/{skuId}") R info(@PathVariable("skuId") Long skuId); } -
WareSkuServiceImpl.java 实现入库操作
- 思路就是查到这个skuid和wareid对应的wareSku,如果存在就再原库存量上加上sukNum,否则新建一个并让库存量为skuNum
@Override
public void addStock(Long skuId, Long wareId, String skuName, Integer skuNum) {
    WareSkuEntity wareSkuEntity = this.baseMapper.selectOne(new QueryWrapper<WareSkuEntity>().eq("sku_id", skuId).eq("ware_id", wareId));
    if(wareSkuEntity == null) {
        wareSkuEntity = new WareSkuEntity();
        wareSkuEntity.setStock(skuNum);
    } else {
        wareSkuEntity.setStock(wareSkuEntity.getStock() + skuNum);
    }
    wareSkuEntity.setSkuName(skuName);
    wareSkuEntity.setWareId(wareId);
    wareSkuEntity.setSkuId(skuId);

    this.saveOrUpdate(wareSkuEntity);
}
- 思路就是查到这个skuid和wareid对应的wareSku,如果存在就再原库存量上加上sukNum,否则新建一个并让库存量为skuNum
(8) 添加分页插件
- 分页有问题是因为要配置分页配置,新建config.WareMyBatisConfig
@Configuration
@EnableTransactionManagement
@MapperScan("com.atguigu.gulimall.ware.dao")
public class WareMyBatisConfig {
    //引入分页插件
    @Bean
    public PaginationInterceptor mybatisPlusInterceptor() {
        PaginationInterceptor paginationInterceptor = new PaginationInterceptor();
        //设置请求的页面大于最大页的操作,true回到首页,false,继续请求,默认false
        paginationInterceptor.setOverflow(true);
        //设置最大单页限制数量,默认500条,-1不受限制
        paginationInterceptor.setLimit(1000);
        return paginationInterceptor;
    }
}
(9)测试
http://localhost:88/api/ware/purchase/done

{
  "id": 1,
  "items": [
    {"itemId":1,"status":3,"reason":"完成"},
    {"itemId":2,"status":3,"reason":"完成"}
  ]
}


(10) Spu管理
-
问题:400
- 解决方法:数据库sys_menu添加(76,37,规格维护,product/)
-
获取spu规格
- AttrController.java实现接口
/product/attr/base/listforspu/{spuId}@GetMapping("/base/listforspu/") public R baseListforspu(@PathVariable("spuId") Long spuId) { List<ProductAttrValueEntity> entityList = productAttrValueService.baseAttrlistForSpu(spuId); return R.ok().put("data", entityList); } - 具体实现
@Override public List<ProductAttrValueEntity> baseAttrlistForSpu(Long spuId) { List<ProductAttrValueEntity> entities = this.baseMapper.selectList(new QueryWrapper<ProductAttrValueEntity>().eq("spu_id",spuId)); return entities; } - 测试:
- AttrController.java实现接口
-
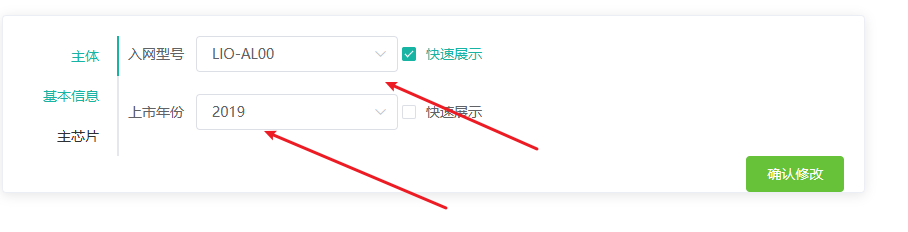
修改商品规格 (接口
/product/attr/update/{spuId})- AttrController.java实现
@PostMapping("/update/{spuId}") public R updateSpuAttr(@PathVariable("spuId") Long spuId, @RequestBody List<ProductAttrValueEntity> entities) { productAttrValueService.updateSpuAttr(spuId, entities); return R.ok(); } - 具体实现
@Override
public void updateSpuAttr(Long spuId, List<ProductAttrValueEntity> entities) {
    //1、删除这个spuId对应的所有属性
    this.baseMapper.delete(new QueryWrapper<ProductAttrValueEntity>().eq("spu_id", spuId));
    //2、新增回去
    for(ProductAttrValueEntity entity: entities) {
        entity.setSpuId(spuId);
    }
    this.saveBatch(entities);
}
- AttrController.java实现

 浙公网安备 33010602011771号