

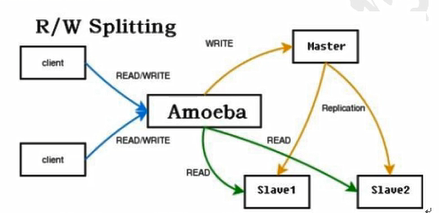
一、MySQL 基于Amoeba实现读写分离
1、在主机Amoeba上安装java环境
114:将下面两个rz进来
[root@localhost ~]# chmod +x jdk-6u14-linux-x64.bin
[root@localhost ~]# ./jdk-6u14-linux-x64.bin
[root@localhost ~]# ls
amoeba-mysql-binary-2.2.0.tar.gz jdk1.6.0_14 公共 视频 文档 音乐
anaconda-ks.cfg jdk-6u14-linux-x64.bin 模板 图片 下载 桌面
[root@localhost ~]# mv jdk1.6.0_14/ /usr/local/jdk1.6
[root@localhost ~]# vim /etc/profile //在最后添加:
export JAVA_HOME=/usr/local/jdk1.6
export CLASSPATH=$CLASSPATH:$JAVA_HOME/lib:$JAVA_HOME/jre/lib
export PATH=$PATH:$JAVA_HOME/lib:$JAVA_HOME/jre/bin:$HOME/bin
export AMOEBA_HOME=/usr/local/amoeba
export PATH=$PATH:$AMOEBA_HOME/bin
[root@localhost ~]# rm -rf /usr/bin/java
[root@localhost ~]# source /etc/profile
[root@localhost ~]# java -version
java version "1.6.0_14"
Java(TM) SE Runtime Environment (build 1.6.0_14-b08)
Java HotSpot(TM) 64-Bit Server VM (build 14.0-b16, mixed mode)
2、解压amoeba
[root@localhost ~]# mkdir /usr/local/amoeba
[root@localhost ~]# tar xf amoeba-mysql-binary-2.2.0.tar.gz -C /usr/local/amoeba
[root@localhost ~]# chmod -R 755 /usr/local/amoeba
3、配置Amoeba读写分离,两个Slave读负载均衡
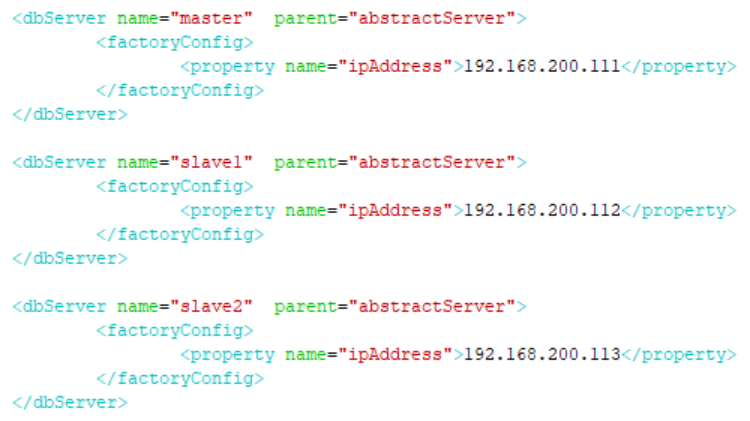
(1)在111、112、113服务器中配置Amoeba的访问授权
MariaDB [(none)]> grant all on *.* to 'test'@'192.168.200.%' identified by '123';
Query OK, 0 rows affected (0.00 sec)
MariaDB [(none)]> flush privileges;
Query OK, 0 rows affected (0.01 sec)
(2)114:编辑amoeba.xml配置文件
[root@localhost ~]# cd /usr/local/amoeba/conf/
[root@localhost conf]# cp amoeba.xml amoeba.xml.bak
[root@localhost conf]# vim amoeba.xml
<property name="user">amoeba</property>
<property name="password">123</property>
<property name="defaultPool">master</property>
<property name="writePool">master</property>
<property name="readPool">slaves</property>
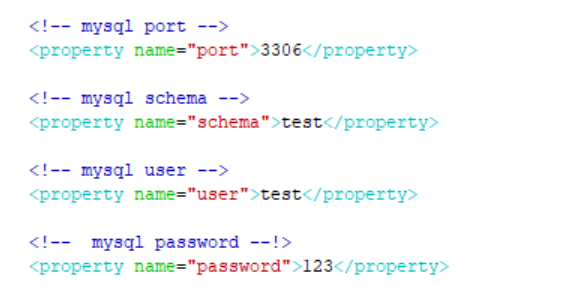
(3)编辑dbServers.xml配置文件
[root@localhost conf]# cp dbServers.xml dbServers.xml.bak
[root@localhost conf]# vim dbServers.xml
<!-- mysql user -->
<property name="user">test</property>
<!-- mysql password --!>
<property name="password">123</property>

4、配置无误之后,启动Amoeba软件,默认端口是TCP协议8066
[root@localhost conf]# nohup /usr/local/amoeba/bin/amoeba start &
[root@localhost ~]# netstat -lnpt //查看一下有没有8066端口
5、*如果没有执行以下操作:
[root@localhost conf]# ps aux | grep amoeba
root 39406 0.3 1.9 1070924 40536 pts/0 Sl 16:28 0:04 /usr/local/jdk1.6/bin/java -server -Xms256m -Xmx256m -Xss128k -Damoeba.home=/usr/local/amoeba -Dclassworlds.conf=/usr/local/amoeba/bin/amoeba.classworlds -classpath /usr/local/amoeba/lib/classworlds-1.0.jar org.codehaus.classworlds.Launcher start
root 39859 0.0 0.0 112656 972 pts/0 R+ 16:49 0:00 grep --color=auto amoeba
[root@localhost conf]# kill -9 39406
[root@localhost conf]# ps aux | grep amoeba
root 39869 0.0 0.0 112656 972 pts/0 R+ 16:49 0:00 grep --color=auto amoeba
[1]+ 已杀死 nohup /usr/local/amoeba/bin/amoeba start
[root@localhost conf]# /usr/local/amoeba/bin/amoeba start
再复制一个ssh渠道:[root@localhost ~]# netstat -lnpt
[root@localhost ~]# netstat -lnpt
Active Internet connections (only servers)
Proto Recv-Q Send-Q Local Address Foreign Address State PID/Program name
tcp 0 0 0.0.0.0:22 0.0.0.0:* LISTEN 1455/sshd
tcp 0 0 127.0.0.1:631 0.0.0.0:* LISTEN 2124/cupsd
tcp 0 0 127.0.0.1:25 0.0.0.0:* LISTEN 1688/master
tcp 0 0 127.0.0.1:6010 0.0.0.0:* LISTEN 37882/sshd: root@pt
tcp 0 0 127.0.0.1:6011 0.0.0.0:* LISTEN 39696/sshd: root@pt
tcp6 0 0 :::8066 :::* LISTEN 39957/java // 已经有了
[root@localhost conf]# nohup /usr/local/amoeba/bin/amoeba start &
[root@localhost conf]# cat nohup.out //可能反应有点慢,但是会出现8066的端口
6、将115作为的客户机打开:安装mariadb
[root@localhost ~]# mysql -u amoeba -p123 -h 192.168.200.114 -P 8066 //登陆成功
Welcome to the MariaDB monitor. Commands end with ; or \g.
Your MySQL connection id is 1781793025
Server version: 5.1.45-mysql-amoeba-proxy-2.2.0 MariaDB Server
Copyright (c) 2000, 2014, Oracle, MariaDB Corporation Ab and others.
Type 'help;' or '\h' for help. Type '\c' to clear the current input statement.
MySQL [(none)]>
7、做读写分离的测试:
(1)在主服务器
MariaDB [(none)]> show databases;
MariaDB [(none)]> use lty
Database changed
MariaDB [lty]> create table student(id int(10),name varchar(10),address varchar(20));
Query OK, 0 rows affected (0.02 sec)
112、113也会有这个库
将112、113主从复制的功能暂时先关闭
MariaDB [(none)]> stop slave;
Query OK, 0 rows affected (0.00 sec)
(2)111上插入一个数据:
MariaDB [lty]> insert into student values('2','lty','jinan');
Query OK, 1 row affected (0.01 sec)
(3)112上插入一个数据:
MariaDB [(none)]> use lty
Database changed
MariaDB [lty]> insert into student values('3','jhc','rizhao');
Query OK, 1 row affected (0.01 sec)
(4)113上插入一个数据:
MariaDB [(none)]> use lty
Database changed
MariaDB [lty]> insert into student values('6','xiaoxingxing','waixing');
Query OK, 1 row affected, 1 warning (0.01 sec)
(5)在客户机上做测试:
[root@localhost ~]# mysql -uamoeba -p123 -h 192.168.200.114 -P 8066
Welcome to the MariaDB monitor. Commands end with ; or \g.
Your MySQL connection id is 1781793025
Server version: 5.1.45-mysql-amoeba-proxy-2.2.0 MariaDB Server
Copyright (c) 2000, 2014, Oracle, MariaDB Corporation Ab and others.
Type 'help;' or '\h' for help. Type '\c' to clear the current input statement.
MySQL [lty]> select * from student;
+------+------+---------+
| id | name | address |
+------+------+---------+
| 3 | jhc | rizhao |
+------+------+---------+
1 row in set (0.01 sec)
MySQL [lty]> select * from student;
+------+------------+---------+
| id | name | address |
+------+------------+---------+
| 6 | xiaoxingxi | waixing |
+------+------------+---------+
1 row in set (0.01 sec)
111:只写
112、113:只读
114:amoeba
115:客户机


【推荐】编程新体验,更懂你的AI,立即体验豆包MarsCode编程助手
【推荐】凌霞软件回馈社区,博客园 & 1Panel & Halo 联合会员上线
【推荐】抖音旗下AI助手豆包,你的智能百科全书,全免费不限次数
【推荐】博客园社区专享云产品让利特惠,阿里云新客6.5折上折
【推荐】轻量又高性能的 SSH 工具 IShell:AI 加持,快人一步
· 为什么说在企业级应用开发中,后端往往是效率杀手?
· 用 C# 插值字符串处理器写一个 sscanf
· Java 中堆内存和栈内存上的数据分布和特点
· 开发中对象命名的一点思考
· .NET Core内存结构体系(Windows环境)底层原理浅谈
· 为什么说在企业级应用开发中,后端往往是效率杀手?
· 本地部署DeepSeek后,没有好看的交互界面怎么行!
· DeepSeek 解答了困扰我五年的技术问题。时代确实变了!
· 趁着过年的时候手搓了一个低代码框架
· 推荐一个DeepSeek 大模型的免费 API 项目!兼容OpenAI接口!