Linux自动化运维工具之Ansible
目录
1、Linux运维发展史
早期服务器比较少。不需要运维岗位,开发就直接处理了。
后来随着网民的增加,服务器的数量节节攀升,出现了服务器的版本不一样可能会导致命令执行不成功的问题,常见的有以下版本:
centos 6、centos 7、centos 8、ubuntu 12、ubuntu 14、ubuntu 16
这时候就衍生出Linux自动化运维工具,来完成一次执行多条命令,同时解决服务器版本不同的问题。

# Linux自动化运维工具常用:
1.Ansible	:基于SSH协议的自动化运维工具,不需要客户端,不能够并发执行。中小型公司一般使用ansible.
2.saltstack :是C/S结构的工具,需要依赖客户端,对于python版本有要求,优点是支持并发。
2、Ansible简介
Ansible是一个自动化统一配置管理工具,自动化主要体现在Ansible集成了丰富模块以及功能组件,可以通过一个命令完成一系列的操作,进而能减少重复性的工作和维护成本,可以提高工作效率和工作精准度。Ansible本身是没有任何功能的,所有的功能都依赖于里面的模块的功能。
3、Ansible的安装
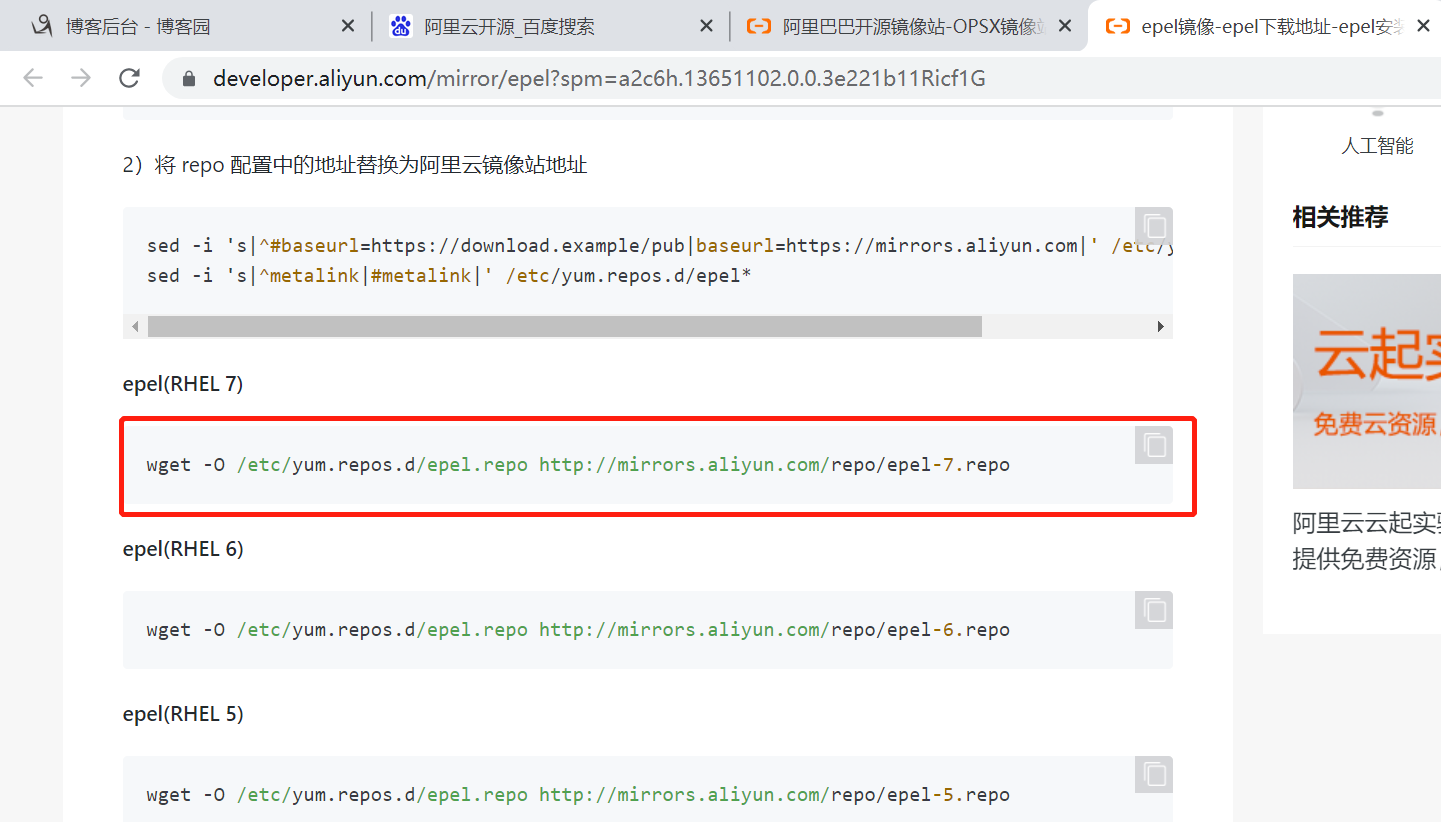
1.安装eple源去阿里云开源镜像站找eple源,找到需要的版本复制后执行命令:
[root@ansible ~]# yum install wget -y
[root@ansible ~]# wget -O /etc/yum.repos.d/epel.repo http://mirrors.aliyun.com/repo/epel-7.repo

2.yum命令安装Asible
[root@ansible ~]# yum install ansible

3.监测是否安装成功,执行命令ansible如有内容输出即为成功:
[root@ansible ~]# ansible -m ping
4、Ansible的组成
1.Ansible的hosts主机文件(ansible通过ssh连接,known_hosts记录登录状态)
[root@ansible ~]# vim /etc/ansible/hosts   # 键入以下内容并保存

    [web]		# 分组
    192.168.15.20 ansible_ssh_user=root ansible_ssh_port=22 ansible_ssh_pass='1'

2.核心模块:主要是ping
[root@ansible ~]# ssh root@192.168.15.20  # 记录登录状态
[root@ansible ~]# ansible web -m ping  # ping看看通不通

3.自定义模块custom modules根据自己的需求编写具体的模块(需要用python去写)

4.插件plugins完成模块功能的补充(后续会用到再进行补充)

5.剧本playbookansible的配置文件,将多个任务定义在剧本中,由ansible自动执行(剧本:把多条ansible命令统一起来再依次执行)

6.主机清单inventor定义ansible需要操作主机的范围(比如需要配置多个项目)

# 最重要的一点是 ansible是模块化的 它所有的操作都依赖于模块
5、Ansible的使用(参数)
1.查看ansible版本 --version
[root@ansible ~]# ansible --version

2.执行的详情 -v
[root@ansible ~]# ansible web -v -m command -a 'ls .'

3.主机清单路径 -i
[root@ansible ~]# ansible web -i /etc/ansible/hosts -m ping

4.输入SSH密码 -k
[root@ansible ~]# ansible web -k -i /etc/ansible/hosts -m ping

5.测试执行的步骤是否正确
[root@ansible ~]# ansible web -m command -a 'mkdir /ss/dd/aa' -C

6.使用的模块名称(默认command) -m
[root@ansible ~]# ansible web -m ping

7.使用的模块参数 -a
[root@ansible ~]# ansible web -m command -a 'mkdir /ss/dd/aa'

# 案例:使用ansible部署Nginx
	[root@ansible ~]# ansible web -m command -a 'yum install nginx -y'
6、Ansible配置文件
# Ansible的配置文件:/etc/ansible/ansible.cfg

配置文件的解析:
[root@ansible ~]# cat /etc/ansible/ansible.cfg
#inventory      = /etc/ansible/hosts      #主机列表配置文件
#library        = /usr/share/my_modules/  #库文件存放目录
#remote_tmp     = ~/.ansible/tmp          #临时py文件存放在远程主机目录
#local_tmp      = ~/.ansible/tmp          #本机的临时执行目录
#forks          = 5                       #默认并发数
#sudo_user      = root                    #默认sudo用户
#ask_sudo_pass = True                     #每次执行是否询问sudo的ssh密码
#ask_pass      = True                     #每次执行是否询问ssh密码
#remote_port    = 22                      #远程主机端口
host_key_checking = False                 #跳过检查主机指纹
log_path = /var/log/ansible.log           #ansible日志
7、主机清单
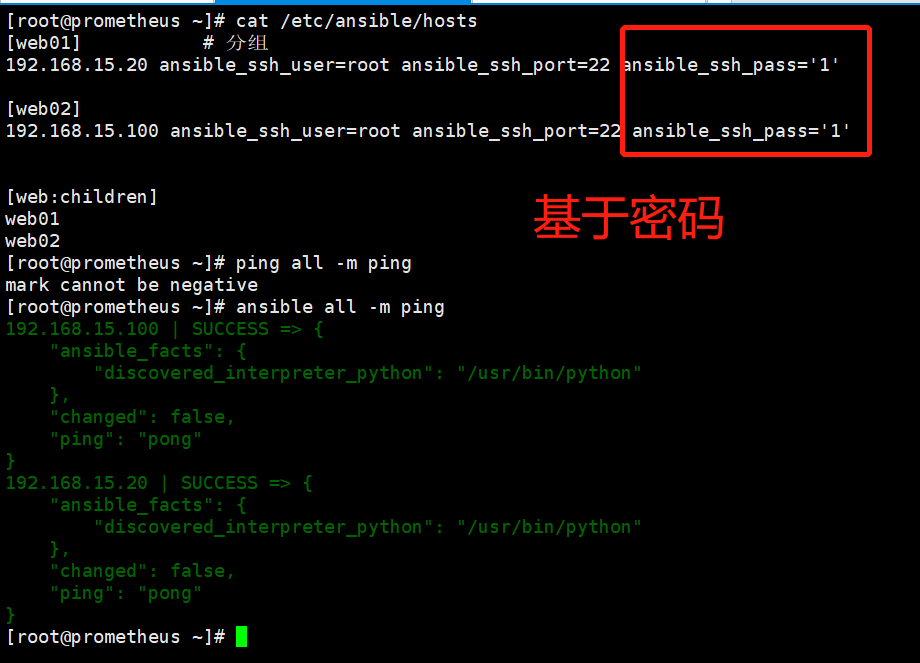
7.1 基于密码的方式
[root@ansible ~]# vim /etc/ansible/hosts

	[web01]
    192.168.15.20 ansible_ssh_user=root ansible_ssh_port=22 ansible_ssh_pass='1'
    [web02]
    192.168.15.100 ansible_ssh_user=root ansible_ssh_port=22 ansible_ssh_pass='1'
    # ansible_ssh_user	:用户名
    # ansible_ssh_port	:端口
    # ansible_ssh_pass	:密码
7.2 基于变量密码的方式
[root@ansible ~]# vim /etc/ansible/hosts
[web01] # 分组
192.168.15.20 ansible_ssh_user=root ansible_ssh_port=22
[web02]
192.168.15.100 ansible_ssh_user=root ansible_ssh_port=22
[web03]
192.168.15.77 ansible_ssh_user=root ansible_ssh_port=22
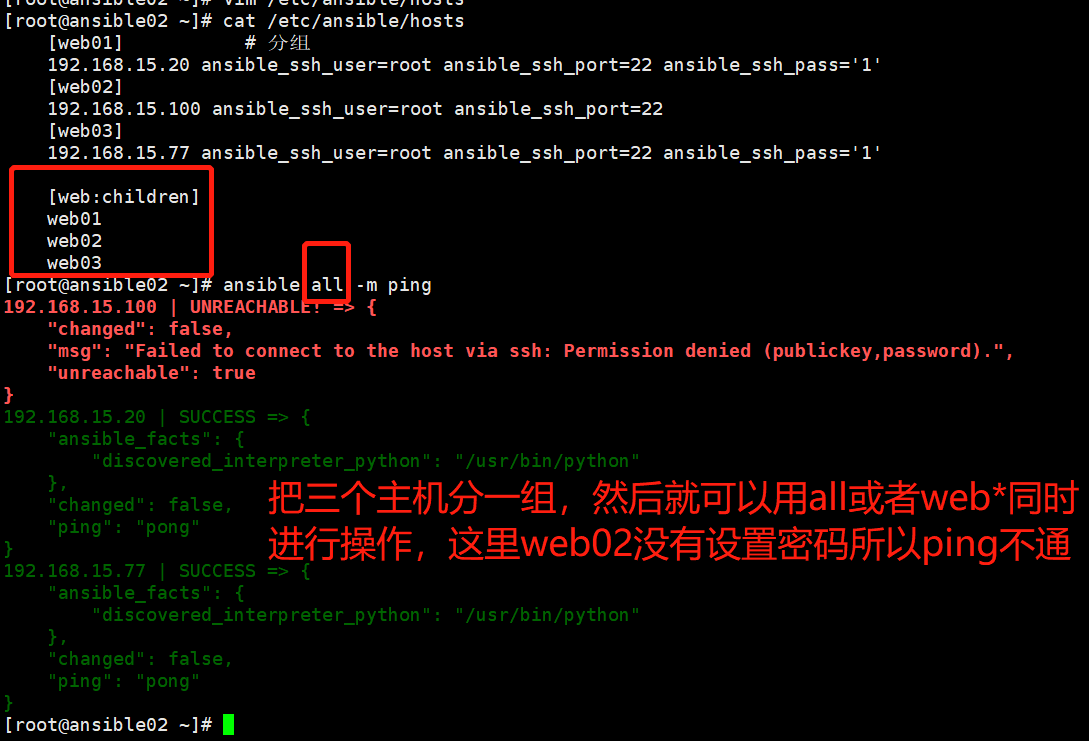
[web:children]
web01
web02
web03
[web01:vars] # 设置变量密码
ansible_ssh_pass='1'

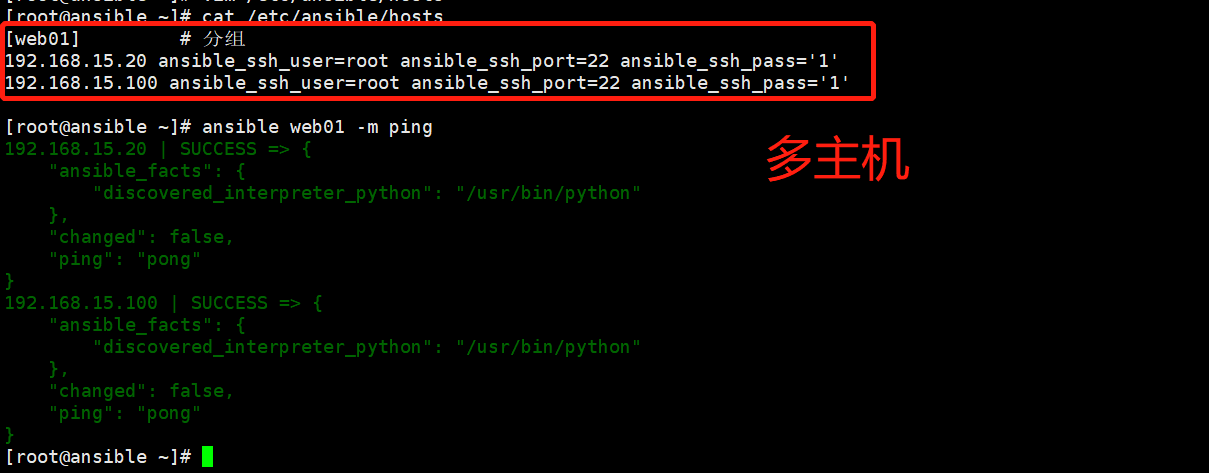
7.3 一个分组配置多主机
[root@ansible ~]# vim /etc/ansible/hosts

    [web01]
    192.168.15.20 ansible_ssh_user=root ansible_ssh_port=22
    192.168.15.100 ansible_ssh_user=root ansible_ssh_port=22
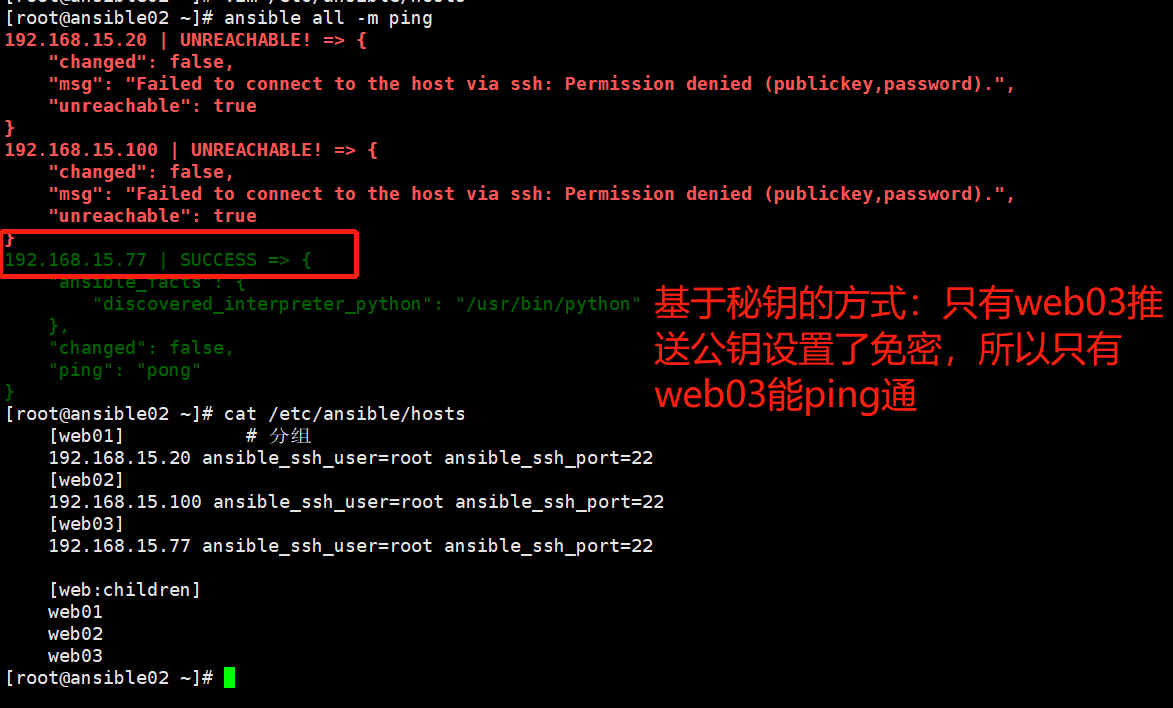
7.4 基于密钥的方式登录
[root@ansible ~]# ssh-keygen  # 生成秘钥
[root@ansible02 ~]# ssh-copy-id -i ~/.ssh/id_rsa.pub root@192.168.15.77  # 推送公钥
[root@ansible ~]# vim /etc/ansible/hosts  # 修改配置

    [web01]
    192.168.15.20 ansible_ssh_user=root ansible_ssh_port=22
    192.168.15.100 ansible_ssh_user=root ansible_ssh_port=22
7.5 分组组合
[root@ansible ~]# vim /etc/ansible/hosts

    [web01]           # 分组
    192.168.15.20 ansible_ssh_user=root ansible_ssh_port=22 ansible_ssh_pass='1'
    [web02]
    192.168.15.100 ansible_ssh_user=root ansible_ssh_port=22
    [web03]
    192.168.15.77 ansible_ssh_user=root ansible_ssh_port=22 ansible_ssh_pass='1'

    [web:children]
    web01
    web02
    web03

# 案例:使用分组的方式,在多台主机上安装Nginx
	[root@ansible ~]# ansible all -m command -a 'yum install nginx -y'
8、Ansible的模块
1.ansible-hoc : 临时命令,执行完即结束,不会保存,是一次性使用。
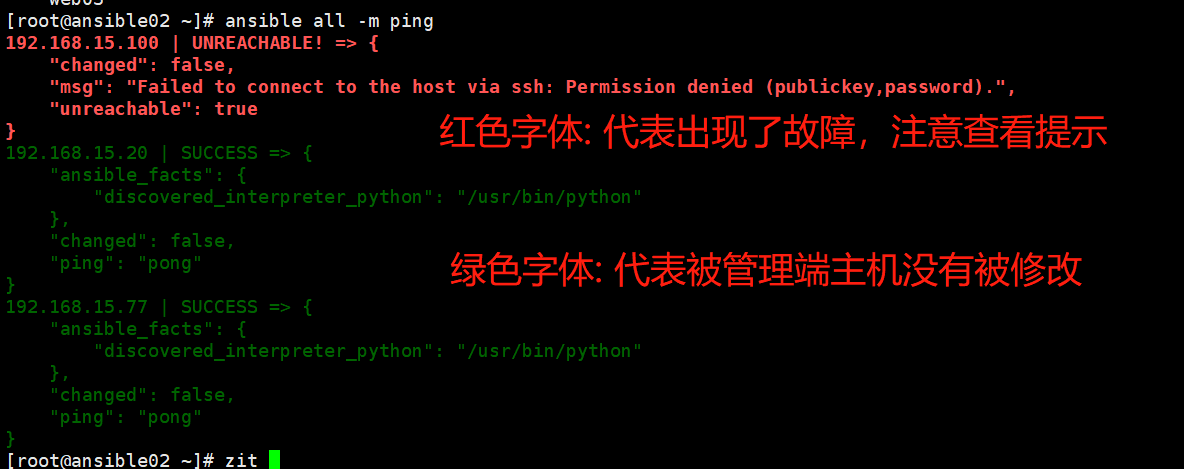
2.ansible-hoc 返回结果
绿色: 代表被管理端主机没有被修改
黄色: 代表被管理端主机发现变更
红色: 代表出现了故障,注意查看提示
3.ad-hoc常用模块
command # 执行shell命令(不支持管道等特殊字符)
shell # 执行shell命令
scripts # 执行shell脚本
yum_repository # 配置yum仓库
yum # 安装软件
copy # 变更配置文件
file # 建立目录或文件
service # 启动与停止服务
systemd # 启动与停止服务
mount # 挂载设备
cron # 定时任务
get_url #下载软件
firewalld #防火墙
selinux #selinux
setup #获取主机信息

8.1 command模块
command模块:远程执行命令模块,是ansible中默认模块,不支持特殊字符。
常用参数:
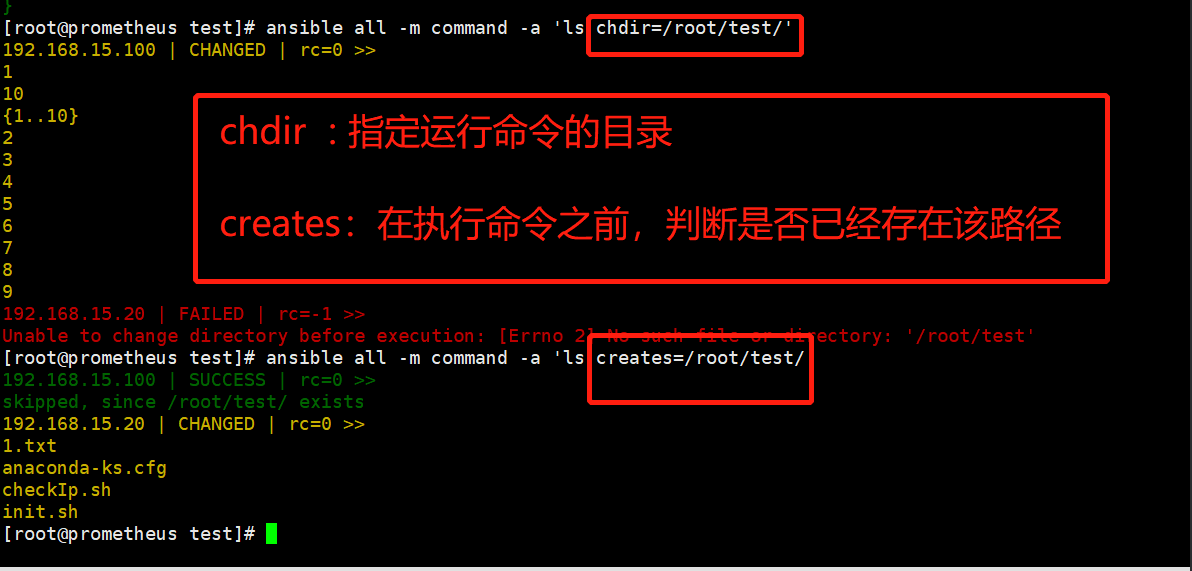
chdir : 运行命令的目录
[root@prometheus test]# ansible all -m command -a 'ls chdir=/root/test/'
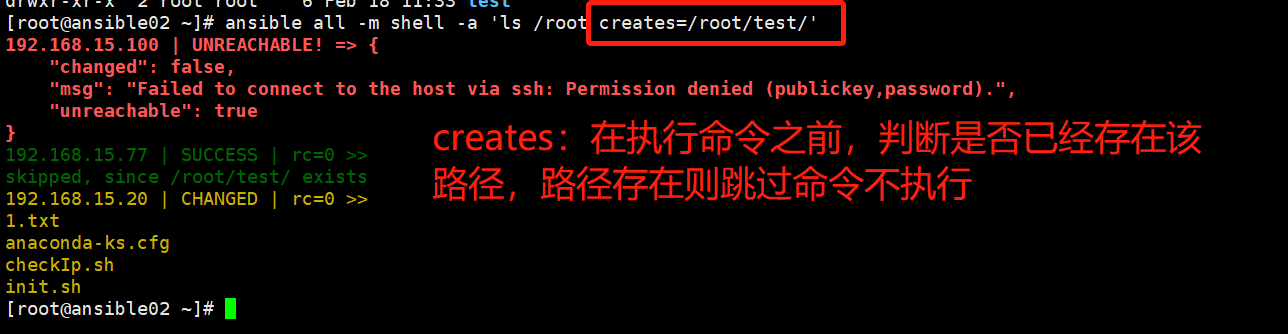
creates:在执行命令之前,判断是否已经存在该路径,路径存在则跳过命令不执行
[root@prometheus test]# ansible all -m command -a 'ls creates=/root/test/'
其他参数:使用命令 ansible-doc command查看
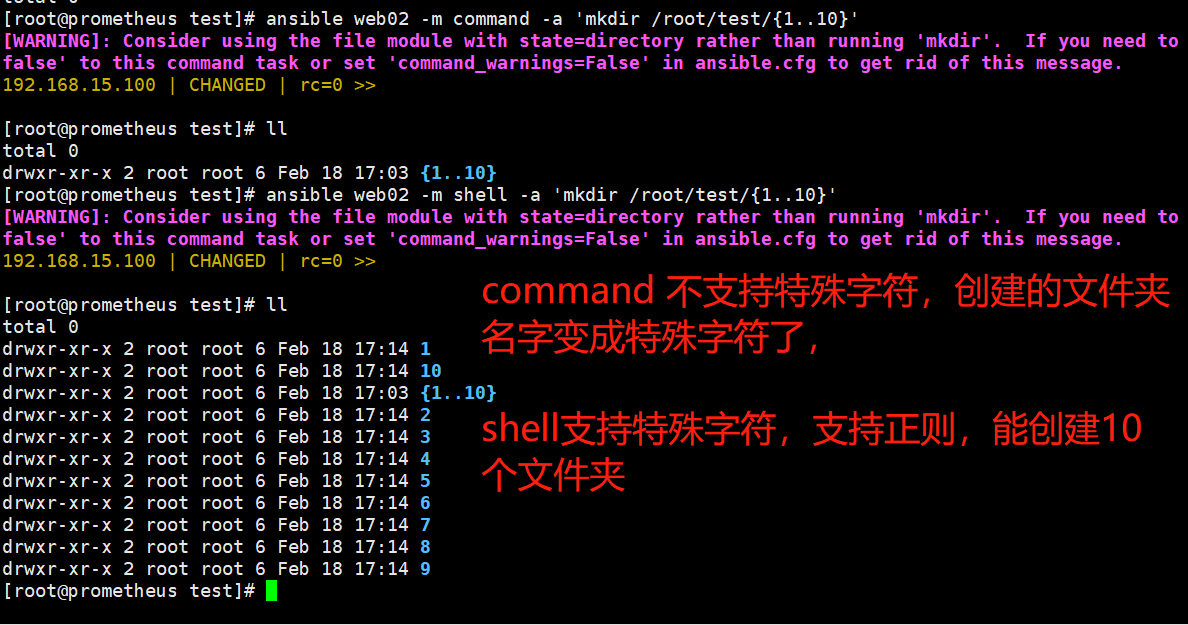
# 案例:使用 ansible的对应模块创建10个文件夹(command模块不支持特殊符号比如{},shell模块支持特殊符号和正则)
[root@ansible test]# ansible web02 -m command -a 'mkdir /root/test/{1..10}' # 不能创建
[root@ansible test]# ansible web02 -m shell -a 'mkdir /root/test/{1..10}' # 可以创建
8.2 shell模块
shell 模块:跟 command 模块功能非常相似,都是执行命令的模块;但是shell模块支持特殊符号,性能没有 command 模块高。
常用参数:
chdir : 运行命令的目录
removes :判断一个文件是否存在,存在则运行。
[root@ansible 1]# ansible all -m shell -a 'touch /root/1.txt removes=/root/test/1'
creates:在执行命令之前,判断是否已经存在该路径,路径存在则跳过命令不执行
[root@ansible02 ~]# ansible all -m shell -a 'ls /root creates=/root/test/'
其他参数:使用命令 ansible-doc shell查看
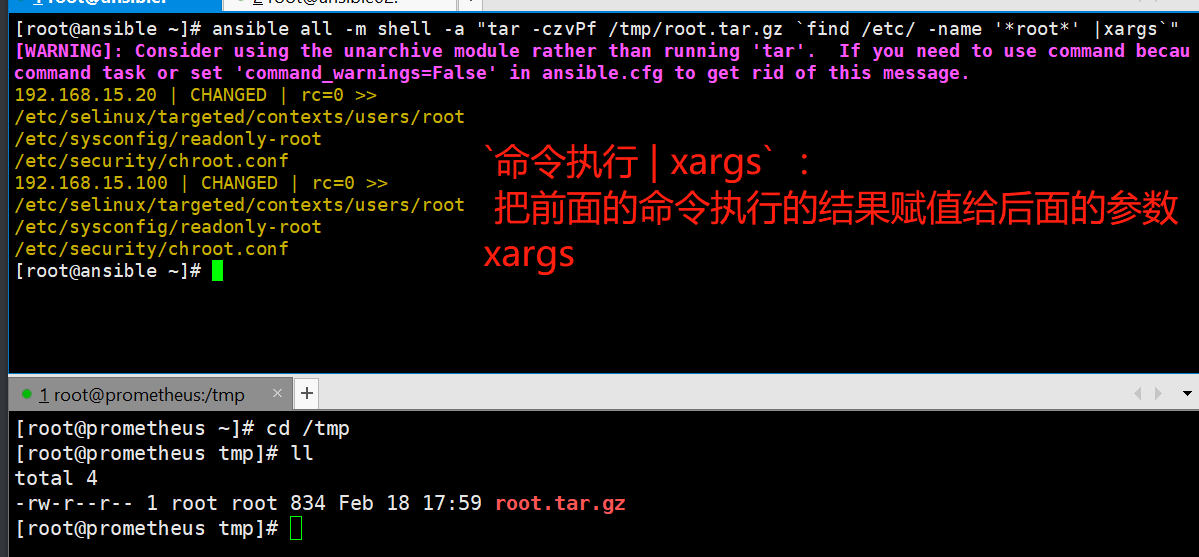
# 案例:将 /etc 目录中文件名称包含 root 的文件打包到 /tmp 目录
[root@ansible ~]# ansible all -m shell -a "tar -czvPf /tmp/root.tar.gz `find /etc/ -name '*root*' | xargs`"
8.3 script模块
script模块:用来执行脚本文件的模块。

常用参数:
	chdir   : 运行命令的目录
	removes :判断一个文件是否存在,存在则运行。
	creates :在执行命令之前,判断是否已经存在该路径,存在则跳过
	其他参数:使用命令 ansible-doc script查看

	[root@ansible ~]# ansible all -m script -a './in.sh'
8.4 yum模块
yum模块:安装软件包的模块。

参数:
	name : 软件包名称
	state :指定 yum 模块运行的状态
		下载的三种状态:present、installed、latest
		卸载的两种状态:absent、removed

# 案例:利用 yum 模块,安装部署mariadb
	[root@ansible ~]# ansible all -m yum -a 'name=mariadb* state=present'

8.5 yum_repository模块
yum模块:仓库模块

常用参数:
	baseurl		: 仓库地址
	description	: 仓库描述
	enabled		: 是否启用
	gpgcheck	:是否验证gpg key
	gpgkey		:gpgkey 验证地址
	name		: 仓库名称

# 案例:卸载所有版本的Nginx,使用官方仓库安装Nginx
    [root@ansible yum.repos.d]# ansible all -m yum -a 'name=nginx state=absent'  # 卸载所有的nginx
    [root@ansible yum.repos.d]# ansible all -m yum_repository -a 'name=nginx-stable description="nginx stable repo" baseurl=http://nginx.org/packages/centos/$releasever/$basearch/ gpgcheck=yes gpgkey=https://nginx.org/keys/nginx_signing.key enabled=yes'  # 配置yum仓库
    [root@ansible yum.repos.d]# ansible all -m yum_repository -a 'name=epel baseurl=http://mirrors.aliyun.com/epel/7/$basearch description=epel enabled=no'  # 禁用epel源
    [root@ansible yum.repos.d]# ansible all -m yum -a 'name=nginx state=latest'  # 安装nginx最新版
8.6 copy模块
copy模块:文件管理模块。
参数:
src : 本地需要复制的文件的路径
dest : 复制到远程的某一个路径
owner :指定属主
group : 指定属组
mode : 设置权限的
backup : 是否备份
content : 指定文件内容(与src互斥)
follow : 是否处理软连接
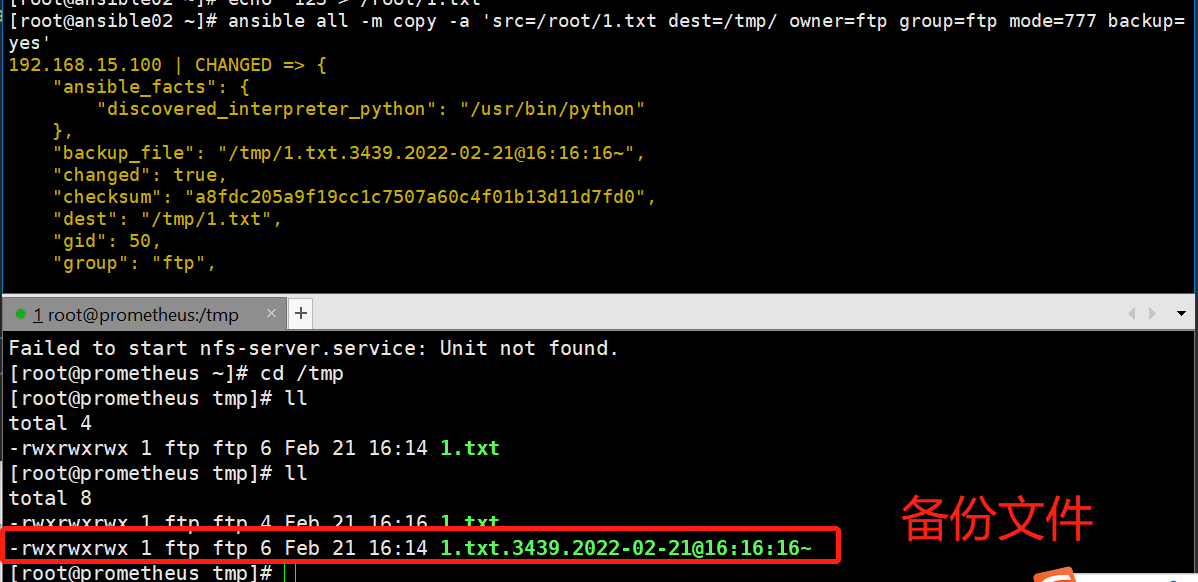
# 案例:推送文件并开启备份
[root@ansible02 ~]# echo "123"> /root/1.txt
[root@ansible02 ~]# ansible all -m copy -a 'src=/root/1.txt dest=/tmp/ owner=ftp group=ftp mode=777 backup=yes'
# 指定内容写入文件
[root@ansible02 ~]# ansible web03 -m copy -a 'content="123456" dest=/tmp/index.html mode=600'

8.7 file模块
file模块:创建文件模块。

参数:
	path 	: 需要创建的文件路径
	owner	:指定属主
	group	: 指定属组
	mode	: 设置权限的
	state	:状态
		link	: 创建软链接
			src	: 源文件路径
			dest:  软链接名字
		touch    : 创建文件
		directory : 创建目录
		absent	: 删除
	recurse	:递归授权

# 案例:创建目录并授权
[root@ansible02 ~]# ansible all -m file -a 'path=/tmp/a/ state=directory mode="644" owner=nginx group=nginx recurse=yes'
8.8 get_url模块
get_url模块:上传下载文件模块

参数:
	url         #文件下载地址
    dest        #文件存放路径
    mode        #文件下载后授权
    checksum    #验证文件
        sha256  #加密方式

# 案例:下载压缩包并验证MD5
[root@ansible02 ~]# ansible all -m get_url -a 'url=https://repo.huaweicloud.com/etcd/v3.1.7/v3.1.7.tar.gz dest=/tmp/ mode="644"'

8.9 service模块
service模块:用来管理系统服务。

参数:
	name : 指定需要操作服务的名称
	state:
		started         #启动服务
    	stopped         #停止服务
    	restarted       #重启服务
    	reloaded        #重载服务
    enabled	:开机自启动

# 案例:启动nginx服务
[root@ansible02 ~]# ansible all -m service -a 'name=nginx state=started'
8.10 systemd模块
systemd模块:用来管理系统服务。但是systemd底层需要systemd服务来支撑,没有systemd的操作系统无法使用。
参数:
	name : 指定需要操作服务的名称
	state:
		started         #启动服务
    	stopped         #停止服务
    	restarted       #重启服务
    	reloaded        #重载服务
    enabled	:开机自启动

# 案例:停用nginx服务
[root@ansible02 ~]# ansible all -m systemd -a 'name=nginx state=stopped'
[root@prometheus tmp]# systemctl status nginx # 查看nginx服务启动状态

8.11 group模块
group模块:用来管理用户组

参数:
    name: somegroup         #组名字
    state:
        present             #创建组
        absent              #删除组
    gid: 666                #指定组id

# 案例:创建用户组www
[root@ansible02 ~]# ansible all -m group -a 'name=www gid=666 state=present'

8.12 user模块
用来管理用户

参数:
    name        #用户名字
    comment     #用户备注
    uid         #用户id
    group       #用户所在的组名字
    shell
        /bin/bash   #用户可以登录
        /sbin/nologin   #用户不需要登录
    state
        absent      #删除用户
        present     #创建用户
    remove          #移除家目录
    create_home     #是否创建家目录
        true        #创建家目录
        false       #不创建家目录

# 案例:创建www用户
[root@ansible02 ~]# ansible all -m user -a 'name=www group=www uid=666 comment="用户www" shell=/bin/nologin state=present create_home=true'
8.13 cron模块
cron模块:定时任务管理模块。
参数:
name #定时任务的备注
minute #分钟
hour #小时
day #日
month #月
weekday #周
job #指定的定时任务内容
state
present #新建定时任务
absent #删除定时任务
disabled
yes #注释定时任务
no #取消注释
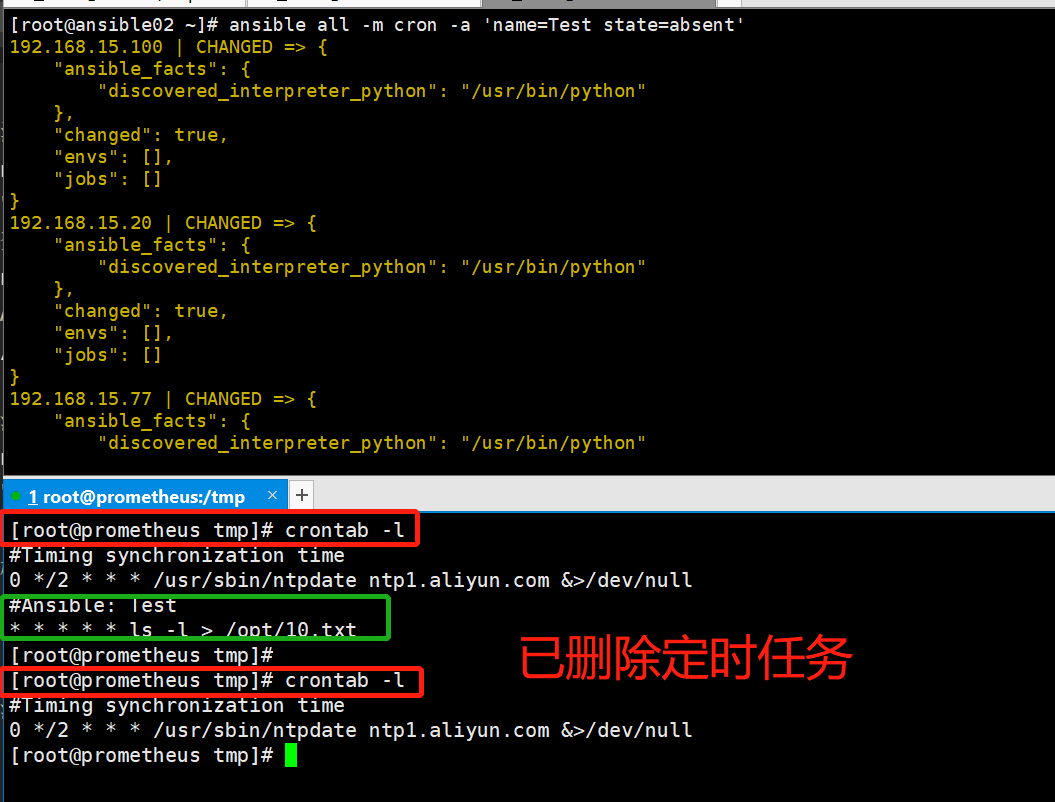
# 案例:添加一个定时任务
[root@ansible02 ~]# ansible all -m cron -a 'name=Test minute="*" hour="*" month="*" day="*" month="*" weekday="*" job="ls -l > /opt/10.txt"'
# 删除定时任务:
[root@ansible02 ~]# ansible all -m cron -a 'name=Test state=absent'
8.14 mount模块
mount模块:挂载文件系统。

参数:
	path        #本机准备挂载的目录
    src         #远端挂载点
    fstype      #指定挂载类型
    opts        #挂载参数(/etc/fstab中的内容)
    state
        present     #配置开机挂载,将配置写入自动挂载文件,并没有直接挂载
        unmounted   #取消挂载,但是没有删除自动挂载配置
        #常用配置
        mounted     #配置开机挂载,并且直接挂载上
        absent      #取消挂载,并且删除自动挂载配置

# 案例:
[root@ansible02 ~]# ansible web03 -m yum -a 'name=nfs-utils state=present' # 安装nfs
[root@ansible02 ~]# ansible web03 -m yum -a 'name=rpcbind state=present'  # 安装rpcbind
[root@ansible02 ~]# ansible web03 -m copy -a 'content="/backup 192.168.15.20/24(rw,sync,all_squash)" dest=/etc/exports'  # 配置nfs
[root@ansible02 ~]# ansible web03 -m file -a 'path=/backup state=directory owner=nfsnobody group=nfsnobody'  # 创建目录授权
[root@ansible02 ~]# ansible web03 -m service -a 'name=nfs state=restarted'  # 启动nfs服务
[root@ansible02 ~]# ansible web01 -m mount -a 'path=/backup src=172.16.1.20:/backup fstype=nfs opts=defaults state=unmounted'  # 配置开机挂载,并且直接挂载上
8.15 selinux模块
selinux模块:用来管理系统selinux

参数:
	state: disabled

# 案例:
[root@ansible02 ~]# ansible all -m selinux -a 'state=disabled'
8.16 firewalld模块
firewalld模块:操作firewalld防火墙模块。

参数:
	service:指定服务
	permanent:是否永久生效
	state:
		enabled :允许通过
	port:指定端口的
	rich_rule:附加规则
	source:指定网段
	interface:指定网卡
	masquerade:是否开启IP伪装

# 案例:允许访问http服务,永久生效
[root@ansible02 ~]# ansible all -m firewalld -a 'service=http permanent=yes state=enabled'
8.17 archive模块
archive模块:压缩模块

参数:
    path: /path/to/foo              #要打包的内容
    dest: /path/to/foo.tgz          #打好的包与存放位置
    format:gz  					 #打包的类型 bz2, gz, tar, xz, zip

# 案例:
8.18 unarchive模块
解压模块

参数:
    src         #包的路径
    dest        #解压后的目标路径
    remote_src
        yes     #包在受控端服务器上
        no      #包在控制端服务器上

# 案例:
[root@ansible02 ~]# ansible all -m unarchive -a 'src=/tmp/optv1.tar.gz dest=/tmp/ remote_src=no'
8.19 setup模块
setup模块:获取控制端信息的模块。

# 案例:获取web01主机所有信息
[root@ansible02 ~]# ansible web01 -m setup
8.20 模块小练习
# 使用ansible部署超级玛丽网页小游戏:

1、上传代码并解压
	[root@ansible02 ~]# ansible all -m unarchive -a "src=/root/mario.tar.gz dest=/usr/share/nginx/html remote_src=no"

2、安装nginx
	[root@ansible02 ~]# ansible all -m yum -a 'name=nginx state=present'

3、启动Nginx
	[root@ansible02 ~]# ansible all -m service -a "name=nginx state=started"

4、关闭防火墙
	[root@ansible02 ~]# ansible all -m service -a 'name=firewalld state=stopped'

5、网页输入ip192.168.15.20查看小游戏。

9、剧本(playbook)
PlayBook即"剧本","兵书"之意,PlayBook是由以下部分组成的:

play(host): 定义的是主机的角色。(主角还是配角)
Book(task): 定义的是具体执行的任务。(角色的台词和动作)
playbook: 由一个或多个play(角色)组成,一个play(角色)可以包含多个task(台词,动作)。

# 剧本的格式是一个YAML文件格式。
9.1 剧本组成
1.hosts	: 指定的需要操作的主机
2.vars	: 指定的是变量(非必须项)
3.tasks	: 具体要执行的任务
4.remote_user : 执行时使用的用户

# 案例:使用剧本同时执行命令ls、创建文件、安装nginx
[root@ansible02 ~]# vim test1.yaml  # 编辑剧本
    - hosts: web01
      tasks:
        - name: 执行ls
          shell: 'ls'
        - name: 创建文件
          shell: 'touch 1.txt'
        - name: 安装Nginx
          yum:
            name: nginx
            state: present
# [root@ansible02 ~]# ansible-playbook test1.yaml  # 执行剧本
9.2 变量
1.主机清单中的变量:
[root@ansible02 ~]# cat /etc/ansible/hosts  # 主机清单
 	[web01]           # 分组
    192.168.15.20 ansible_ssh_user=root ansible_ssh_port=22 ansible_ssh_pass='1'
    [web02]
    192.168.15.100 ansible_ssh_user=root ansible_ssh_port=22 ansible_ssh_pass='1'
    [web:children]  # children就是变量
    web01
    web02

2.剧本中的变量
	2.1 全局变量:在全局定义变量
	[root@ansible ~]# ansible-playbook -C test.yaml  # 编辑剧本
        - hosts: web01
          vars:
            package_name: nginx
          tasks:
            - name: 使用全局变量的nginx安装
              yum:
                name: "{{ package_name }}"
                state: present

    2.2 局部变量:在tasks里面定义变量
    [root@ansible ~]# ansible-playbook -C test.yaml  # 编辑剧本
        - hosts: web01
          tasks:
            - name: 使用局部变量的nginx安装
              vars:
                package_name: nginx
              yum:
                name: "{{ package_name }}"
                state: present

    2.3 配置清单中的变量
		[root@ansible02 ~]# cat /etc/ansible/hosts  # 主机清单
         	[web01]           # 分组
    		192.168.15.20 ansible_ssh_user=root ansible_ssh_port=22 ansible_ssh_pass='1'
    		[web01:vars]
        	 package_name=redis

    2.4 在命令行中设置变量:使用-e参数
    	[root@localhost ansible]# ansible-playbook test.yaml -e 'package_name=mamecache'

    2.5 变量的优先级:范围越小优先级越高
    	在命令行中设置变量 > 局部变量 > 全局变量 > 配置清单
9.3 剧本小练习
# 案例:使用剧本部署超级玛丽

[root@ansible02 ~]# vim test1.yaml  # 编辑剧本
    - hosts: web01
      vars:
        package_name: nginx
      tasks:
        - name: 上传游戏代码
          unarchive:
            src: /root/mario.tar.gz
            dest: /usr/share/nginx/html
            remote_src: no
        - name: 安装Nginx
          yum:
            name: "{{ package_name }}"
            state: present
        - name: 启动Nginx
          service:
            name: "{{ package_name }}"
            state: restarted
[root@ansible02 ~]# ansible-playbook test1.yaml  # 执行剧本
10、流程控制
10.1 条件判断(when)
# 案例1:在CentOS系统中,安装Nginx
[root@ansible02 ~]# vim test1.yaml  # 编辑剧本
    - hosts: web01
      tasks:
        - name: 安装Nginx
          yum:
            name: nginx
            state: present
          when: ansible_distribution == "CentOS"
[root@ansible02 ~]# ansible-playbook test1.yaml # 执行剧本

# 补充:
and : 并且
or  : 或者

# 案例2:判断Nginx服务是否启动
[root@localhost ansible]# vim 1.sh # 编辑脚本文件
#!/bin/bash
function main() {
    RES=`systemctl is-active nginx`
    if [ $RES == 'unknown' ];then
      return 1
    else
      return 0
    fi
}
main

[root@ansible02 ~]# vim test1.yaml  # 编辑剧本
- hosts: web01
  tasks:
    - name: nginx服务监测
      script: './1.sh'
      register: check_nginx
    - name: 查看check_nginx变量
      debug: var=check_nginx
    - name: 启动Nginx
      service:
        name: nginx
        state: started
      when: check_nginx.rc == 0

[root@ansible02 ~]# ansible-playbook test1.yaml # 执行剧本
10.2 循环流程(with_item、items)
# 案例1:要求同时安装nginx、mariadb等多个软件
[root@ansible02 ~]# vim test1.yaml  #编辑剧本
    - hosts: web01
      tasks:
        - name: 安装多个软件
          yum:
            name: "{{ item }}"
            state: present
          with_items:
            - nginx
            - mariadb

# 案例2:要求安装Nginx、卸载mariaDB
[root@ansible02 ~]# vim test1.yaml  # 编辑剧本
    - hosts: web01
      tasks:
        - name: 安装多个软件同时卸载多个软件
          yum:
            name: "{{ item.name }}"
            state: "{{ item.state }}"
          with_items:
            - {"name":"nginx","state":"present"}
            - {"name":"mariadb","state":"absent"}

# 案例:要求安装nginx、mariadb;卸载redis
[root@ansible02 ~]# vim test1.yaml  # 编辑剧本
    - hosts: web01
      tasks:
        - name: 安装多个软件同时卸载多个软件
          yum:
            name: "{{ item.name }}"
            state: "{{ item.state }}"
          with_items:
            - {"name":"nginx","state":"present"}
            - {"name":"mariadb","state":"present"}
            - {"name":"redis","state":"sbsent"}
10.3 在某种条件下执行任务
# 案例:要求在安装完成之后再启动Nginx
[root@ansible02 ~]# vim test1.yaml  # 编辑剧本
    - hosts: web01
      tasks:
        - name: 安装Nginx
          yum:
            name: "{{ item.name }}"
            state: "{{ item.state }}"
          with_items:
            - {"name":"nginx","state":"present"}
          notify: 启动Nginx
      handlers:
        - name: 启动Nginx
          service:
            name: nginx
            state: restarted
11、标签使用
# 定义每个任务的标签,用于方便选择标签执行对象任务,使用-t参数。
[root@ansible02 ~]# vim test1.yaml  # 编辑剧本
- hosts: web01
  tasks:
    - name: 安装Nginx
      yum:
        name: "{{ item.name }}"
        state: "{{ item.state }}"
      with_items:
        - {"name":"nginx","state":"present"}
      tags: nginx  # 标签nginx

    - name: 安装mariadb
      yum:
        name: mariadb
        state: present
      tags: mariadb  # 标签mariadb

[root@ansible02 ~]# ansible-playbook test1.yaml -t nginx  # 选择执行nginx任务
[root@ansible02 ~]# ansible-playbook test1.yaml -t nginx,mariadb
12、jinjia2模板
12.1 jinjia2模板语法
jinja2是Python的全功能模板引擎。

1、变量的使用

{{ 变量名 }}

{{ 变量名 计算公式 }}

2、判断语句的使用

{% if 1 == 1 %}

{% elif 条件 %}

{% else %}

{% endif %}

3、循环语句的使用
{% for i in EXPR %}
{% endfor %}
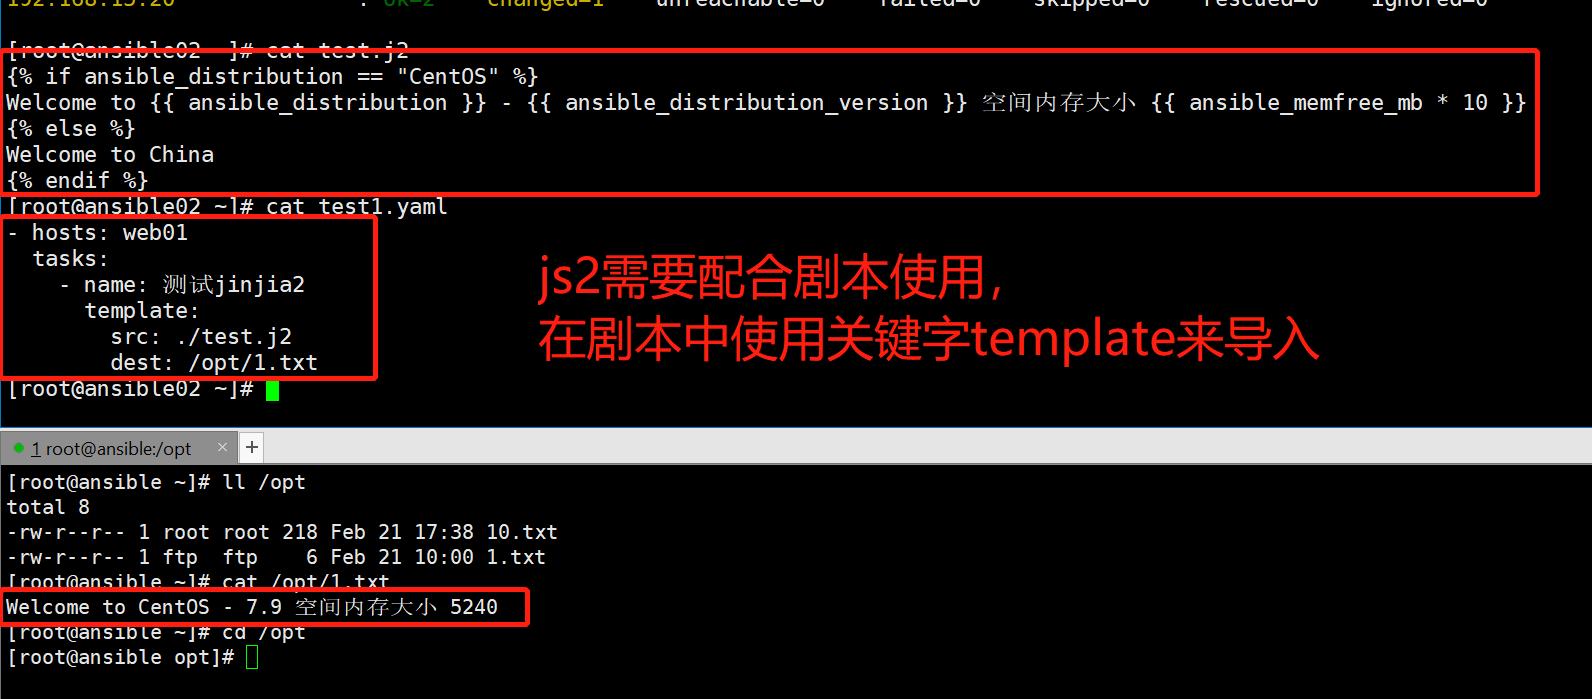
12.2 jinjia2模板使用
jinjia2模板不能单独使用,只能跟剧本配合使用。

# 案例:
{% if ansible_distribution == "CentOS" %}
WelCome to {{ ansible_distribution }} - {{ ansible_distribution_version }} 空闲内存大小 {{ ansible_memfree_mb * 1000 }}
{% else %}
Welcome to China
{% endif %}

{% for i in ansible_date_time %}
{{ i }}
{% endfor %}
12.3 Ansible Roles
解决了剧本的问题?
	1、解决了剧本的耦合性
	2、还可以利用剧本的便利性
12.4 创建Roles
[root@ansible ansible]# ansible-galaxy init nginx
- Role nginx was created successfully

[root@ansible ansible]# tree nginx/
nginx/
├── defaults			# 变量(优先级低)
│   └── main.yml
├── files				# 存放文件
├── handlers			# 存放handlers
│   └── main.yml
├── meta				# 存放依赖roles
│   └── main.yml
├── README.md
├── tasks				# 存放具体任务的目录
│   └── main.yml
├── templates			# 存放jinjia2模板的
├── tests				# 存放测试文件
│   ├── inventory
│   └── test.yml
└── vars				# 存放变量
    └── main.yml

8 directories, 8 files
12.5 调用Roles
 调用Roles的步骤:
1.创建一个yaml文件
2.使用roles模块
12.6 小练习:使用j2部署小游戏
1.创建roles目录
[root@ansible ansible]# ansible-galaxy init mario
2.存放小游戏代码
[root@ansible ansible]# cp /root/mario.tar.gz mario/files/
3.编写配置文件
[root@ansible ansible]# yum remove nginx -y # 卸载受控端Nginx
[root@ansible ansible]# rm -rf /usr/share/nginx/html/* # 清除受控端nginx的相关残留
[root@ansible ansible]# cat mario/tasks/main.yml # 编写任务配置文件
---
- name: 安装Nginx
yum:
name: nginx
state: present
notify: 启动Nginx # 导入handlers配置
- name: 上传代码
unarchive:
src: ./mario.tar.gz
dest: /usr/share/nginx/html
remote_src: no
[root@ansible ansible]# vim mario/handlers/main.yml # 编写handlers配置文件
---
# handlers file for mario
- name: 启动Nginx
service:
name: nginx
state: restarted
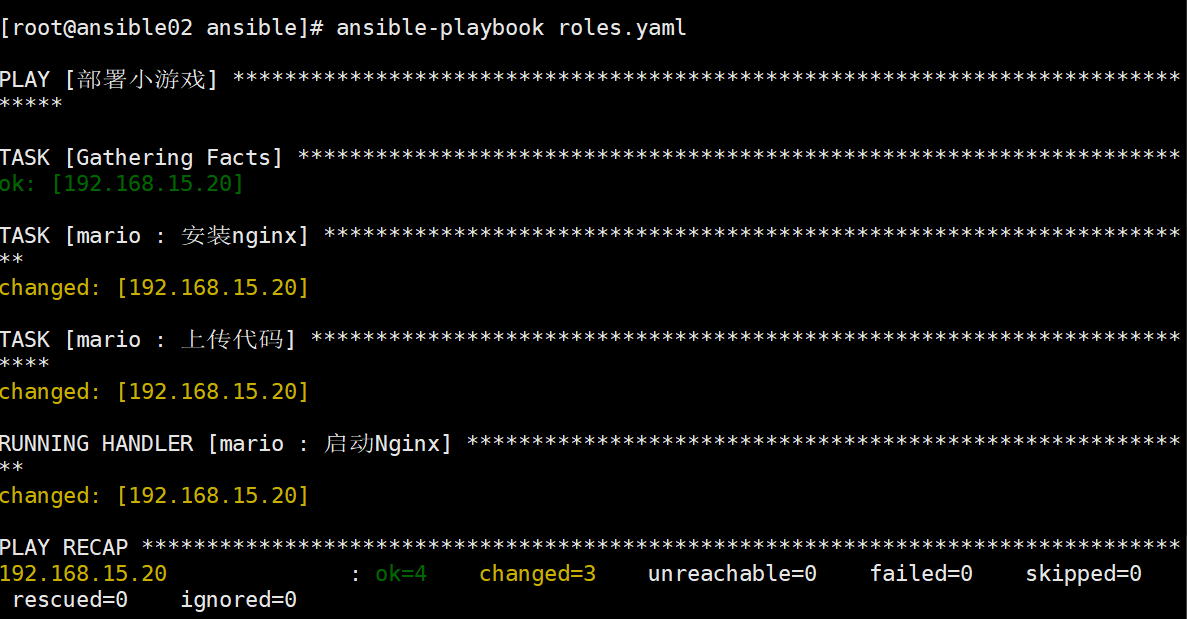
[root@ansible ansible]# vim roles.yaml # 编写剧本
- hosts: web01
name: 部署超级玛丽
roles:
- mario
[root@ansible ansible]# ansible-playbook roles.yaml # 执行剧本