javaSpring之AOP
1.什么是AOP
翻译中文为:面向切面编程,可以让你在业务代码与非业务代码隔离,增加新的非业务代码
2.AOP使用场景
1.我一直遵循着存在即合理的观念,在各大需求中,有一种需求是每当操作时,就会在数据库记录日志,那么在不更改业务代码的情况下应该怎么做,没错,AOP可以解决
2.当然,其也可以做权限校验等业务需求
3.AOP的延续就是事务管理
3.AOP的结构
结构图:
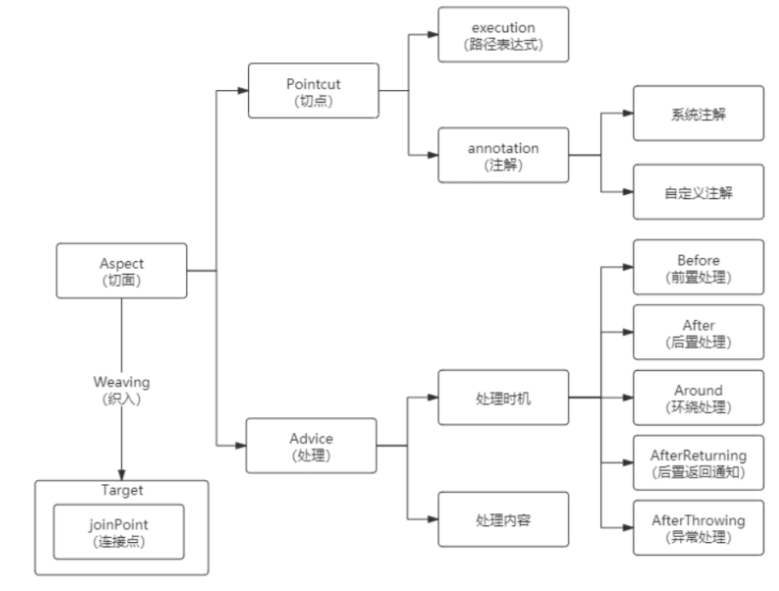
其主要分为:
-
-
PointCut:切点:---方式: 路径表达式 (2)注解形式
-
4.AOP的使用
现在模拟在业务操作结束后利用AOP打印日志
这里就使用数的基本运算来操作【+ - * /】
4.1 创建新工程并进行基本配置
pom文件添加依赖:
        <!--spring的依赖-->
        <dependency>
            <groupId>org.springframework</groupId>
            <artifactId>spring-webmvc</artifactId>
            <version>5.2.15.RELEASE</version>
        </dependency>
        <dependency>
            <groupId>org.springframework</groupId>
            <artifactId>spring-jdbc</artifactId>
            <version>5.2.15.RELEASE</version>
        </dependency>
<!--        AOP-->
        <dependency>
            <groupId>org.aspectj</groupId>
            <artifactId>aspectjweaver</artifactId>
            <version>1.6.8</version>
        </dependency>
新建spring.xml配置文件:
<?xml version="1.0" encoding="UTF-8"?>
<beans xmlns="http://www.springframework.org/schema/beans"
       xmlns:xsi="http://www.w3.org/2001/XMLSchema-instance"
       xmlns:context="http://www.springframework.org/schema/context"
       xmlns:mvc="http://www.springframework.org/schema/mvc"
       xmlns:aop="http://www.springframework.org/schema/aop"
       xsi:schemaLocation="http://www.springframework.org/schema/beans http://www.springframework.org/schema/beans/spring-beans.xsd http://www.springframework.org/schema/context https://www.springframework.org/schema/context/spring-context.xsd http://www.springframework.org/schema/mvc https://www.springframework.org/schema/mvc/spring-mvc.xsd http://www.springframework.org/schema/aop https://www.springframework.org/schema/aop/spring-aop.xsd">

    <!--springmvc的配置-->
    <!--包扫描 扫描com.ykq以及该包下的子包-->
    <context:component-scan base-package="com.xw.aspect"/>
<!--    开启AOP-->
    <aop:aspectj-autoproxy/>
</beans>
4.2建立四则运算接口并实现
接口
public interface aspectim {
    public double add(double a,double b);
    public double mul(double a,double b);
    public double cheng(double a,double b);
    public double div(double a,double b);
}实现,并为其添加@Serveice 注解
@Service
public class AspectimService implements aspectim{
    @Override
    public double add(double a, double b) {
        double c = a + b;
        System.out.println("======");
        return c;
    }

    @Override
    public double mul(double a, double b) {
        double c = a - b;
        return c;
    }

    @Override
    public double cheng(double a, double b) {
        double c = a * b;
        return c;
    }

    @Override
    public double div(double a, double b) {
        double c = a / b;
        return c;
    }
}
4.3 新建AOP类
这里就用Aspectj命名
且为其添加
@Component
@Aspect
注解@After
@After(value = "execution(public double com.xw.aspect.AspectimService.add(double ,double ))")
public void b(){
  System.out.println("我被操作了且打印日志");
}
4.4 新建测试并运行
新建测试类,且声明main方法
由于添加注解,需要spring为其添加到容器中自动帮其创建对象
//加载spring配置文件
ApplicationContext app=new ClassPathXmlApplicationContext("classpath:spring.xml");
aspectim aspectimService = (aspectim)app.getBean("aspectimService");
System.out.println(aspectimService.add(2,3));
【注;aspectim aspectimService = (aspectim)app.getBean("aspectimService");这里需要使用接口强转】;getBean获取的是实现类
运行结果

很明显,AOP切面已经生效
BUT!
这里又有新的问题出现,咱们再次调用除的方法

此处会发现,AOP并未生效,这是为何?
原因在这:
@After(value = "execution(public double com.xw.aspect.AspectimService.add(double ,double ))")
public void b(){ System.out.println("我被操作了且打印日志");}
4.5 指定切点的两种方式:*通配符与@自定义注解
【其注解中Value内并未指定div也是切点,那么解决方式也有两种】
1.第一种,使用 || 来指定
@After(value = "execution(public double com.xw.aspect.AspectimService.add(double ,double )) || execution(public double com.xw.aspect.AspectimService.div(double ,double ))")
就像如此,但是,如果你有一万个方法呢,很奇妙,难不成你要整一万个 || !
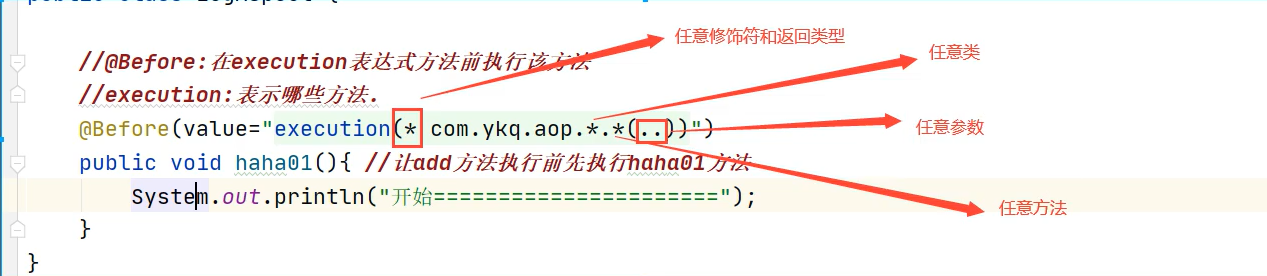
2.第二种,使用AOP通配符指定
@After(value = "execution(* com.xw.aspect.*.*(..))")
public void b(){
System.out.println("我被操作了且打印日志");
测试调用div方法
再次打印运行:

成功,无论调用哪个方法,其都会在程序运行后打印日志
4.6 理解AOP通配符
4.7 自定义注解方式指定
新建注解类,这里使用MyAnnotation来命名
@Target(value = {ElementType.METHOD,ElementType.TYPE})
@Retention(RetentionPolicy.RUNTIME)
public @interface MyAnnotation {
    String value() default "";
}
再次来到Aop类更改代码
    @Pointcut(value = "@annotation(com.xw.aspect.MyAnnotation)")  //定义为切点
    private void mypointcut2(){}
    @After(value = "mypointcut2()")
    public void b(){
    System.out.println("我被操作了且打印日志");
}
5.AOP的通知类型
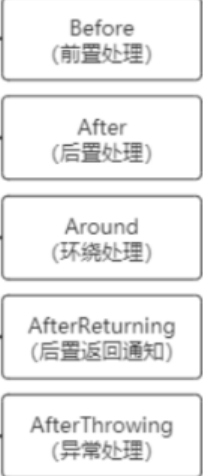
类型:
@After: 后置通知: 被代理的方法执行完后--执行
@AfterReturning: 后置返回通知: 被代理的方法碰到return.--才会执行
@AfterThrowing: 后置异常通知: 当被代理的方法出现异常时--才会执行。
在上面,咱们已在将@After演示
5.1 这里继续演示@Before
@Before(value = "execution(* com.xw.aspect.*.*(..))")
public void c(){
    System.out.println("无论执行啥,我都会先出现");
}
使用@Before时无论怎样,都会先执行
哪怕抛出异常
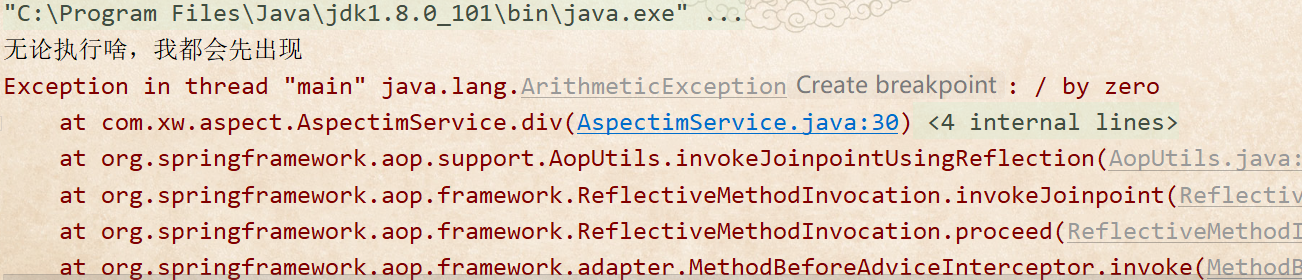
它也会坚定不移
5.2 这里继续演示@AfterReturning
@AfterReturning(value = "execution(* com.xw.aspect.*.*(..))")
public void d(){
    System.out.println("我是结果返回后才执行打印");
}
那么此时此刻
测试类:
System.out.println(aspectimService.add(10,0));却如彼时彼刻
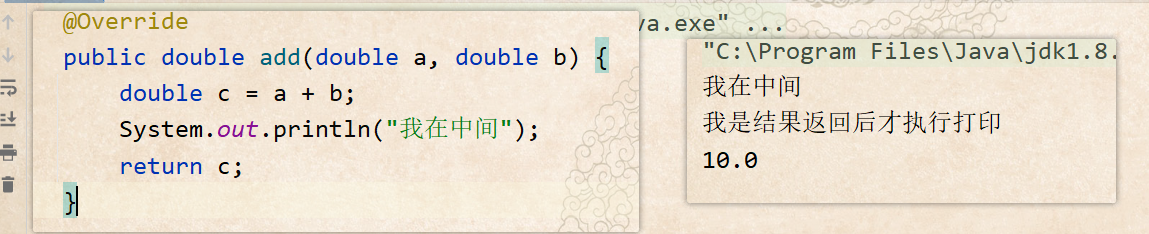
那么结果显然可见
5.3 这里继续演示@AfterThrowing
@AfterThrowing(value = "execution(* com.xw.aspect.*.*(..))")
public void e(){
   System.out.println("我是抛出异常才会打印");
}
这个只有当方法抛出异常时才会打印

如此,君已可见
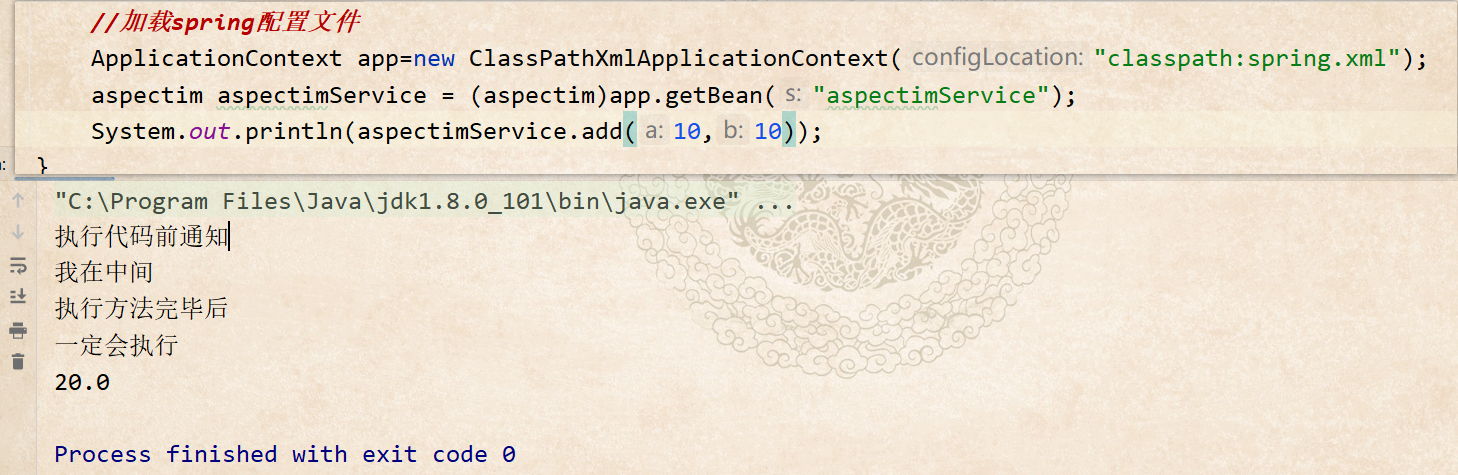
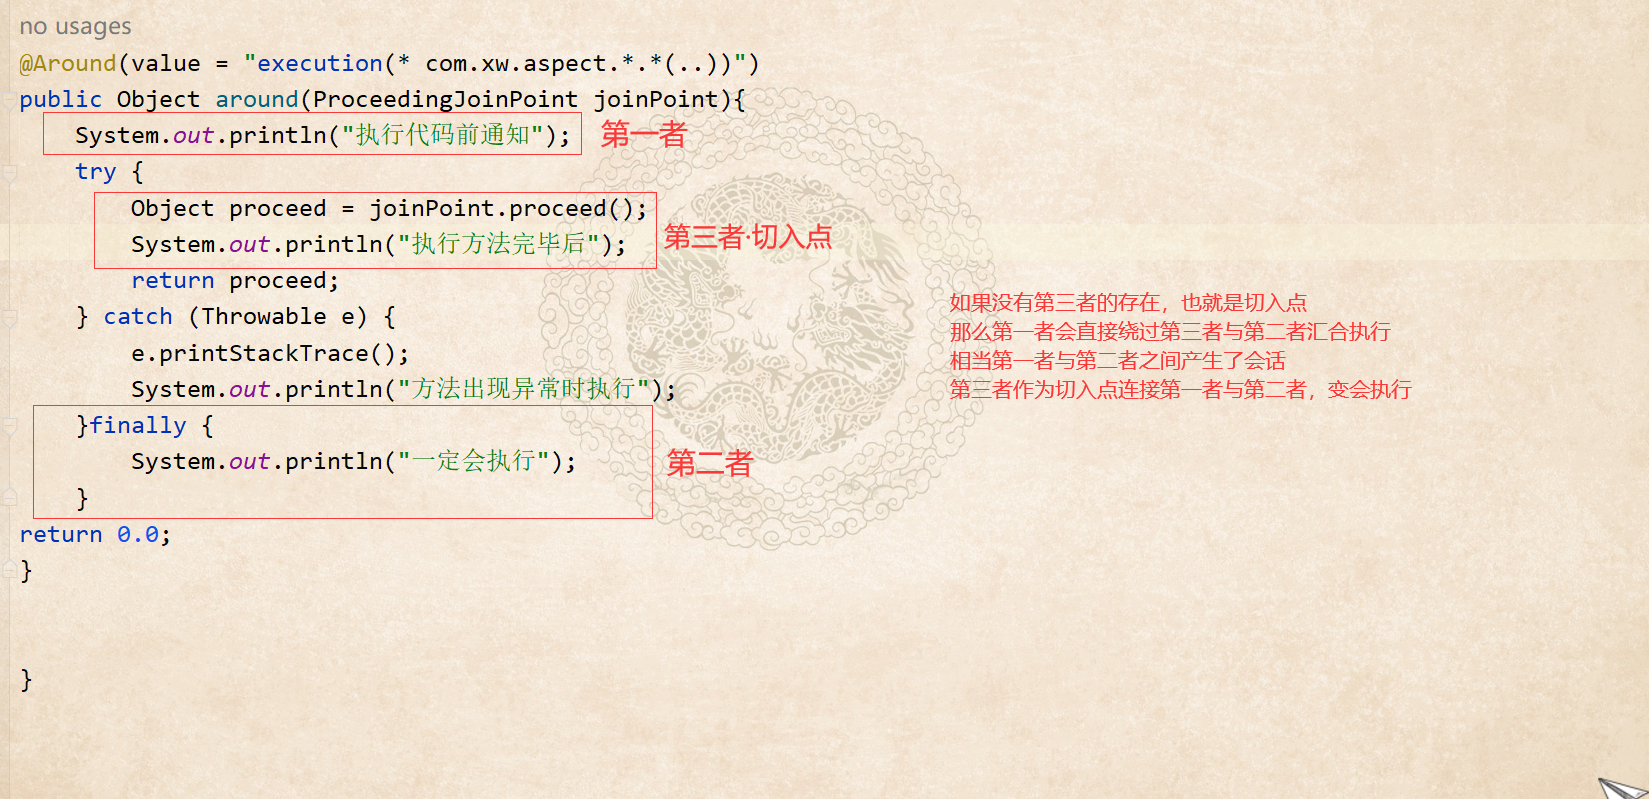
5.4 这里继续演示@Around
@Around(value = "execution(* com.xw.aspect.*.*(..))")
public Object around(ProceedingJoinPoint joinPoint){
    System.out.println("执行代码前通知");
    try {
        Object proceed = joinPoint.proceed();
        System.out.println("执行方法完毕后");
        return proceed;
    } catch (Throwable e) {
        e.printStackTrace();
        System.out.println("方法出现异常时执行");
    }finally {
        System.out.println("一定会执行");
    }
return 0.0;
}
不抛异常执行运行:
抛异常执行运行:
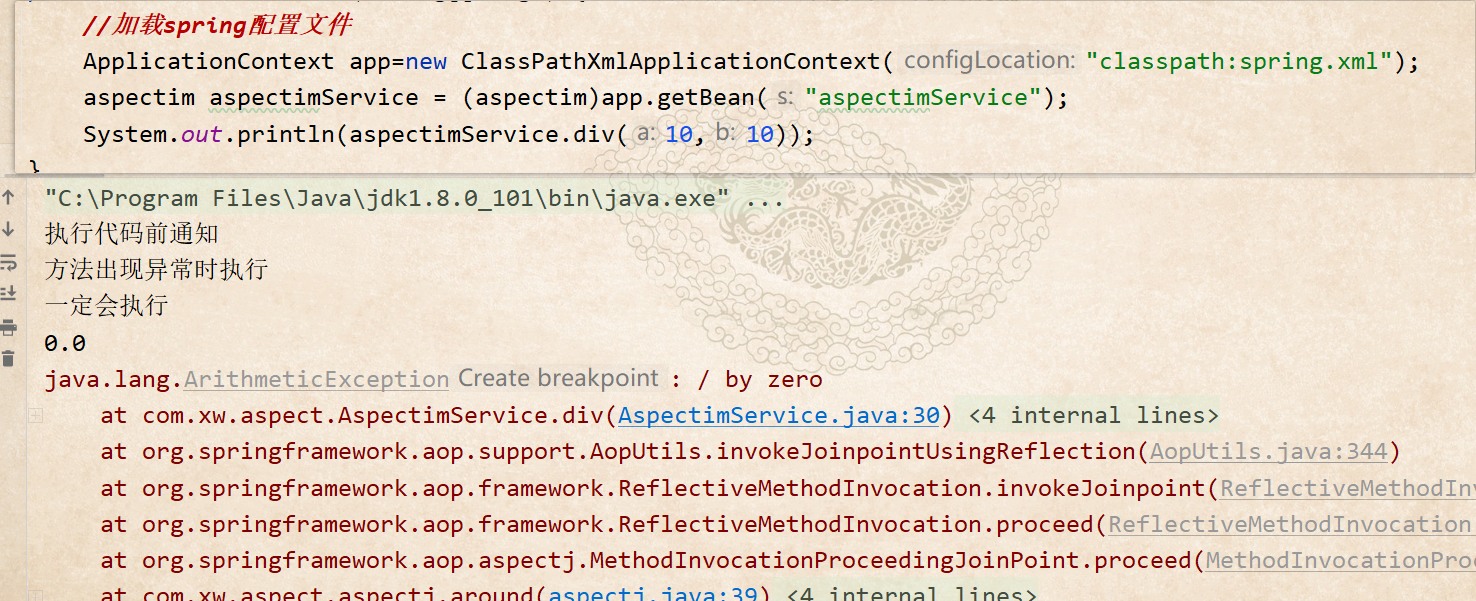
这里的话,就可以拿try{ }、catch{ }、finally { }来理解了,
以上便是javaSpring之AOP中的部分内容,如有漏缺请在下方留言告知,我会及时补充


 浙公网安备 33010602011771号