
Fragment+RadioButton实现点击切换页面效果
首先我们需要在主布局文件中 放一个 容器,方便让fragment加入进去,我们创建了四个Fragment,并用RedioButton实现了导航栏
MainActivity.java
  1 package com.example.administrator.fragmentdemo;
  2
  3 import android.app.Activity;
  4 import android.app.FragmentManager;
  5 import android.app.FragmentTransaction;
  6 import android.os.Bundle;
  7 import android.view.View;
  8 import android.widget.RadioButton;
  9
 10
 11 public class MainActivity extends Activity implements View.OnClickListener {
 12
 13     private RadioButton image1;
 14     private RadioButton image2;
 15     private RadioButton image3;
 16     private RadioButton image4;
 17
 18     private FirstFragment firstFragment;
 19     private SecondFragment secondFragment;
 20     private ThirdFragment thirdFragment;
 21     private FourFragment fourFragment;
 22
 23     @Override
 24     protected void onCreate(Bundle savedInstanceState) {
 25         super.onCreate(savedInstanceState);
 26         setContentView(R.layout.activity_main);
 27
 28         initViews();
 29         initEvents();
 30         //首先 我们先选定一个
 31         select(0);
 32     }
 33     //初始化  各种个 View
 34     private void initViews(){
 35         image1 = (RadioButton) findViewById(R.id.tab_image1);
 36         image2 = (RadioButton) findViewById(R.id.tab_image2);
 37         image3 = (RadioButton) findViewById(R.id.tab_image3);
 38         image4 = (RadioButton) findViewById(R.id.tab_image4);
 39     }
 40     //初始化 监听事件
 41     private void initEvents(){
 42         image1.setOnClickListener(this);
 43         image2.setOnClickListener(this);
 44         image3.setOnClickListener(this);
 45         image4.setOnClickListener(this);
 46     }
 47     // 初始化 各种图片
 48     private void initImageBack(){
 49         image1.setBackgroundResource(R.drawable.chatting_biaoqing_btn_normal);
 50         image2.setBackgroundResource(R.drawable.lbs_icon_disable);
 51         image3.setBackgroundResource(R.drawable.scan_book);
 52         image4.setBackgroundResource(R.drawable.scan_word);
 53     }
 54     //
 55     private void select(int i){
 56         FragmentManager fm = getFragmentManager();  //获得Fragment管理器
 57         FragmentTransaction ft = fm.beginTransaction(); //开启一个事务
 58
 59         hidtFragment(ft);   //先隐藏 Fragment
 60
 61         switch (i){
 62             case 0:
 63                 image1.setBackgroundResource(R.drawable.chatting_biaoqing_btn_enable);
 64                 if (firstFragment == null){
 65                     firstFragment = new FirstFragment();
 66                     ft.add(R.id.fragment_container,firstFragment);
 67                 }else{
 68                     ft.show(firstFragment);
 69                 }
 70                 break;
 71             case 1:
 72                 image2.setBackgroundResource(R.drawable.lbs_icon_enable);
 73                 if (secondFragment == null){
 74                     secondFragment = new SecondFragment();
 75                     ft.add(R.id.fragment_container,secondFragment);
 76                 }else {
 77                     ft.show(secondFragment);
 78                 }
 79                 break;
 80             case 2:
 81                 image3.setBackgroundResource(R.drawable.scan_book_hl);
 82                 if (thirdFragment == null){
 83                     thirdFragment = new ThirdFragment();
 84                     ft.add(R.id.fragment_container,thirdFragment);
 85                 }else {
 86                     ft.show(thirdFragment);
 87                 }
 88                 break;
 89             case 3:
 90                 image4.setBackgroundResource(R.drawable.scan_word_hl);
 91                 if(fourFragment == null){
 92                     fourFragment = new FourFragment();
 93                     ft.add(R.id.fragment_container,fourFragment);
 94                 }else {
 95                     ft.show(fourFragment);
 96                 }
 97                 break;
 98         }
 99         ft.commit();   //提交事务
100     }
101     //隐藏所有Fragment
102     private void hidtFragment(FragmentTransaction fragmentTransaction){
103         if (firstFragment != null){
104             fragmentTransaction.hide(firstFragment);
105         }
106         if (secondFragment != null){
107             fragmentTransaction.hide(secondFragment);
108         }
109         if (thirdFragment != null){
110             fragmentTransaction.hide(thirdFragment);
111         }
112         if (fourFragment != null){
113             fragmentTransaction.hide(fourFragment);
114         }
115     }
116     //重写监听
117     @Override
118     public void onClick(View v) {
119
120         initImageBack(); //初始化 图片背景
121
122         switch (v.getId()){
123             case R.id.tab_image1:
124                 select(0);
125                 break;
126             case R.id.tab_image2:
127                 select(1);
128                 break;
129             case R.id.tab_image3:
130                 select(2);
131                 break;
132             case R.id.tab_image4:
133                 select(3);
134                 break;
135         }
136     }
137 }
主布局文件,在这里我分开写的,底部的导航栏有新建了一个xml文件,并在主布局文件中用include将他包含进来。
activity_main.xml
<LinearLayout
    xmlns:android="http://schemas.android.com/apk/res/android"
    xmlns:tools="http://schemas.android.com/tools"
    android:layout_width="match_parent"
    android:layout_height="match_parent"
    android:orientation="vertical"
    tools:context=".MainActivity">

    <ImageView
        android:layout_width="match_parent"
        android:layout_height="40dp"
        android:background="@drawable/friendactivity_comment_frame_pressed"/>

    <FrameLayout
        android:id="@+id/fragment_container"
        android:layout_width="match_parent"
        android:layout_height="0dp"
        android:layout_weight="1">
    </FrameLayout>

    <include layout="@layout/activity_main_tab_view"/>

</LinearLayout>
底部导航栏的布局文件
<?xml version="1.0" encoding="utf-8"?>
<LinearLayout
    xmlns:android="http://schemas.android.com/apk/res/android"
    android:orientation="horizontal"
    android:layout_width="match_parent"
    android:layout_height="50dp"
    android:layout_gravity="bottom"
    android:background="@drawable/friendactivity_comment_frame_pressed">

    <RadioGroup
        android:layout_width="match_parent"
        android:layout_height="match_parent"
        android:orientation="horizontal">

        <RadioButton
            android:id="@+id/tab_image1"
            android:layout_width="0dp"
            android:layout_height="match_parent"
            android:layout_weight="1"
            android:button="@null"
            android:background="@drawable/chatting_biaoqing_btn_normal"/>

        <RadioButton
            android:id="@+id/tab_image2"
            android:layout_width="0dp"
            android:layout_height="match_parent"
            android:layout_weight="1"
            android:button="@null"
            android:background="@drawable/lbs_icon_disable"/>
        <RadioButton
            android:id="@+id/tab_image3"
            android:layout_width="0dp"
            android:layout_height="match_parent"
            android:layout_weight="1"
            android:button="@null"
            android:background="@drawable/scan_book"/>
        <RadioButton
            android:id="@+id/tab_image4"
            android:layout_width="0dp"
            android:layout_height="match_parent"
            android:layout_weight="1"
            android:button="@null"
            android:background="@drawable/scan_word"/>
    </RadioGroup>

</LinearLayout>
四个fragment都一样,我就放一个代码,布局也很简单,就放了一个TextView
Fragment.java
package com.example.administrator.fragmentdemo;

import android.app.Fragment;
import android.os.Bundle;
import android.view.LayoutInflater;
import android.view.View;
import android.view.ViewGroup;

/**
 * Created by Administrator on 2015/9/3.
 */
public class FirstFragment extends Fragment {
    @Override
    public View onCreateView(LayoutInflater inflater, ViewGroup container, Bundle savedInstanceState) {

        return inflater.inflate(R.layout.first_fragment_view,container,false);
    }
}
该fragment的布局文件为:
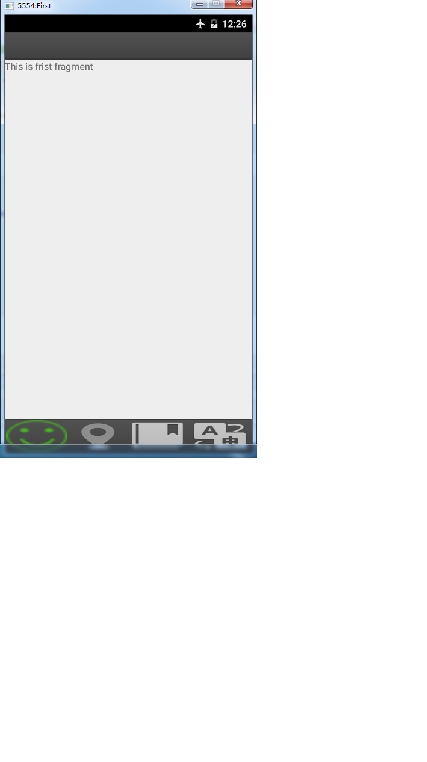
<?xml version="1.0" encoding="utf-8"?>
<LinearLayout
    xmlns:android="http://schemas.android.com/apk/res/android"
    android:layout_width="match_parent"
    android:layout_height="match_parent"
    android:orientation="vertical">
    <TextView
        android:layout_width="wrap_content"
        android:layout_height="wrap_content"
        android:text="This is frist fragment"/>
</LinearLayout>
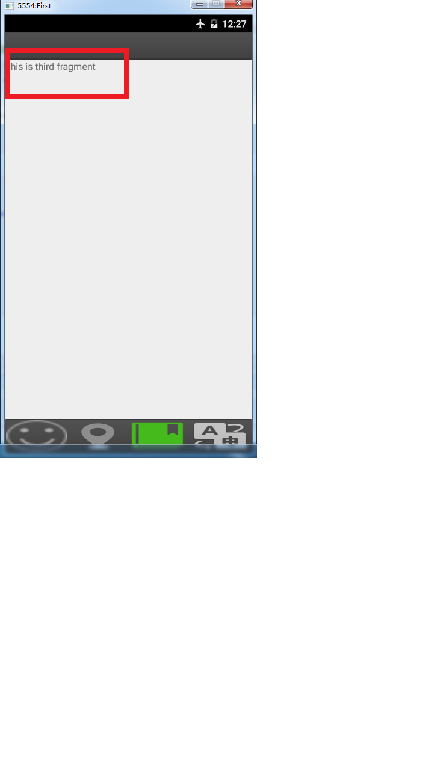
效果图:
新人学习中,也不太会总结,有做的不对的地方希望各位大神指出,谢谢。

