

OAuth是一种用来规范令牌(Token)发放的授权机制,主要包含了四种授权模式:授权码模式、简化模式、密码模式和客户端模式。Spring Security OAuth2对这四种授权模式进行了实现。这节主要记录下什么是OAuth2以及Spring Security OAuth2的基本使用。
四种授权模式
在了解这四种授权模式之前,我们需要先学习一些和OAuth相关的名词。举个社交登录的例子吧,比如在浏览器上使用QQ账号登录虎牙直播,这个过程可以提取出以下几个名词:
-
Third-party application 第三方应用程序,比如这里的虎牙直播;
-
HTTP service HTTP服务提供商,比如这里的QQ(腾讯);
-
Resource Owner 资源所有者,就是QQ的所有人,你;
-
User Agent 用户代理,这里指浏览器;
-
Authorization server 认证服务器,这里指QQ提供的第三方登录服务;
-
Resource server 资源服务器,这里指虎牙直播提供的服务,比如高清直播,弹幕发送等(需要认证后才能使用)。
认证服务器和资源服务器可以在同一台服务器上,比如前后端分离的服务后台,它即供认证服务(认证服务器,提供令牌),客户端通过令牌来从后台获取服务(资源服务器);它们也可以不在同一台服务器上,比如上面第三方登录的例子。
大致了解了这几个名词后,我们开始了解四种授权模式。
授权码模式
授权码模式是最能体现OAuth2协议,最严格,流程最完整的授权模式,流程如下所示:
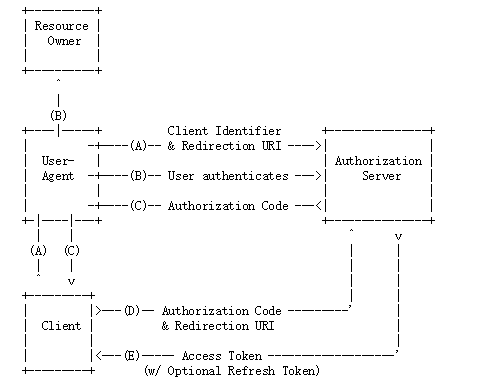
A. 客户端将用户导向认证服务器;
B. 用户决定是否给客户端授权;
C. 同意授权后,认证服务器将用户导向客户端提供的URL,并附上授权码;
D. 客户端通过重定向URL和授权码到认证服务器换取令牌;
E. 校验无误后发放令牌。
其中A步骤,客户端申请认证的URI,包含以下参数:
-
response_type:表示授权类型,必选项,此处的值固定为”code”,标识授权码模式
-
client_id:表示客户端的ID,必选项
-
redirect_uri:表示重定向URI,可选项
-
scope:表示申请的权限范围,可选项
-
state:表示客户端的当前状态,可以指定任意值,认证服务器会原封不动地返回这个值。
D步骤中,客户端向认证服务器申请令牌的HTTP请求,包含以下参数:
-
grant_type:表示使用的授权模式,必选项,此处的值固定为”authorization_code”。
-
code:表示上一步获得的授权码,必选项。
-
redirect_uri:表示重定向URI,必选项,且必须与A步骤中的该参数值保持一致。
-
client_id:表示客户端ID,必选项。
密码模式
在密码模式中,用户像客户端提供用户名和密码,客户端通过用户名和密码到认证服务器获取令牌。流程如下所示:
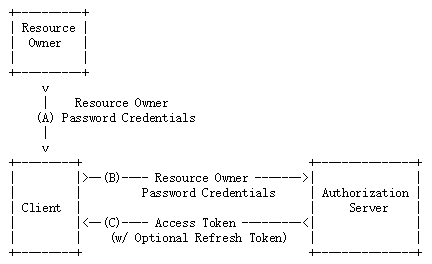
A. 用户向客户端提供用户名和密码;
B. 客户端向认证服务器换取令牌;
C. 发放令牌。
B步骤中,客户端发出的HTTP请求,包含以下参数:
-
grant_type:表示授权类型,此处的值固定为”password”,必选项。
-
username:表示用户名,必选项。
-
password:表示用户的密码,必选项。
-
scope:表示权限范围,可选项。
剩下两种授权模式可以参考下面的参考链接,这里就不介绍了。
Spring Security OAuth2
Spring框架对OAuth2协议进行了实现,下面学习下上面两种模式在Spring Security OAuth2相关框架的使用。
Spring Security OAuth2主要包含认证服务器和资源服务器这两大块的实现:
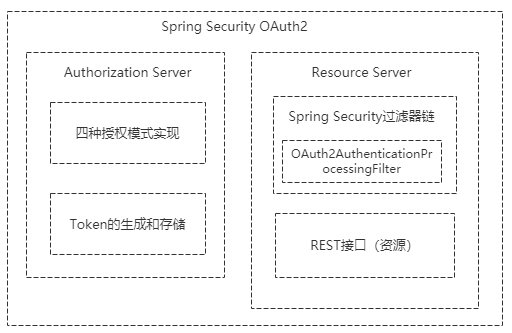
认证服务器主要包含了四种授权模式的实现和Token的生成与存储,我们也可以在认证服务器中自定义获取Token的方式(后面会介绍到);资源服务器主要是在Spring Security的过滤器链上加了OAuth2AuthenticationProcessingFilter过滤器,即使用OAuth2协议发放令牌认证的方式来保护我们的资源。
配置认证服务器
新建一个Spring Boot项目,版本为2.1.6.RELEASE,并引入相关依赖,pom如下所示:
<?xml version="1.0" encoding="UTF-8"?>
<project xmlns="http://maven.apache.org/POM/4.0.0" xmlns:xsi="http://www.w3.org/2001/XMLSchema-instance"
xsi:schemaLocation="http://maven.apache.org/POM/4.0.0 http://maven.apache.org/xsd/maven-4.0.0.xsd">
<modelVersion>4.0.0</modelVersion>
<parent>
<groupId>org.springframework.boot</groupId>
<artifactId>spring-boot-starter-parent</artifactId>
<version>2.1.6.RELEASE</version>
<relativePath/> <!-- lookup parent from repository -->
</parent>
<groupId>cc.mrbird</groupId>
<artifactId>security</artifactId>
<version>0.0.1-SNAPSHOT</version>
<name>security</name>
<description>Demo project for Spring Boot</description>
<properties>
<java.version>1.8</java.version>
<spring-cloud.version>Greenwich.SR1</spring-cloud.version>
</properties>
<dependencies>
<dependency>
<groupId>org.springframework.boot</groupId>
<artifactId>spring-boot-starter-web</artifactId>
</dependency>
<dependency>
<groupId>org.springframework.cloud</groupId>
<artifactId>spring-cloud-starter</artifactId>
</dependency>
<dependency>
<groupId>org.springframework.cloud</groupId>
<artifactId>spring-cloud-starter-oauth2</artifactId>
</dependency>
<dependency>
<groupId>org.springframework.cloud</groupId>
<artifactId>spring-cloud-starter-security</artifactId>
</dependency>
<dependency>
<groupId>org.apache.commons</groupId>
<artifactId>commons-lang3</artifactId>
</dependency>
</dependencies>
<dependencyManagement>
<dependencies>
<dependency>
<groupId>org.springframework.cloud</groupId>
<artifactId>spring-cloud-dependencies</artifactId>
<version>${spring-cloud.version}</version>
<type>pom</type>
<scope>import</scope>
</dependency>
</dependencies>
</dependencyManagement>
<build>
<plugins>
<plugin>
<groupId>org.springframework.boot</groupId>
<artifactId>spring-boot-maven-plugin</artifactId>
</plugin>
</plugins>
</build>
</project>
在创建认证服务器前,我们先定义一个MyUser对象:
public class MyUser implements Serializable {
private static final long serialVersionUID = 3497935890426858541L;
private String userName;
private String password;
private boolean accountNonExpired = true;
private boolean accountNonLocked= true;
private boolean credentialsNonExpired= true;
private boolean enabled= true;
// get set 略
}
接着定义UserDetailService实现org.springframework.security.core.userdetails.UserDetailsService接口:
@Service
public class UserDetailService implements UserDetailsService {
@Autowired
private PasswordEncoder passwordEncoder;
@Override
public UserDetails loadUserByUsername(String username) throws UsernameNotFoundException {
MyUser user = new MyUser();
user.setUserName(username);
user.setPassword(this.passwordEncoder.encode("123456"));
return new User(username, user.getPassword(), user.isEnabled(),
user.isAccountNonExpired(), user.isCredentialsNonExpired(),
user.isAccountNonLocked(), AuthorityUtils.commaSeparatedStringToAuthorityList("admin"));
}
}
这里的逻辑是用什么账号登录都可以,但是密码必须为123456,并且拥有”admin”权限(这些都在前面的Security教程里说过了,就不再详细说明了)。
接下来开始创建一个认证服务器,并且在里面定义UserDetailService需要用到的PasswordEncoder。
创建认证服务器很简单,只需要在Spring Security的配置类上使用@EnableAuthorizationServer注解标注即可。创建AuthorizationServerConfig,代码如下所示:
@Configuration
@EnableAuthorizationServer
public class AuthorizationServerConfig extends WebSecurityConfigurerAdapter {
@Bean
public PasswordEncoder passwordEncoder() {
return new BCryptPasswordEncoder();
}
}
这时候启动项目,会发现控制台打印出了随机分配的client-id和client-secret:

为了方便后面的测试,我们可以手动指定这两个值。在Spring Boot配置文件application.yml中添加如下配置:
security:
  oauth2:
    client:
      client-id: test
      client-secret: test1234
重启项目,发现控制台输出:

说明替换成功。
授权码模式获取令牌
接下来开始往认证服务器请求授权码。打开浏览器,访问http://localhost:8080/oauth/authorize?response_type=code&client_id=test&redirect_uri=http://mrbird.cc&scope=all&state=hello
URL中的几个参数在上面的授权码模式的A步骤里都有详细说明。这里response_type必须为code,表示授权码模式,client_id就是刚刚在配置文件中手动指定的test,redirect_uri这里随便指定一个地址即可,主要是用来重定向获取授权码的,scope指定为all,表示所有权限。
访问这个链接后,页面如下所示:
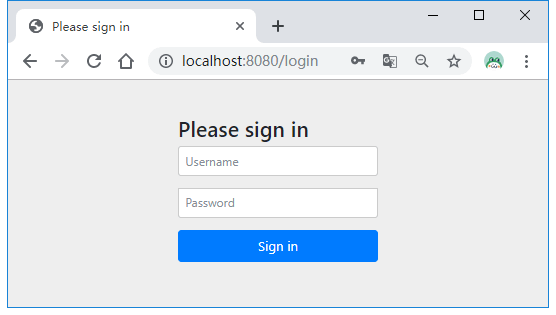
需要登录认证,根据我们前面定义的UserDetailService逻辑,这里用户名随便输,密码为123456即可。输入后,页面跳转如下所示:
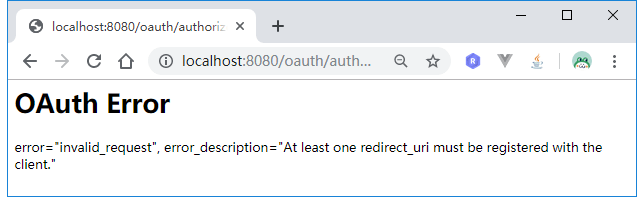
原因是上面指定的redirect_uri必须同时在配置文件中指定,我们往application.yml添加配置:
security:
  oauth2:
    client:
      client-id: test
      client-secret: test1234
      registered-redirect-uri: http://mrbird.cc
重启项目,重新执行上面的步骤,登录成功后页面成功跳转到了授权页面:
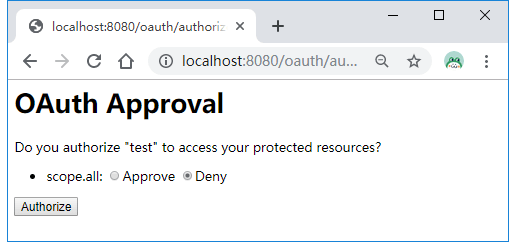
选择同意Approve,然后点击Authorize按钮后,页面跳转到了我们指定的redirect_uri,并且带上了授权码信息:

到这里我们就可以用这个授权码从认证服务器获取令牌Token了。
使用postman发送如下请求POST请求localhost:8080/oauth/token:
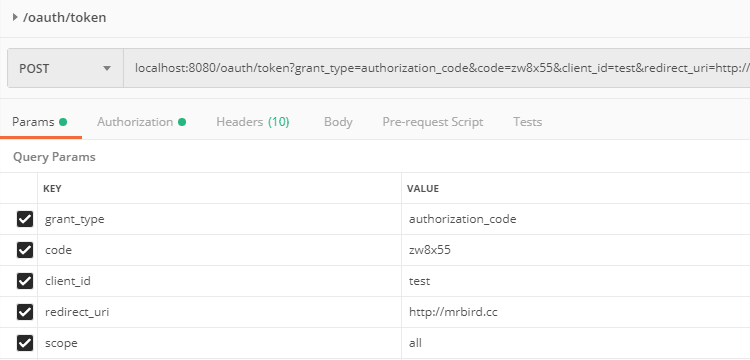
这里要填的参数和上面介绍的授权码模式D步骤介绍的一致。grant_type固定填authorization_code,code为上一步获取到的授权码,client_id和redirect_uri必须和我们上面定义的一致。
除了这几个参数外,我们还需要在请求头中填写:
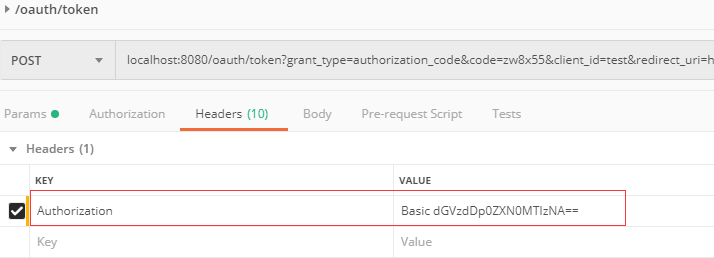
key为Authorization,value为Basic加上client_id:client_secret经过base64加密后的值(可以使用http://tool.chinaz.com/Tools/Base64.aspx):
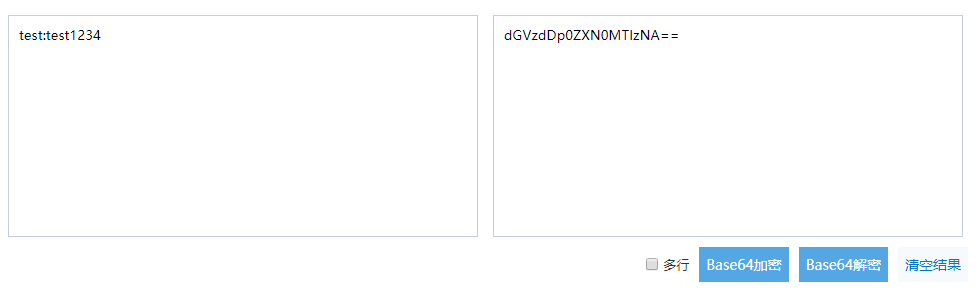
参数填写无误后,点击发送便可以获取到令牌Token:
{
    "access_token": "950018df-0199-4936-aa80-a3a66183f634",
    "token_type": "bearer",
    "refresh_token": "cc22e8b2-e069-459d-8c24-cfda0bc72128",
    "expires_in": 42827,
    "scope": "all"
}
一个授权码只能换一次令牌,如果再次点击postman的发送按钮,将返回:
{
    "error": "invalid_grant",
    "error_description": "Invalid authorization code: xw8x55"
}
密码模式获取令牌
和授权码模式相比,使用密码模式获取令牌就显得简单多了。同样使用postman发送POST请求localhost:8080/oauth/token:
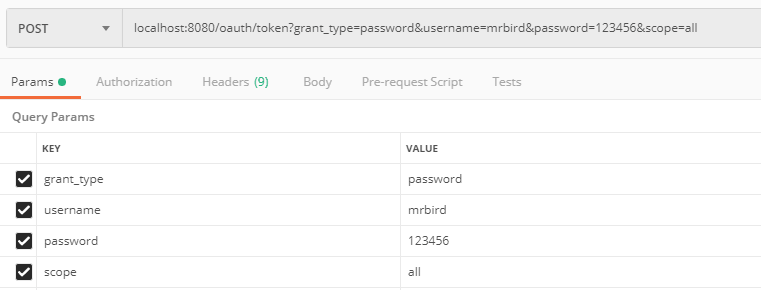
grant_type填password,表示密码模式;然后填写用户名和密码,头部也需要填写Authorization信息,内容和授权码模式介绍的一致,这里就不截图了。
点击发送,也可以获得令牌:
{
    "access_token": "d612cf50-6499-4a0c-9cd4-9c756839aa12",
    "token_type": "bearer",
    "refresh_token": "fdc6c77f-b910-46dc-a349-835dc0587919",
    "expires_in": 43090,
    "scope": "all"
}
配置资源服务器
为什么需要资源服务器呢?我们先来看下在没有定义资源服务器的时候,使用Token去获取资源时会发生什么。
定义一个REST接口:
@RestController
public class UserController {
@GetMapping("index")
public Object index(Authentication authentication){
return authentication;
}
}
启动项目,为了方便我们使用密码模式获取令牌,然后使用该令牌获取/index这个资源:

Authorization值为token_type access_token,发送请求后,返回:
{
    "timestamp": "2019-03-24T13:13:43.818+0000",
    "status": 401,
    "error": "Unauthorized",
    "message": "Unauthorized",
    "path": "/index"
}
虽然令牌是正确的,但是并无法访问/index,所以我们必须配置资源服务器,让客户端可以通过合法的令牌来获取资源。
资源服务器的配置也很简单,只需要在配置类上使用@EnableResourceServer注解标注即可:
@Configuration
@EnableResourceServer
public class ResourceServerConfig {
}
重启服务,重复上面的步骤,再次访问/index便可以成功获取到信息:
{
    "authorities": [
        {
            "authority": "admin"
        }
    ],
    "details": {
        "remoteAddress": "0:0:0:0:0:0:0:1",
        "sessionId": null,
        "tokenValue": "621f59ba-3161-4c9b-aff8-a8335ce6e3cc",
        "tokenType": "bearer",
        "decodedDetails": null
    },
    "authenticated": true,
    "userAuthentication": {
        "authorities": [
            {
                "authority": "admin"
            }
        ],
        "details": {
            "grant_type": "password",
            "username": "mrbird",
            "scope": "all"
        },
        "authenticated": true,
        "principal": {
            "password": null,
            "username": "mrbird",
            "authorities": [
                {
                    "authority": "admin"
                }
            ],
            "accountNonExpired": true,
            "accountNonLocked": true,
            "credentialsNonExpired": true,
            "enabled": true
        },
        "credentials": null,
        "name": "mrbird"
    },
    "credentials": "",
    "oauth2Request": {
        "clientId": "test",
        "scope": [
            "all"
        ],
        "requestParameters": {
            "grant_type": "password",
            "username": "mrbird",
            "scope": "all"
        },
        "resourceIds": [],
        "authorities": [
            {
                "authority": "ROLE_USER"
            }
        ],
        "approved": true,
        "refresh": false,
        "redirectUri": null,
        "responseTypes": [],
        "extensions": {},
        "refreshTokenRequest": null,
        "grantType": "password"
    },
    "clientOnly": false,
    "principal": {
        "password": null,
        "username": "mrbird",
        "authorities": [
            {
                "authority": "admin"
            }
        ],
        "accountNonExpired": true,
        "accountNonLocked": true,
        "credentialsNonExpired": true,
        "enabled": true
    },
    "name": "mrbird"
}
在同时定义了认证服务器和资源服务器后,再去使用授权码模式获取令牌可能会遇到 Full authentication is required to access this resource 的问题,这时候只要确保认证服务器先于资源服务器配置即可,比如在认证服务器的配置类上使用@Order(1)标注,在资源服务器的配置类上使用@Order(2)标注。
源码链接:https://github.com/wuyouzhuguli/SpringAll/tree/master/63.Spring-Security-OAuth2-Guide

 浙公网安备 33010602011771号