

在前面几节中,我们获取到的令牌都是基于Spring Security OAuth2默认配置生成的,Spring Security允许我们自定义令牌配置,比如不同的client_id对应不同的令牌,令牌的有效时间,令牌的存储策略等;我们也可以使用JWT来替换默认的令牌。
自定义令牌配置
我们让认证服务器AuthorizationServerConfig继承AuthorizationServerConfigurerAdapter,并重写它的configure(ClientDetailsServiceConfigurer clients)方法:
@Configuration
@EnableAuthorizationServer
public class AuthorizationServerConfig extends AuthorizationServerConfigurerAdapter {
......
@Autowired
private AuthenticationManager authenticationManager;
@Autowired
private UserDetailService userDetailService;
@Override
public void configure(AuthorizationServerEndpointsConfigurer endpoints) {
endpoints.authenticationManager(authenticationManager)
.userDetailsService(userDetailService);
}
@Override
public void configure(ClientDetailsServiceConfigurer clients) throws Exception {
clients.inMemory()
.withClient("test1")
.secret("test1111")
.accessTokenValiditySeconds(3600)
.refreshTokenValiditySeconds(864000)
.scopes("all", "a", "b", "c")
.authorizedGrantTypes("password")
.and()
.withClient("test2")
.secret("test2222")
.accessTokenValiditySeconds(7200);
}
}
认证服务器在继承了AuthorizationServerConfigurerAdapter适配器后,需要重写configure(AuthorizationServerEndpointsConfigurer endpoints)方法,指定 AuthenticationManager和UserDetailService。
创建一个新的配置类SecurityConfig,在里面注册我们需要的AuthenticationManagerBean:
@Configuration
public class SecurityConfig extends WebSecurityConfigurerAdapter {
@Bean(name = BeanIds.AUTHENTICATION_MANAGER)
@Override
public AuthenticationManager authenticationManagerBean() throws Exception {
return super.authenticationManagerBean();
}
}
此外,重写configure(ClientDetailsServiceConfigurer clients)方法主要配置了:
-
定义两个client_id,及客户端可以通过不同的client_id来获取不同的令牌;
-
client_id为test1的令牌有效时间为3600秒,client_id为test2的令牌有效时间为7200秒;
-
client_id为test1的refresh_token(下面会介绍到)有效时间为864000秒,即10天,也就是说在这10天内都可以通过refresh_token来换取新的令牌;
-
在获取client_id为test1的令牌的时候,scope只能指定为all,a,b或c中的某个值,否则将获取失败;
-
只能通过密码模式(password)来获取client_id为test1的令牌,而test2则无限制。
启动项目,演示几个效果。启动项目后使用密码模式获取test1的令牌:
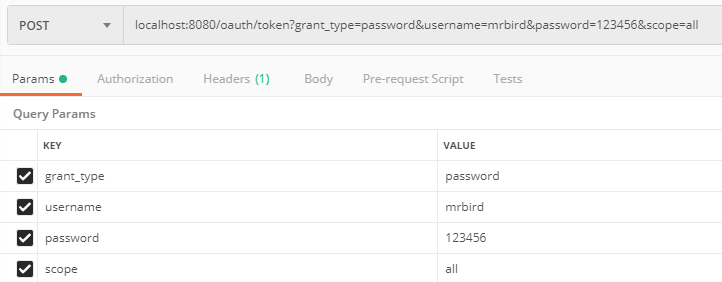
和前面介绍的那样,头部需要传入test1:test1111经过base64加密后的值: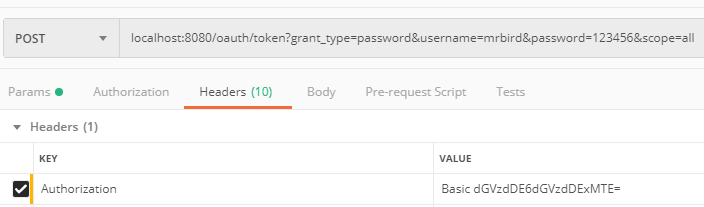
点击发送后,意外的返回了错误!
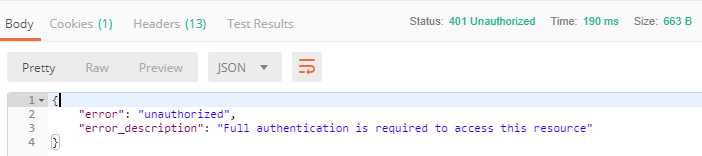
控制台输出了 Encoded password does not look like BCrypt 的告警。
查阅资料后发现,在新版本的spring-cloud-starter-oauth2指定client_secret的时候需要进行加密处理:
@Configuration
@EnableAuthorizationServer
public class AuthorizationServerConfig extends AuthorizationServerConfigurerAdapter {
......
@Override
public void configure(ClientDetailsServiceConfigurer clients) throws Exception {
clients.inMemory()
.withClient("test1")
.secret(new BCryptPasswordEncoder().encode("test1111"))
.accessTokenValiditySeconds(3600)
.refreshTokenValiditySeconds(864000)
.scopes("all", "a", "b", "c")
.authorizedGrantTypes("password")
.and()
.withClient("test2")
.secret(new BCryptPasswordEncoder().encode("test2222"))
.accessTokenValiditySeconds(7200);
}
}
在前面自定义登录认证获取令牌一节中,我们在MyAuthenticationSucessHandler判断了client_secret的值是否正确。由于我们这里client_secret加密了,所以判断逻辑需要调整为下面这样:
...
else if (!passwordEncoder.matches(clientSecret, clientDetails.getClientSecret())) {
throw new UnapprovedClientAuthenticationException("clientSecret不正确");
}
...
言归正传,修改后重启项目,重新使用密码模式获取令牌:
{
    "access_token": "c23376b0-efa3-4905-8356-8c9583c2a2a0",
    "token_type": "bearer",
    "expires_in": 3599,
    "scope": "all"
}
可以看到expires_in的时间是我们定义的3600秒。
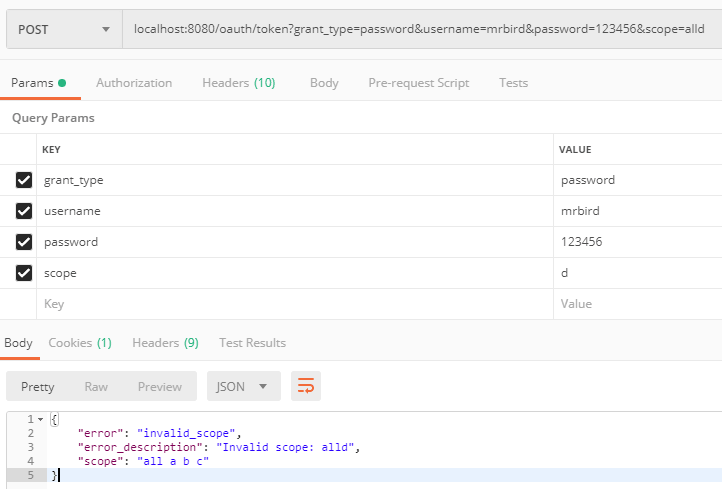
将scope指定为d看看会有什么结果:
由于我们定义了只能通过密码模式来获取client_id为test1的令牌,所以我们看看将grant_type改为xxoo会有什么结果:

默认令牌是存储在内存中的,我们可以将它保存到第三方存储中,比如Redis。
创建TokenStoreConfig:
@Configuration
public class TokenStoreConfig {
@Autowired
private RedisConnectionFactory redisConnectionFactory;
@Bean
public TokenStore redisTokenStore (){
return new RedisTokenStore(redisConnectionFactory);
}
}
然后在认证服务器里指定该令牌存储策略。重写configure(AuthorizationServerEndpointsConfigurer endpoints)方法:
@Configuration
@EnableAuthorizationServer
public class AuthorizationServerConfig extends AuthorizationServerConfigurerAdapter {
@Autowired
private TokenStore redisTokenStore;
@Override
public void configure(AuthorizationServerEndpointsConfigurer endpoints) {
endpoints.authenticationManager(authenticationManager)
.tokenStore(redisTokenStore);
}
......
}
重启项目获取令牌后,查看Redis中是否存储了令牌相关信息:
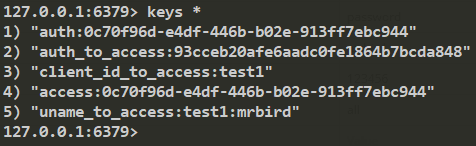
可以看到,令牌信息已经存储到Redis里了。
使用JWT替换默认令牌
使用JWT替换默认的令牌(默认令牌使用UUID生成)只需要指定TokenStore为JwtTokenStore即可。
创建一个JWTokenConfig配置类:
@Configuration
public class JWTokenConfig {
@Bean
public TokenStore jwtTokenStore() {
return new JwtTokenStore(jwtAccessTokenConverter());
}
@Bean
public JwtAccessTokenConverter jwtAccessTokenConverter() {
JwtAccessTokenConverter accessTokenConverter = new JwtAccessTokenConverter();
accessTokenConverter.setSigningKey("test_key"); // 签名密钥
return accessTokenConverter;
}
}
签名密钥为test_key。在配置类里配置好JwtTokenStore后,我们在认证服务器里指定它:
@Configuration
@EnableAuthorizationServer
public class AuthorizationServerConfig extends AuthorizationServerConfigurerAdapter {
@Autowired
private TokenStore jwtTokenStore;
@Autowired
private JwtAccessTokenConverter jwtAccessTokenConverter;
@Override
public void configure(AuthorizationServerEndpointsConfigurer endpoints) {
endpoints.authenticationManager(authenticationManager)
.tokenStore(jwtTokenStore)
.accessTokenConverter(jwtAccessTokenConverter);
}
......
}
重启服务获取令牌,系统将返回如下格式令牌:
{
    "access_token": "eyJhbGciOiJIUzI1NiIsInR5cCI6IkpXVCJ9.eyJleHAiOjE1NjE1MzI1MDEsInVzZXJfbmFtZSI6Im1yYmlyZCIsImF1dGhvcml0aWVzIjpbImFkbWluIl0sImp0aSI6IjJkZjY4MGNhLWFmN2QtNGU4Ni05OTdhLWI1ZmVkYzQxZmYwZSIsImNsaWVudF9pZCI6InRlc3QxIiwic2NvcGUiOltdfQ.dZ4SeuU3VWnSJKy5vELGQ0YkVRddcEydUlJAVovlycg",
    "token_type": "bearer",
    "expires_in": 3599,
    "scope": "all",
    "jti": "2df680ca-af7d-4e86-997a-b5fedc41ff0e"
}
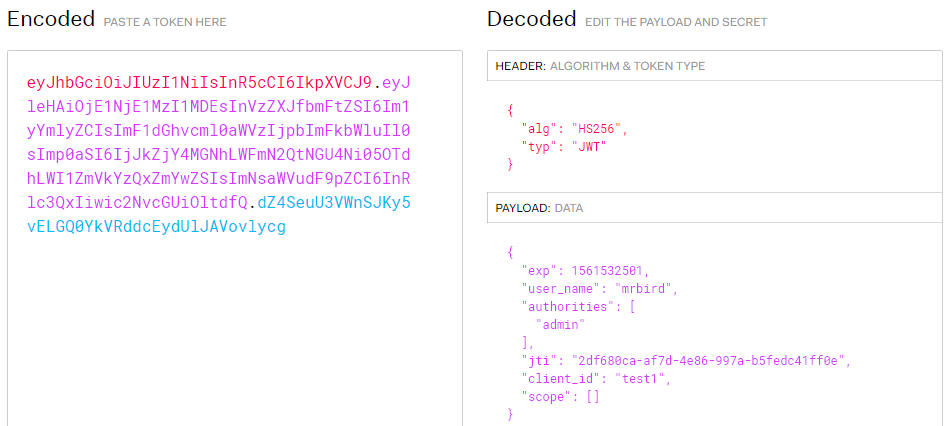
将access_token中的内容复制到https://jwt.io/网站解析下:
使用这个token访问/index可以成功获取到信息,这里就不演示了。
拓展JWT
上面的Token解析得到的PAYLOAD内容为:
{
  "exp": 1561532501,
  "user_name": "mrbird",
  "authorities": [
    "admin"
  ],
  "jti": "2df680ca-af7d-4e86-997a-b5fedc41ff0e",
  "client_id": "test1",
  "scope": ["all"]
}
如果想在JWT中添加一些额外的信息,我们需要实现TokenEnhancer(Token增强器):
public class JWTokenEnhancer implements TokenEnhancer {
    @Override
    public OAuth2AccessToken enhance(OAuth2AccessToken oAuth2AccessToken, OAuth2Authentication oAuth2Authentication) {
        Map<String, Object> info = new HashMap<>();
        info.put("message", "hello world");
        ((DefaultOAuth2AccessToken) oAuth2AccessToken).setAdditionalInformation(info);
        return oAuth2AccessToken;
    }
}
我们在Token中添加了message: hello world信息。然后在JWTokenConfig里注册该Bean:
@Configuration
public class JWTokenConfig {
......
@Bean
public TokenEnhancer tokenEnhancer() {
return new JWTokenEnhancer();
}
}
最后在认证服务器里配置该增强器:
@Configuration
@EnableAuthorizationServer
public class AuthorizationServerConfig extends AuthorizationServerConfigurerAdapter {
@Autowired
private TokenStore jwtTokenStore;
@Autowired
private JwtAccessTokenConverter jwtAccessTokenConverter;
@Autowired
private TokenEnhancer tokenEnhancer;
@Override
public void configure(AuthorizationServerEndpointsConfigurer endpoints) {
TokenEnhancerChain enhancerChain = new TokenEnhancerChain();
List<TokenEnhancer> enhancers = new ArrayList<>();
enhancers.add(tokenEnhancer);
enhancers.add(jwtAccessTokenConverter);
enhancerChain.setTokenEnhancers(enhancers);
endpoints.tokenStore(jwtTokenStore)
.accessTokenConverter(jwtAccessTokenConverter)
.tokenEnhancer(enhancerChain);
}
......
}
重启项目,再次获取令牌,系统返回:
{
    "access_token": "eyJhbGciOiJIUzI1NiIsInR5cCI6IkpXVCJ9.eyJ1c2VyX25hbWUiOiJtcmJpcmQiLCJzY29wZSI6W10sImV4cCI6MTU2MTUzNDQ1MCwibWVzc2FnZSI6ImhlbGxvIHdvcmxkIiwiYXV0aG9yaXRpZXMiOlsiYWRtaW4iXSwianRpIjoiY2E1NDA3ZTEtMzBmZS00MzA3LThiYmItYjU2NGY5Y2ViOWUzIiwiY2xpZW50X2lkIjoidGVzdDEifQ.qW92ssifRKi_rxX2XIH2u4D5IUPVcKECv812hTpuUuA",
    "token_type": "bearer",
    "expires_in": 3599,
    "message": "hello world",
    "jti": "ca5407e1-30fe-4307-8bbb-b564f9ceb9e3"
}
可以看到,在返回的JSON内容里已经多了我们添加的message信息,此外将access_token复制到jwt.io网站解析,内容如下:
{
  "user_name": "mrbird",
  "scope": [],
  "exp": 1561534450,
  "message": "hello world",
  "authorities": [
    "admin"
  ],
  "jti": "ca5407e1-30fe-4307-8bbb-b564f9ceb9e3",
  "client_id": "test1"
}
解析后的JWT也包含了我们添加的message信息。
Java中解析JWT
要在Java代码中解析JWT,需要添加如下依赖:
<dependency>
    <groupId>io.jsonwebtoken</groupId>
    <artifactId>jjwt</artifactId>
    <version>0.9.1</version>
</dependency>
修改/index:
@GetMapping("index")
public Object index(@AuthenticationPrincipal Authentication authentication, HttpServletRequest request) {
String header = request.getHeader("Authorization");
String token = StringUtils.substringAfter(header, "bearer ");
return Jwts.parser().setSigningKey("test_key".getBytes(StandardCharsets.UTF_8)).parseClaimsJws(token).getBody();
}
signkey需要和JwtAccessTokenConverter中指定的签名密钥一致。重启项目,获取令牌后访问/index,输出内容如下:
{
    "exp": 1561557893,
    "user_name": "mrbird",
    "authorities": [
        "admin"
    ],
    "jti": "3c29f89a-1344-40d8-bcfd-1b9c45fb8b89",
    "client_id": "test1",
    "scope": [
        "all"
    ]
}
刷新令牌
令牌过期后我们可以使用refresh_token来从系统中换取一个新的可用令牌。但是从前面的例子可以看到,在认证成功后返回的JSON信息里并没有包含refresh_token,要让系统返回refresh_token,需要在认证服务器自定义配置里添加如下配置:
@Configuration
@EnableAuthorizationServer
public class AuthorizationServerConfig extends AuthorizationServerConfigurerAdapter {
......
@Override
public void configure(ClientDetailsServiceConfigurer clients) throws Exception {
clients.inMemory()
.withClient("test1")
.secret(new BCryptPasswordEncoder().encode("test1111"))
.authorizedGrantTypes("password", "refresh_token")
.accessTokenValiditySeconds(3600)
.refreshTokenValiditySeconds(864000)
.scopes("all", "a", "b", "c")
.and()
.withClient("test2")
.secret(new BCryptPasswordEncoder().encode("test2222"))
.accessTokenValiditySeconds(7200);
}
}
授权方式需要加上refresh_token,除了四种标准的OAuth2获取令牌方式外,Spring Security OAuth2内部把refresh_token当作一种拓展的获取令牌方式。
通过上面的配置,使用test1这个client_id获取令牌时将返回refresh_token,refresh_token的有效期为10天,即10天之内都可以用它换取新的可用令牌。
重启项目,认证成功后,系统返回如:
{
    "access_token": "eyJhbGciOiJIUzI1NiIsInR5cCI6IkpXVCJ9.eyJleHAiOjE1NjE1NTgwOTcsInVzZXJfbmFtZSI6Im1yYmlyZCIsImF1dGhvcml0aWVzIjpbImFkbWluIl0sImp0aSI6Ijg2NTdhMDBlLTFiM2MtNDA5NS1iMjNmLTJlMjUxOWExZmUwMiIsImNsaWVudF9pZCI6InRlc3QxIiwic2NvcGUiOlsiYWxsIl19.hrxKOz3NKY6Eq8k5QeOqKhXUQ4aAbicrb6J5y-LBRA0",
    "token_type": "bearer",
    "refresh_token": "eyJhbGciOiJIUzI1NiIsInR5cCI6IkpXVCJ9.eyJ1c2VyX25hbWUiOiJtcmJpcmQiLCJzY29wZSI6WyJhbGwiXSwiYXRpIjoiODY1N2EwMGUtMWIzYy00MDk1LWIyM2YtMmUyNTE5YTFmZTAyIiwiZXhwIjoxNTYyNDE4NDk3LCJhdXRob3JpdGllcyI6WyJhZG1pbiJdLCJqdGkiOiI2MTNjMDVlNS1hNzUzLTRmM2UtOWViOC1hZGE4MTJmY2IyYWQiLCJjbGllbnRfaWQiOiJ0ZXN0MSJ9.efw9OePFUN9X6UGMF3h9BF_KO3zqyIfpvfmE8XklBDs",
    "expires_in": 3599,
    "scope": "all",
    "jti": "8657a00e-1b3c-4095-b23f-2e2519a1fe02"
}
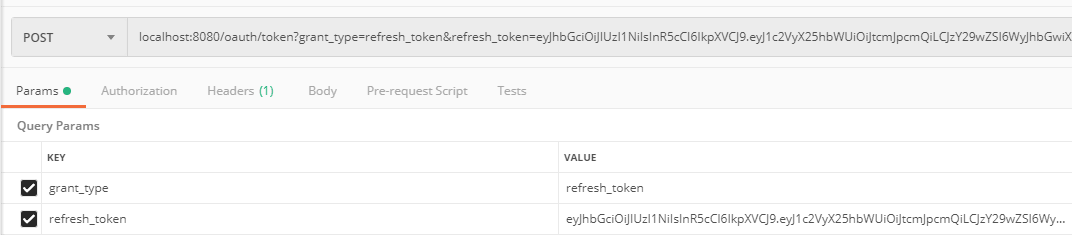
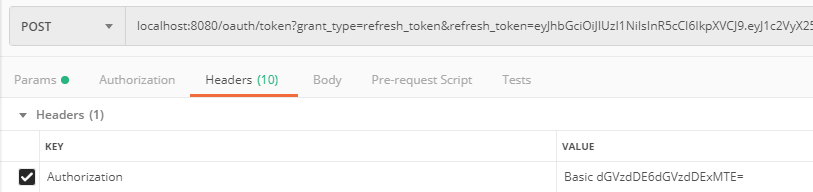
假设现在access_token过期了,我们用refresh_token去换取新的令牌。使用postman发送如下请求:
{
"access_token": "eyJhbGciOiJIUzI1NiIsInR5cCI6IkpXVCJ9.eyJleHAiOjE1NjE1NTgyMzEsInVzZXJfbmFtZSI6Im1yYmlyZCIsImF1dGhvcml0aWVzIjpbImFkbWluIl0sImp0aSI6ImFmNjU5MTE3LWJkMTItNDNmZS04YzE2LTM0MDQxMTMyZDFlOCIsImNsaWVudF9pZCI6InRlc3QxIiwic2NvcGUiOlsiYWxsIl19.4ZD5bXxsXjSw62_1wVl2QpHUKYcC8_1phdNRP02Iihs",
"token_type": "bearer",
"refresh_token": "eyJhbGciOiJIUzI1NiIsInR5cCI6IkpXVCJ9.eyJ1c2VyX25hbWUiOiJtcmJpcmQiLCJzY29wZSI6WyJhbGwiXSwiYXRpIjoiYWY2NTkxMTctYmQxMi00M2ZlLThjMTYtMzQwNDExMzJkMWU4IiwiZXhwIjoxNTYyNDE4NDk3LCJhdXRob3JpdGllcyI6WyJhZG1pbiJdLCJqdGkiOiI2MTNjMDVlNS1hNzUzLTRmM2UtOWViOC1hZGE4MTJmY2IyYWQiLCJjbGllbnRfaWQiOiJ0ZXN0MSJ9.e4p3CRyk_cZ82cGzjCBOb4p_0bqRqXElczJjf0nB58o",
"expires_in": 3599,
"scope": "all",
"jti": "af659117-bd12-43fe-8c16-34041132d1e8"
}

 浙公网安备 33010602011771号