DI依赖注入
一.依赖注入
1.构造器注入
二.set方式注入【重点】
依赖注入:set注入!
依赖:bean对象的创建依赖容器!
注入:bean中所有对象的属性,由容器来注入!
【环境搭建】
1.复杂类型
package top.lostyou.pojo;

public class Address {
    private String address;

    public String getAddress() {
        return address;
    }

    public void setAddress(String address) {
        this.address = address;
    }
}
2.真实测试对象
public class Student {
    private String name;
    private Address address;
    private String[] books;
    private List<String> hobbys;
    private Map<String,String> card;
    private Set<String> games;
    private String wife;
    private Properties info;
}
3.beans.xml
<?xml version="1.0" encoding="UTF-8"?>
<beans xmlns="http://www.springframework.org/schema/beans"
       xmlns:xsi="http://www.w3.org/2001/XMLSchema-instance"
       xsi:schemaLocation="http://www.springframework.org/schema/beans
        http://www.springframework.org/schema/beans/spring-beans.xsd">
<bean id="address" class="top.lostyou.pojo.Address">
    <property name="address" value="重庆"/>
</bean>
<bean id="Student" class="top.lostyou.pojo.Student">
    <!-- 第一种,普通值注入 -->
    <property name="name" value="msf"/>
    <!-- 第二种,bean(对象)注入 -->
    <property name="address" ref="address"/>
    <!-- 数组注入 -->
    <property name="books">
        <array>
            <value>三国演义</value>
            <value>西游记</value>
            <value>水浒传</value>
            <value>红楼梦</value>
        </array>
    </property>
    <!-- list(集合)注入 -->
    <property name="hobbys">
        <list>
            <value>听歌</value>
            <value>写程序</value>
            <value>看电视剧</value>
        </list>
    </property>
    <!-- map注入 -->
    <property name="card">
        <map>
            <entry key="username" value="maming"/>
            <entry key="password" value="123456"/>
        </map>
    </property>
    <!-- set注入 -->
    <property name="games">
        <set>
            <value>原神</value>
            <value>部落冲突</value>
            <value>数独</value>
        </set>
    </property>
    <!-- null注入 -->
    <property name="wife">
        <null/>
    </property>
    <!-- properties注入 -->
    <property name="info">
        <props>
            <prop key="driver">mysql.jdbc.java.Driver</prop>
            <prop key="username">root</prop>
            <prop key="password">123456</prop>
        </props>
    </property>
</bean>

</beans>
4.测试类
public class mytest {
    public static void main(String[] args) {
        ClassPathXmlApplicationContext context = new ClassPathXmlApplicationContext("beans.xml");
        Student student = (Student) context.getBean("Student");
        System.out.println(student.toString());
    }
}
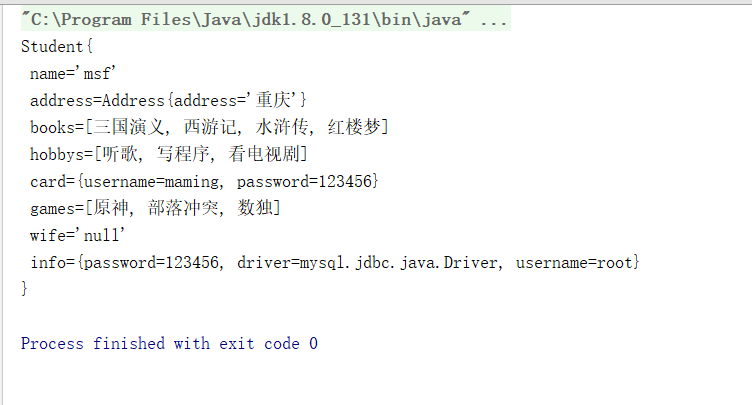
5.测试结果

总结:spring为了给我们提供容器,把绝大部分的属性和对象类型装载了,十分方便的可以是我们完成注入,其中最常用的包括:普通注入,bean注入,数组注入,map注入
三.其它注入(p命名空间,c命名空间)
1.工具类
package top.lostyou.pojo;

public class user {
    private String name;
    private String sex;

    public user() {
    }

    public user(String name, String sex) {
        this.name = name;
        this.sex = sex;
    }

    public String getName() {
        return name;
    }

    public void setName(String name) {
        this.name = name;
    }

    public String getSex() {
        return sex;
    }

    public void setSex(String sex) {
        this.sex = sex;
    }

    @Override
    public String toString() {
        return "user{" +
                "name='" + name + '\'' +
                ", sex='" + sex + '\'' +
                '}';
    }
}
2.spring的xml文件
<?xml version="1.0" encoding="UTF-8"?>
<beans xmlns="http://www.springframework.org/schema/beans"
       xmlns:xsi="http://www.w3.org/2001/XMLSchema-instance"
       xmlns:p="http://www.springframework.org/schema/p"
       xmlns:c="http://www.springframework.org/schema/c"
       xsi:schemaLocation="http://www.springframework.org/schema/beans
        http://www.springframework.org/schema/beans/spring-beans.xsd">


    <!-- P命名空间注入,可以直接注入属性的值,适用于无参构造,property  -->
<bean id="user" class="top.lostyou.pojo.user" p:name="jay周" p:sex="男"/>
    <!-- C命名空间注入,通过构造器注入,适用于有参构造,construct-args  -->
<bean id="user2" class="top.lostyou.pojo.user" c:name="程奕迅" c:sex="男"/>


</beans>
3.测试
    @Test
    public void tset1(){
        ClassPathXmlApplicationContext con = new ClassPathXmlApplicationContext("userBeans.xml");
        user user2 = con.getBean("user2", user.class);
        System.out.println(user2);
    }


· 阿里巴巴 QwQ-32B真的超越了 DeepSeek R-1吗?
· 10年+ .NET Coder 心语 ── 封装的思维:从隐藏、稳定开始理解其本质意义
· 【设计模式】告别冗长if-else语句:使用策略模式优化代码结构
· 字符编码:从基础到乱码解决
· 提示词工程——AI应用必不可少的技术