
Flume基本操作
安装(解压即安装)
#将flume安装包上传到hadoop集群的一个节点上
scp apache-flume-1.6.0-bin.tar.gz mini1:/root/apps/
#解压
cd /root/apps/
tar -zxvf apache-flume-1.6.0-bin.tar.gz -C install
cd install
mv apache-flume-1.6.0-bin flume
Flume支持众多的source和sink类型,详细手册可参考官方文档
http://flume.apache.org/FlumeUserGuide.html
根据采集需求编写配置文件
从网络端口接收数据,下沉到logger
vim flume/conf/netcat-logger.conf

#给那三个组件取个名字
a1.sources = r1
a1.sinks = k1
a1.channels = c1

#类型, 从网络端口接收数据,在本机启动, 所以localhost, type=spoolDir采集目录源,目录里有就采
a1.sources.r1.type = netcat
a1.sources.r1.bind = 192.168.38.3
a1.sources.r1.port = 44444

# Describe the sink
a1.sinks.k1.type = logger

# Use a channel which buffers events in memory
#下沉的时候是一批一批的, 下沉的时候是一个个eventChannel参数解释:
#capacity:默认该通道中最大的可以存储的event数量
#trasactionCapacity:每次最大可以从source中拿到或者送到sink中的event数量
a1.channels.c1.type = memory
a1.channels.c1.capacity = 1000
a1.channels.c1.transactionCapacity = 100

# 将数据来源与去向绑定到中间的数据通道
a1.sources.r1.channels = c1
a1.sinks.k1.channel = c1

启动命令:
#告诉flum启动一个agent,指定配置参数, --name:agent的名字,
$ bin/flume-ng agent --conf conf --conf-file conf/netcat-logger.conf --name a1 -Dflume.root.logger=INFO,console

或
bin/flume-ng agent -c conf -f conf/netcat-logger.conf -n a1  -Dflume.root.logger=INFO,console
-c conf   指定flume自身的配置文件所在目录
-f conf/netcat-logger.conf  指定我们所描述的采集方案
-n a1  指定我们这个agent的名字

#测试(使用telnet连接44444端口)
$ telnet localhost 44444
Trying 127.0.0.1...
Connected to localhost.localdomain (127.0.0.1).
Escape character is '^]'.
Hello world! <ENTER>
OK
从文件夹接收数据
vim ./conf/spool-logger.conf

# Name the components on this agent
a1.sources = r1
a1.sinks = k1
a1.channels = c1

# Describe/configure the source
#监听目录,spoolDir指定目录, fileHeader要不要给文件夹前坠名
a1.sources.r1.type = spooldir
a1.sources.r1.spoolDir = /root/flume_data_dir
a1.sources.r1.fileHeader = true

# Describe the sink
a1.sinks.k1.type = logger

# Use a channel which buffers events in memory
a1.channels.c1.type = memory
a1.channels.c1.capacity = 1000
a1.channels.c1.transactionCapacity = 100

# Bind the source and sink to the channel
a1.sources.r1.channels = c1
a1.sinks.k1.channel = c1

#启动命令:
bin/flume-ng agent -c ./conf -f ./conf/spool-logger.conf -n a1 -Dflume.root.logger=INFO,console

#测试:
往/root/flume_data_dir放文件
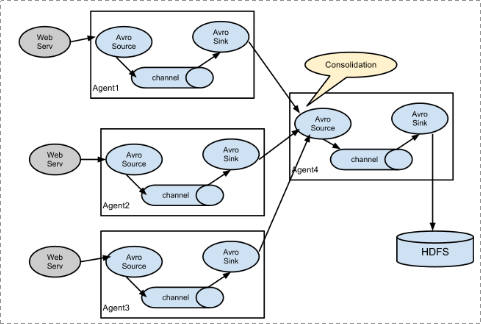
从命令获取数据下沉到avro端口(可使用avro实现多个agent的数据发送到一个agent)
vim tail-avro.conf
# Name the components on this agent
a1.sources = r1
a1.sinks = k1
a1.channels = c1

# Describe/configure the source
a1.sources.r1.type = exec
a1.sources.r1.command = tail -F /home/hadoop/log/test.log
a1.sources.r1.channels = c1

# Describe the sink
#绑定的不是本机, 是另外一台机器的服务地址, sink端的avro是一个发送端, avro的客户端, 往mini2这个机器上发
a1.sinks = k1
a1.sinks.k1.type = avro
a1.sinks.k1.channel = c1
a1.sinks.k1.hostname = mini2
a1.sinks.k1.port = 4141
a1.sinks.k1.batch-size = 2

# Use a channel which buffers events in memory
a1.channels.c1.type = memory
a1.channels.c1.capacity = 1000
a1.channels.c1.transactionCapacity = 100

# Bind the source and sink to the channel
a1.sources.r1.channels = c1
a1.sinks.k1.channel = c1

#启动命令
bin/flume-ng agent -c ./conf -f ./conf/tail-avro.conf -n a1
从avro端口接收数据(可接收来自多个avro客户端的数据,下沉到hdfs)
vim ./conf/avro-hdfs.conf

# Name the components on this agent
a1.sources = r1
a1.sinks = k1
a1.channels = c1

# Describe/configure the source
a1.sources.r1.type = avro
a1.sources.r1.channels = c1
#绑定本机所有ip地址(0.0.0.0)
#a1.sources.r1.bind = 0.0.0.0
a1.sources.r1.bind = mini2
a1.sources.r1.port = 4141

# Describe the sink
a1.sinks.k1.type = logger

# Use a channel which buffers events in memory
a1.channels.c1.type = memory
a1.channels.c1.capacity = 1000
a1.channels.c1.transactionCapacity = 100

# Bind the source and sink to the channel
a1.sources.r1.channels = c1
a1.sinks.k1.channel = c1

#启动命令:
bin/flume-ng agent -c ./conf -f ./conf/avro-hdfs.conf -n a1 -Dflume.root.logger=INFO,console

测试,发送数据:
$ bin/flume-ng avro-client -H localhost -p 4141 -F /usr/logs/log.10
从命令接收数据下沉到hdfs
vim tail-hdfs.conf

# Name the components on this agent
a1.sources = r1
a1.sinks = k1
a1.channels = c1

#exec 指的是命令
# Describe/configure the source
a1.sources.r1.type = exec
#F根据文件名追中, f根据文件的nodeid追中
a1.sources.r1.command = tail -F /root/test_data/test.log
a1.sources.r1.channels = c1

# Describe the sink
#下沉目标
a1.sinks.k1.type = hdfs
a1.sinks.k1.channel = c1
#指定目录, flum帮做目的替换
a1.sinks.k1.hdfs.path = /flume/events/%y-%m-%d/%H%M/
#文件的命名, 前缀
a1.sinks.k1.hdfs.filePrefix = events-

#10 分钟就改目录
a1.sinks.k1.hdfs.round = true
a1.sinks.k1.hdfs.roundValue = 10
a1.sinks.k1.hdfs.roundUnit = minute

#多久滚动一次(秒)
a1.sinks.k1.hdfs.rollInterval = 3

#文件滚动的大小限制(bytes)
a1.sinks.k1.hdfs.rollSize = 500

#写入多少个event数据后滚动文件(事件个数)
a1.sinks.k1.hdfs.rollCount = 20

#5个事件就往里面写入(缓存中有五个事件就开始往HDFS写)
a1.sinks.k1.hdfs.batchSize = 5

#用本地时间格式化目录
a1.sinks.k1.hdfs.useLocalTimeStamp = true

#下沉后, 生成的文件类型,默认是Sequencefile,可用DataStream,则为普通文本
a1.sinks.k1.hdfs.fileType = DataStream

# Use a channel which buffers events in memory
a1.channels.c1.type = memory
a1.channels.c1.capacity = 1000
a1.channels.c1.transactionCapacity = 100

# Bind the source and sink to the channel
a1.sources.r1.channels = c1
a1.sinks.k1.channel = c1

#创建文件
touch /root/test_data/test.log
#不断往test.log中写入数据,模拟不断生成的日志信息
while true
do
echo 111111 >> /home/hadoop/log/test.log
sleep 0.5
done
#启动flume接收数据
bin/flume-ng agent -c conf -f conf/tail-hdfs.conf -n a1
作者:py小杰
本文版权归作者和博客园共有,欢迎转载,但未经作者同意必须保留此段声明,且在文章页面明显位置给出原文连接,否则保留追究法律责任的权利。

 浙公网安备 33010602011771号