Elasticsearch实践(一):基础入门
本文以 Elasticsearch 6.2.4为例。
注:最新(截止到2018-09-23)的 Elasticsearch 是 6.4.1。5.x系列和6.x系列虽然有些区别,但基本用法是一样的。
官方文档:
https://www.elastic.co/guide/en/elasticsearch/reference/6.2/
安装
安装比较简单。分两步:
- 配置JDK环境
- 安装Elasticsearch
Elasticsearch 依赖 JDK环境,需要系统先下载安装 JDK 并配置
JAVA_HOME环境变量。JDK 版本推荐:1.8.0系列。地址:https://www.oracle.com/technetwork/java/javase/downloads/jdk8-downloads-2133151.html
安装JDk
Linux:
$ yum install -y java-1.8.0-openjdk
配置环境变量,需要修改/etc/profile, 增加:
JAVA_HOME=/usr/lib/jvm/java-1.8.0-openjdk-1.8.0.181-3.b13.el6_10.x86_64
PATH=$JAVA_HOME/bin:$PATH
CLASSPATH=.:$JAVA_HOME/lib/dt.jar:$JAVA_HOME/lib/tools.jar
JAVACMD=/usr/bin/java
export JAVA_HOME JAVACMD CLASSPATH PATH
然后使之生效:
source /etc/profile
Windows:
下载并配置JDK环境变量
JAVA_HOME=C:\Program Files\Java\jdk1.8.0_101

CLASSPATH=.;%JAVA_HOME%\lib;.;%JAVA_HOME%\lib\dt.jar;%JAVA_HOME%\lib\tools.jar;
安装Elasticsearch
Elasticsearch 安装只需要下载二进制压缩包包,解压即可使用。需要特别注意的是版本号,如果还要安装Kibana及插件,需要注意选用一样的版本号。
安装包下载:https://artifacts.elastic.co/downloads/elasticsearch/elasticsearch-6.2.4.tar.gz
这个页面有 Elasticsearch 所有版本的下载:https://www.elastic.co/downloads/past-releases
下载后解压到指定目录,进入到 bin 目录,就可以运行 Elasticsearch 了:
Linux:
./elasticsearch
Windows:
elasticsearch.bat
Windows也可以安装为系统服务:
D:\work\elk\elasticsearch-6.2.4\bin>elasticsearch-service.bat
Usage: elasticsearch-service.bat install|remove|start|stop|manager [SERVICE_ID]

elasticsearch-service.bat install
elasticsearch-service.bat start

elasticsearch-service.bat stop
elasticsearch-service.bat remove
浏览器访问:http://127.0.0.1:9200,如果返回version等信息,说明安装成功。
注: Linux/Mac环境不能使用 root 用户运行。
Dev Tools
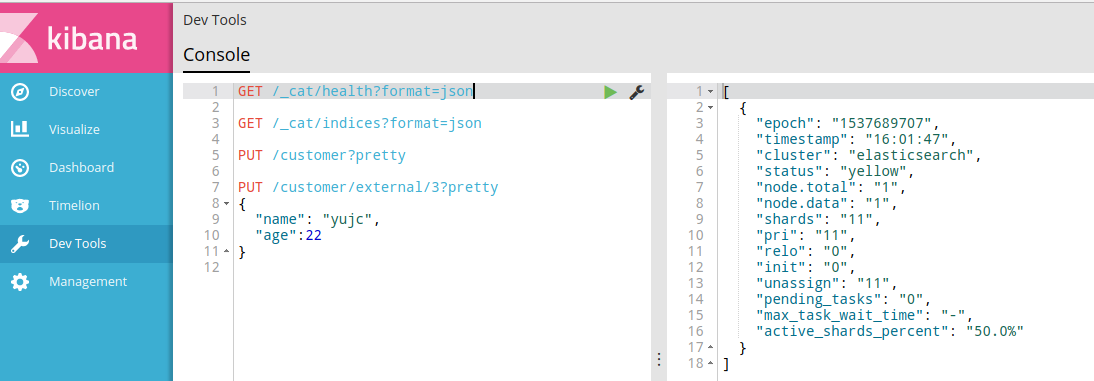
我们可以使用curl或者kibana提供的Dev Tools进行API测试。
例如:
curl方式:
curl 'localhost:9200/_cat/health?format=json'

[{"epoch":"1537689647","timestamp":"16:00:47","cluster":"elasticsearch","status":"yellow","node.total":"1","node.data":"1","shards":"11","pri":"11","relo":"0","init":"0","unassign":"11","pending_tasks":"0","max_task_wait_time":"-","active_shards_percent":"50.0%"}]
Dev Tools:
GET /_cat/health?format=json

个人比较喜欢Kibana提供的Dev Tools,非常方便。如果没有安装,参考下面安装:
a. 下载kibana Windows版:
https://artifacts.elastic.co/downloads/kibana/kibana-6.2.4-windows-x86_64.zip
b. 解压后进kibana-6.2.4-windows-x86_64\bin目录,运行
kibana.bat即可:
D:\work\elk\kibana-6.2.4-windows-x86_64\bin>kibana.bat
  log   [02:52:17.243] [info][status][plugin:kibana@6.2.4] Status changed from uninitialized to gree
n - Ready
  log   [02:52:17.869] [info][status][plugin:elasticsearch@6.2.4] Status changed from uninitialized
to yellow - Waiting for Elasticsearch
  log   [02:52:17.880] [info][status][plugin:console@6.2.4] Status changed from uninitialized to gre
en - Ready
  log   [02:52:17.888] [info][status][plugin:metrics@6.2.4] Status changed from uninitialized to gre
en - Ready
  log   [02:52:18.165] [info][status][plugin:timelion@6.2.4] Status changed from uninitialized to gr
een - Ready
  log   [02:52:18.200] [info][listening] Server running at http://localhost:5601
  log   [02:52:18.268] [info][status][plugin:elasticsearch@6.2.4] Status changed from yellow to gree
n - Ready
c. 浏览器访问: http://127.0.0.1:5601
查看_cat命令:
GET _cat
=^.^=
/_cat/allocation
/_cat/shards
/_cat/shards/{index}
/_cat/master
/_cat/nodes
/_cat/tasks
/_cat/indices
/_cat/indices/{index}
/_cat/segments
/_cat/segments/{index}
/_cat/count
/_cat/count/{index}
/_cat/recovery
/_cat/recovery/{index}
/_cat/health
/_cat/pending_tasks
/_cat/aliases
/_cat/aliases/{alias}
/_cat/thread_pool
/_cat/thread_pool/{thread_pools}
/_cat/plugins
/_cat/fielddata
/_cat/fielddata/{fields}
/_cat/nodeattrs
/_cat/repositories
/_cat/snapshots/{repository}
/_cat/templates
以下测试均在Dev Tools执行。
节点操作
查看健康状态
GET /_cat/health?format=json
format=json表示输出json格式,默认是文本格式。
结果:
[
  {
    "epoch": "1537689915",
    "timestamp": "16:05:15",
    "cluster": "elasticsearch",
    "status": "yellow",
    "node.total": "1",
    "node.data": "1",
    "shards": "11",
    "pri": "11",
    "relo": "0",
    "init": "0",
    "unassign": "11",
    "pending_tasks": "0",
    "max_task_wait_time": "-",
    "active_shards_percent": "50.0%"
  }
]
健康状态有3种:
- Green - 正常(集群功能齐全)
- Yellow - 所有数据均可用,但尚未分配一些副本(群集功能齐全)
- Red - 某些数据由于某种原因不可用(群集部分功能可用)
注意:当群集为红色时,它将继续提供来自可用分片的搜索请求,但您可能需要尽快修复它,因为存在未分配的分片。
查看节点
GET /_cat/nodes?format=json
索引
创建index
PUT /customer
输出:
{
  "acknowledged": true,
  "shards_acknowledged": true,
  "index": "customer"
}
注:实际项目里一般是不会直接这样创建 index 的,这里仅为演示。一般都是通过创建 mapping 手动定义 index 或者自动生成 index 。
查看所有index
GET /_cat/indices?format=json
结果:
[
  {
    "health": "yellow",
    "status": "open",
    "index": "customer",
    "uuid": "AC4WMuViTguHDFtCRlXLow",
    "pri": "5",
    "rep": "1",
    "docs.count": "0",
    "docs.deleted": "0",
    "store.size": "1.1kb",
    "pri.store.size": "1.1kb"
  }
]
删除index
DELETE /customer
输出:
{
  "acknowledged": true
}
注:删除索引会把数据一并删除。实际操作请谨慎。
简单的增删改查
本文只讲解简单的增删改查。
ES文档有一些缺省字段,称之为Meta-Fields,例如_index、_type、_id等,查询文档的时候会返回。
按ID新增数据
type为doc:
PUT /customer/doc/1
{
  "name": "John Doe"
}
对应命令行:
curl -XPUT http://127.0.0.1:9200/customer/doc/1 -H "Content-Type: application/json" -d '{"name": "John Doe"}'
PUT /customer/doc/2
{
  "name": "yujc",
  "age":22
}
如果索引index不存在,直接新增数据也会同时创建index。
同时,该操作也能修改数据:
PUT /customer/doc/2
{
  "name": "yujc2"
}
name字段会被修改,而且_version会被修改为2。该操作实际是覆盖数据:
GET /customer/doc/2
对应命令行:
curl -XGET http://127.0.0.1:9200/customer/doc/2
结果:
{
  "_index": "customer",
  "_type": "doc",
  "_id": "2",
  "_version": 2,
  "found": true,
  "_source": {
    "name": "yujc2"
  }
}
按ID查询数据
GET /customer/doc/1
对应命令行:
curl -XGET http://127.0.0.1:9200/customer/doc/1
结果:
{
  "_index": "customer",
  "_type": "doc",
  "_id": "1",
  "_version": 1,
  "found": true,
  "_source": {
    "name": "John Doe"
  }
}
直接新增数据
我们也可以不指定文档ID从而直接新增数据:
POST /customer/doc
{
  "name": "yujc",
  "age":23
}
注意这里使用的动作是POST。PUT新增数据必须指定文档ID。
按ID更新数据
我们使用下面两种方式均能更新已有数据:
PUT /customer/doc/1
{
  "name": "yujc2",
  "age":22
}

POST /customer/doc/1
{
  "name": "yujc2",
  "age":22
}
以上操作均会覆盖现有数据。
更新部分字段(_update)
如果只是想更新指定字段,必须使用POST加参数的形式:
POST /customer/doc/1/_update
{
  "doc":{"name": "yujc"}
}
其中_update表示更新。json里doc必须有,否则会报错。
对应命令行:
curl -XPOST http://127.0.0.1:9200/customer/doc/1/_update -H "Content-Type: application/json" -d '{"doc":{"name": "yujc"}}'
增加字段:
POST /customer/doc/1/_update
{
  "doc":{"year": 2018}
}
就会在已有的数据基础上增加一个year字段,不会覆盖已有数据:
GET /customer/doc/1
结果:
{
  "_index": "customer",
  "_type": "doc",
  "_id": "1",
  "_version": 16,
  "found": true,
  "_source": {
    "name": "yujc",
    "age": 22,
    "year": 2018
  }
}
也可以使用简单脚本执行更新。此示例使用脚本将年龄增加5:
POST /customer/doc/1/_update
{
  "script":"ctx._source.age+=5"
}
结果:
{
  "_index": "customer",
  "_type": "doc",
  "_id": "1",
  "_version": 17,
  "found": true,
  "_source": {
    "name": "yujc",
    "age": 27,
    "year": 2018
  }
}
按ID删除数据
DELETE /customer/doc/1
查询mapping
GET /customer/_mapping
输出:
{
  "customer": {
    "mappings": {
      "doc": {
        "properties": {
          "age": {
            "type": "long"
          },
          "name": {
            "type": "text",
            "fields": {
              "keyword": {
                "type": "keyword",
                "ignore_above": 256
              }
            }
          }
        }
      }
    }
  }
}
说明:properties表示字段,这里一共有2个字段(ES自动创建的):
- age,类型是long(支持检索)
- name,类型是text(支持检索、分词);且额外增加了一个字段
name.keyword,类型是keyword(支持检索)。
以上具体到后面讲解。
拓展知识:
注:ElasticSearch里面有
index和type的概念:index称为索引,type为文档类型,一个index下面有多个type,每个type的字段可以不一样。这类似于关系型数据库的 database 和 table 的概念。但是,ES中不同type下名称相同的filed最终在Lucene中的处理方式是一样的。所以后来ElasticSearch团队想去掉type,于是在6.x版本为了向下兼容,一个index只允许有一个type。预计7.x版本彻底去掉type。参考:https://www.elastic.co/guide/en/elasticsearch/reference/current/removal-of-types.html
所以,实际使用中建议一个
index里面仅有一个type,名称可以和index一致,或者使用固定的doc。
批量接口
批量创建
POST /customer/doc/_bulk
{"index":{"_id":"1"}}
{"name": "John Doe" }
{"index":{"_id":"2"}}
{"name": "Jane Doe" }
该操作会新增2条记录,其中文档第1行和第3行提供的是要操作的文档id,第2行和第4行是相应的源文档,即数据内容。这里对文档的操作是index,也可以是create,二者都是创建文档,只是如果文档已存在,index会覆盖,create会失败。
查询数据:
GET /customer/doc/2
结果:
{
  "_index": "customer",
  "_type": "doc",
  "_id": "2",
  "_version": 2,
  "found": true,
  "_source": {
    "name": "Jane Doe"
  }
}
批量更新、删除
POST /customer/doc/_bulk
{"update":{"_id":"1"}}
{"doc": { "name": "John Doe becomes Jane Doe" } }
{"delete":{"_id":"2"}}
该操作会更新ID为1的文档,删除ID为2的文档。对于删除操作,之后没有相应的源文档,因为删除只需要删除文档的ID。
注意:批量操作如果某条失败了,并不影响下一条继续执行。
按条件更新
curl -X POST http://127.0.0.1:9200/test/doc/_update_by_query -H "Content-Type: application/json" -d '{"script":{"source":"ctx._source[\"is_pub\"]=1"},"query":{"match_all":{}}}'
这个示例的含义是将文档test/doc的所有文档的is_pub字段设置为1。
按条件删除
curl -X POST http://127.0.0.1:9200/test/doc/_delete_by_query -H "Content-Type: application/json" -d '{"query":{"bool":{"filter":{"range":{"id":{"gt":1661208}}}}}}'
这个示例的含义是将文档test/doc里字段 id 符合id>1661208的全部删除。
防盗版声明:本文系原创文章,发布于公众号飞鸿影的博客(fhyblog)及博客园,转载需作者同意。
参考
1、Getting Started | Elasticsearch Reference [6.2] | Elastic
https://www.elastic.co/guide/en/elasticsearch/reference/6.2/getting-started.html
2、Elasticsearch 5.x 关于term query和match query的认识 - wangchuanfu - 博客园
https://www.cnblogs.com/wangchuanfu/p/7444253.html
本文优先在公众号"飞鸿影的博客(fhyblog)"发布,欢迎关注公众号及时获取最新文章推送!

作者:飞鸿影
出处:http://52fhy.cnblogs.com/
版权申明:没有标明转载或特殊申明均为作者原创。本文采用以下协议进行授权,自由转载 - 非商用 - 非衍生 - 保持署名 | Creative Commons BY-NC-ND 3.0,转载请注明作者及出处。


