微服务之springCloud-docker-hystrix-dashboard-turbine(九)
简介
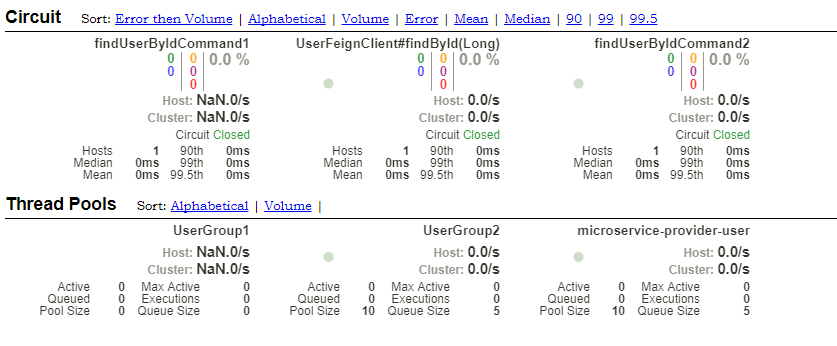
Hystrix的主要优点之一是它收集关于每个HystrixCommand的一套指标。Hystrix仪表板以有效的方式显示每个断路器的运行状况,通过Hystrix Dashboard我们可以在直观地看到各Hystrix Command的断路器是否打开,请求响应时间, 请求失败率,请求超时个数等等数据。但是只使用Hystrix Dashboard的话, 你只能看到单个应用内的服务信息, 这明显不够. 我们需要一个工具能让我们汇总系统内多个服务的数据并显示到Hystrix Dashboard上, 这个工具就是Turbine,这节我们讨论一下,怎么用turbine+hystrix-dashboard监听两个消费者服务
一、监听模块microservice-consumer-movie-feign-with-hystrix断路器的运行状况
这个模块在前面博客中讨论,这里就不写怎么创建了
http://www.cnblogs.com/520playboy/p/8066618.html
二、监听模块microservice-consumer-movie-ribbon-with-hystrix1断路器的运行状况
2.1、创建模块microservice-consumer-movie-ribbon-with-hystrix1
项目结构如下:

2.2、pom.xml文件
<?xml version="1.0" encoding="UTF-8"?>
<project xmlns="http://maven.apache.org/POM/4.0.0"
         xmlns:xsi="http://www.w3.org/2001/XMLSchema-instance"
         xsi:schemaLocation="http://maven.apache.org/POM/4.0.0 http://maven.apache.org/xsd/maven-4.0.0.xsd">
    <parent>
        <artifactId>microservice-spring-cloud</artifactId>
        <groupId>com.jacky</groupId>
        <version>1.0-SNAPSHOT</version>
    </parent>
    <modelVersion>4.0.0</modelVersion>

    <artifactId>microservice-consumer-movie-ribbon-with-hystrix1</artifactId>
    <packaging>jar</packaging>

    <properties>
        <project.build.sourceEncoding>UTF-8</project.build.sourceEncoding>
        <project.reporting.outputEncoding>UTF-8</project.reporting.outputEncoding>
        <java.version>1.8</java.version>
    </properties>

    <dependencies>
        <dependency>
            <groupId>org.springframework.boot</groupId>
            <artifactId>spring-boot-starter-web</artifactId>
        </dependency>

        <dependency>
            <groupId>org.springframework.cloud</groupId>
            <artifactId>spring-cloud-starter-eureka</artifactId>
        </dependency>

        <dependency>
            <groupId>org.springframework.boot</groupId>
            <artifactId>spring-boot-starter-actuator</artifactId>
        </dependency>

        <dependency>
            <groupId>org.springframework.cloud</groupId>
            <artifactId>spring-cloud-starter-hystrix</artifactId>
        </dependency>
        <dependency>
            <groupId>org.springframework.cloud</groupId>
            <artifactId>spring-cloud-starter-zipkin</artifactId>
        </dependency>
    </dependencies>
    <build>
        <plugins>
            <plugin>
                <groupId>com.spotify</groupId>
                <artifactId>docker-maven-plugin</artifactId>
                <executions>
                    <!--设置在执行maven 的install时构建镜像-->
                    <execution>
                        <id>build-image</id>
                        <phase>install</phase>
                        <goals>
                            <goal>build</goal>
                        </goals>
                    </execution>
                </executions>
                <configuration>
                    <!--安装了docker的主机,并且打开了api remote接口设置-->
                    <dockerHost>http://192.168.6.130:5678</dockerHost>
                    <pushImage>true</pushImage><!--设置上传镜像到私有仓库,需要docker设置指定私有仓库地址-->
                    <!--镜像名称-->
                    <imageName>${docker.repostory}/${docker.image.prefix}/${project.artifactId}:${project.version}</imageName>
                    <!--镜像的基础版本-->
                    <baseImage>java:openjdk-8-jdk-alpine</baseImage>
                    <!--镜像启动参数-->
                    <entryPoint>["java", "-jar", "/${project.build.finalName}.jar"]</entryPoint>
                    <resources>
                        <resource>
                            <targetPath>/</targetPath>
                            <directory>${project.build.directory}</directory>
                            <include>${project.build.finalName}.jar</include>
                        </resource>
                    </resources>
                </configuration>
            </plugin>
        </plugins>
    </build>
</project>
2.3、配置文件application.yml
spring:
  application:
    name: microservice-consumer-movie-ribbon-with-hystrix1
  sleuth:
    sampler:
      percentage: 1.0
  #zipkin:
    #base-url: http://localhost:7788
server:
  port: 8010
eureka:
  client:
    healthcheck:
      enabled: true
    serviceUrl:
      defaultZone: http://jacky:admin@peer1:8761/eureka/,http://jacky:admin@peer2:8762/eureka/,http://jacky:admin@peer3:8763/eureka/
  instance:
    prefer-ip-address: true
    instance-id: ${spring.application.name}:${spring.cloud.client.ipAddress}:${spring.application.instance_id:${server.port}}
hystrix.command.default.execution.isolation.thread.timeoutInMilliseconds: 5000
#security:
  #oauth2:
   # resource:
    #  id: microservice-consumer-movie-ribbon-with-hystrix1
     # user-info-uri: http://localhost:9999/uaa/user
      #prefer-token-info: false
2.4、实体类User.java
package com.jacky.cloud.entity;

import java.math.BigDecimal;

public class User {
  private Long id;

  private String username;

  private String name;

  private Short age;

  private BigDecimal balance;

  public Long getId() {
    return this.id;
  }

  public void setId(Long id) {
    this.id = id;
  }

  public String getUsername() {
    return this.username;
  }

  public void setUsername(String username) {
    this.username = username;
  }

  public String getName() {
    return this.name;
  }

  public void setName(String name) {
    this.name = name;
  }

  public Short getAge() {
    return this.age;
  }

  public void setAge(Short age) {
    this.age = age;
  }

  public BigDecimal getBalance() {
    return this.balance;
  }

  public void setBalance(BigDecimal balance) {
    this.balance = balance;
  }

}
2.5、控制层MovieController.java
package com.jacky.cloud.controller;

import com.netflix.hystrix.contrib.javanica.annotation.HystrixProperty;
import org.springframework.beans.factory.annotation.Autowired;

import org.springframework.web.bind.annotation.GetMapping;
import org.springframework.web.bind.annotation.PathVariable;
import org.springframework.web.bind.annotation.RestController;
import org.springframework.web.client.RestTemplate;

import com.jacky.cloud.entity.User;
import com.netflix.hystrix.contrib.javanica.annotation.HystrixCommand;

@RestController
public class MovieController {
  @Autowired
  private RestTemplate restTemplate;

  @GetMapping("/movie/{id}")
  @HystrixCommand(groupKey="UserGroup1", commandKey = "findUserByIdCommand1",commandProperties = {
          @HystrixProperty(name = "execution.isolation.thread.timeoutInMilliseconds", value = "1000"),
          @HystrixProperty(name = "execution.timeout.enabled", value = "false")},fallbackMethod = "findByIdFallback")
  public User findById(@PathVariable Long id) {
    return this.restTemplate.getForObject("http://microservice-provider-user/simple/" + id, User.class);
  }

  /**
   * fallback方法
   * @param id
   * @return
     */
  public User findByIdFallback(Long id) {
    User user = new User();
    user.setId(5L);
    return user;
  }
}
2.6、启动类
package com.jacky.cloud;

import org.springframework.boot.SpringApplication;
import org.springframework.boot.autoconfigure.SpringBootApplication;
import org.springframework.cloud.client.circuitbreaker.EnableCircuitBreaker;
import org.springframework.cloud.client.loadbalancer.LoadBalanced;
import org.springframework.cloud.netflix.eureka.EnableEurekaClient;
import org.springframework.context.annotation.Bean;
import org.springframework.web.client.RestTemplate;

@SpringBootApplication
@EnableEurekaClient
@EnableCircuitBreaker       //映入断路器注解
public class ConsumerMovieRibbonApplication {

  @Bean
  @LoadBalanced
  public RestTemplate restTemplate() {
    return new RestTemplate();
  }

  public static void main(String[] args) {
    SpringApplication.run(ConsumerMovieRibbonApplication.class, args);
  }
}
三、创建hystrix+turbine模块(microservice-hystrix-turbine1)
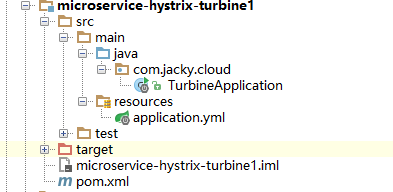
项目结构如下:

3.1、pom.xml文件
<?xml version="1.0" encoding="UTF-8"?>
<project xmlns="http://maven.apache.org/POM/4.0.0"
         xmlns:xsi="http://www.w3.org/2001/XMLSchema-instance"
         xsi:schemaLocation="http://maven.apache.org/POM/4.0.0 http://maven.apache.org/xsd/maven-4.0.0.xsd">
    <parent>
        <artifactId>microservice-spring-cloud</artifactId>
        <groupId>com.jacky</groupId>
        <version>1.0-SNAPSHOT</version>
    </parent>
    <modelVersion>4.0.0</modelVersion>

    <artifactId>microservice-hystrix-turbine1</artifactId>
    <packaging>jar</packaging>

    <properties>
        <project.build.sourceEncoding>UTF-8</project.build.sourceEncoding>
    </properties>

    <dependencies>
        <dependency>
            <groupId>org.springframework.cloud</groupId>
            <artifactId>spring-cloud-starter-turbine</artifactId>
        </dependency>
        <dependency>
            <groupId>org.springframework.cloud</groupId>
            <artifactId>spring-cloud-netflix-turbine</artifactId>
        </dependency>
        <dependency>
            <groupId>org.springframework.boot</groupId>
            <artifactId>spring-boot-starter-actuator</artifactId>
        </dependency>
        <dependency>
            <groupId>org.springframework.cloud</groupId>
            <artifactId>spring-cloud-starter-hystrix-dashboard</artifactId>
        </dependency>
    </dependencies>

    <build>
        <plugins>
            <plugin>
                <groupId>com.spotify</groupId>
                <artifactId>docker-maven-plugin</artifactId>
                <executions>
                    <!--设置在执行maven 的install时构建镜像-->
                    <execution>
                        <id>build-image</id>
                        <phase>install</phase>
                        <goals>
                            <goal>build</goal>
                        </goals>
                    </execution>
                </executions>
                <configuration>
                    <!--安装了docker的主机,并且打开了api remote接口设置-->
                    <dockerHost>http://192.168.6.130:5678</dockerHost>
                    <pushImage>true</pushImage><!--设置上传镜像到私有仓库,需要docker设置指定私有仓库地址-->
                    <!--镜像名称-->
                    <imageName>${docker.repostory}/${docker.image.prefix}/${project.artifactId}:${project.version}</imageName>
                    <!--镜像的基础版本-->
                    <baseImage>java:openjdk-8-jdk-alpine</baseImage>
                    <!--镜像启动参数-->
                    <entryPoint>["java", "-jar", "/${project.build.finalName}.jar"]</entryPoint>
                    <resources>
                        <resource>
                            <targetPath>/</targetPath>
                            <directory>${project.build.directory}</directory>
                            <include>${project.build.finalName}.jar</include>
                        </resource>
                    </resources>
                </configuration>
            </plugin>
        </plugins>
    </build>

</project>
3.2、配置文件application.yml
server:
  port: 8031
spring:
  application:
    name: microservice-hystrix-turbine
eureka:
  client:
    serviceUrl:
      defaultZone: http://jacky:admin@peer1:8761/eureka/,http://jacky:admin@peer2:8762/eureka/,http://jacky:admin@peer3:8763/eureka/
  instance:
    prefer-ip-address: true
turbine:
  aggregator:
    clusterConfig: default     #指定聚合哪些集群,多个使用”,”分割,默认为default。可使用http://.../turbine.stream?cluster={clusterConfig之一}访问
    #配置Eureka中的serviceId列表,表明监控哪些服务
  appConfig: microservice-consumer-movie-feign-with-hystrix,microservice-consumer-movie-ribbon-with-hystrix1
  #1. clusterNameExpression指定集群名称,默认表达式appName;此时:turbine.aggregator.clusterConfig需要配置想要监控的应用名称;
  #2. 当clusterNameExpression: default时,turbine.aggregator.clusterConfig可以不写,因为默认就是default;
  #3. 当clusterNameExpression: metadata[‘cluster’]时,假设想要监控的应用配置了eureka.instance.metadata-map.cluster: ABC,则需要配置,同时turbine.aggregator.clusterConfig: ABC
  clusterNameExpression: "'default'"
3.3、启动类
package com.jacky.cloud;

import org.springframework.boot.SpringApplication;
import org.springframework.boot.autoconfigure.SpringBootApplication;
import org.springframework.cloud.netflix.hystrix.dashboard.EnableHystrixDashboard;
import org.springframework.cloud.netflix.turbine.EnableTurbine;

@EnableTurbine
@EnableHystrixDashboard
@SpringBootApplication
public class TurbineApplication {
  public static void main(String[] args) {
    SpringApplication.run(TurbineApplication.class, args);
  }
}
四、启动
- 启动 microservice-provider-user
- 启动 microservice-consumer-movie-feign-with-hystrix
- 启动microservice-consumer-movie-ribbon-with-hystrix1
- 启动microservice-hystrix-turbine
五、测试


