微服务之springCloud-docker-comsumer(三)
简介
上一节,我们讲了创建spring cloud生产者,并利用docker-compose部署到swarm集群中,这节我们讨论一下最restTemlate调用生产者服务
一、创建模块(microservice-consumer-movie)
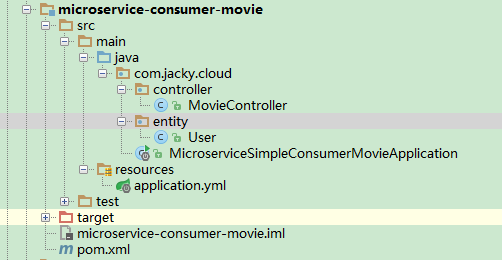
项目结构如下:

二、pom.xml文件
<?xml version="1.0" encoding="UTF-8"?>
<project xmlns="http://maven.apache.org/POM/4.0.0"
         xmlns:xsi="http://www.w3.org/2001/XMLSchema-instance"
         xsi:schemaLocation="http://maven.apache.org/POM/4.0.0 http://maven.apache.org/xsd/maven-4.0.0.xsd">
    <parent>
        <artifactId>microservice-spring-cloud</artifactId>
        <groupId>com.jacky</groupId>
        <version>1.0-SNAPSHOT</version>
    </parent>
    <modelVersion>4.0.0</modelVersion>

    <artifactId>microservice-consumer-movie</artifactId>
    <packaging>pom</packaging>
    <modules>
        <module>../microservice-provider-user</module>
    </modules>
    <properties>
        <project.build.sourceEncoding>UTF-8</project.build.sourceEncoding>
        <project.reporting.outputEncoding>UTF-8</project.reporting.outputEncoding>
        <java.version>1.8</java.version>
    </properties>

    <dependencies>
        <dependency>
            <groupId>org.springframework.boot</groupId>
            <artifactId>spring-boot-starter-web</artifactId>
        </dependency>

        <dependency>
            <groupId>org.springframework.cloud</groupId>
            <artifactId>spring-cloud-starter-eureka</artifactId>
        </dependency>

        <dependency>
            <groupId>org.springframework.boot</groupId>
            <artifactId>spring-boot-starter-actuator</artifactId>
        </dependency>

        <!--<dependency>
            <groupId>org.springframework.cloud</groupId>
            <artifactId>spring-cloud-starter-zipkin</artifactId>
        </dependency>-->
    </dependencies>

    <build>
        <plugins>
            <plugin>
                <groupId>com.spotify</groupId>
                <artifactId>docker-maven-plugin</artifactId>
                <executions>
                    <!--设置在执行maven 的install时构建镜像-->
                    <execution>
                        <id>build-image</id>
                        <phase>install</phase>
                        <goals>
                            <goal>build</goal>
                        </goals>
                    </execution>
                </executions>
                <configuration>
                    <!--安装了docker的主机,并且打开了api remote接口设置-->
                    <dockerHost>http://192.168.6.130:5678</dockerHost>
                    <pushImage>true</pushImage><!--设置上传镜像到私有仓库,需要docker设置指定私有仓库地址-->
                    <!--镜像名称-->
                    <imageName>${docker.repostory}/${docker.image.prefix}/${project.artifactId}:${project.version}</imageName>
                    <!--镜像的基础版本-->
                    <baseImage>java:openjdk-8-jdk-alpine</baseImage>
                    <!--镜像启动参数-->
                    <entryPoint>["java", "-jar", "/${project.build.finalName}.jar"]</entryPoint>
                    <resources>
                        <resource>
                            <targetPath>/</targetPath>
                            <directory>${project.build.directory}</directory>
                            <include>${project.build.finalName}.jar</include>
                        </resource>
                    </resources>
                </configuration>
            </plugin>
        </plugins>
    </build>

</project>
三、实体类(User.java)
package com.jacky.cloud.entity;

import java.math.BigDecimal;

public class User {
  private Long id;

  private String username;

  private String name;

  private Short age;

  private BigDecimal balance;

  public Long getId() {
    return this.id;
  }

  public void setId(Long id) {
    this.id = id;
  }

  public String getUsername() {
    return this.username;
  }

  public void setUsername(String username) {
    this.username = username;
  }

  public String getName() {
    return this.name;
  }

  public void setName(String name) {
    this.name = name;
  }

  public Short getAge() {
    return this.age;
  }

  public void setAge(Short age) {
    this.age = age;
  }

  public BigDecimal getBalance() {
    return this.balance;
  }

  public void setBalance(BigDecimal balance) {
    this.balance = balance;
  }

}
四、MovieController.java
package com.jacky.cloud.controller;

import com.jacky.cloud.entity.User;
import org.springframework.beans.factory.annotation.Autowired;
import org.springframework.beans.factory.annotation.Value;
import org.springframework.web.bind.annotation.GetMapping;
import org.springframework.web.bind.annotation.PathVariable;
import org.springframework.web.bind.annotation.RestController;
import org.springframework.web.client.RestTemplate;


@RestController
public class MovieController {
  @Autowired
  private RestTemplate restTemplate;

  @Value("${user.userServicePath}")
  private String userServicePath;

  @GetMapping("/movie/{id}")
  public User findById(@PathVariable Long id) {
    return this.restTemplate.getForObject(this.userServicePath + id, User.class);
  }
}
五、启动类(MicroserviceSimpleConsumerMovieApplication)
package com.jacky.cloud;

import org.springframework.boot.SpringApplication;
import org.springframework.boot.autoconfigure.SpringBootApplication;
import org.springframework.cloud.netflix.eureka.EnableEurekaClient;
import org.springframework.context.annotation.Bean;
import org.springframework.web.client.RestTemplate;

@SpringBootApplication
@EnableEurekaClient
public class MicroserviceSimpleConsumerMovieApplication {

  @Bean
  public RestTemplate restTemplate() {
    return new RestTemplate();
  }

  public static void main(String[] args) {
    SpringApplication.run(MicroserviceSimpleConsumerMovieApplication.class, args);
  }
}
六、配置文件application.yml
server:
  port: 7901
spring:
  application:
    name: microservice-consumer-movie
  #zipkin:
    #base-url: http://127.0.0.1:7788
user:
  userServicePath: http://localhost:7900/simple/      #指定生产者的路径
eureka:
  client:
    healthcheck:
      enabled: true
    serviceUrl:
      defaultZone: http://jacky:admin@peer1:8761/eureka/,http://jacky:admin@peer2:8762/eureka/,http://jacky:admin@peer3:8763/eureka/
  instance:
    prefer-ip-address: true
    instance-id: ${spring.application.name}:${spring.cloud.client.ipAddress}:${spring.application.instance_id:${server.port}}


