SpringBoot整合RabbitMQ,实现消息发送和消费以及多个消费者的情况
配置文件application.properties:
spring.application.name=spring-boot-rabbitmq

spring.rabbitmq.host=localhost
spring.rabbitmq.port=5672
spring.rabbitmq.username=guest
spring.rabbitmq.password=guest

server.port = 5678
RabbitMQ配置文件类(注释的代码可以直接删掉):
import org.springframework.amqp.core.Binding;
import org.springframework.amqp.core.BindingBuilder;
import org.springframework.amqp.core.Queue;
import org.springframework.amqp.core.TopicExchange;
import org.springframework.context.annotation.Bean;
import org.springframework.context.annotation.Configuration;


/**
 * topic 是RabbitMQ中最灵活的一种方式,可以根据routing_key自由的绑定不同的队列
 * 首先对topic规则配置
 */
//@Configuration
public class TopicRabbitConfig {

    final public static String QUEUE_NAME = "queue.name";
    final public static String TEST_TOPIC_ROUTINGKEY = "test.topic.routingKey";
    final public static String TEST_EXCHANGE_HAHA = "test.exchange.haha";


    /**
     * 设置交换器的名称
     * @return
     *//*
    @Bean
    TopicExchange exchange() {
        return new TopicExchange(TopicRabbitConfig.TEST_EXCHANGE_HAHA);
    }

    *//**
     * 队列名称
     * @return
     *//*
    @Bean
    public Queue queueMessage() {
        return new Queue(TopicRabbitConfig.QUEUE_NAME);
    }

    *//**
     * 将指定routing key的名称绑定交换器的队列
     * @param queueMessage
     * @param exchange
     * @return
     *//*
    @Bean
    Binding bindingExchangeMessage(Queue queueMessage, TopicExchange exchange) {
        return BindingBuilder.bind(queueMessage).to(exchange).with(TopicRabbitConfig.TEST_TOPIC_ROUTINGKEY);
    }*/

    /**
     * 匹配以topic开头的路由键routing key
     * 交换机绑定多个队列
     */

    /*@Bean
    Binding bindingExchangeMessages(Queue queueMessages, TopicExchange exchange) {
        return BindingBuilder.bind(queueMessages).to(exchange).with("topic.#");
    }*/
}
生产者,这里根据Exchange和Routing Key,直接发送一个字符串:
import lombok.extern.slf4j.Slf4j;
import org.springframework.amqp.rabbit.core.RabbitTemplate;
import org.springframework.beans.factory.annotation.Autowired;
import org.springframework.stereotype.Component;
import xy.study.rabbitmq.conf.TopicRabbitConfig;

@Component
@Slf4j
public class HelloSender {

    @Autowired
    private RabbitTemplate rabbitTemplate;


    /**
     * 通过exchange和routingKey的方式
     * rabbitTemplate.convertAndSend(String exchange, String routingKey, Object object)
     * @param i
     */
    public void send(int i) {
        String context = "hello " + i;
        log.info("Sender : {}", context);
        this.rabbitTemplate.convertAndSend(TopicRabbitConfig.TEST_EXCHANGE_HAHA,TopicRabbitConfig.TEST_TOPIC_ROUTINGKEY, context);
    }
}
消费者,绑定对应的Exchange,Queue和Routing Key,直接打印获取的信息:
import lombok.extern.slf4j.Slf4j;
import org.springframework.amqp.core.ExchangeTypes;
import org.springframework.amqp.rabbit.annotation.Exchange;
import org.springframework.amqp.rabbit.annotation.Queue;
import org.springframework.amqp.rabbit.annotation.QueueBinding;
import org.springframework.amqp.rabbit.annotation.RabbitListener;
import org.springframework.messaging.handler.annotation.Payload;
import org.springframework.stereotype.Component;
import xy.study.rabbitmq.conf.TopicRabbitConfig;

@Component
@Slf4j
public class HelloReceiver {
    @RabbitListener(bindings = @QueueBinding(
            value = @Queue(value = TopicRabbitConfig.QUEUE_NAME, durable = "true"),
            exchange = @Exchange(value = TopicRabbitConfig.TEST_EXCHANGE_HAHA, type = ExchangeTypes.TOPIC),
            key = TopicRabbitConfig.TEST_TOPIC_ROUTINGKEY)
    )
    public void onOrgDeleted(@Payload String msg) {
        log.info("HelloReceiver msg : {}",msg);
    }
}
测试类,调用生产者发送信息的函数send,消费者会监听消费:
import org.junit.Test;
import org.junit.runner.RunWith;
import org.springframework.beans.factory.annotation.Autowired;
import org.springframework.boot.test.context.SpringBootTest;
import org.springframework.test.context.junit4.SpringRunner;
import xy.study.rabbitmq.producer.HelloSender;

@RunWith(SpringRunner.class)
@SpringBootTest
public class RabbitmqApplicationTests {

    @Autowired
    private HelloSender sender;

    @Test
    public void testSend() {
        sender.send(666);
    }

}
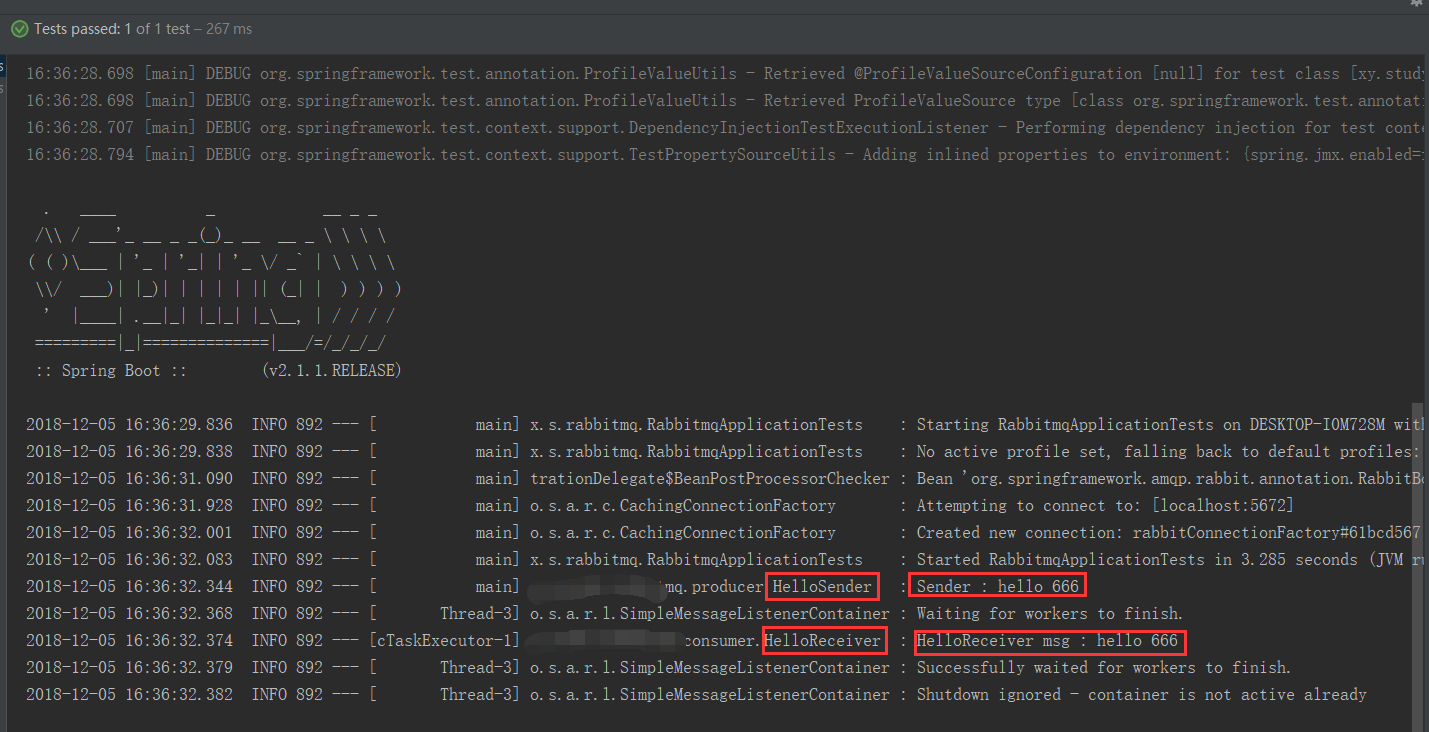
如图,控制台日志,能生成消息,并且能被对应的消费者消费。
topic exchange 通配路由中多个消费者的情况
修改消费者的代码如下:
import lombok.extern.slf4j.Slf4j;
import org.springframework.amqp.core.ExchangeTypes;
import org.springframework.amqp.rabbit.annotation.Exchange;
import org.springframework.amqp.rabbit.annotation.Queue;
import org.springframework.amqp.rabbit.annotation.QueueBinding;
import org.springframework.amqp.rabbit.annotation.RabbitListener;
import org.springframework.messaging.handler.annotation.Payload;
import org.springframework.stereotype.Component;
import xy.study.rabbitmq.conf.TopicRabbitConfig;

@Component
@Slf4j
public class HelloReceiver {

    /**
     * 下面四个消费者,exchange和RoutingKey都相同,最后两个消费者队列名都相同
     * @param msg
     */
    @RabbitListener(bindings = @QueueBinding(
            value = @Queue(value = TopicRabbitConfig.QUEUE_NAME, durable = "true"),
            exchange = @Exchange(value = TopicRabbitConfig.TEST_EXCHANGE_HAHA, type = ExchangeTypes.TOPIC),
            key = TopicRabbitConfig.TEST_TOPIC_ROUTINGKEY)
    )
    public void queueName(@Payload String msg) {
        log.info("{}-----HelloReceiver msg : {}",TopicRabbitConfig.QUEUE_NAME,msg);
    }


    @RabbitListener(bindings = @QueueBinding(
            value = @Queue(value = TopicRabbitConfig.QUEUE_NAME+".test", durable = "true"),
            exchange = @Exchange(value = TopicRabbitConfig.TEST_EXCHANGE_HAHA, type = ExchangeTypes.TOPIC),
            key = TopicRabbitConfig.TEST_TOPIC_ROUTINGKEY)
    )
    public void queueNameTest(@Payload String msg) {
        log.info("{}-----HelloReceiver msg : {}",TopicRabbitConfig.QUEUE_NAME+".test",msg);
    }

    /**
     * 这里我的消费者队列名"123445",是乱写的,也能够接受
     * @param msg
     */
    @RabbitListener(bindings = @QueueBinding(
            value = @Queue(value = 123445+"", durable = "true"),
            exchange = @Exchange(value = TopicRabbitConfig.TEST_EXCHANGE_HAHA, type = ExchangeTypes.TOPIC),
            key = TopicRabbitConfig.TEST_TOPIC_ROUTINGKEY)
    )
    public void queueNameNumber(@Payload String msg) {
        log.info("{}-----HelloReceiver msg : {}",123445+""+".test",msg);
    }

    /**
     * 由于这个和上面的Exchange、RoutingKey、queue完全相同,所以这两个消费者,一条消息,只有一个能消费(随机)
     * @param msg
     */
    @RabbitListener(bindings = @QueueBinding(
            value = @Queue(value = 123445+"", durable = "true"),
            exchange = @Exchange(value = TopicRabbitConfig.TEST_EXCHANGE_HAHA, type = ExchangeTypes.TOPIC),
            key = TopicRabbitConfig.TEST_TOPIC_ROUTINGKEY)
    )
    public void queueNameNumberSame(@Payload String msg) {
        log.info("same+{}-----HelloReceiver msg : {}",123445+""+".test",msg);
    }
}
再次执行测试,测试结果如下:

总结:
上面四个消费者代码,Exchange和RoutingKey都相同,最后两个消费者队列名都相同。
根据结果可知,当Exchange和RoutingKey相同、queue不同时,所有消费者都能消费同样的信息;
当Exchange和RoutingKey、queue都相同时(最后两个消费者),消费者中只有一个能消费信息,其他消费者都不能消费该信息。

 浙公网安备 33010602011771号