Redis入门、安装和启动
- 1.1. Redis 诞生历程
-
- 1.1.1.从一个故事开始
- 1.2. Redis 定位与特性
-
- 1.2.1.SQL 与 NoSQL
- 它以表格的形式,基于行存储数据,是一个二维的模式。
- 它存储的是结构化的数据,数据存储有固定的模式(schema),数据需要适应表结构。
- 表与表之间存在关联(Relationship)。
- 大部分关系型数据库都支持 SQL(结构化查询语言)的操作,支持复杂的关联查询。
- 通过支持事务(ACID 酸)来提供严格或者实时的数据一致性。
- 要实现扩容的话,只能向上(垂直)扩展,比如磁盘限制了数据的存储,就要扩大磁盘容量,通过堆硬件的方式,不支持动态的扩缩容。水平扩容需要复杂的技术来实现,比如分库分表。
- 表结构修改困难,因此存储的数据格式也受到限制。
- 在高并发和高数据量的情况下,我们的关系型数据库通常会把数据持久化到磁盘,基于磁盘的读写压力比较大。
- 存储非结构化的数据,比如文本、图片、音频、视频。
- 表与表之间没有关联,可扩展性强。
- 保证数据的最终一致性。遵循 BASE(碱)理论。 Basically Available(基本可用); Soft-state(软状态); Eventually Consistent(最终一致性)。
- 支持海量数据的存储和高并发的高效读写。
- 支持分布式,能够对数据进行分片存储,扩缩容简单。
- 1.2.2.Redis 特性
- 1)更丰富的数据类型;
- 2)进程内与跨进程;单机与分布式;
- 3)功能丰富:持久化机制、过期策略;
- 4)支持多种编程语言;
- 5)高可用,集群;
- 1、Linux 安装
1、下载redis
下载地址在:redis.io
比如把Redis安装到/usr/local/soft/
cd /usr/local/soft/
wget http://download.redis.io/releases/redis-5.0.5.tar.gz
2、解压压缩包
tar -zxvf redis-5.0.5.tar.gz
3、安装gcc依赖
Redis是C语言编写的,编译需要
yum install gcc
4、编译安装
cd redis-5.0.5
make MALLOC=libc
将/usr/local/soft/redis-5.0.5/src目录下二进制文件安装到/usr/local/bin
cd src
make install
5、修改配置文件
默认的配置文件是/usr/local/soft/redis-5.0.5/redis.conf
后台启动
daemonize no
改成
daemonize yes
下面一行必须改成 bind 0.0.0.0 或注释,否则只能在本机访问
bind 127.0.0.1
如果需要密码访问,取消requirepass的注释
requirepass yourpassword
6、使用指定配置文件启动Redis(这个命令建议配置alias)
/usr/local/soft/redis-5.0.5/src/redis-server /usr/local/soft/redis-5.0.5/redis.conf
7、进入客户端(这个命令建议配置alias)
/usr/local/soft/redis-5.0.5/src/redis-cli
8、停止redis(在客户端中)
redis> shutdown
或
ps -aux | grep redis
kill -9 xxxx
CentOS 7 单机安装Redis Cluster(3主3从)
为了节省机器,我们直接把6个Redis实例安装在同一台机器上(3主3从),只是使用不同的端口号。
机器IP 192.168.8.207
更新:新版的cluster已经不需要通过ruby脚本创建,删掉了ruby相关依赖的安装
cd /usr/local/soft/redis-5.0.5
mkdir redis-cluster
cd redis-cluster
mkdir 7291 7292 7293 7294 7295 7296
复制redis配置文件到7291目录
cp /usr/local/soft/redis-5.0.5/redis.conf /usr/local/soft/redis-5.0.5/redis-cluster/7291
修改7291的redis.conf配置文件,内容:
cd /usr/local/soft/redis-5.0.5/redis-cluster/7291
>redis.conf
vim redis.conf


port 7291
daemonize yes
protected-mode no
dir /usr/local/soft/redis-5.0.5/redis-cluster/7291/
cluster-enabled yes
cluster-config-file nodes-7291.conf
cluster-node-timeout 5000
appendonly yes
pidfile /var/run/redis_7291.pid
把7291下的redis.conf复制到其他5个目录。
cd /usr/local/soft/redis-5.0.5/redis-cluster/7291
cp redis.conf ../7292
cp redis.conf ../7293
cp redis.conf ../7294
cp redis.conf ../7295
cp redis.conf ../7296
批量替换内容
cd /usr/local/soft/redis-5.0.5/redis-cluster
sed -i 's/7291/7292/g' 7292/redis.conf
sed -i 's/7291/7293/g' 7293/redis.conf
sed -i 's/7291/7294/g' 7294/redis.conf
sed -i 's/7291/7295/g' 7295/redis.conf
sed -i 's/7291/7296/g' 7296/redis.conf
启动6个Redis节点
cd /usr/local/soft/redis-5.0.5/
./src/redis-server redis-cluster/7291/redis.conf
./src/redis-server redis-cluster/7292/redis.conf
./src/redis-server redis-cluster/7293/redis.conf
./src/redis-server redis-cluster/7294/redis.conf
./src/redis-server redis-cluster/7295/redis.conf
./src/redis-server redis-cluster/7296/redis.conf
是否启动了6个进程
ps -ef|grep redis
创建集群
旧版本中的redis-trib.rb已经废弃了,直接用–cluster命令
注意用绝对IP,不要用127.0.0.1
cd /usr/local/soft/redis-5.0.5/src/
redis-cli --cluster create 192.168.8.207:7291 192.168.8.207:7292 192.168.8.207:7293 192.168.8.207:7294 192.168.8.207:7295 192.168.8.207:7296 --cluster-replicas 1
Redis会给出一个预计的方案,对6个节点分配3主3从,如果认为没有问题,输入yes确认
>>> Performing hash slots allocation on 6 nodes...
Master[0] -> Slots 0 - 5460
Master[1] -> Slots 5461 - 10922
Master[2] -> Slots 10923 - 16383
Adding replica 127.0.0.1:7295 to 127.0.0.1:7291
Adding replica 127.0.0.1:7296 to 127.0.0.1:7292
Adding replica 127.0.0.1:7294 to 127.0.0.1:7293
>>> Trying to optimize slaves allocation for anti-affinity
[WARNING] Some slaves are in the same host as their master
M: dfdc9c0589219f727e4fd0ad8dafaf7e0cfb4f1c 127.0.0.1:7291
   slots:[0-5460] (5461 slots) master
M: 8c878b45905bba3d7366c89ec51bd0cd7ce959f8 127.0.0.1:7292
   slots:[5461-10922] (5462 slots) master
M: aeeb7d7076d9b25a7805ac6f508497b43887e599 127.0.0.1:7293
   slots:[10923-16383] (5461 slots) master
S: ebc479e609ff8f6ca9283947530919c559a08f80 127.0.0.1:7294
   replicates aeeb7d7076d9b25a7805ac6f508497b43887e599
S: 49385ed6e58469ef900ec48e5912e5f7b7505f6e 127.0.0.1:7295
   replicates dfdc9c0589219f727e4fd0ad8dafaf7e0cfb4f1c
S: 8d6227aefc4830065624ff6c1dd795d2d5ad094a 127.0.0.1:7296
   replicates 8c878b45905bba3d7366c89ec51bd0cd7ce959f8
Can I set the above configuration? (type 'yes' to accept):
注意看slot的分布:
7291  [0-5460] (5461个槽)
7292  [5461-10922] (5462个槽)
7293  [10923-16383] (5461个槽)
集群创建完成
>>> Nodes configuration updated
>>> Assign a different config epoch to each node
>>> Sending CLUSTER MEET messages to join the cluster
Waiting for the cluster to join
....
>>> Performing Cluster Check (using node 127.0.0.1:7291)
M: dfdc9c0589219f727e4fd0ad8dafaf7e0cfb4f1c 127.0.0.1:7291
   slots:[0-5460] (5461 slots) master
   1 additional replica(s)
M: 8c878b45905bba3d7366c89ec51bd0cd7ce959f8 127.0.0.1:7292
   slots:[5461-10922] (5462 slots) master
   1 additional replica(s)
M: aeeb7d7076d9b25a7805ac6f508497b43887e599 127.0.0.1:7293
   slots:[10923-16383] (5461 slots) master
   1 additional replica(s)
S: 8d6227aefc4830065624ff6c1dd795d2d5ad094a 127.0.0.1:7296
   slots: (0 slots) slave
   replicates aeeb7d7076d9b25a7805ac6f508497b43887e599
S: ebc479e609ff8f6ca9283947530919c559a08f80 127.0.0.1:7294
   slots: (0 slots) slave
   replicates dfdc9c0589219f727e4fd0ad8dafaf7e0cfb4f1c
S: 49385ed6e58469ef900ec48e5912e5f7b7505f6e 127.0.0.1:7295
   slots: (0 slots) slave
   replicates 8c878b45905bba3d7366c89ec51bd0cd7ce959f8
[OK] All nodes agree about slots configuration.
>>> Check for open slots...
>>> Check slots coverage...
[OK] All 16384 slots covered.重置集群的方式是在每个节点上个执行cluster reset,然后重新创建集群
连接到客户端
redis-cli -p 7291
redis-cli -p 7292
redis-cli -p 7293
批量写入值
cd /usr/local/soft/redis-5.0.5/redis-cluster/
vim setkey.sh
脚本内容
#!/bin/bash
for ((i=0;i<20000;i++))
do
echo -en "helloworld" | redis-cli -h 192.168.8.207 -p 7291 -c -x set name$i >>redis.log
done


chmod +x setkey.sh
./setkey.sh
每个节点分布的数据
127.0.0.1:7292> dbsize
(integer) 6683
127.0.0.1:7293> dbsize
(integer) 6665
127.0.0.1:7291> dbsize
(integer) 6652
其他命令,比如添加节点、删除节点,重新分布数据:
redis-cli --cluster help
Cluster Manager Commands:
  create         host1:port1 ... hostN:portN
                 --cluster-replicas <arg>
  check          host:port
                 --cluster-search-multiple-owners
  info           host:port
  fix            host:port
                 --cluster-search-multiple-owners
  reshard        host:port
                 --cluster-from <arg>
                 --cluster-to <arg>
                 --cluster-slots <arg>
                 --cluster-yes
                 --cluster-timeout <arg>
                 --cluster-pipeline <arg>
                 --cluster-replace
  rebalance      host:port
                 --cluster-weight <node1=w1...nodeN=wN>
                 --cluster-use-empty-masters
                 --cluster-timeout <arg>
                 --cluster-simulate
                 --cluster-pipeline <arg>
                 --cluster-threshold <arg>
                 --cluster-replace
  add-node       new_host:new_port existing_host:existing_port
                 --cluster-slave
                 --cluster-master-id <arg>
  del-node       host:port node_id
  call           host:port command arg arg .. arg
  set-timeout    host:port milliseconds
  import         host:port
                 --cluster-from <arg>
                 --cluster-copy
                 --cluster-replace
  help

For check, fix, reshard, del-node, set-timeout you can specify the host and port of any working node in the cluster.
附录:
集群命令
- cluster info :打印集群的信息
- cluster nodes :列出集群当前已知的所有节点(node),以及这些节点的相关信息。
- cluster meet :将 ip 和 port 所指定的节点添加到集群当中,让它成为集群的一份子。
- cluster forget <node_id> :从集群中移除 node_id 指定的节点(保证空槽道)。
- cluster replicate <node_id> :将当前节点设置为 node_id 指定的节点的从节点。
- cluster saveconfig :将节点的配置文件保存到硬盘里面。
槽slot命令
- cluster addslots [slot …] :将一个或多个槽(slot)指派(assign)给当前节点。
- cluster delslots [slot …] :移除一个或多个槽对当前节点的指派。
- cluster flushslots :移除指派给当前节点的所有槽,让当前节点变成一个没有指派任何槽的节点。
- cluster setslot node <node_id> :将槽 slot 指派给 node_id 指定的节点,如果槽已经指派给另一个节点,那么先让另一个节点删除该槽>,然后再进行指派。
- cluster setslot migrating <node_id> :将本节点的槽 slot 迁移到 node_id 指定的节点中。
- cluster setslot importing <node_id> :从 node_id 指定的节点中导入槽 slot 到本节点。
- cluster setslot stable :取消对槽 slot 的导入(import)或者迁移(migrate)。
键命令
- cluster keyslot :计算键 key 应该被放置在哪个槽上。
- cluster countkeysinslot :返回槽 slot 目前包含的键值对数量。
- cluster getkeysinslot :返回 count 个 slot 槽中的键
阿里云CentOS7 Docker安装Redis
获取最新镜像
docker pull redis
查看已下载的镜像
docker images
因为Docker安装的Redis默认没有配置文件,所以需要挂载主机的配置文件
在主机环境中创建映射的配置和数据目录
mkdir -p /usr/local/soft/redis/conf/
mkdir -p /usr/local/soft/redis/data/
复制 redis.conf 文件到主机/usr/local/soft/redis/conf/目录下(这个配置文件可以在官网redis.io下载的压缩包中找到)。
注意有两行配置要修改:
daemonize yes 这一行必须注释,否则无法启动
bind 127.0.0.1 改成 bind 0.0.0.0 ,否则只能在本机访问
运行Redis服务端:
docker run -p 6379:6379 --name redis5 -v /usr/local/soft/redis/conf/redis.conf:/etc/redis/redis.conf -v /usr/local/soft/redis/data/:/data -d redis:latest redis-server /etc/redis/redis.conf --appendonly yes
注意:
如果需要安装多个redis,可以修改映射的端口,如:
6391:6379
6392:6379
6393:6379
外网环境记得在末尾加上以下参数,以免被攻击
--requirepass "youpassword"
参数说明:
- -d 后台运行
- -p 6379:6379 端口映射(本机6379端口映射容器6379端口)
- –name redis5 容器别名
- -v /etc/app/redis/conf:/conf 目录映射(本机redis配置文件目录)
- -v /etc/app/redis/data:/data 目录映射(本机redis数据目录)
- redis-server /conf/redis.conf --appendonly yes 在容器运行命令,并打开数据持久化
连接Redis客户端:
docker exec -it redis5 redis-cli
Redis一主二从Sentinel监控配置
开启哨兵模式,至少需要3个Sentinel实例(奇数个,否则无法选举Leader)。
本例通过3个Sentinel实例监控3个Redis服务(1主2从)。
IP地址	          节点角色&端口
192.168.8.203	Master:6379 / Sentinel : 26379
192.168.8.204	Slave :6379 / Sentinel : 26379
192.168.8.205	Slave :6379 / Sentinel : 26379
防火墙记得关闭!!!
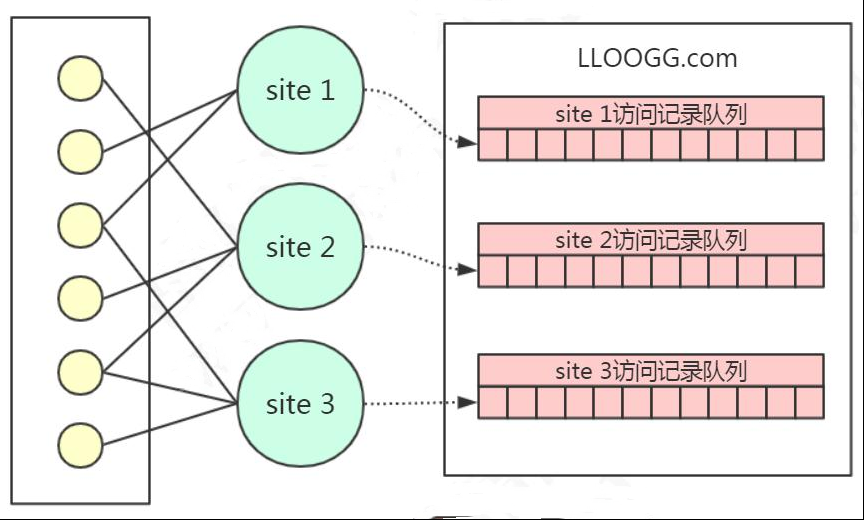
网络结构图:

在204和205的redis.conf配置中添加一行
slaveof 192.168.8.203 6379
在203、204、205创建sentinel配置文件(单例安装后根目录下默认有sentinel.conf,可以先备份默认的配置)
cd /usr/local/soft/redis-5.0.5
mkdir logs
mkdir rdbs
mkdir sentinel-tmp
cp sentinel.conf sentinel.conf.bak
>sentinel.conf
vim sentinel.conf
sentinel.conf配置文件内容,三台机器相同
daemonize yes
port 26379
protected-mode no
dir "/usr/local/soft/redis-5.0.5/sentinel-tmp"
sentinel monitor redis-master 192.168.8.203 6379 2
sentinel down-after-milliseconds redis-master 30000
sentinel failover-timeout redis-master 180000
sentinel parallel-syncs redis-master 1
在3台机器上分别启动Redis和Sentinel
cd /usr/local/soft/redis-5.0.5/src
./redis-server ../redis.conf
./redis-sentinel ../sentinel.conf
哨兵节点的另一种启动方式:
./redis-server ../sentinel.conf --sentinel
在3台机器上查看集群状态:
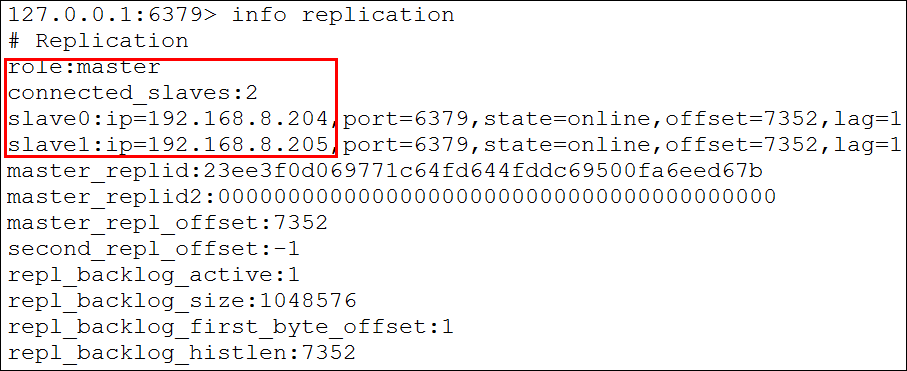
$ /usr/local/soft/redis-5.0.5/src/redis-cli
redis> info replication
模拟master宕机,在203执行:
redis> shutdown
注意看sentinel.conf里面的redis-master被修改了,变成了当前master的IP端口。
$ /usr/local/soft/redis-5.0.5/src/redis-cli
redis> info replication
这个时候会有一个slave节点被Sentinel设置为master。
再次启动master,它不一定会被选举为master。
slave宕机和恢复测试省略。
注意这里有的朋友遇到了坑:
- 1、slave可以显示master信息,而master没有slave信息。
- 2、master宕机后slave没有被提升为master。
可能有几个主要原因:
- 1、master信息配置不正确。
- 2、需要配置auth-pass。
./redis-server
daemonize yes
bind 0.0.0.0
redis-server /usr/local/soft/redis-5.0.5/redis.conf
切换数据库
select 0
清空当前数据库
flushdb
清空所有数据库
flushall

 浙公网安备 33010602011771号