
SpringBoot+Security+JWT实现单点登录
本次整合实现的目标:1、SSO单点登录2、基于角色和spring security注解的权限控制。
推荐一篇博客:Spring Security + OAuth2.0 + JWT 实现单点登录
整合过程如下:
1、使用maven构建项目,加入先关依赖,pom.xml如下:
<?xml version="1.0" encoding="UTF-8"?>
<project xmlns="http://maven.apache.org/POM/4.0.0" xmlns:xsi="http://www.w3.org/2001/XMLSchema-instance"
    xsi:schemaLocation="http://maven.apache.org/POM/4.0.0 http://maven.apache.org/xsd/maven-4.0.0.xsd">
    <modelVersion>4.0.0</modelVersion>

    <groupId>powerx.io</groupId>
    <artifactId>springboot-security-jwt</artifactId>
    <version>0.0.1-SNAPSHOT</version>
    <packaging>jar</packaging>

    <name>springboot-security-jwt</name>
    <description>Demo project for Spring Boot</description>

    <parent>
        <groupId>org.springframework.boot</groupId>
        <artifactId>spring-boot-starter-parent</artifactId>
        <version>2.0.5.RELEASE</version>
        <relativePath /> <!-- lookup parent from repository -->
    </parent>

    <properties>
        <project.build.sourceEncoding>UTF-8</project.build.sourceEncoding>
        <project.reporting.outputEncoding>UTF-8</project.reporting.outputEncoding>
        <java.version>1.8</java.version>
    </properties>

    <dependencies>
        <dependency>
            <groupId>org.springframework.boot</groupId>
            <artifactId>spring-boot-starter-web</artifactId>
        </dependency>
        <dependency>
            <groupId>org.springframework.boot</groupId>
            <artifactId>spring-boot-starter-security</artifactId>
        </dependency>
        <dependency>
            <groupId>io.jsonwebtoken</groupId>
            <artifactId>jjwt</artifactId>
            <version>0.7.0</version>
        </dependency>

        <dependency>
            <groupId>org.springframework.boot</groupId>
            <artifactId>spring-boot-starter-test</artifactId>
            <scope>test</scope>
        </dependency>
    </dependencies>

    <build>
        <plugins>
            <plugin>
                <groupId>org.springframework.boot</groupId>
                <artifactId>spring-boot-maven-plugin</artifactId>
            </plugin>
        </plugins>
    </build>


</project>
2、JWT相关的两个过滤器:认证过滤器JWTLoginFilter和鉴权过滤器JWTAuthenticationFilter,为了简单,这里没有写专门的JWTUtils工具类来进行token的一系列操作,只是简单的利用JWT的第三方jar生成了token。
JWTLoginFilter.java
package com.example.demo;

import java.io.IOException;
import java.io.PrintWriter;
import java.util.ArrayList;
import java.util.Date;
import java.util.stream.Collectors;

import javax.servlet.FilterChain;
import javax.servlet.ServletException;
import javax.servlet.http.HttpServletRequest;
import javax.servlet.http.HttpServletResponse;

import org.springframework.security.authentication.AuthenticationManager;
import org.springframework.security.authentication.UsernamePasswordAuthenticationToken;
import org.springframework.security.core.Authentication;
import org.springframework.security.core.AuthenticationException;
import org.springframework.security.web.authentication.UsernamePasswordAuthenticationFilter;

import io.jsonwebtoken.Claims;
import io.jsonwebtoken.Jwts;
import io.jsonwebtoken.SignatureAlgorithm;

/**
 * 验证用户名密码正确后,生成一个token,并将token返回给客户端
 * 该类继承自UsernamePasswordAuthenticationFilter,重写了其中的2个方法 ,
 * attemptAuthentication:接收并解析用户凭证。
 * successfulAuthentication:用户成功登录后,这个方法会被调用,我们在这个方法里生成token并返回。
 *
 */
public class JWTLoginFilter extends UsernamePasswordAuthenticationFilter {

    private AuthenticationManager authenticationManager;

    public JWTLoginFilter(AuthenticationManager authenticationManager) {
        this.authenticationManager = authenticationManager;
    }

    @Override
    public Authentication attemptAuthentication(HttpServletRequest request, HttpServletResponse response)
            throws AuthenticationException {
            String username = request.getParameter("username");
            String password = request.getParameter("password");
            return authenticationManager.authenticate(new UsernamePasswordAuthenticationToken(username, password, new ArrayList<>()));

    }

    @Override
    protected void successfulAuthentication(HttpServletRequest request, HttpServletResponse response, FilterChain chain,
            Authentication auth) throws IOException, ServletException {
         Claims claims = Jwts.claims();
         claims.put("role", auth.getAuthorities().stream().map(s -> s.getAuthority()).collect(Collectors.toList()));
        String token = Jwts.builder()
                .setClaims(claims)
                .setSubject(auth.getName())
                .setExpiration(new Date(System.currentTimeMillis() + 60 * 60 * 24 * 1000))
                .signWith(SignatureAlgorithm.HS512, "MyJwtSecret11").compact();
        response.setCharacterEncoding("UTF-8");
        response.setContentType("application/json; charset=utf-8");
        String str = "{\"token\":\"" + token + "\"}";
        PrintWriter out;
        try {
            out = response.getWriter();
            out.print(str);
            out.flush();
            out.close();
        } catch (IOException e) {
            e.printStackTrace();
        }
    }
}
JWTAuthenticationFilter.java
package com.example.demo;

import java.io.IOException;
import java.util.List;
import java.util.stream.Collectors;

import javax.servlet.FilterChain;
import javax.servlet.ServletException;
import javax.servlet.http.HttpServletRequest;
import javax.servlet.http.HttpServletResponse;

import org.springframework.security.authentication.AuthenticationManager;
import org.springframework.security.authentication.UsernamePasswordAuthenticationToken;
import org.springframework.security.core.authority.SimpleGrantedAuthority;
import org.springframework.security.core.context.SecurityContextHolder;
import org.springframework.security.web.authentication.www.BasicAuthenticationFilter;

import io.jsonwebtoken.Claims;
import io.jsonwebtoken.Jwts;

public class JWTAuthenticationFilter extends BasicAuthenticationFilter {
    public JWTAuthenticationFilter(AuthenticationManager authenticationManager) {
        super(authenticationManager);
    }

    /**
     * 在拦截器中获取token并解析,拿到用户信息,放置到SecurityContextHolder,这样便完成了springsecurity和jwt的整合。
     */
    @Override
    protected void doFilterInternal(HttpServletRequest request, HttpServletResponse response, FilterChain chain)
            throws IOException, ServletException {
        String header = request.getHeader("Authorization");
        if (header == null || !header.startsWith("Bearer ")) {
            chain.doFilter(request, response);
            return;
        }
        UsernamePasswordAuthenticationToken authentication = getAuthentication(request);
        SecurityContextHolder.getContext().setAuthentication(authentication);
        chain.doFilter(request, response);
    }

    private UsernamePasswordAuthenticationToken getAuthentication(HttpServletRequest request) {
        String token = request.getHeader("Authorization");
        if (token != null) {

            Claims claims = Jwts.parser().setSigningKey("MyJwtSecret11").parseClaimsJws(token.replace("Bearer ", ""))
                    .getBody();
            String user  = claims.getSubject();
            @SuppressWarnings("unchecked")
            List<String> roles = claims.get("role", List.class);
            List<SimpleGrantedAuthority> auth = roles.stream().map(s -> new SimpleGrantedAuthority(s)).collect(Collectors.toList());

            if (user != null) {
                return new UsernamePasswordAuthenticationToken(user, null, auth);
            }
            return null;
        }
        return null;
    }

}
3、spring security基础配置和测试的controller。
WebSecurityConfig.java
package com.example.demo;

import java.util.ArrayList;
import java.util.Collection;

import org.springframework.beans.factory.annotation.Autowired;
import org.springframework.context.annotation.Bean;
import org.springframework.context.annotation.Configuration;
import org.springframework.security.config.annotation.authentication.builders.AuthenticationManagerBuilder;
import org.springframework.security.config.annotation.method.configuration.EnableGlobalMethodSecurity;
import org.springframework.security.config.annotation.web.builders.HttpSecurity;
import org.springframework.security.config.annotation.web.configuration.EnableWebSecurity;
import org.springframework.security.config.annotation.web.configuration.WebSecurityConfigurerAdapter;
import org.springframework.security.core.GrantedAuthority;
import org.springframework.security.core.authority.SimpleGrantedAuthority;
import org.springframework.security.core.userdetails.User;
import org.springframework.security.core.userdetails.UserDetailsService;
import org.springframework.security.crypto.password.PasswordEncoder;
import org.springframework.security.provisioning.InMemoryUserDetailsManager;

@Configuration
@EnableWebSecurity
@EnableGlobalMethodSecurity(prePostEnabled = true)
public class WebSecurityConfig extends WebSecurityConfigurerAdapter {

    @Autowired
    private MyAuthenticationProvider provider;// 自定义的AuthenticationProvider

    @Bean
    public PasswordEncoder myPasswordEncoder() {
        return new MyPasswordEncoder();//自定义的加密工具
    }

    @Override
    protected void configure(HttpSecurity http) throws Exception {
        http.authorizeRequests()
        .anyRequest().authenticated()
        .and()
        .formLogin().loginProcessingUrl("/login")
        .and()
        .csrf().disable()
        .addFilter(new JWTLoginFilter(authenticationManager()))
        .addFilter(new JWTAuthenticationFilter(authenticationManager()));
    }

    @Override
    public void configure(AuthenticationManagerBuilder auth) throws Exception {
        auth.authenticationProvider(provider);
        auth.userDetailsService(userDetailsService());
    }

    @Bean
    public UserDetailsService userDetailsService() {
        InMemoryUserDetailsManager iud = new InMemoryUserDetailsManager();
        Collection<GrantedAuthority> adminAuth = new ArrayList<>();
        adminAuth.add(new SimpleGrantedAuthority("ROLE_ADMIN"));
        iud.createUser(new User("zhangsan", "123456", adminAuth));
        return iud;
    }

}
MyAuthenticationProvider.java
package com.example.demo;

import org.springframework.beans.factory.annotation.Autowired;
import org.springframework.security.authentication.AuthenticationProvider;
import org.springframework.security.authentication.UsernamePasswordAuthenticationToken;
import org.springframework.security.core.Authentication;
import org.springframework.security.core.AuthenticationException;
import org.springframework.security.core.userdetails.UserDetails;
import org.springframework.security.core.userdetails.UserDetailsService;
import org.springframework.stereotype.Component;


@Component
public class MyAuthenticationProvider implements AuthenticationProvider {

    @Autowired
    private UserDetailsService userDetailsService;

    /**
     * 自定义验证方式
     */
    @Override
    public Authentication authenticate(Authentication authentication) throws AuthenticationException {
        String username = authentication.getName();
        String password = (String) authentication.getCredentials();
        UserDetails  user = userDetailsService.loadUserByUsername(username);
        if(user.getPassword().equals(password)) {
            return new UsernamePasswordAuthenticationToken(username, null, user.getAuthorities());
        }
        return null;
    }

    @Override
    public boolean supports(Class<?> arg0) {
        return true;
    }

}
MyPasswordEncoder.java
package com.example.demo;

import org.springframework.security.crypto.password.PasswordEncoder;

public class MyPasswordEncoder implements PasswordEncoder {
    @Override
    public String encode(CharSequence charSequence) {
        return charSequence.toString();
    }

    @Override
    public boolean matches(CharSequence charSequence, String s) {
        return s.equals(charSequence.toString());
    }
}
UserController.java
package com.example.demo;

import org.springframework.security.access.prepost.PreAuthorize;
import org.springframework.web.bind.annotation.RequestMapping;
import org.springframework.web.bind.annotation.RestController;

@RestController
public class UserController {

    @RequestMapping("/hello")
    public String hello() {
        return "hello";
    }

    @PreAuthorize("hasAuthority('ROLE_USER')")
    @RequestMapping("/test1")
    public String test1() {
        return "test1";
    }
    @PreAuthorize("hasAuthority('ROLE_ADMIN')")
    @RequestMapping("/test2")
    public String test2() {
        return "test2";
    }
}
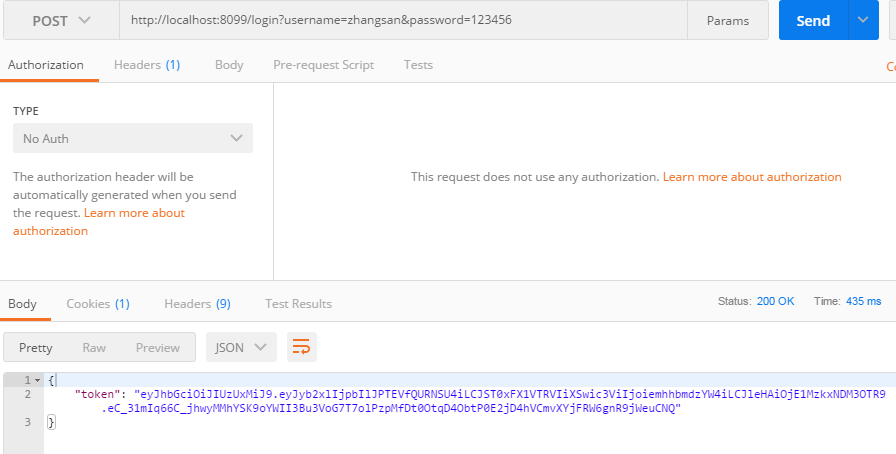
至此,核心代码都以经贴上,启动项目,使用postman访问http://localhost:8099/login?username=zhangsan&password=123456,响应如下:
我们访问http://localhost:8099/hello,同时在请求头上加入auth,如下:

同样的url,不加auth则会给我们返回默认的登录页,如下:

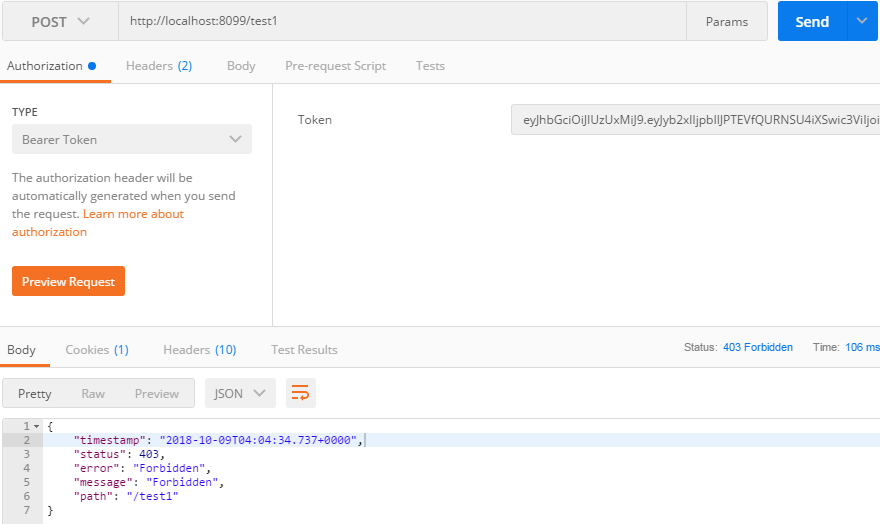
访问http://localhost:8099/test1,则提示权限不够,因为我们只为zhangsan用户分配了ROLE_ADMIN角色,而test1需要ROLE_USER。如下:
访问http://localhost:8099/test2,如下:
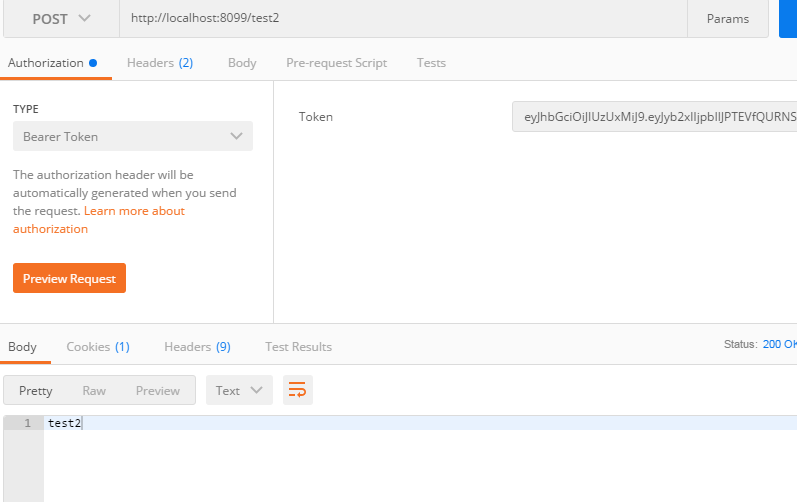
为了验证是否实现了单点登录,我们可以复制我们的项目,使用postman在第一个项目中拿到token,发现这个token在第二个项目中也可以使用,也就证明了我们的项目可以实现单点登录功能,在实际开发中,我们只需要在一个项目中去颁发token,而其他的项目中去按照相同的规则去解析这个token,这样就可以实现单点登录,需要注意的就是在解析token时的签名密码要一致或者对应。
此外说一下,我在写demo中遇到的坑,第一个就是springboot2.0版本以上必须要有一个加密工具的实现,不然会报错;第二个就是在加入我们自己的过滤器后,必须使用默认的登录url即/login,不支持自定义的登录url了,具体原因我也不清楚;第三个就是在生成token时加入角色信息,不能直接加入auth.getAuthorities(),不然在解析时会出现类型不匹配,具体可参考我的代码。

 浙公网安备 33010602011771号