数据库拆分+扩展web
1.用户发起一个请求,请求会访问到
2.nginx进行判断,静态请求直接返回给用户
3.动态请求交给fastcgi,fastcgi调用php-fpm管理进程
php-fpm.conf:进程相关的配置(启动程序的用户,组...)
php.ini:工作请求相关的配置(上传的大小...)
4.php-fpm调用wrapper对动态请求进行解析
5.如果用请求需要调用数据库,php会连接到数据库
注意:PHP和MySQL建立连接,一定是开发建立连接
1.php想连接数据库,必须安装php-mysqlnd
2.php连接数据库,必须通过代码连接
[root@web01 ~]# mkdir /code
优化源
[root@web01 ~]# vim /etc/yum.repos.d/CentOS-Base.repo
1)更改nginx的官方源
[root@web01 ~]# vim /etc/yum.repos.d/nginx.repo
[nginx-stable]
name=nginx stable repo
baseurl=http://nginx.org/packages/centos/7/$basearch/
gpgcheck=0
enabled=1
2)安装nginx
[root@web02 ~]# yum install -y nginx
3)创建www用户
[root@web02 ~]# groupadd www -g 666
[root@web02 ~]# useradd www -u 666 -g 666 -s /sbin/nologin -M
4)修改nginx的启动用户
[root@web02 ~]# vim /etc/nginx/nginx.conf
user  www;
5)启动nginx并加入开机自启
[root@web02 ~]# systemctl start nginx
[root@web02 ~]# systemctl enable nginx
6)更改PHP的源
[root@web02 ~]# vim /etc/yum.repos.d/php.repo
[php-webtatic]
name = PHP Repository
baseurl = http://us-east.repo.webtatic.com/yum/el7/x86_64/
gpgcheck = 0
7)安装php
[root@web02 ~]# yum -y install php71w php71w-cli php71w-common php71w-devel php71w-embedded php71w-gd php71w-mcrypt php71w-mbstring php71w-pdo php71w-xml php71w-fpm php71w-mysqlnd php71w-opcache php71w-pecl-memcached php71w-pecl-redis php71w-pecl-mongodb
[root@web01 ~]# mkdir php
[root@web01 ~]# mv php.tar.gz php
[root@web01 ~]# ll
total 8
-rw-------. 1 root root 1444 Jul 24 09:32 anaconda-ks.cfg
-rwxr-xr-x. 1 root root 473 Jul 24 10:50 host_ip.sh
drwxr-xr-x 2 root root 24 Aug 20 15:15 php
[root@web01 ~]# cd
[root@web01 ~]#
[root@web01 ~]# cd php/
[root@web01 php]# ll
total 19424
-rw-r--r-- 1 root root 19889622 Aug 20 15:13 php.tar.gz
[root@web01 php]# tar xf php.tar.gz
[root@web01 php]# rpm -Uvh *rpm
8)修改php的启动用户
[root@web02 ~]# cd
user = www
group = www
9)启动php并加入开机自启
[root@web02 ~]# systemctl start php-fpm
[root@web02 ~]# systemctl enable php-fpm
10)安装数据库
[root@web02 ~]# yum install -y mariadb-server
11)启动数据库并加入开机自启
[root@web02 ~]# systemctl start mariadb
[root@web02 ~]# systemctl enable mariadb
12)设置数据库的密码
[root@web02 ~]# mysqladmin -uroot -p password 'Zls123.com'
13)连接数据库
[root@web02 ~]# mysql -uroot -pZls123.com
14)查看数据库,并创建数据库
MariaDB [(none)]> show databases;
+--------------------+
| Database |
+--------------------+
| information_schema |
| mysql |
| performance_schema |
| test |
+--------------------+
#创建wordpress库
MariaDB [(none)]> create database wordpress;
#创建zh库
MariaDB [(none)]> create database zh;
#创建edusoho库
MariaDB [(none)]> create database edusoho;
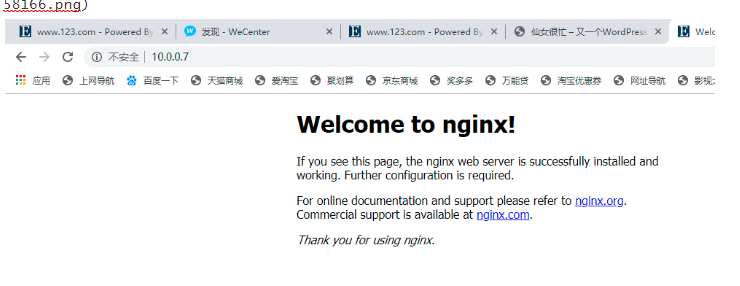
测试nginx
1)编辑nginx配置文件
[root@web01 ~]# vim /etc/nginx/conf.d/blog.drz.com.conf
server {
listen 80;
server_name blog.drz.com;
location / {
root /code/wordpress;
index index.php index.html;
}
}
创建站点目录
[root@web01 ~]# mkdir -p /code/wordpress
写测试的配置文件
[root@web01 ~]# cd /code/wordpress/
[root@web01 wordpress]# echo 123 > index.html
[root@web01 wordpress]# nginx -t
[root@web01 wordpress]# nginx -s reload
2)测试nginx连接php

#修改nginx的配置文件
[root@web01 wordpress]# vim /etc/nginx/conf.d/blog.drz.com.conf
server {
listen 80;
server_name blog.drz.com;
location / {
root /code/wordpress;
index index.php index.html;
}
location ~ \.php$ {
root /code/wordpress;
fastcgi_pass 127.0.0.1:9000;
fastcgi_index index.php;
fastcgi_param SCRIPT_FILENAME $document_root$fastcgi_script_name;
include fastcgi_params;
}
}
[root@web01 wordpress]# ll
total 4
-rw-r--r-- 1 root root 4 Aug 20 15:29 index.html
[root@web01 wordpress]# rm -r index.html
rm: remove regular file ‘index.html’? y
[root@web01 wordpress]# vim index.php
#写index.php
[root@web02 wordpress]# vim index.php
<?php
phpinfo();
?>
启动
[root@web01 wordpress]# nginx -t
[root@web01 wordpress]# nginx -s reload
访问下浏览器
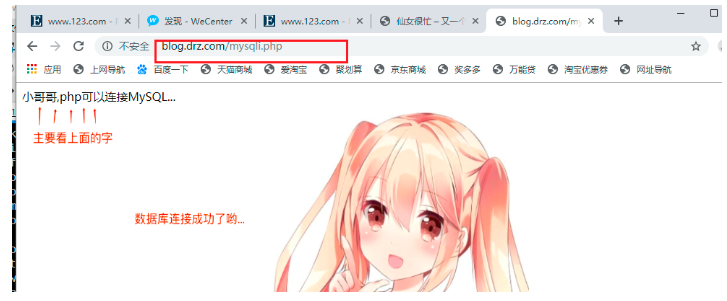
3)测试php连接MySQL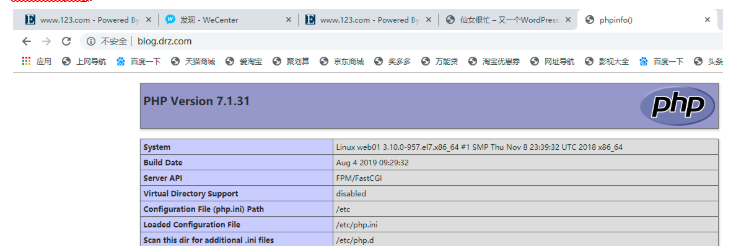
#编辑mysqlli.php
[root@web01 wordpress]# vim mysqli.php
<?php
$servername = "localhost";
$username = "root";
$password = "Zls123.com";
// 创建连接
$conn = mysqli_connect($servername, $username, $password);
// 检测连接
if (!$conn) {
die("Connection failed: " . mysqli_connect_error());
}
echo "小哥哥,php可以连接MySQL...";
?>
<img style='width:100%;height:100%;' src=https://www.driverzeng.com/zenglaoshi/php_mysql.png>
测试成功后删除
[root@web01 wordpress]# rm -fr ./*
[root@web01 wordpress]# ll
total 0
[root@web01 wordpress]# cd ..
[root@web01 code]# ll
total 0
drwxr-xr-x 2 root root 6 Aug 20 15:43 wordpress
[root@web01 code]# rm -fr wordpress/
[root@web01 code]# ll
total 0
代码上线
1)解压
[root@web01 code]# tar xf wordpress-5.0.3-zh_CN.tar.gz
2)授权
[root@web02 code]# chown -R www.www /code/


部署zh
[root@web01 code]# mkdir zh
[root@web01 code]# cd zh 上传知乎的包
[root@web01 code]# unzip WeCenter_3-3-1.zip 解压
[root@web01 code]# chown -R www.www /code/ 授权
[root@web01 code]# cd /etc/nginx/conf.d/
[root@web01 conf.d]# ll
total 8
-rw-r--r-- 1 root root 465 Aug 20 15:35 blog.drz.com.conf
-rw-r--r-- 1 root root 1093 Aug 13 23:02 default.conf
[root@web01 conf.d]# rm -rf default.conf
[root@web01 conf.d]# ll
total 4
-rw-r--r-- 1 root root 465 Aug 20 15:35 blog.drz.com.conf
[root@web01 conf.d]# cp blog.drz.com.conf zh.drz.com.conf
[root@web01 conf.d]# vim zh.drz.com.conf
server {
listen 80;
server_name zh.drz.com;
location / {
root /code/zh;
index index.php index.html;
}
location ~ \.php$ {
root /code/zh;
fastcgi_pass 127.0.0.1:9000;
fastcgi_index index.php;
fastcgi_param SCRIPT_FILENAME $document_root$fastcgi_script_name;
include fastcgi_params;
}
}
[root@web01 conf.d]# nginx -t
nginx: the configuration file /etc/nginx/nginx.conf syntax is ok
nginx: configuration file /etc/nginx/nginx.conf test is successful
[root@web01 conf.d]# nginx -s reload


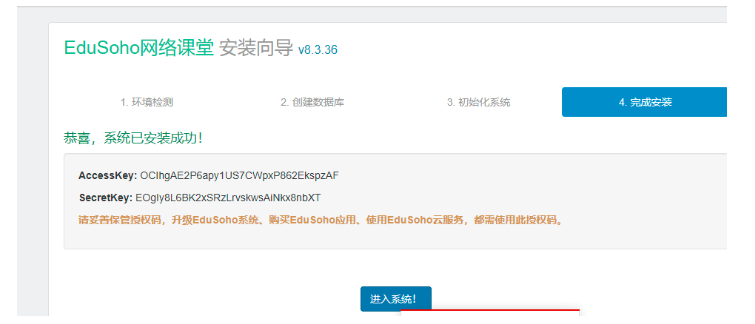
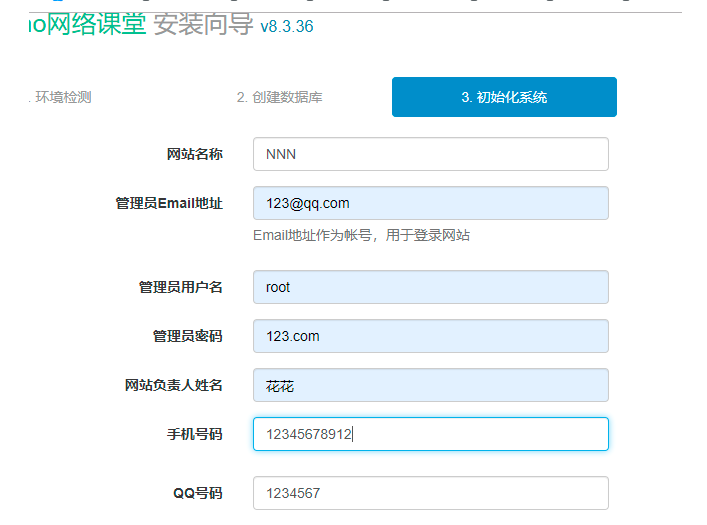
edusoho
上传edusoho
[root@web01 code]# tar xf edusoho-8.3.36.tar.gz 解压
[root@web01 code]# chown -R www.www ./*
[root@web01 code]# vim /etc/nginx/conf.d/edu.drz.com.conf
server {
listen 80;
# [改] 网站的域名
server_name www.xxxx.com;
#301跳转可以在nginx中配置
# 程序的安装路径
root /code/edusoho/web;
# 日志路径
access_log /var/log/nginx/example.com.access.log;
error_log /var/log/nginx/example.com.error.log;
location / {
index app.php;
try_files $uri @rewriteapp;
}
location @rewriteapp {
rewrite ^(.*)$ /app.php/$1 last;
}
location ~ ^/udisk {
internal;
root /var/www/edusoho/app/data/;
}
location ~ ^/(app|app_dev)\.php(/|$) {
fastcgi_pass 127.0.0.1:9000;
fastcgi_split_path_info ^(.+\.php)(/.*)$;
include fastcgi_params;
fastcgi_param SCRIPT_FILENAME $document_root$fastcgi_script_name;
fastcgi_param HTTPS off;
fastcgi_param HTTP_X-Sendfile-Type X-Accel-Redirect;
fastcgi_param HTTP_X-Accel-Mapping /udisk=/code/edusoho/app/data/udisk;
fastcgi_buffer_size 128k;
fastcgi_buffers 8 128k;
}
# 配置设置图片格式文件
location ~* \.(jpg|jpeg|gif|png|ico|swf)$ {
# 过期时间为3年
expires 3y;
# 关闭日志记录
access_log off;
# 关闭gzip压缩,减少CPU消耗,因为图片的压缩率不高。
gzip off;
}
# 配置css/js文件
location ~* \.(css|js)$ {
access_log off;
expires 3y;
}
# 禁止用户上传目录下所有.php文件的访问,提高安全性
location ~ ^/files/.*\.(php|php5)$ {
deny all;
}
# 以下配置允许运行.php的程序,方便于其他第三方系统的集成。
location ~ \.php$ {
# [改] 请根据实际php-fpm运行的方式修改
fastcgi_pass 127.0.0.1:9000;
fastcgi_split_path_info ^(.+\.php)(/.*)$;
include fastcgi_params;
fastcgi_param SCRIPT_FILENAME $document_root$fastcgi_script_name;
fastcgi_param HTTPS off;
}
}
[root@web01 code]# nginx -t
[root@web01 code]# nginx -s reload


密码Zls123.com
数据库拆分
数据库拆分后解决的问题
1.缓解web网站的压力 2.增强数据库读写性能 3.提高用户访问速度
拆分环境准备
| 主机名称 | 应用环境 | 外网地址 | 内网地址 |
|---|---|---|---|
| web01 | nginx+php | 10.0.0.7 | 172.16.1.7 |
| db01 | mysql | 172.16.1.51 |
[root@web01 ~]# mysql -uroot -pZls123.com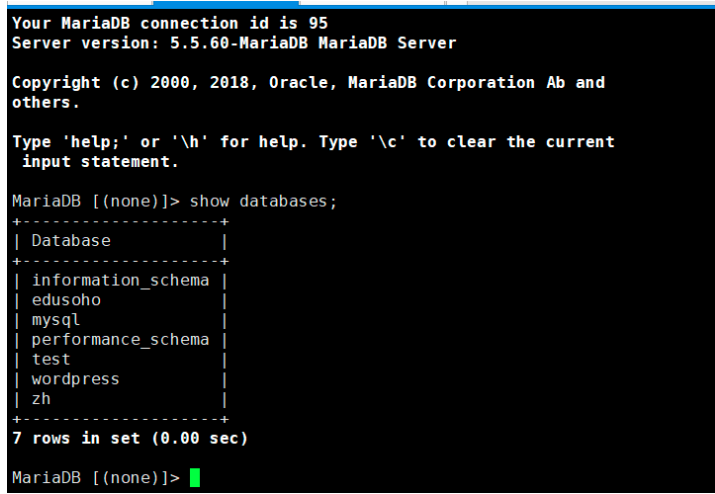
1)导出源数据库中的数据
[root@web01 ~]# mysqldump -uroot -pZls123.com -B wordpress > /tmp/wordpress.sql
2)将导出的数据,传到新数据库的服务器上
[root@web01 code]# scp /tmp/wordpress.sql 172.16.1.51:/tmp
3)在db01服务器上,安装数据库
[root@db0 ~]# yum install -y mariadb-server
4)启动数据库并加入开机自启
[root@db01 ~]# systemctl start mariadb
[root@db01 ~]# systemctl enable mariadb
5)设置MySQL密码
[root@db01 ~]# mysqladmin -uroot -p password 'Zls123.com'
6)将导出的数据,导入数据库内
[root@db01 ~]# mysql -uroot -pZls123.com < /tmp/wordpress.sql
7)连接数据库并查看
[root@db01 ~]# mysql -uroot -pZls123.com
MariaDB [(none)]> show databases;
+--------------------+
| Database           |
+--------------------+
| information_schema |
| mysql              |
| performance_schema |
| test               |
| wordpress          |
+--------------------+
#查看库中的表
MariaDB [(none)]> show tables from wordpress;
+-----------------------+
| Tables_in_wordpress   |
+-----------------------+
| wp_commentmeta        |
| wp_comments           |
| wp_links              |
| wp_options            |
| wp_postmeta           |
| wp_posts              |
| wp_term_relationships |
| wp_term_taxonomy      |
| wp_termmeta           |
| wp_terms              |
| wp_usermeta           |
| wp_users              |
+-----------------------+
8)停止旧的数据库
[root@web01 code]# systemctl stop mariadb
[root@web0 ~]# vim /code/wordpress/wp-config.php
[root@web01 ~]# systemctl restart php-fpm
9)测试连接数据库
[root@web01 ~]# mysql -uroot -pZls123.com -h172.16.1.51
报错:
[root@web01 ~]# mysql -uroot -pZls123.com -h172.16.1.51
ERROR 2003 (HY000): Can't connect to MySQL server on '172.16.1.51' (113)
#关闭防火墙
[root@db01 ~]# systemctl stop firewalld
[root@web01 ~]# mysql -uroot -pZls123.com -h172.16.1.51
ERROR 1130 (HY000): Host '172.16.1.8' is not allowed to connect to this MariaDB server
#授权用户允许远程连接
10)创建远程连接MySQL的用户
[root@db01 ~]# mysql -uroot -pZls123.com
MariaDB [(none)]> select user,host from mysql.user;
+------+-----------+
| user | host |
+------+-----------+
| root | 127.0.0.1 |
| root | ::1 |
| | db01 |
| root | db01 |
| | localhost |
| root | localhost |
+------+-----------+
6 rows in set (0.00 sec)
#授权用户允许远程连接
MariaDB [(none)]> grant all on wordpress.* to wp@'172.16.1.%' identified by 'Zls123.com';
MariaDB [(none)]>
MariaDB [(none)]> select user,host from mysql.user;
+------+------------+
| user | host |
+------+------------+
| root | 127.0.0.1 |
| wp | 172.16.1.% |
| root | ::1 |
| | db01 |
| root | db01 |
| | localhost |
| root | localhost |
+------+------------+
11)编辑php代码连库文件
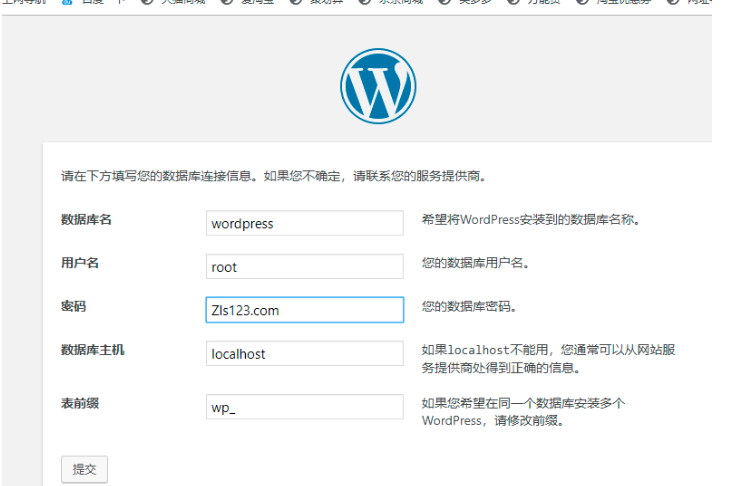
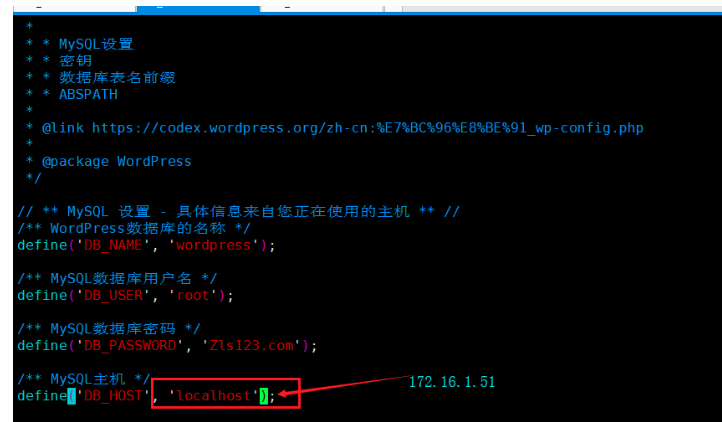
[root@web01 ~]# vim /code/wordpress/wp-config.php
// ** MySQL 设置 - 具体信息来自您正在使用的主机 ** //
/** WordPress数据库的名称 */
define( 'DB_NAME', 'wordpress' );
/** MySQL数据库用户名 */
define( 'DB_USER', 'wp' );
/** MySQL数据库密码 */
define( 'DB_PASSWORD', 'Zls123.com' );
/** MySQL主机 */
define( 'DB_HOST', '172.16.1.51' );
重启一下
[root@web01 ~]# systemctl restart php-fpm
12)测试数据库连接
[root@web01 ~]# mysql -uwp -pZls123.com -h172.16.1.51
13)重启php
[root@web01 ~]# systemctl restart php-fpm
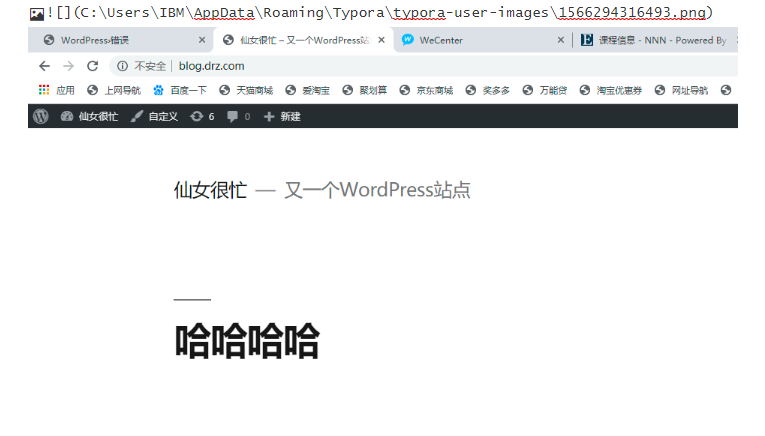
14)打开浏览器访问
拆分zh
[root@web01 ~]# systemctl start mariadb 启一下数据库
将导出的数据,导入数据库内
[root@web01 ~]# mysqldump -uroot -pZls123.com -B zh >/tmp/zh.sql
[root@web01 ~]# systemctl stop mariadb 关闭数据库
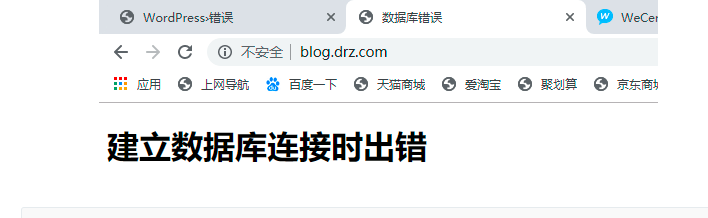
访问blog.drz.com是没有问题的
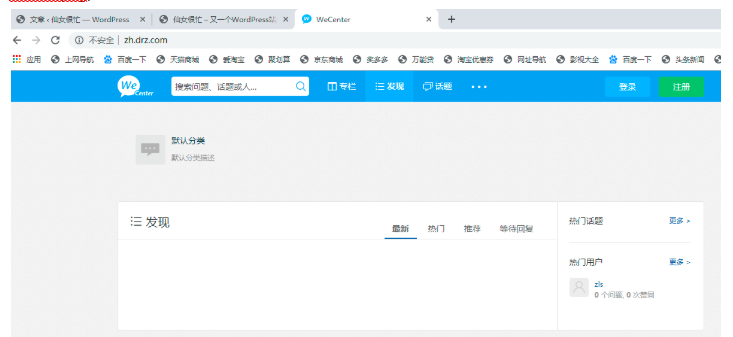
访问zh.drz.com就有问题了
将导出的数据,传到新数据库的服务器上
[root@web01 ~]# scp /tmp/zh.sql 172.16.1.51:/tmp/
[root@web01 ~]# ssh root@172.16.1.51
将数据导入
[root@db01 ~]# mysql -uroot -pZls123.com < /tmp/zh.sql
连接数据并查看
[root@db01 ~]# mysql -uroot -pZls123.com
Welcome to the MariaDB monitor. Commands end with ; or \g.
Your MariaDB connection id is 37
Server version: 5.5.60-MariaDB MariaDB Server
Copyright (c) 2000, 2018, Oracle, MariaDB Corporation Ab and others.
Type 'help;' or '\h' for help. Type '\c' to clear the current input statement.
MariaDB [(none)]> show databases;
+--------------------+
| Database |
+--------------------+
| information_schema |
| mysql |
| performance_schema |
| test |
| wordpress |
| zh |
+--------------------+
6 rows in set (0.00 sec)
MariaDB [(none)]> show tables from zh;
+--------------------------------+
| Tables_in_zh |
+--------------------------------+
| aws_active_data |
| aws_answer |
| aws_answer_comments |
| aws_answer_thanks |
授权并登录
MariaDB [(none)]> grant all on zh.* to zh@'172.16.1.%' identified by 'Zls123.com';
MariaDB [(none)]> \q
Bye
[root@db01 ~]# exit
logout
Connection to 172.16.1.51 closed.
[root@web01 ~]# mysql -uzh -pZls123.com -h172.16.1.51
Welcome to the MariaDB monitor. Commands end with ; or \g.
Your MariaDB connection id is 44
Server version: 5.5.60-MariaDB MariaDB Server
Copyright (c) 2000, 2018, Oracle, MariaDB Corporation Ab and others.
Type 'help;' or '\h' for help. Type '\c' to clear the current input statement.
MariaDB [(none)]> show databases;
+--------------------+
| Database |
+--------------------+
| information_schema |
| test |
| zh |
+--------------------+
3 rows in set (0.00 sec)
MariaDB [(none)]>
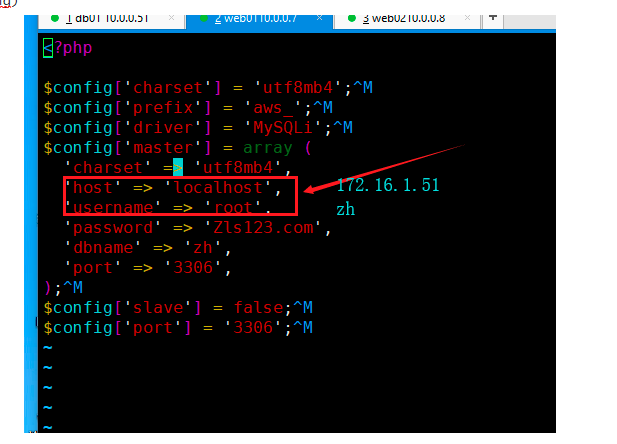
修改配置文件
[root@web01 zh]# grep -r 'Zls123.com' ./*
./system/config/database.php: 'password' => 'Zls123.com',
[root@web01 zh]#
[root@web01 ~]# cd /code/zh/
[root@web01 zh]# ll
[root@web01 zh]# cd system/config/
[root@web01 config]# ll
total 56
-rw-r--r-- 1 www www 9858 Dec 10 2018 admin_menu.php
-rwxrwxrwx 1 www www 331 Aug 20 16:25 database.php
-rw-r--r-- 1 www www 3661 Dec 10 2018 email_message_en_US.php
-rw-r--r-- 1 www www 4240 Dec 10 2018 email_message_ko_KOREA.php
-rw-r--r-- 1 www www 3522 Feb 13 2019 email_message.php
-rw-r--r-- 1 www www 1095 Dec 10 2018 image.php
-rw-r--r-- 1 www www 10 Aug 20 16:25 install.lock.php
-rw-r--r-- 1 www www 6203 Feb 21 16:51 notification.php
-rw-r--r-- 1 www www 59 Dec 10 2018 system.php
-rw-r--r-- 1 www www 654 Dec 10 2018 weixin.php
[root@web01 config]# pwd
/code/zh/system/config
[root@web01 config]# vim database.php
[root@web01 config]# systemctl restart php-fpm
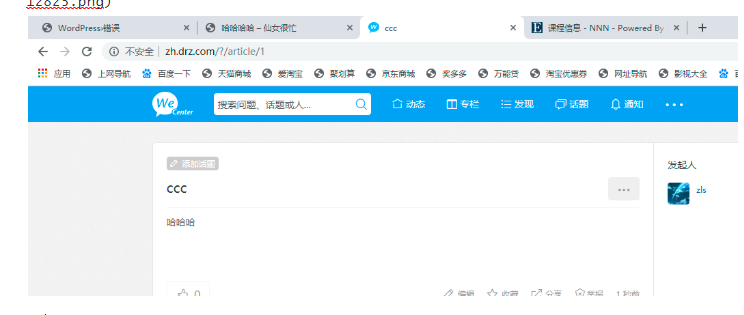
再次访问一下zh
soho
[root@web01 ~]# systemctl start mariadb 开启数据库
[root@web01 ~]# mysql -uroot -pZls123.com
Welcome to the MariaDB monitor. Commands end with ; or \g.
Your MariaDB connection id is 9
Server version: 5.5.60-MariaDB MariaDB Server
Copyright (c) 2000, 2018, Oracle, MariaDB Corporation Ab and others.
Type 'help;' or '\h' for help. Type '\c' to clear the current input statement.
MariaDB [(none)]> show databases; 查看一下
+--------------------+
| Database |
+--------------------+
| information_schema |
| edusoho |
| mysql |
| performance_schema |
| test |
| wordpress |
| zh |
+--------------------+
7 rows in set (0.04 sec)
MariaDB [(none)]> \q
Bye
导出数据
[root@web01 ~]# mysqldump -uroot -pZls123.com -B edusoho > /tmp/edusoho.sql
[root@web01 ~]# systemctl stop mariadb 关闭数据库
访问blog.drz.com是没有问题的
访问zh.drz.com没有问题了
访问edu.dtz.com 就有问题了
导出的数据传到新数据库上
[root@web01 ~]# scp /tmp/edusoho.sql 172.16.1.51:/tmp/
将数据导入
[root@db01 ~]# mysql -uroot -pZls123.com < /tmp/edusoho.sql
[root@db01 ~]# mysql -uroot -pZls123.com
Welcome to the MariaDB monitor. Commands end with ; or \g.
Your MariaDB connection id is 72
Server version: 5.5.60-MariaDB MariaDB Server
Copyright (c) 2000, 2018, Oracle, MariaDB Corporation Ab and others.
Type 'help;' or '\h' for help. Type '\c' to clear the current input statement.
MariaDB [(none)]> show databases;
+--------------------+
| Database |
+--------------------+
| information_schema |
MariaDB [(none)]> show tables from edusoho;
+----------------------------------+
| Tables_in_edusoho |
+----------------------------------+
| activity |
| activity_audio |
| activity_doc |
| activity_download |
| activity_flash |
MariaDB [(none)]>grant all on edusoho.* to edu@'172.16.1.%' identified by 'Zls123.com';
Query OK, 0 rows affected (0.00 sec)
[root@web01 ~]# mysql -uedu -pZls123.com -h172.16.1.51
Welcome to the MariaDB monitor. Commands end with ; or \g.
Your MariaDB connection id is 73
Server version: 5.5.60-MariaDB MariaDB Server
Copyright (c) 2000, 2018, Oracle, MariaDB Corporation Ab and others.
Type 'help;' or '\h' for help. Type '\c' to clear the current input statement.
MariaDB [(none)]> show databases;
+--------------------+
| Database |
+--------------------+
| information_schema |
| edusoho |
| test |
+--------------------+
3 rows in set (0.00 sec)
MariaDB [(none)]>
[root@web01 code]# cd edusoho
[root@web01 edusoho]# grep -r 'Zls123.com' ./*
[root@web01 code]# mv edusoho/app/cache/prod/Jianmo/appProdProjectContainer.php edusoho/app/cache/prod/Jianmo/appProdProjectContainer.php.off
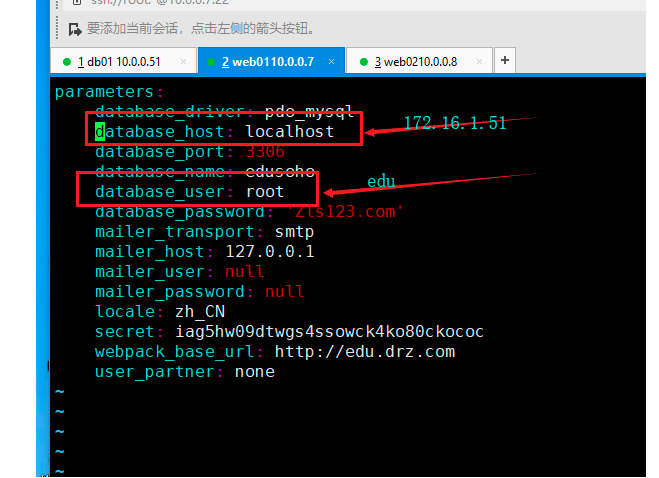
[root@web01 edusoho]# vim app/config/parameters.yml
扩展一台web
1)安装nginx和php
1)更改nginx的官方源
[root@web01 ~]# vim /etc/yum.repos.d/nginx.repo
[nginx-stable]
name=nginx stable repo
baseurl=http://nginx.org/packages/centos/7/$basearch/
gpgcheck=0
enabled=1
2)安装nginx
[root@web02 ~]# yum install -y nginx
3)创建www用户
[root@web02 ~]# groupadd www -g 666
[root@web02 ~]# useradd www -u 666 -g 666 -s /sbin/nologin -M
4)修改nginx的启动用户
[root@web02 ~]# vim /etc/nginx/nginx.conf
user  www;
5)启动nginx并加入开机自启
[root@web02 ~]# systemctl start nginx
[root@web02 ~]# systemctl enable nginx
更改PHP的源
[root@web02 ~]# vim /etc/yum.repos.d/php.repo
[php-webtatic]
name = PHP Repository
baseurl = http://us-east.repo.webtatic.com/yum/el7/x86_64/
gpgcheck = 0
7)安装php
[root@web02 ~]# yum -y install php71w php71w-cli php71w-common php71w-devel php71w-embedded php71w-gd php71w-mcrypt php71w-mbstring php71w-pdo php71w-xml php71w-fpm php71w-mysqlnd php71w-opcache php71w-pecl-memcached php71w-pecl-redis php71w-pecl-mongodb
[root@web01 ~]# scp -r /code 172.16.1.8:/ 传过去
[root@web01 ~]# cd /etc/nginx/conf.d/
[root@web01 conf.d]# ll
total 12
-rw-r--r-- 1 root root 465 Aug 20 16:22 blog.drz.com.conf
-rw-r--r-- 1 root root 2029 Aug 20 16:31 edu.drz.com.conf
-rw-r--r-- 1 root root 449 Aug 20 16:22 zh.drz.com.conf
[root@web01 conf.d]# scp ./* 172.16.1.8:/etc/nginx/conf.d/
[root@web02 ~]# chown -R www.www /code/拷贝配置文件
[root@web02 ~]# ll /etc/nginx/conf.d/
[root@web02 ~]# rm -rf /etc/nginx/conf.d/default.conf启动nginx和php
[root@web02 conf.d]# ll
total 12
-rw-r--r-- 1 root root 464 Aug 20 22:40 blog.drz.com.conf
-rw-r--r-- 1 root root 2029 Aug 20 22:40 edu.drz.com.conf
-rw-r--r-- 1 root root 448 Aug 20 22:40 zh.drz.com.conf
[root@web02 ~]# systemctl start nginx php-fpm
[root@web02 ~]# systemctl enable nginx php-fpm域名解析==>访问浏览器
启动nginx和php
[root@web01 ~]# systemctl start nginx php-fpm
[root@web01 ~]# systemctl enable nginx php-fpm
访问一个各个网址
