状态码
状态码(重点)
200:正常访问
301:永久重定向
307:内部重定向
客户端报错(nginx/apache)
401:用户名密码认证失败
403:找不到主页,权限不足,selinux没有关
404:找不到页面
后端代码程序,php,java... MySQL ,redis
500:内部错误
502:bad gateway
503:服务器过载
504:请求超时
咱们班总共38人,一人两台设备,访问www.123.xxx 就会发起10次请求,访问两次
PV:38*2*2*10
UV:38*2
IP:1
SOA:松耦合架构
Nginx
两种部署方式:
1)yum安装
更改官方源:
[root@web ~]# vim /etc/yum.repos.d/nginx.repo
[nginx]
name=nginx repo
baseurl=http://nginx.org/packages/centos/7/$basearch/
gpgcheck=0
enabled=1
安装依赖包
yum install -y gcc gcc-c++ autoconf pcre pcre-devel openssl-devel make automake
安装nginx-1.16.0
yum install -y nginx
[root@web01 ~]# cd /usr/local/
[root@web01 local]# ll
total 0
drwxr-xr-x. 2 root root 6 Apr 11 2018 bin
drwxr-xr-x. 2 root root 6 Apr 11 2018 etc
drwxr-xr-x. 2 root root 6 Apr 11 2018 games
drwxr-xr-x. 2 root root 6 Apr 11 2018 include
drwxr-xr-x. 2 root root 6 Apr 11 2018 lib
drwxr-xr-x. 2 root root 6 Apr 11 2018 lib64
drwxr-xr-x. 2 root root 6 Apr 11 2018 libexec
lrwxrwxrwx 1 root root 23 Aug 14 18:56 nginx -> /usr/local/nginx-1.16.0
drwxr-xr-x. 2 root root 6 Apr 11 2018 sbin
drwxr-xr-x. 5 root root 49 Jul 24 09:24 share
drwxr-xr-x. 2 root root 6 Apr 11 2018 src
2)源码安装
解压
tar xf nginx-1.16.0.tar.gz
#创建www用户
groupadd www -g 666
useradd www -u 666 -g 666 -s /sbin/nologin -M
生成
./configure --prefix=/usr/local/nginx-1.16.0 \
--user=www \
--group=www \
--with-http_ssl_module \
--with-http_stub_status_module \
--with-stream
编译
make
安装
make install
如何升级nginx或者添加功能
ln -s /usr/local/nginx-1.16.0 /usr/local/nginx
#升级版本
./configure --prefix=/usr/local/nginx-1.17.2 \
--user=www \
--group=www \
--with-http_ssl_module \
--with-http_stub_status_module \
--with-stream \
--with-http_mp4_module
#重新软链接
rm -f /usr/local/nginx && ln -s /usr/local/nginx-1.17.2 /usr/local/nginx
-----------------------------------------------------------------------------------------
#添加模块
./configure --prefix=/usr/local/nginx_new-1.16.0 \
--user=www \
--group=www \
--with-http_ssl_module \
--with-http_stub_status_module \
--with-stream \
--with-http_mp4_module
#重新软链接
rm -f /usr/local/nginx && ln -s /usr/local/nginx_new-1.16.0 /usr/local/nginx
Ansible,SaltStack
先源码安装,然后打rpm包,放到yum仓库,然后yum安装
使用systemd管理nginx
vim /usr/lib/systemd/system/nginx.service
[Unit]
Description=nginx - high performance web server
Documentation=http://nginx.org/en/docs/
After=network-online.target remote-fs.target nss-lookup.target
Wants=network-online.target
[Service]
Type=forking
PIDFile=/usr/local/nginx/logs/nginx.pid
ExecStart=/usr/local/nginx/sbin/nginx -c /usr/local/nginx/conf/nginx.conf
ExecReload=/bin/kill -s HUP $MAINPID
ExecStop=/bin/kill -s TERM $MAINPID
[Install]
WantedBy=multi-user.target
nginx相关配置文件
1.Nginx主配置文件
| 路径 | 类型 | 作用 |
|---|---|---|
| /etc/nginx/nginx.conf | 配置文件 | nginx主配置文件 |
| /etc/nginx/conf.d/default.conf | 配置文件 | 默认网站配置文件 |
2.Nginx代理相关参数文件
| 路径 | 类型 | 作用 |
|---|---|---|
| /etc/nginx/fastcgi_params | 配置文件 | Fastcgi代理配置文件 |
| /etc/nginx/scgi_params | 配置文件 | scgi代理配置文件 |
| /etc/nginx/uwsgi_params | 配置文件 | uwsgi代理配置文件 |
3.Nginx编码相关配置文件
| 路径 | 类型 | 作用 |
|---|---|---|
| /etc/nginx/win-utf | 配置文件 | Nginx编码转换映射文件 |
| /etc/nginx/koi-utf | 配置文件 | Nginx编码转换映射文件 |
| /etc/nginx/koi-win | 配置文件 | Nginx编码转换映射文件 |
| /etc/nginx/mime.types | 配置文件 | Content-Type与扩展名 |
4.Nginx管理相关命令
| 路径 | 类型 | 作用 |
|---|---|---|
| /usr/sbin/nginx | 命令 | Nginx命令行管理终端工具 |
| /usr/sbin/nginx-debug | 命令 | Nginx命令行与终端调试工具 |
4.Nginx日志相关目录与文件
| 路径 | 类型 | 作用 |
|---|---|---|
| /var/log/nginx | 目录 | Nginx默认存放日志目录 |
| /etc/logrotate.d/nginx | 配置文件 | Nginx默认的日志切割 |
nginx的配置文件详解
Nginx主配置文件整体分为三块进行学习,分别是CoreModule(核心模块),EventModule(事件驱动模块),HttpCoreModule(http内核模块)
Nginx主配置文件/etc/nginx/nginx.conf是一个纯文本类型的文件,整个配置文件是以区块的形式组织的。一般,每个区块以一对大括号{}来表示开始与结束。
Nginx主配置文件整体分为三块进行学习,分别是CoreModule(核心模块),EventModule(事件驱动模块),HttpCoreModule(http内核模块)
CoreModule核心模块
user www; #Nginx进程所使用的用户
worker_processes 1; #Nginx运行的work进程数量(建议与CPU数量一致或auto)
error_log /log/nginx/error.log #Nginx错误日志存放路径
pid /var/run/nginx.pid #Nginx服务运行后产生的pid进程号
EventModule(事件驱动模块)
events {
worker_connections 25535; #每个worker进程支持的最大连接数
use epoll; #事件驱动模型, epoll默认
}
HttpCoreModule(http内核模块)
#http层开始
http {
#包含资源类型文件
include /etc/nginx/mime.types;
#默认以下载方式传输给浏览器(前提是该资源在mime.types中无法找到)
default_type application/octet-stream;
#日志格式
log_format main '$remote_addr - $remote_user [$time_local] "$request" '
'$status $body_bytes_sent "$http_referer" '
'"$http_user_agent" "$http_x_forwarded_for"';
#访问日志
access_log /var/log/nginx/access.log main;
#高效文件传输
sendfile on;
#搭配sendfile使用
#tcp_nopush on;
#长连接超时时间
keepalive_timeout 65;
#是否开启压缩
#gzip on;
#使用Server配置网站, 每个Server{}代表一个网站(简称虚拟主机)
'server' {
listen 80; #监听端口, 默认80
server_name driverzeng.com; #提供的域名
access_log access.log; #该网站的访问日志
#控制网站访问路径
'location' / {
root /usr/share/nginx/html; #存放网站源代码的位置
index index.html index.htm; #默认返回网站的文件
}
}
...
#第二个虚拟主机配置
'server' {
...
}
include /etc/nginx/conf.d/*.conf; #包含/etc/nginx/conf.d/目录下所有以.conf结尾的文件
} #http结束层
手写虚拟主机
[root@web01 conf.d]# vim game.conf
server {
listen 80;
server_name localhost;
location / {
root /code;
index index.html;
}
}
#创建站点目录
[root@web01 conf.d]# mkdir /code
#授权www用户给站点目录
[root@web01 conf.d]# chown -R www.www /code
#手动创建index
[root@web01 code]# echo game > /code/index.html
[root@web01 code]# ll /code/
total 18860
-rw-r--r-- 1 root root 19304923 Aug 14 11:36 h5_games.zip
-rw-r--r-- 1 www  www         5 Aug 14 11:51 index.html
[root@web01 code]# pwd
/code
[root@web01 code]# unzip h5_games.zip
虚拟主机
方式一、基于主机多IP方式
方式二、基于端口的配置方式
方式三、基于多个hosts名称方式(多域名方式)
[root@web01 ~]# cd /etc/nginx/conf.d/
[root@web01 conf.d]# ll
total 8
-rw-r--r-- 1 root root 488 Apr 23 22:34 default.conf.gz
[root@web01 conf.d]# vim game.conf
server {
listen 80; 监听端口
server_name localhost; 一般是跟域名,但是现在没有域名,所以写localhost
location / {
root /code/h5_games; root表示站点目录,
index index.html;
}
}
~
[root@web01 conf.d]# mkdir /code 创建站点目录
[root@web01 conf.d]# vim /etc/nginx/nginx.conf
把里面的user nginx 改成user www;
[root@web01 conf.d]# nginx -t 重启nginx 检测语法
nginx: the configuration file /etc/nginx/nginx.conf syntax is ok
nginx: configuration file /etc/nginx/nginx.conf test is successful
[root@web01 conf.d]# nginx -s reload
[root@web01 conf.d]# chown -R www.www /code 授权
[root@web01 code]# echo game >/code/index.html
[root@web01 code]# ll
-rw-r--r-- 1 www www 5 Aug 14 11:53 index.html
[root@web01 code]# cat index.html
game
[root@web01 code]# chown -R www.www /code/
[root@web01 conf.d]# gzip default.conf.gz
[root@web01 conf.d]# nginx -t
nginx: the configuration file /etc/nginx/nginx.conf syntax is ok
nginx: configuration file /etc/nginx/nginx.conf test is successful
[root@web01 conf.d]# nginx -s reload
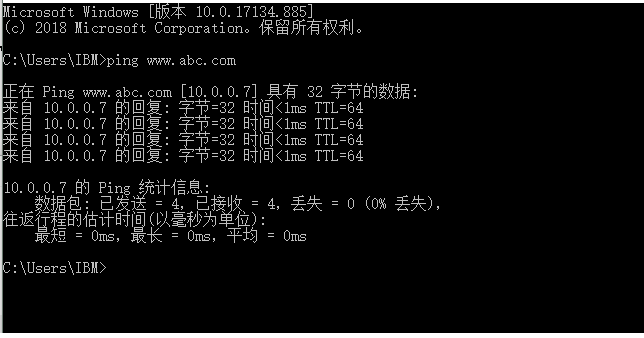
访问浏览器10.0.0.7 会出现一个game
方式一
[root@web01 conf.d]# cd /etc/nginx/
[root@web01 nginx]# ll
drwxr-xr-x 2 root root 46 Aug 14 15:33 conf.d
-rw-r--r-- 1 root root 1007 Apr 23 22:36 fastcgi_params
-rw-r--r-- 1 root root 2837 Apr 23 22:36 koi-utf
-rw-r--r-- 1 root root 2223 Apr 23 22:36 koi-win
-rw-r--r-- 1 root root 5231 Apr 23 22:36 mime.types
lrwxrwxrwx 1 root root 29 Aug 13 19:18 modules -> ../../usr/lib64/nginx/modules
-rw-r--r-- 1 root root 641 Aug 14 15:16 nginx.conf
-rw-r--r-- 1 root root 636 Apr 23 22:36 scgi_params
-rw-r--r-- 1 root root 664 Apr 23 22:36 uwsgi_params
-rw-r--r-- 1 root root 3610 Apr 23 22:36 win-utf
[root@web01 nginx]# cd /etc/nginx/conf.d/
[root@web01 conf.d]# ll
total 8
-rw-r--r-- 1 root root 488 Apr 23 22:34 default.conf.gz
-rw-r--r-- 1 root root 176 Aug 14 15:33 game.conf
[root@web01 conf.d]# gzip -d default.conf.gz
[root@web01 conf.d]# ll
total 8
-rw-r--r-- 1 root root 1093 Apr 23 22:34 default.conf
-rw-r--r-- 1 root root 176 Aug 14 15:33 game.conf
[root@web01 conf.d]# vim default.conf
server {
listen 10.0.0.7:80;
server_name -;
[root@web01 conf.d]# vim game.conf
server {
listen 172.16.1.7:80; 监听在内网IP上
server_name -;
location / {
root /code/h5_games;
index index.html;
}
}
访问一下10.0.0.7 刷新下还是显示那个游戏的页面,就使用下面的操作
[root@web01 conf.d]# pidof nginx
7351 6780
[root@web01 conf.d]# pidof nginx|xargs kill -9
[root@web01 conf.d]# !ps
ps -ef|grep nginx
root 7372 7286 0 15:50 pts/1 00:00:00 grep --color=autonginx
[root@web01 conf.d]# systemctl start nginx
[root@web01 conf.d]# netstat -lntup 然后我们在查看一下 发现内网和外网各占一个进程
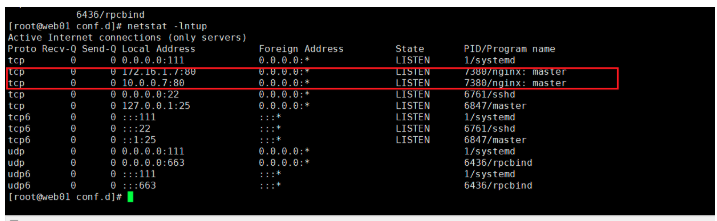
9然后我们在访问一下,就可以了
[root@web01 conf.d]# curl 172.16.1.7 发现是游戏

方式二基于端口
/etc/nginx/conf.d/port_80.conf
10.0.0.7:80
浏览器:port:80
/etc/nginx/conf.d/port_81.conf
10.0.0.7:81 浏览器内容:port:81
[root@web01 conf.d]# vim default.conf
server {
listen 81;
server_name localhost;
[root@web01 conf.d]# vim game.conf
server {
listen 80;
server_name localhost;
location / {
root /code/h5_games;
index index.html;
}
}
[root@web01 conf.d]# nginx -t
[root@web01 conf.d]# nginx -s reload
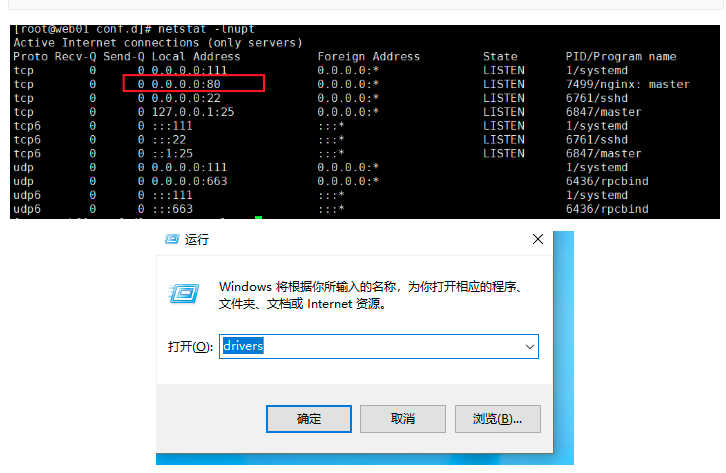
[root@web01 conf.d]# netstat -lntup
[root@web01 conf.d]# systemctl restart nginx 访问10.0.0.7:81 发现访问不了
原因是
[root@web01 conf.d]# pidof nginx
7451 7437
[root@web01 conf.d]# pidof nginx|xargs kill -9
方式三基于域名/etc/nginx/conf.d/www.name.com.conf
打开浏览器:www.name.com
/etc/nginx/conf.d/guy.name.com.conf
打开浏览器:guy.name.com
[root@web01 conf.d]# vim default.conf
server {
listen 80;
server_name www.zhp.com;
[root@web01 conf.d]# vim game.conf
server {
listen 80;
server_name game..com;
location / {
root /code/h5_games;
index index.html;
}
}
~[root@web01 conf.d]# nginx -t
[root@web01 conf.d]# systemctl restart nginx
[root@web01 conf.d]# netstat -lnupt
etc 下有个host 打开
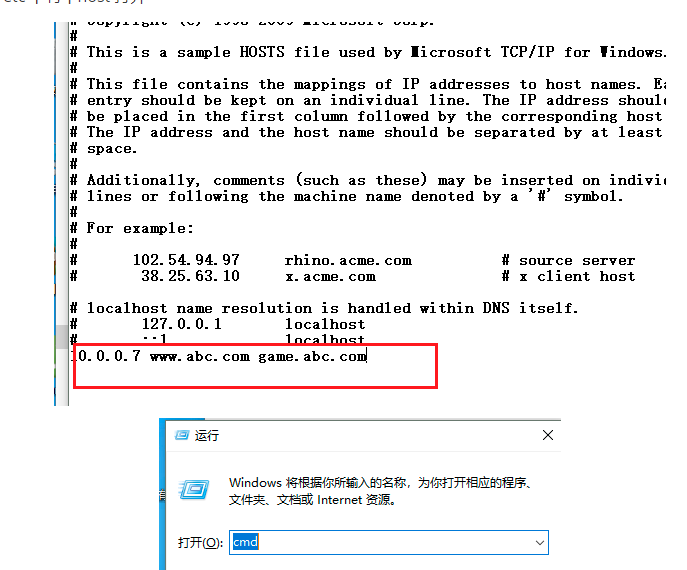
访问www.abc.com/就可以了