SpringBoot实现事件监听
在Spring Boot中,事件监听是一种机制,通过该机制,你可以定义和触发自定义的事件,以及在应用程序中注册监听器来响应这些事件,提供了一种解耦的方式来处理应用程序中的事件。
事件监听的主要组件
-
事件(Event):
事件是一个普通的Java对象,用于封装与应用程序中发生的某个动作或状态变化相关的信息。 -
事件发布器(Event Publisher):
事件发布器是一个负责将事件发布给注册的监听器的组件。在Spring中,ApplicationEventPublisher接口定义了事件发布器的标准。 -
事件监听器(Event Listener):
事件监听器是用于监听和响应特定事件的组件。在Spring中,通过ApplicationListener接口或使用@EventListener注解来定义事件监听器。
示例Demo
1.假设现在的需求是用户注册成功之后给他发个短信,通知他一下。
正常来说,伪代码很简单:
boolean success = userRegister(user);
if(success){
    sendMsg("...........test.............");
}
这代码能用,完全没有任何问题。但是,你仔细想,发短信通知这个动作按理来说,不应该和用户注册的行为“耦合”在一起,难道你短信发送的时候失败了,用户就不算注册成功吗?
上面的代码就是一个耦合性很强的代码。
2.解耦
应该是在用户注册成功之后,发布一个有用户注册成功了的事件:
boolean success = userRegister(user);
if(success){
    publicRegisterSuccessEvent(user);
}
然后有地方去监听这个事件,在监听事件的地方触发短信发送的动作。
这样的好处是后续假设不发短信了,要求发邮件,或者短信、邮件都要发送,诸如此类的需求变化,我们的用户注册流程的代码不需要进行任何变化,仅仅是在事件监听的地方搞事情就完事了。
这样就算是完成了两个动作的解耦。
3.Spring事件
我们可以基于 Spring 提供的 ApplicationListener 去做这个时间。
这次的 Demo 也非常的简单,我们首先需要一个对象来封装事件相关的信息,比如我这里用户注册成功,肯定要关心的是 userName:
@Data
public class RegisterSuccessEvent {
    private String userName;
    public RegisterSuccessEvent(String userName) {
        this.userName = userName;
    }
}
我这里只是为了做 Demo,对象很简单,实际使用过程中,你需要什么字段就放进去就行。
然后需要一个事件的监听逻辑:
@Slf4j
@Component
public class RegisterEventListener {

    @EventListener
    // @Async("myTaskExecutor") // 异步执行的注解,线程池
    public void handleNotifyEvent(RegisterSuccessEvent event) {
        log.info("监听到用户注册成功事件:" +
                "{},测试成功", event.getUserName());
    }

}
接着,通过 Http 接口来进行事件发布:
@Resource
private ApplicationContext applicationContext;
@GetMapping("/publishEvent")
public void publishEvent() {
    applicationContext.publishEvent(new RegisterSuccessEvent("歪歪"));
}
代码
1.自定义事件类 CoursesTestEvent继承ApplicationEvent:
package com.example.springbootredis.event;

import lombok.Getter;
import lombok.Setter;
import org.springframework.context.ApplicationEvent;

/**
 * 课程事件类,继承自 ApplicationEvent,表示课程相关的事件。也可以是普通类不继承,标志事件内容
 */
@Setter
@Getter
public class CoursesTestEvent extends ApplicationEvent {

    private Integer id;
    /**
     * 课程标题
     */
    private String title;
    /**
     * 课程封面
     */
    private String thumb;
    /**
     * 课程价格(分)
     */
    private Integer charge;
    /**
     * 随便传递几个参数
     * */
    public CoursesTestEvent(Object source, String title, String thumb) {
        super(source);
        this.title = title;
        this.thumb = thumb;
    }

}
2.创建一个事件监听器类 CoursesTestListener:
package com.example.springbootredis.listener;

import com.example.springbootredis.event.CoursesTestEvent;
import com.example.springbootredis.service.CoursesService;
import lombok.extern.slf4j.Slf4j;
import org.springframework.beans.factory.annotation.Autowired;
import org.springframework.context.event.EventListener;
import org.springframework.scheduling.annotation.Async;
import org.springframework.stereotype.Component;

/**
 * 用于测试监听事务,异步执行方法
 * 课程事件监听器类,用于异步更新课程信息。
 */
@Component
@Slf4j
public class CoursesTestListener {

    //根据实际的需求进行注入
    @Autowired
    private CoursesService coursesService;

    /**
     * 异步事件监听方法,用于监听CoursesTestEvent进行更新课程相关信息。
     * @param event 触发的课程的事件。
     */
//    @Async("myTaskExecutor") // 异步执行的注解,需要配置个线程池
//    @Async() // 异步执行的注解
    @EventListener  // 事件监听器的注解
    public void updateLoginInfo(CoursesTestEvent event)  {
        //检查是否能够获取到CoursesTestEvent
        System.out.println("title:"+event.getTitle());
        System.out.println("thumb:"+event.getThumb());
        System.out.println(3);
        // 打印当前线程的信息
        System.out.println("执行当前线程的名称3: " + Thread.currentThread().getName());
    }
}
3.在业务逻辑中进行测试事件监听:
package com.example.springbootredis.service.impl;

import com.example.springbootredis.domain.Courses;
import com.example.springbootredis.event.CoursesTestEvent;
import com.example.springbootredis.mapper.CoursesMapper;
import com.example.springbootredis.service.CoursesService;
import lombok.extern.slf4j.Slf4j;
import org.springframework.beans.factory.annotation.Autowired;
import org.springframework.context.ApplicationContext;
import org.springframework.stereotype.Service;
import java.util.List;
 /**
  * 业务类,推送事件地方,使用 ApplicationContext.publishEvent() 推送
  */
@Service
@Slf4j
public class CoursesServiceImpl implements CoursesService {

    @Autowired
    private CoursesMapper coursesMapper;

    //用于管理和维护Bean以及处理Bean之间依赖关系的核心容器。
    @Autowired
    private ApplicationContext applicationContext;

    //进行异步测试
    @Override
    public List<Courses> asyTest() {

        List<Courses> courses = coursesMapper.findAll();
        System.out.println(1);
        // 打印当前线程的信息
        System.out.println("执行当前线程的名称1: " + Thread.currentThread().getName());
        // 发布自定义的课程测试事件
        applicationContext.publishEvent(new CoursesTestEvent(this,courses.get(0).getTitle(),courses.get(0).getThumb()));
        System.out.println(2);
        System.out.println("执行当前线程的名称2: " + Thread.currentThread().getName());
        return courses;
    }

}
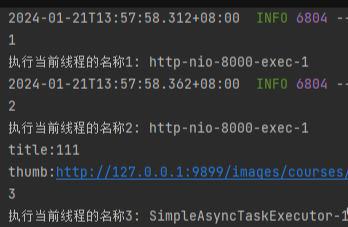
4.代码执行结果(没有使用异步):

再进行测试(异步):

原文章地址:
https://blog.csdn.net/m0_64210833/article/details/135728594
https://blog.csdn.net/u012060033/article/details/136006082


【推荐】国内首个AI IDE,深度理解中文开发场景,立即下载体验Trae
【推荐】编程新体验,更懂你的AI,立即体验豆包MarsCode编程助手
【推荐】抖音旗下AI助手豆包,你的智能百科全书,全免费不限次数
【推荐】轻量又高性能的 SSH 工具 IShell:AI 加持,快人一步
· 【自荐】一款简洁、开源的在线白板工具 Drawnix
· 没有Manus邀请码?试试免邀请码的MGX或者开源的OpenManus吧
· 无需6万激活码!GitHub神秘组织3小时极速复刻Manus,手把手教你使用OpenManus搭建本
· C#/.NET/.NET Core优秀项目和框架2025年2月简报
· DeepSeek在M芯片Mac上本地化部署