springboot集成cas
CAS介绍
CAS是Central Authentication Service的缩写,中央认证服务,一种独立开放指令协议。CAS 是 耶鲁大学(Yale University)发起的一个开源项目,旨在为 Web 应用系统提供一种可靠的单点登录方法,CAS 在 2004 年 12 月正式成为 JA-SIG 的一个项目。
特点:
- 开源的企业级单点登录解决方案。
- CAS Server 为需要独立部署的 Web 应用。
- CAS Client 支持非常多的客户端(这里指单点登录系统中的各个 Web 应用),包括 Java, .Net, PHP, Perl, Apache, uPortal, Ruby 等。
- CAS属于Apache 2.0许可证,允许代码修改,再发布(作为开源或商业软件)。
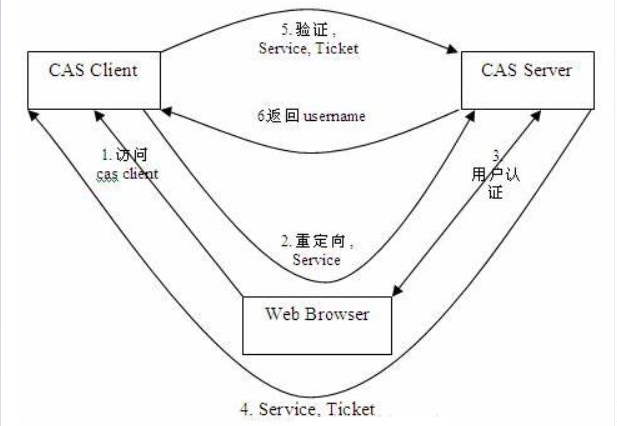
CAS 包含两个部分: CAS Server 和 CAS Client。CAS Server 需要独立部署,主要负责对用户的认证工作;CAS Client 负责处理对客户端受保护资源的访问请求,需要登录时,重定向到 CAS Server。

- CAS Client 与受保护的客户端应用部署在一起,以 Filter 方式保护受保护的资源。
- 对于访问受保护资源的每个 Web 请求,CAS Client 会分析该请求的 Http 请求中是否包含 Service Ticket,如果没有,则说明当前用户尚未登录,于是将请求重定向到指定好的 CAS Server 登录地址,并传递 Service (也就是要访问的目的资源地址),以便登录成功过后转回该地址。
- 用户在第 3 步中输入认证信息,如果登录成功,CAS Server 随机产生一个
相当长度、唯一、不可伪造的 Service Ticket,并缓存以待将来验证,之后系统自动重定向到 Service 所在地址,并为客户端浏览器设置一个 Ticket Granted Cookie(TGC),CAS Client 在拿到 Service 和新产生的 Ticket 过后,在第 5,6 步中与 CAS Server 进行身份核实,以确保 Service Ticket 的合法性。- 在该协议中,所有与 CAS 的交互均采用 SSL 协议,确保,ST 和 TGC 的安全性。协议工作过程中会有 2 次重定向的过程,但是 CAS Client 与 CAS Server 之间进行 Ticket 验证的过程对于用户是透明的。另外,CAS 协议中还提供了 Proxy (代理)模式,以适应更加高级、复杂的应用场景,具体介绍可以参考 CAS 官方网站上的相关文档。
原理:
-
1、CAS结构中一般包含CAS服务器(Cas验证服务器)、应用服务器(程序所在服务器)、客户端(web浏览器)三个部分。
-
2、客户端向应用服务器发出请求,由于未登录,会被跳转到CAS服务器登录。
-
3、登录成功后跳转回应用服务器的登录前的URL,但是CAS服务器会给URL加上一个ticket参数。
-
4、应用服务器(这里应该是指业务服务器)拿着ticket去CAS服务器验证,验证成功后即加入一个session表示已登录,以后就不用再次登录了。
CAS服务搭建
可以直接放在Tomcat中启动,这里可以为了方便直接用IDEA搭建启动。如果直接拉取示例代码以下内容都已修改完毕。拉取代码直接使用。
-
CAS 提供了模板
https://github.com/apereo/cas-overlay-template,拉取 代码。 -
Idea新建Maven项目
-
新建模块
cas-server,将下载的CAS模板解压后文件内的所有文件考入该模块中。 -
修改项目该路径下
overlays\org.apereo.cas.cas-server-webapp-tomcat-5.3.16\WEB-INF\classes\的application.properties文件
修改为:
# 取消票根对应的Cookie的Secure配置,否则非https无法完成单点登录(但是能达到每个应用都需要登录的目的)
cas.tgc.secure=false
# 使用services目录下的json配置初始化serviceRegistry
cas.serviceRegistry.initFromJson=true
# 配置允许登出后跳转到指定页面
cas.logout.followServiceRedirects=true
# 跳转到指定页面需要的参数名为 service
cas.logout.redirectParameter=service
- 修改项目该路径下
overlays\org.apereo.cas.cas-server-webapp-tomcat-5.3.16\WEB-INF\classes\services的HTTPSandIMAPS-10000001.json
改为以下内容:
"serviceId" : "^(https|http|imaps)://.*",
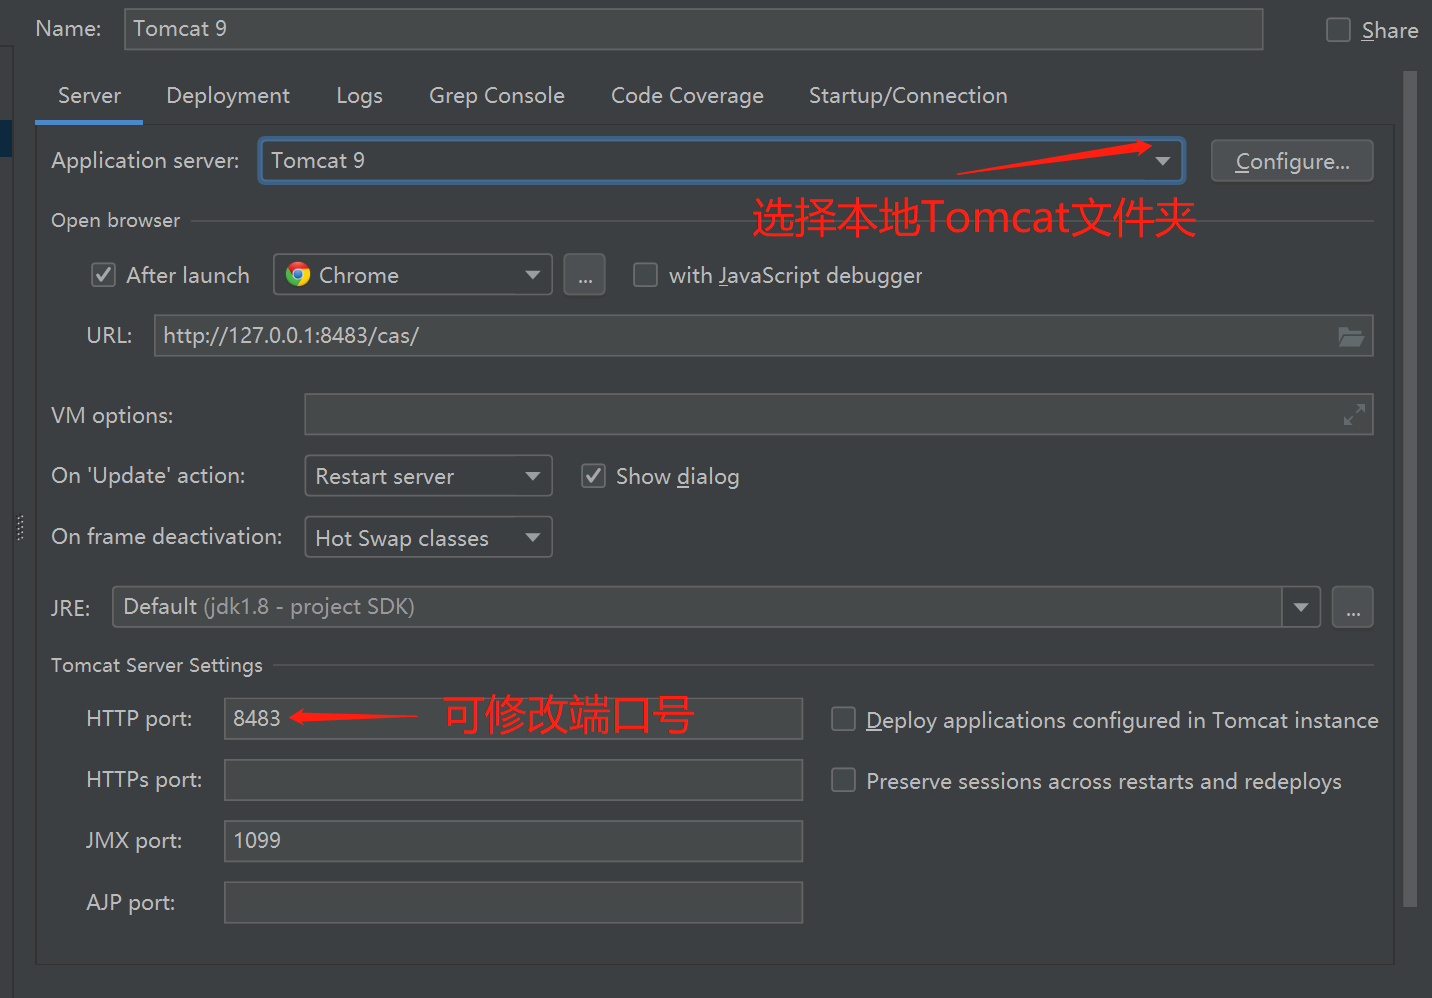
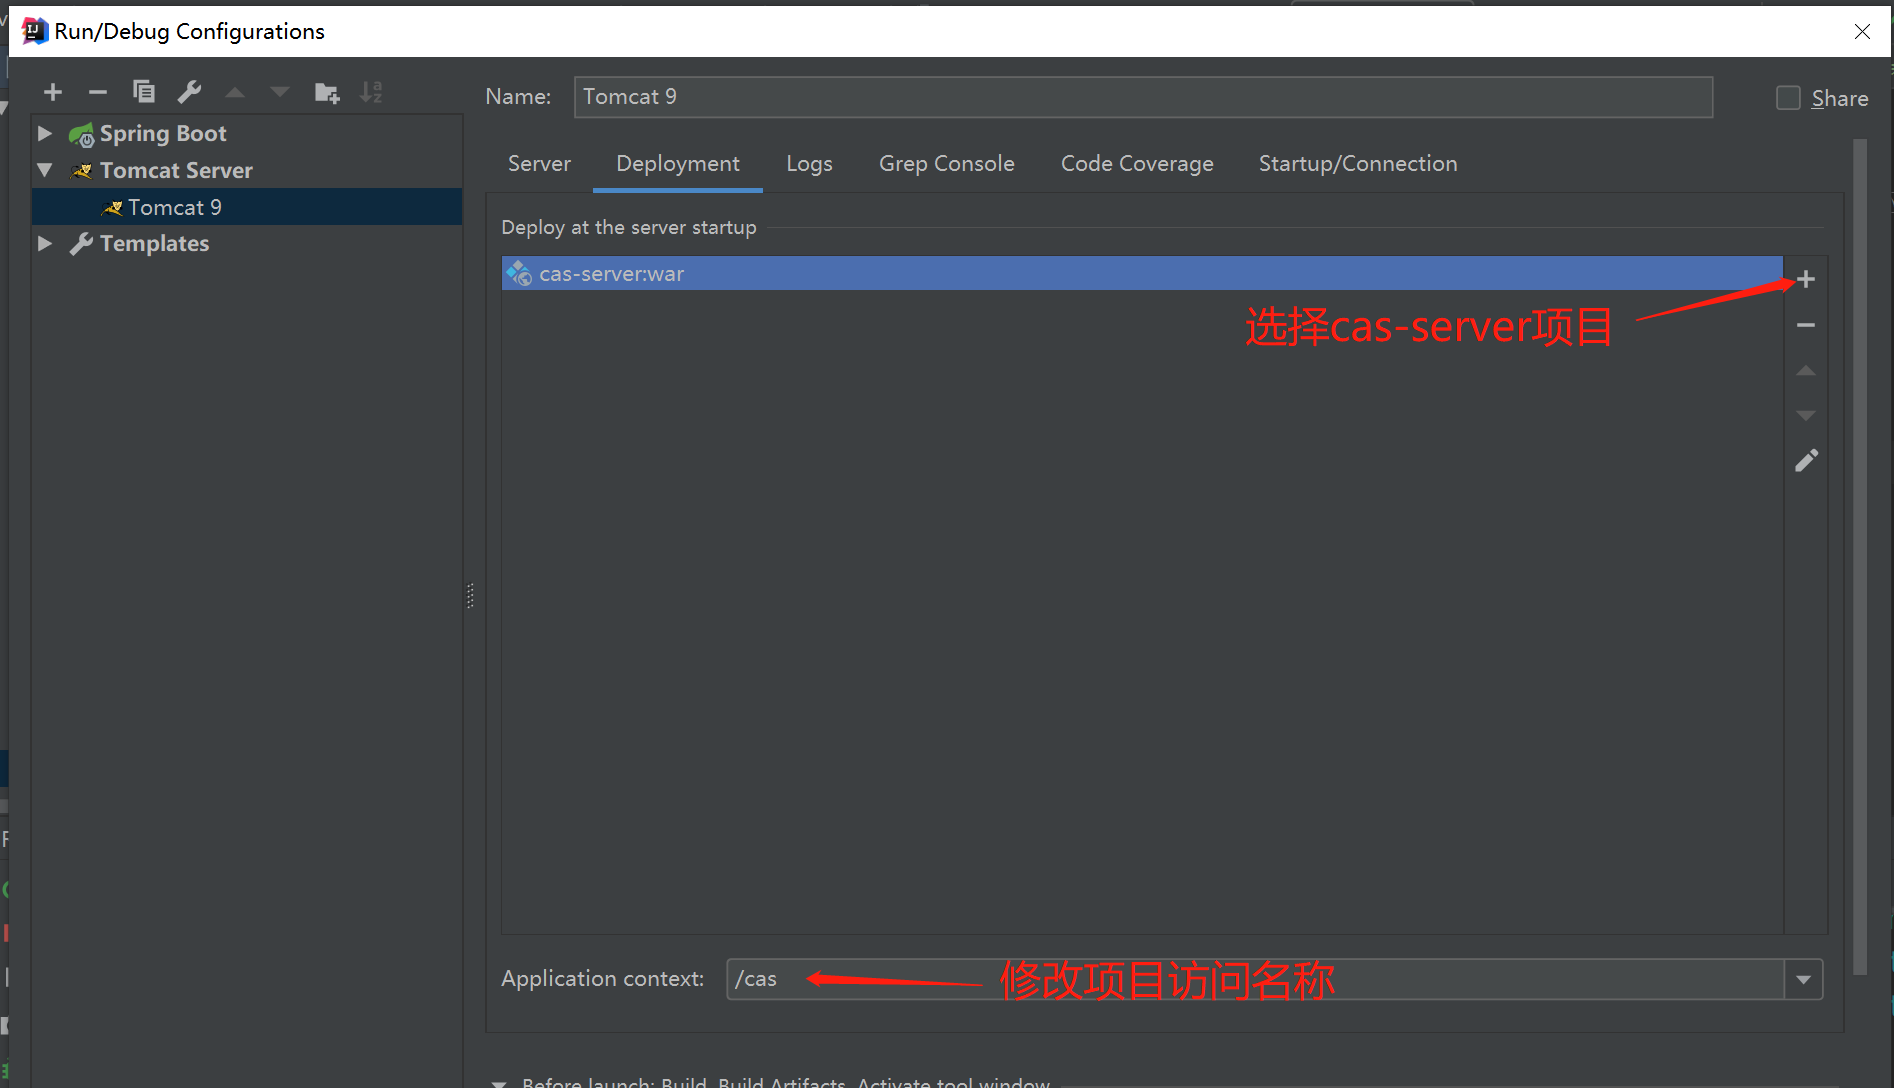
- Idea 配置 Tomcat

选择本地的Tomcat

选择项目

配置完成,点击运行即可,浏览器访问 http://localhost:8483/cas/login ,用户:casuser,密码:Mellon。
SpringBoot 客户端项目配置与测试
引入自动配置依赖,并启用 @EnableCasClient 注解。
<dependency>
    <groupId>org.jasig.cas.client</groupId>
    <artifactId>cas-client-support-springboot</artifactId>
    <version>${cas.client.version}</version>
</dependency>
EnableCasClient 注解类引入了配置类 CasClientConfiguration,配置类中做了以下几件事:
casAuthenticationFilter()创建了 认证过滤器casValidationFilter()创建了 验证票据过滤器casHttpServletRequestWrapperFilter()创建了请求对象的包装类casAssertionThreadLocalFilter()创建了将Assertion放到ThreadLocal的过滤器,对于获取不到HttpRequest请求对象的情况这很有用casSingleSignOutFilter()创建了单点登出的过滤器casSingleSignOutListener()创建单点登出的Listener,用于监听登出事件,清理内存中单点登录会话缓存SpringSecurityAssertionAutoConfiguration兼容Spring Security的配置类
其中对于单点登录最重要的是
casAuthenticationFilter()、casValidationFilter()这两个方法,另外以上几个方法创建的对象类都在cas-client-core.jar,也就是说可以只引这一个包,然后自行配置。
YML配置,两个客户端类似
server:
  port: 8480
cas:
  # cas服务端的地址
  server-url-prefix: http://127.0.0.1:8483/cas
  # cas服务端的登录地址
  server-login-url: http://127.0.0.1:8483/cas/login
  # 当前服务器的地址(后台客户端)
  client-host-url: http://localhost:8480
  # Ticket校验器使用Cas30ProxyReceivingTicketValidationFilter
  validation-type: cas3
  # 使用session
  use-session: true
客户端一
@Controller
public class TestController {

    @ResponseBody
    @RequestMapping("/sso-test1")
    public String test1(HttpSession session){

        Assertion assertion = (Assertion)session.getAttribute(CONST_CAS_ASSERTION);
        AttributePrincipal principal = assertion.getPrincipal();
        String loginName = principal.getName();

        return "sso-test1,当前登录账户"+loginName;
    }

    /**
     * 退出 后自动重定向自定义接口
     */
    @RequestMapping("/system/logout1")
    public String logout1(HttpServletRequest request) {
        HttpSession session = request.getSession();
        session.invalidate();
        return "redirect:http://127.0.0.1:8483/cas/logout?service=http://localhost:8480/system/logoutSuccess";

    }
    /**
     * 退出成功页
     */
    @RequestMapping("/system/logoutSuccess")
    @ResponseBody
    public String logoutSuccess() {
        return "test2成功退出!";
    }
}
客户端二
@Controller
public class TestController {

    @ResponseBody
    @RequestMapping("/sso-test2")
    public String test1(HttpSession session){

        Assertion assertion = (Assertion)session.getAttribute(CONST_CAS_ASSERTION);
        AttributePrincipal principal = assertion.getPrincipal();
        String loginName = principal.getName();

        return "sso-test2,当前登录账户"+loginName;
    }

    /**
     * 退出 后自动重定向自定义接口
     */
    @RequestMapping("/system/logout2")
    public String logout1(HttpServletRequest request) {
        HttpSession session = request.getSession();
        session.invalidate();
        return "redirect:http://127.0.0.1:8483/cas/logout?service=http://localhost:8481/system/logoutSuccess";

    }
    /**
     * 退出成功页
     */
    @RequestMapping("/system/logoutSuccess")
    @ResponseBody
    public String logoutSuccess() {
        return "test2成功退出!";
    }
}
测试
CAS服务器未登录时测试:
访问 http://localhost:8480/sso-test1 ,跳转至 http://127.0.0.1:8483/cas/login页面。
访问 http://localhost:8480/sso-test2 ,跳转至 http://127.0.0.1:8483/cas/login页面。
CAS服务器登录时测试:
访问 http://localhost:8480/sso-test1 ,返回 sso-test1,当前登录账户casuser。
访问 http://localhost:8480/sso-test2 ,返回 sso-test2,当前登录账户casuser。
CAS服务器登录后登出时测试:
访问 http://localhost:8480/sso-test1 ,跳转至 http://127.0.0.1:8483/cas/login页面。
访问 http://localhost:8480/sso-test2 ,返回 sso-test2,当前登录账户casuser。
客户端一执行system/logout1登出方法测试:
访问 http://localhost:8480/system/logout1 ,未跳到指定方法/system/logoutSuccess,跳转至 http://127.0.0.1:8483/cas/login页面。
访问 http://localhost:8480/system/logout2,未跳到指定方法/system/logoutSuccess,跳转至 http://127.0.0.1:8483/cas/login页面。
客户端二执行system/logout2登出方法测试:
访问 http://localhost:8480/system/logout1 ,未跳到指定方法/system/logoutSuccess,跳转至 http://127.0.0.1:8483/cas/login页面。
访问 http://localhost:8480/system/logout2,未跳到指定方法/system/logoutSuccess,跳转至 http://127.0.0.1:8483/cas/login页面。
配置忽略验证
可以看到上方没有跳转到指定方法/system/logoutSuccess。现在加入手动配置类,加入设置忽略方法。
package com.blackcatcas.config;

import org.jasig.cas.client.authentication.AuthenticationFilter;
import org.springframework.beans.factory.annotation.Value;
import org.springframework.boot.web.servlet.FilterRegistrationBean;
import org.springframework.context.annotation.Bean;
import org.springframework.context.annotation.Configuration;

import java.util.HashMap;
import java.util.Map;

/**
 * 描述 :CAS 配置类
 * @author : zhangdahui
 * @date : 2022/8/2 10:07
 */
@Configuration
public class Config {

    @Value("${cas.server-url-prefix}")
    private String prefix;
    @Value("${cas.server-login-url}")
    private String login;
    @Value("${cas.client-host-url}")
    private String client;

    /**
     * description:授权过滤器
     */
    @Bean
    public FilterRegistrationBean filterAuthenticationRegistration() {
        FilterRegistrationBean registration = new FilterRegistrationBean();
        registration.setFilter(new AuthenticationFilter());
        // 设定匹配的路径
        registration.addUrlPatterns("/*");
        Map<String,String>  initParameters = new HashMap<>();
        initParameters.put("casServerLoginUrl", login);
        initParameters.put("serverName", client);
        //设置忽略  退出登录不用登录CAS
        initParameters.put("ignorePattern", "/system/*");
        registration.setInitParameters(initParameters);
        // 设定加载的顺序
        registration.setOrder(1);
        return registration;
    }

}
现在访问 http://localhost:8480/system/logout1 ,跳转到指定方法/system/logoutSuccess,返回:test2成功退出!
平台集成
// 当cas验证通过后,获取平台的授权token
@GetMapping(value = "clientLogin")
public String clientLogin(HttpServletRequest httpServletRequest, RedirectAttributes redirectAttributes) {
    String username = httpServletRequest.getRemoteUser();
    AttributePrincipal principal = (AttributePrincipal) httpServletRequest.getUserPrincipal();
    if (StrUtil.isEmpty(username) && ObjectUtil.isNotNull(principal)) {
        // 获取登录用户名
        Map map = principal.getAttributes();
        if (ObjectUtil.isNotNull(map.get("loginName"))) {
            username = map.get("loginName").toString();
        }
    }
    System.out.println("load username is:" + username);
    String data = null;
    // 获取平台token
    if (StrUtil.isNotEmpty(username) && this.existUserName(username)) {
        String password=this.getPassword(username);
        data = this.getToken(username, password);
        redirectAttributes.addFlashAttribute("token", data);
    }
    // 前端拿到授权token就可以行页面操作了
    return "redirect:http://127.0.0.1:8480/index.html?token=" + data;
}
原文章地址;
https://blog.csdn.net/qq_18498707/article/details/126262939
https://blog.csdn.net/weixin_42875245/article/details/109603406


【推荐】国内首个AI IDE,深度理解中文开发场景,立即下载体验Trae
【推荐】编程新体验,更懂你的AI,立即体验豆包MarsCode编程助手
【推荐】抖音旗下AI助手豆包,你的智能百科全书,全免费不限次数
【推荐】轻量又高性能的 SSH 工具 IShell:AI 加持,快人一步
· 无需6万激活码!GitHub神秘组织3小时极速复刻Manus,手把手教你使用OpenManus搭建本
· C#/.NET/.NET Core优秀项目和框架2025年2月简报
· Manus爆火,是硬核还是营销?
· 一文读懂知识蒸馏
· 终于写完轮子一部分:tcp代理 了,记录一下