docker利用nexus搭建maven私服
为什么使用 Nexus
- Maven仓库结构图:
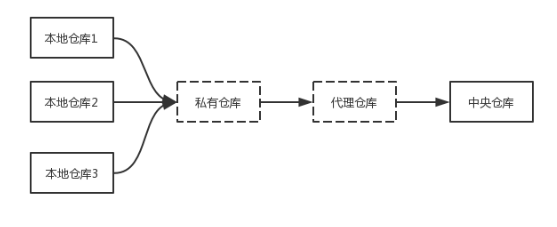
通常,我们开发项目并没有使用到虚线标识的那两部分,基本都是通过本机的Maven直接访问中央仓库,下载jar包到本地仓库。现在我们需要搭建中间虚线部分。
三种专门的Maven仓库管理软件可以用来帮助大家建立私服:Apache基金会的Archiva、JFrog的Artifactory和Sonatype的Nexus。而Nexus是当前最流行的Maven仓库管理工具。
- Nexus简介
nexus是一个强大的maven仓库管理器,它极大的简化了本地内部仓库的维护和外部仓库的访问.
nexus是一套开箱即用的系统不需要数据库,它使用文件系统加Lucene来组织数据
nexus使用ExtJS来开发界面,利用Restlet来提供完整的REST APIs,通过IDEA和Eclipse集成使用
nexus支持webDAV与LDAP安全身份认证.
nexus提供了强大的仓库管理功能,构件搜索功能,它基于REST,友好的UI是一个extjs的REST客户端,占用较少的内存,基于简单文件系统而非数据库.
特点:
-
节省外网带宽。
-
加速Maven构建。
-
部署第三方构件。
-
提高稳定性,增强控制。
-
降低中央仓库的负荷。
-
控制和审计
-
建立本地内部公用仓库
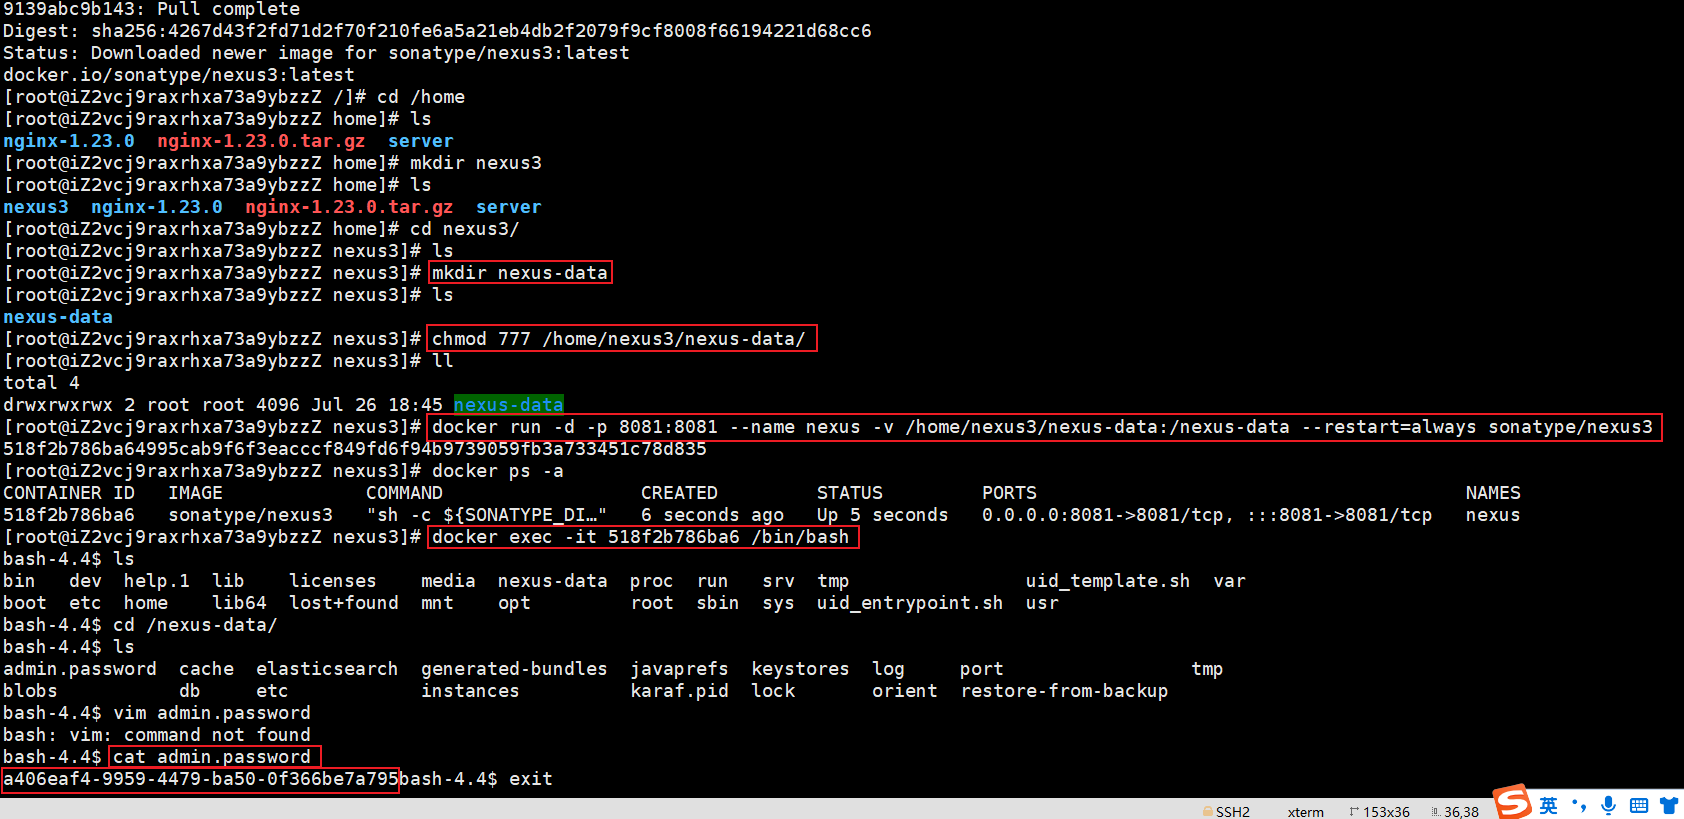
下载镜像
docker pull sonatype/nexus3
创建映射文件
# 创建文件夹
mkdir /home/nexus3/nexus-data/

# 授权
chmod 777 /home/nexus3/nexus-data/
运行
docker run -d -p 8081:8081 --name nexus -v /home/nexus3/nexus-data:/nexus-data --restart=always sonatype/nexus3
查看日志
docker logs -f nexus3

出现 Started Sonatype Nexus OSS 表示启动好了
查看密码
密码保存在容器内 admin.password 文件里
# 进入容器
docker exec -it 容器名/容器id /bin/bash

# 查看密码
bash-4.4$ cat /nexus-data/admin.password

# 密码
a406eaf4-9959-4479-ba50-0f366be7a795
测试
# 本地测试
curl http://localhost:8081/

# 返回结果
<!DOCTYPE html>
<html lang="en">
<head>
  <title>Nexus Repository Manager</title>
  <meta http-equiv="Content-Type" content="text/html; charset=utf-8"/>
  <meta name="description" content="Nexus Repository Manager"/>
  <meta http-equiv="X-UA-Compatible" content="IE=edge"/>
  <!--[if lt IE 9]>
    <script>(new Image).src="./static/rapture/resources/favicon.ico?_v=3.40.1-01&_e=OSS"</script>
  <![endif]-->
  <link rel="icon" type="image/png" href="./static/rapture/resources/favicon-32x32.png?_v=3.40.1-01&_e=OSS" sizes="32x32">
  <link rel="mask-icon" href="./static/rapture/resources/safari-pinned-tab.svg?_v=3.40.1-01&_e=OSS" color="#5bbad5">
  <link rel="icon" type="image/png" href="./static/rapture/resources/favicon-16x16.png?_v=3.40.1-01&_e=OSS" sizes="16x16">
  <link rel="shortcut icon" href="./static/rapture/resources/favicon.ico?_v=3.40.1-01&_e=OSS">
  <meta name="msapplication-TileImage" content="./static/rapture/resources/mstile-144x144.png?_v=3.40.1-01&_e=OSS">
  <meta name="msapplication-TileColor" content="#00a300">
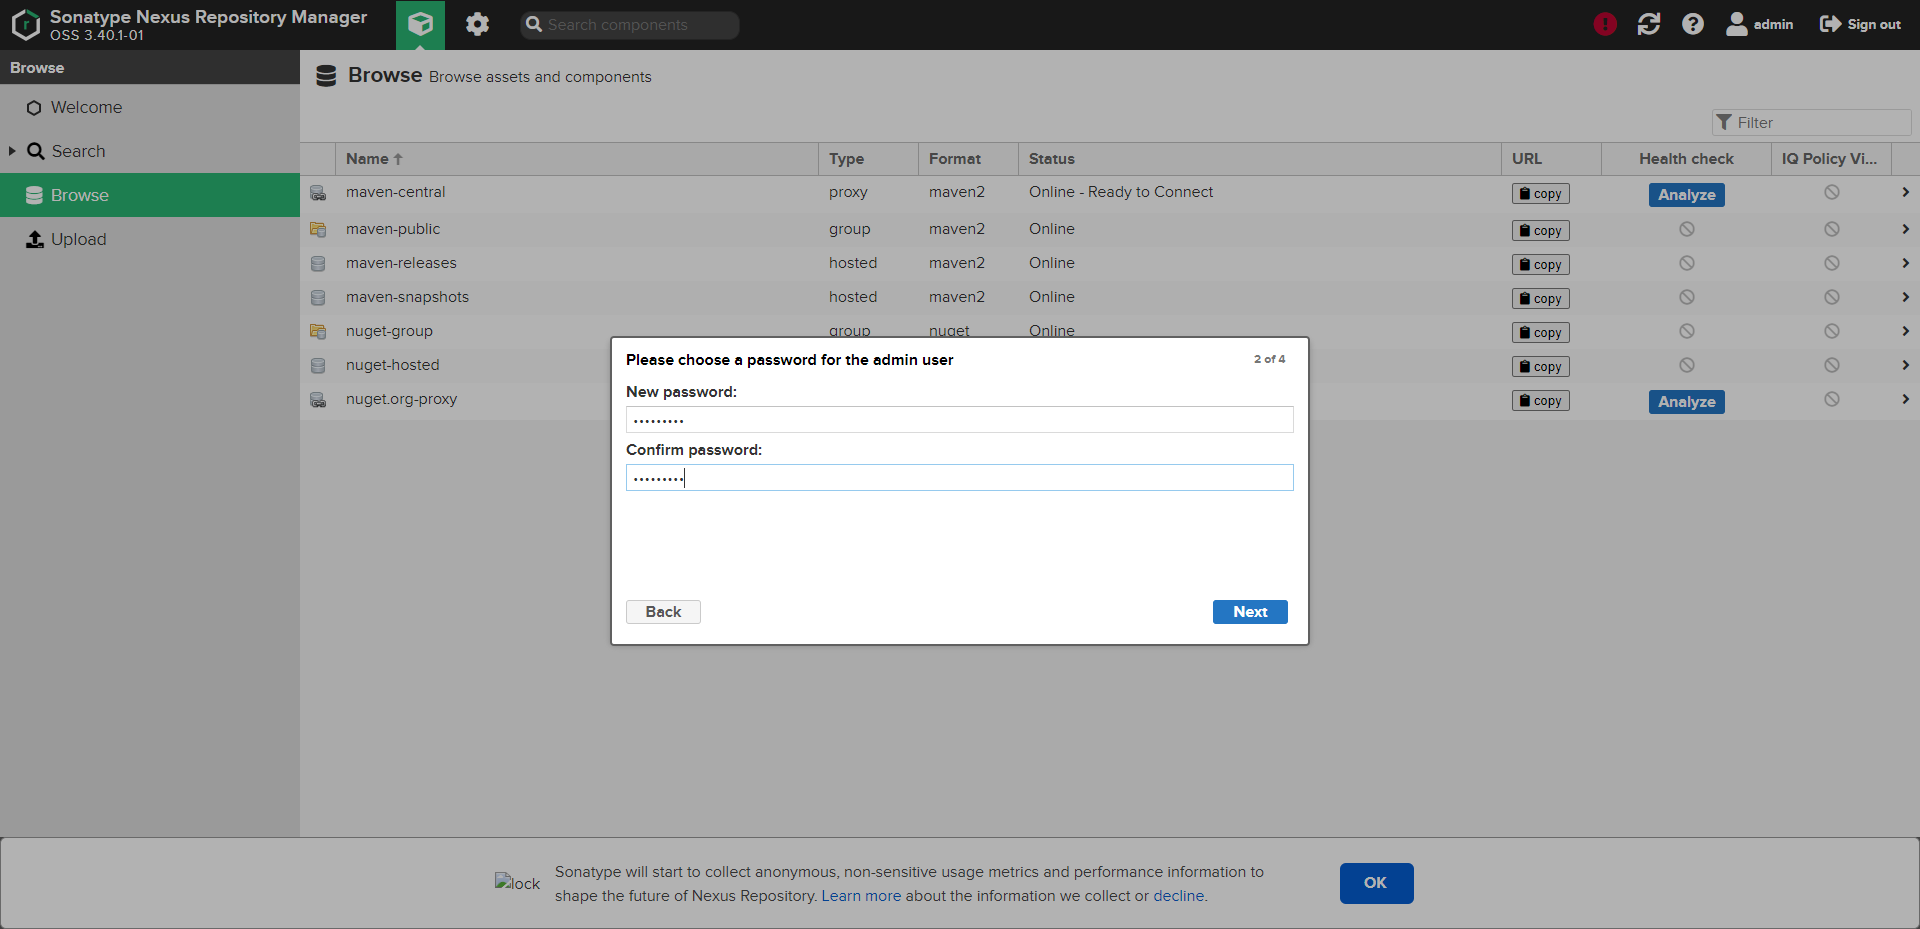
修改密码
- 浏览器输入
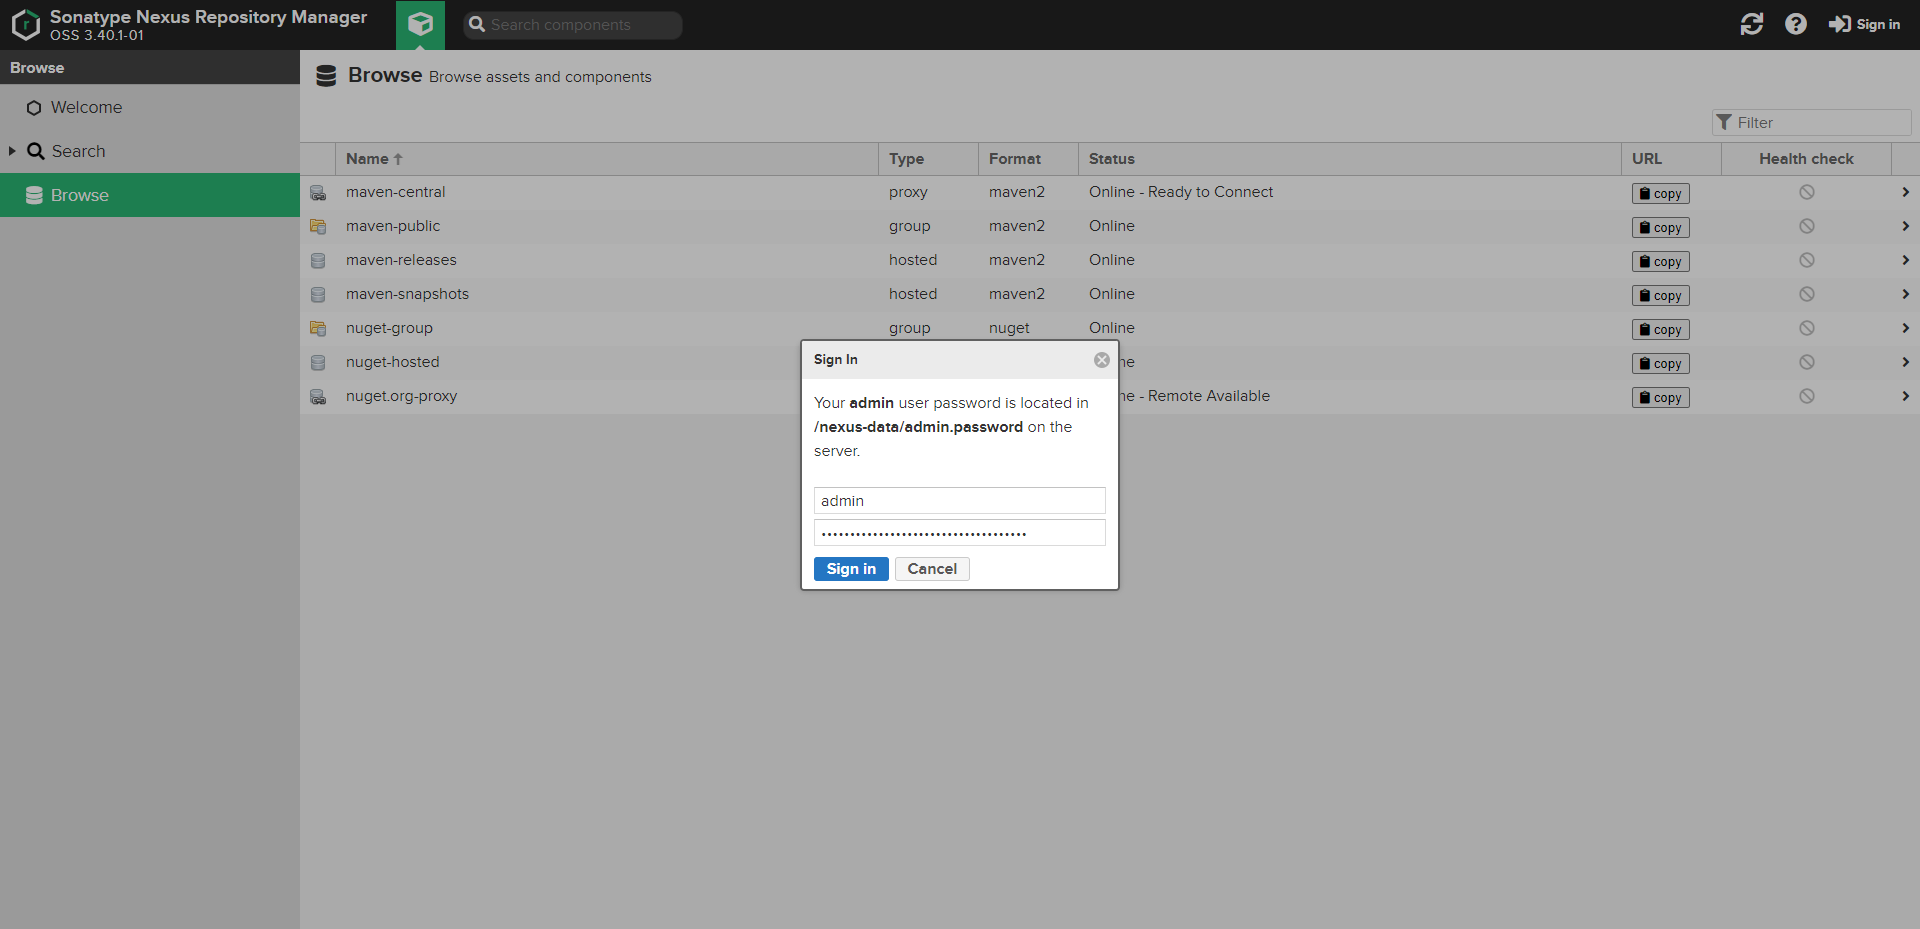
http://ip地址:8081/进入,点击sign in输入账号admin/初始密码进行密码的修改
修改私服中央仓库站点
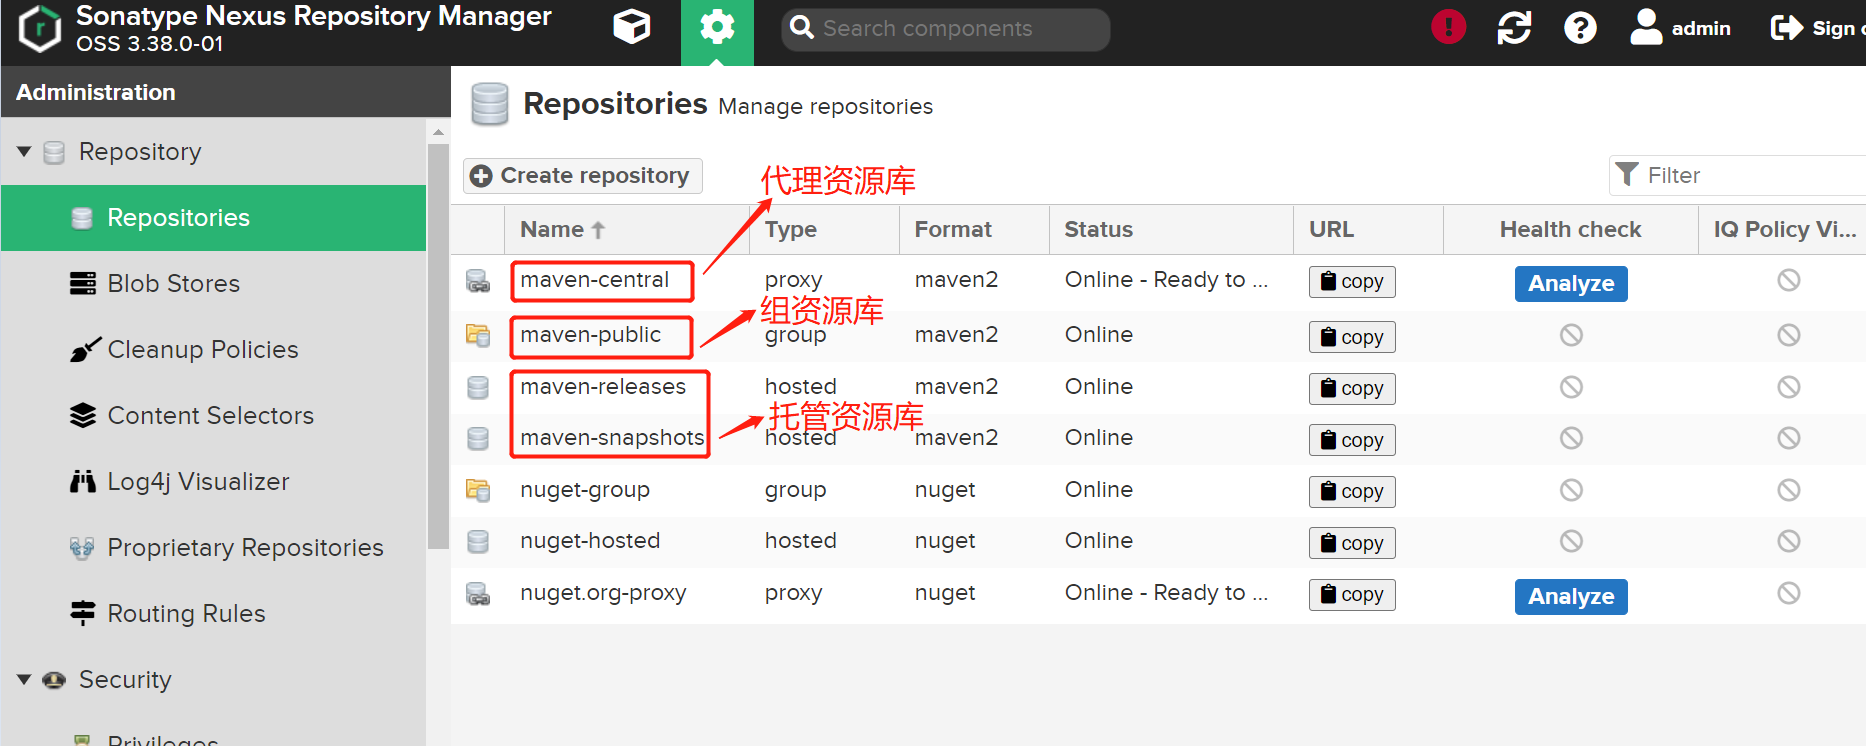
代理仓库负责代理远程中央仓库,托管仓库负责本地资源,组资源库 = 代理资源库 + 托管资源库
默认仓库说明:
| 默认仓库 | 说明 |
|---|---|
| maven-central | maven中央库,默认从https://repo1.maven.org/maven2/拉取jar |
| maven-releases | 私库发行版jar,初次安装请将Deployment policy设置为Allow redeploy |
| maven-snapshots | 私库快照(调试版本)jar |
| maven-public | 仓库分组,把上面三个仓库组合在一起对外提供服务,在本地maven基础配置settings.xml或项目pom.xml中使用 |
进入 maven-central 仓库,配置 Remote storage 地址
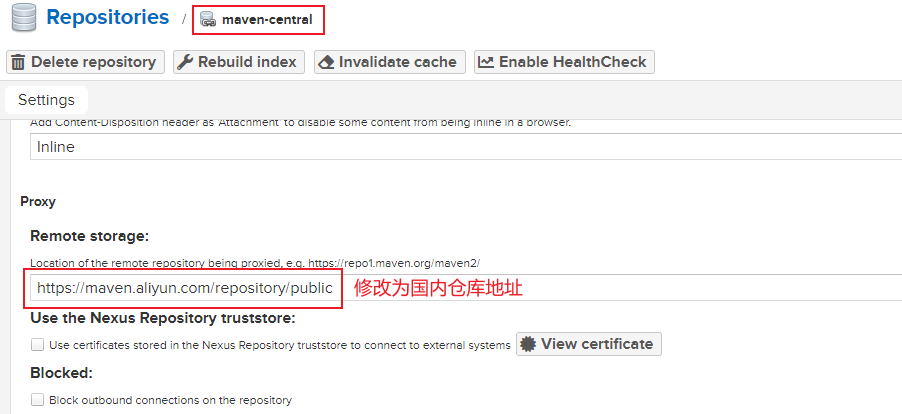
# 仓库地址配置需要从阿里云或者腾讯云的 mirrors 找
# aliyun各种服务mirrors
https://developer.aliyun.com/mirror/
# 各云平台npm mirrors
https://cloud.tencent.com/developer/article/1372949
# 阿里云公共maven仓库地址
https://maven.aliyun.com/repository/public
# 腾讯云maven仓库地址
公网使用地址 https://mirrors.cloud.tencent.com/help/maven.html
腾讯云平台部署的nexus把域名换成http://mirrors.tencentyun.com/ 就是内网仓库地址了,内网仓库只能云服务器访问
阿里云仓库配置:
创建hosted repository仓库
在创建仓库repository之前,还需要先指定文件存储目录,便于统一管理。就需要创建Blob Stores,不创建则使用的是default
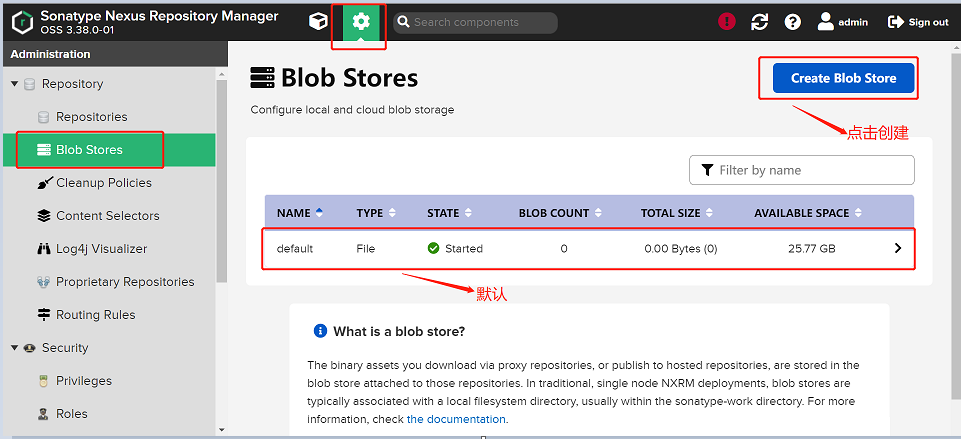
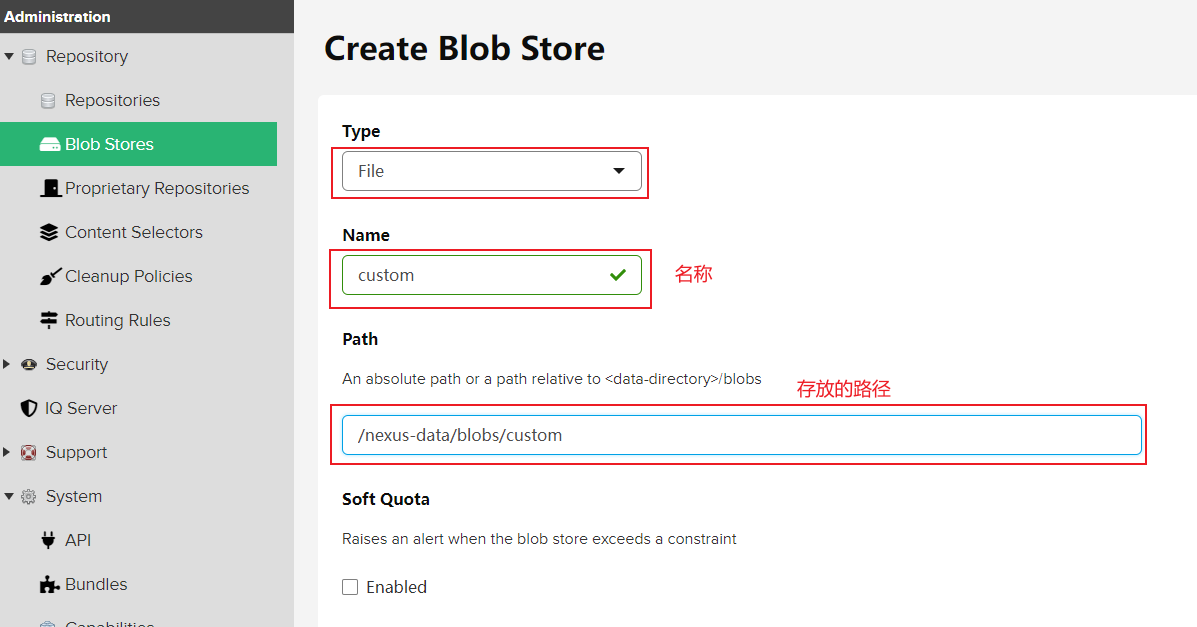
blob stores有两个,一个是系统默认的,一个是刚创建的。如果不想自己创建,使用系统默认的文件存储目录也是可以的。到时候创建repository时,存储目录选择default就可以了。新创建的目录,可以在/data/blobs/目录下面可以看到。


- 创建 hosted repository仓库
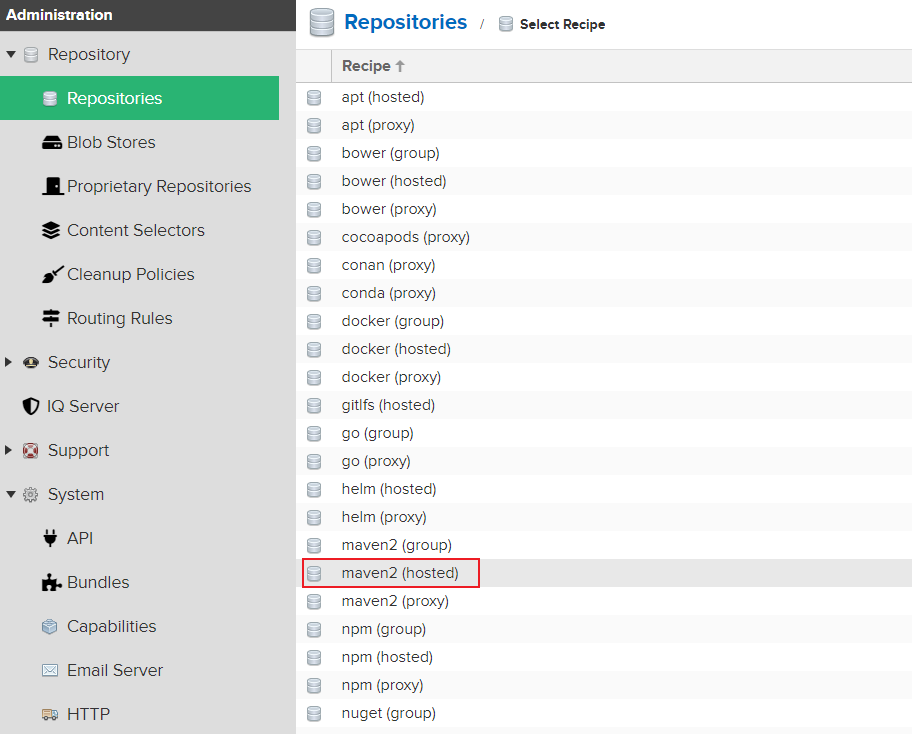
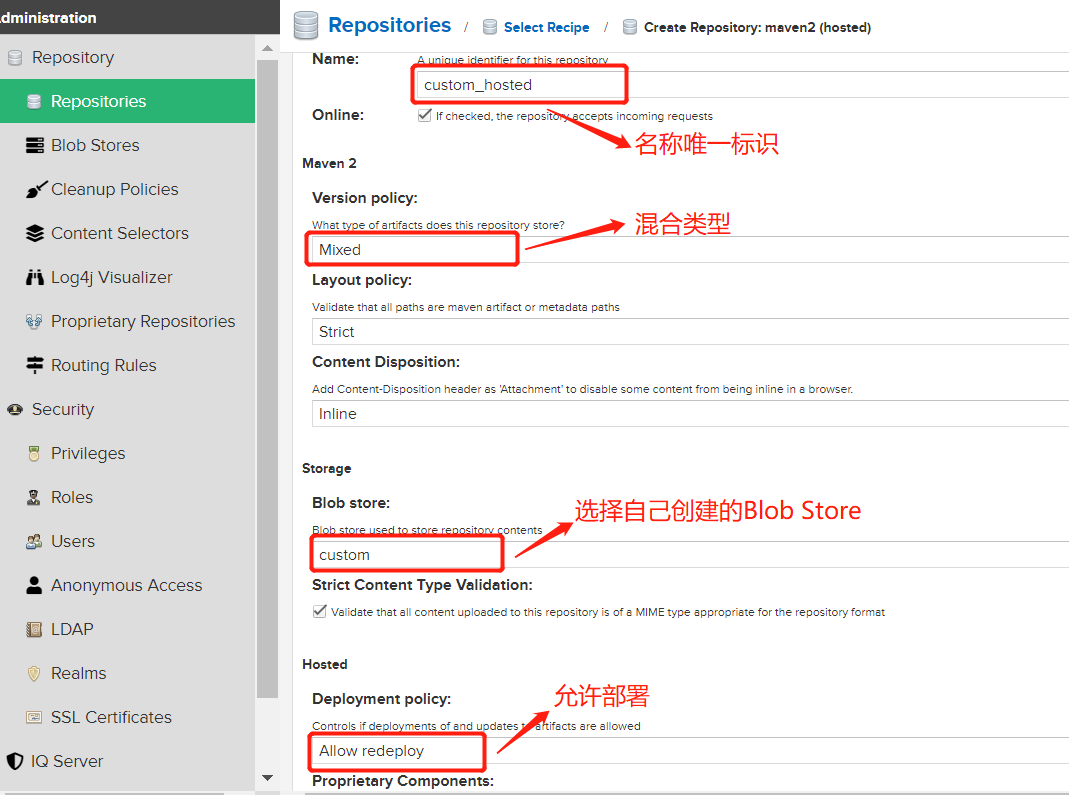
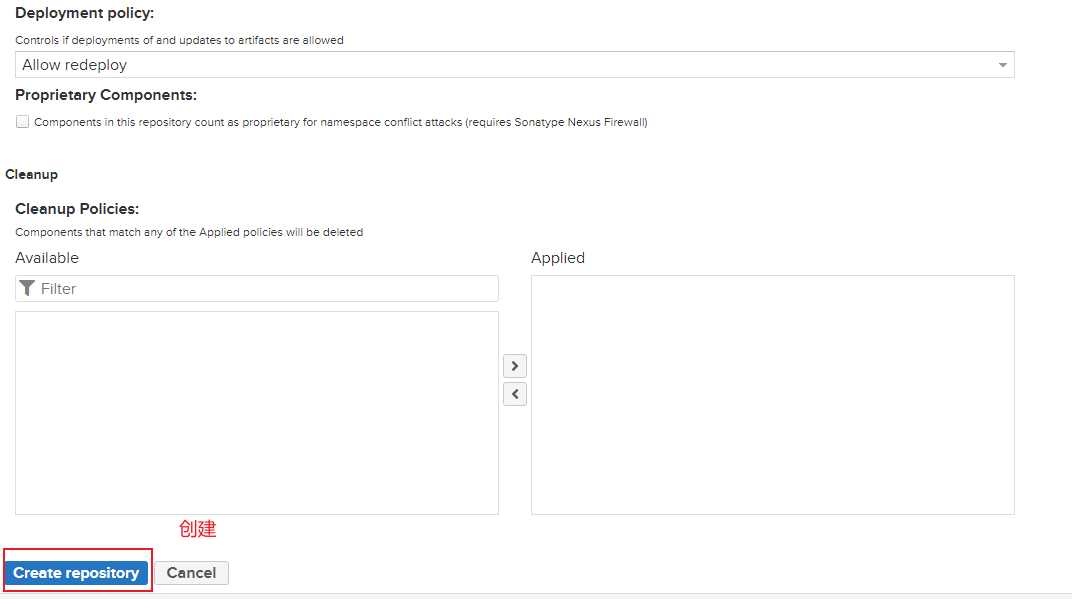
Hosted有三种方式:Releases、Snapshot、Mixed

Releases: 一般是已经发布的Jar包
Snapshot: 未发布的版本
Mixed:混合的
Hosted设置选项,选项中有三个值:

Allow redeploy:允许同一个版本号下重复提交代码, nexus以时间区分
Disable redeploy:不允许同一个版本号下重复提交代码
Read-Only:不允许提交任何版本
原生的maven-releases库是Disable redeploy设置, maven-snapshots是Allow redeploy。
创建proxy repository代理仓库
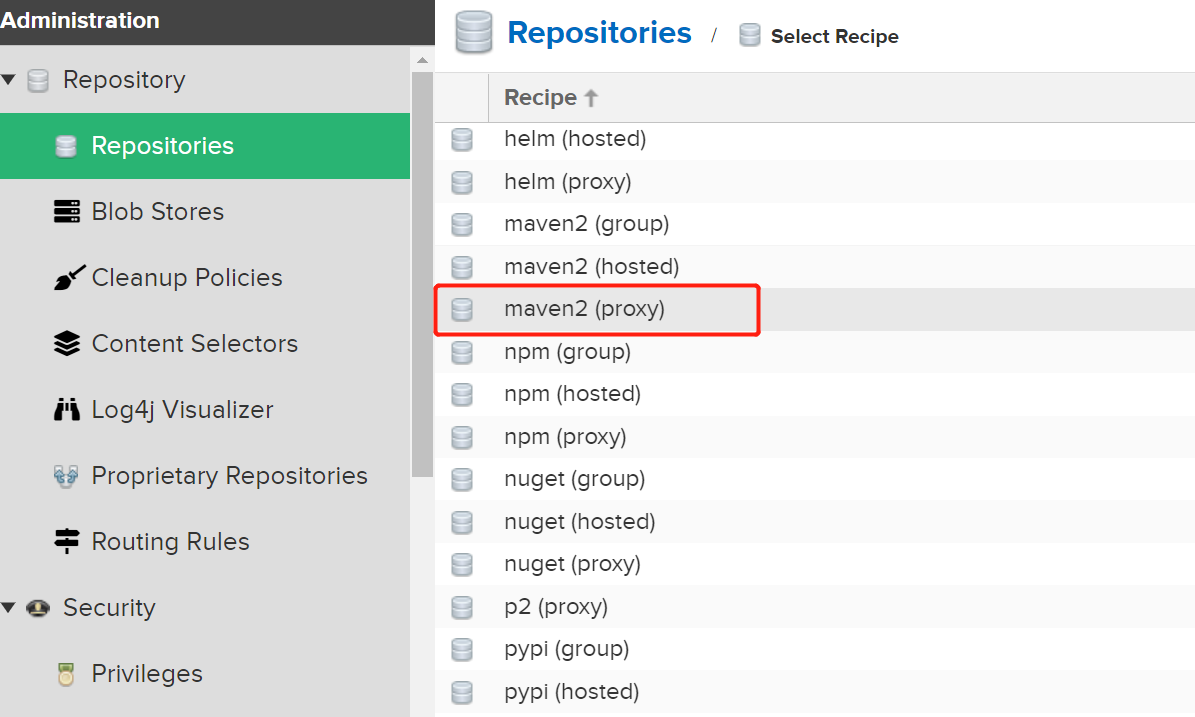
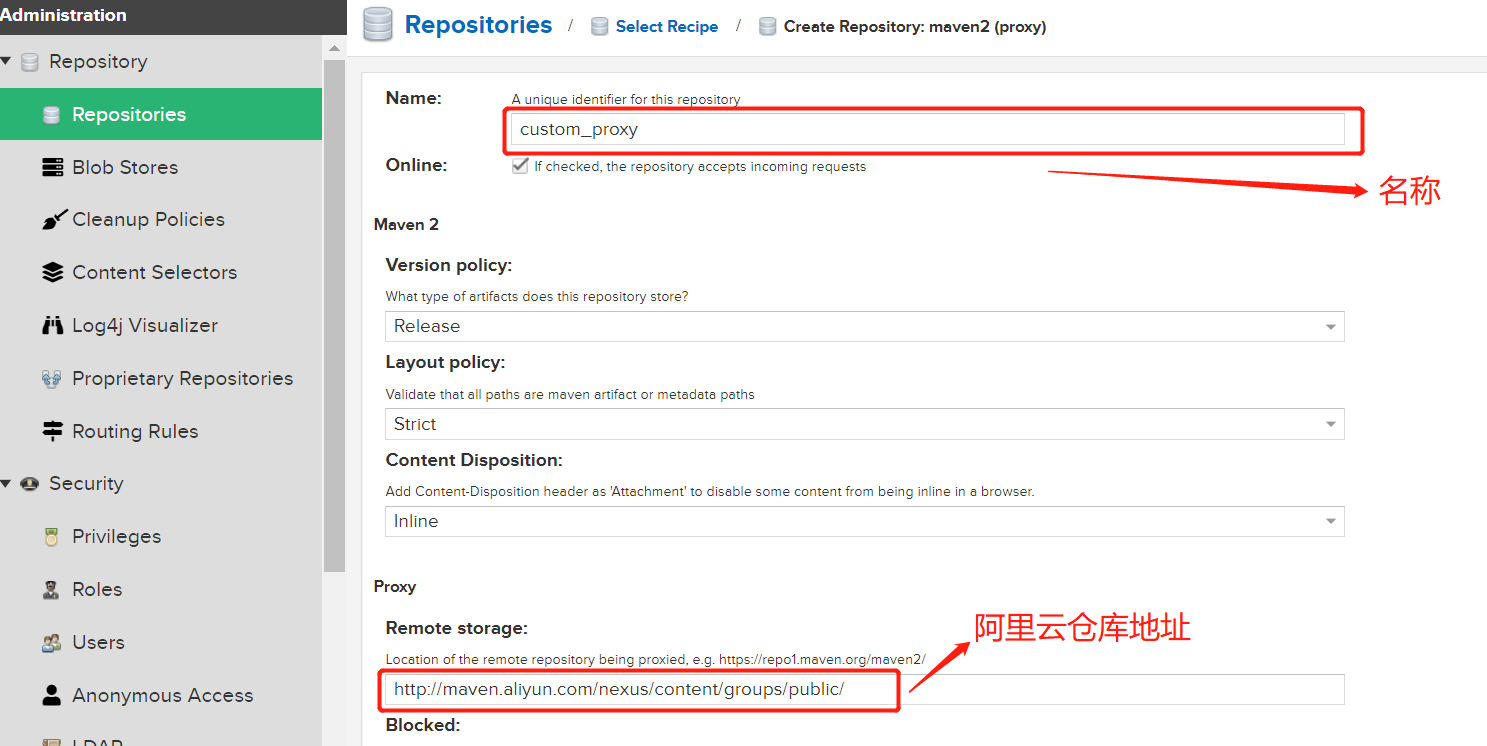
这里推荐几个远程仓库:
jboss的maven中央仓库地址:http://repository.jboss.com/maven2/
阿里云的maven中央仓库地址:http://maven.aliyun.com/nexus/content/groups/public/
apache的maven中央仓库地址:http://repo.maven.apache.org/maven2/
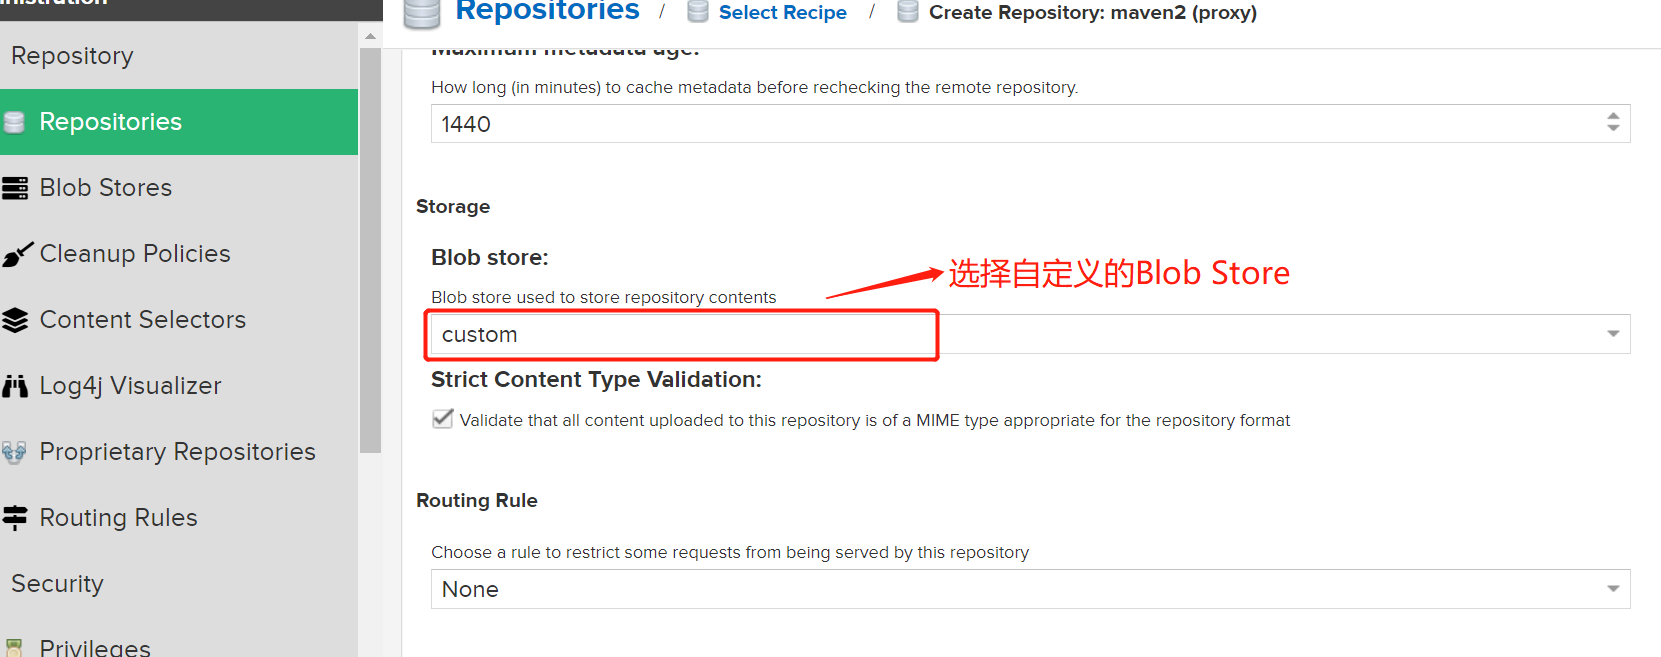
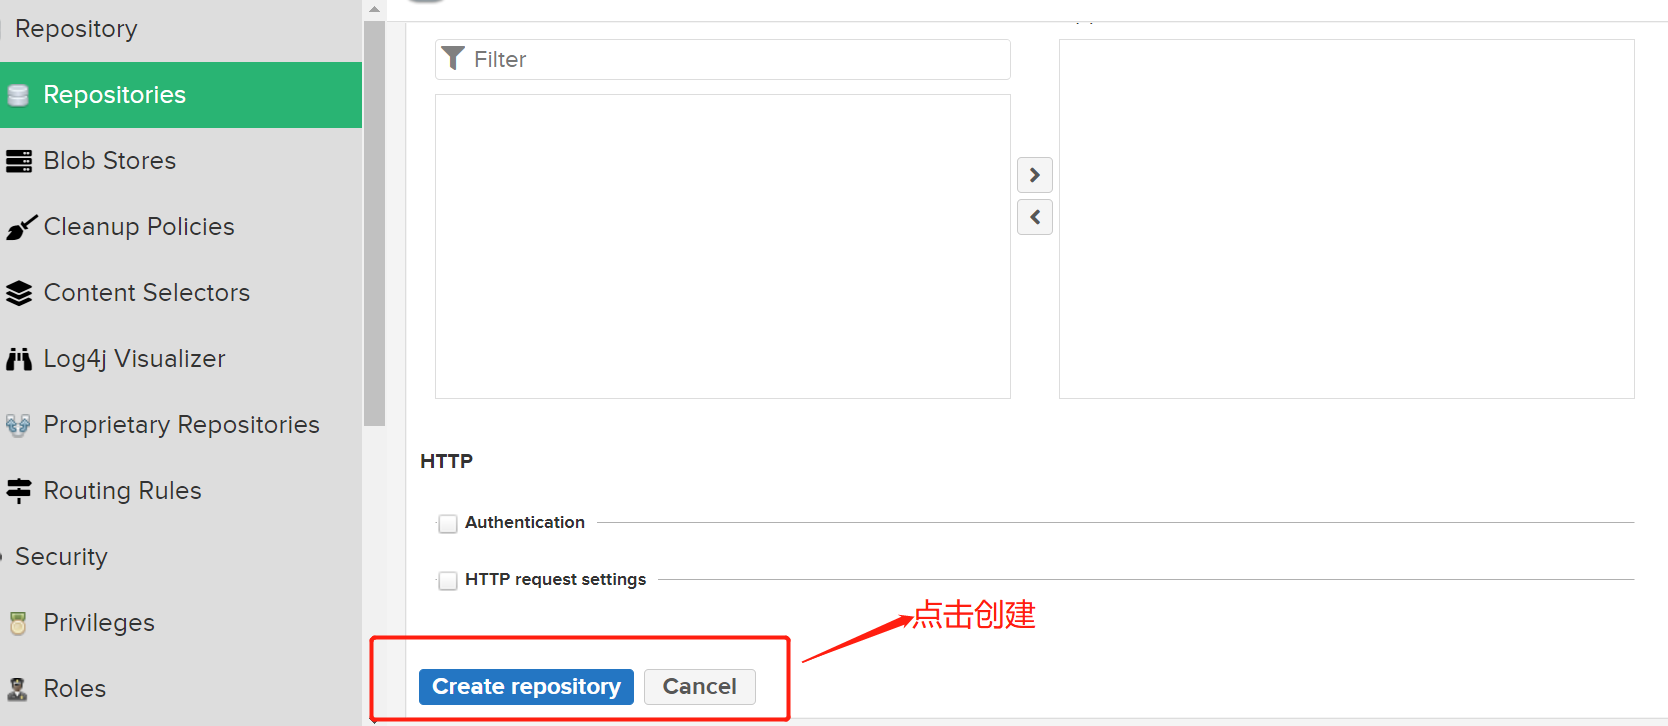
创建group repository组仓库
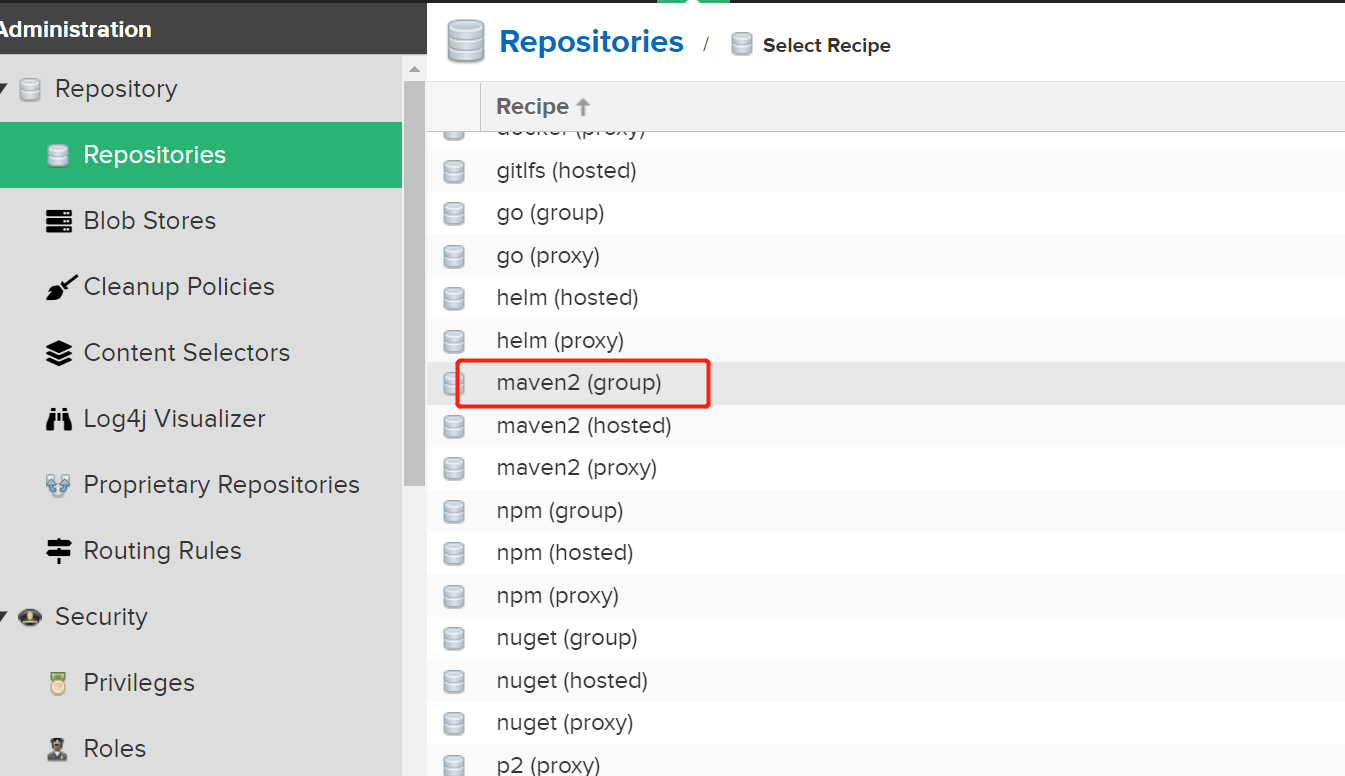
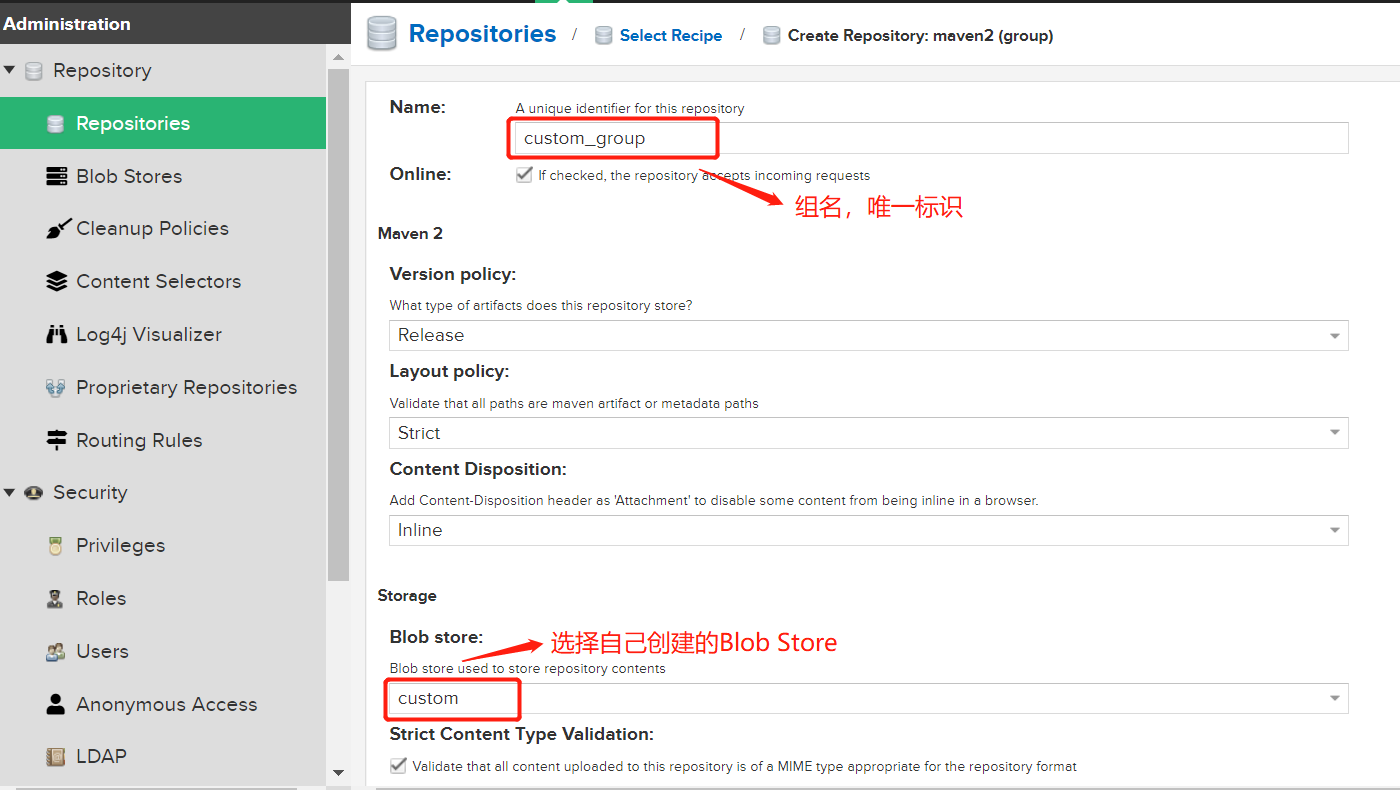
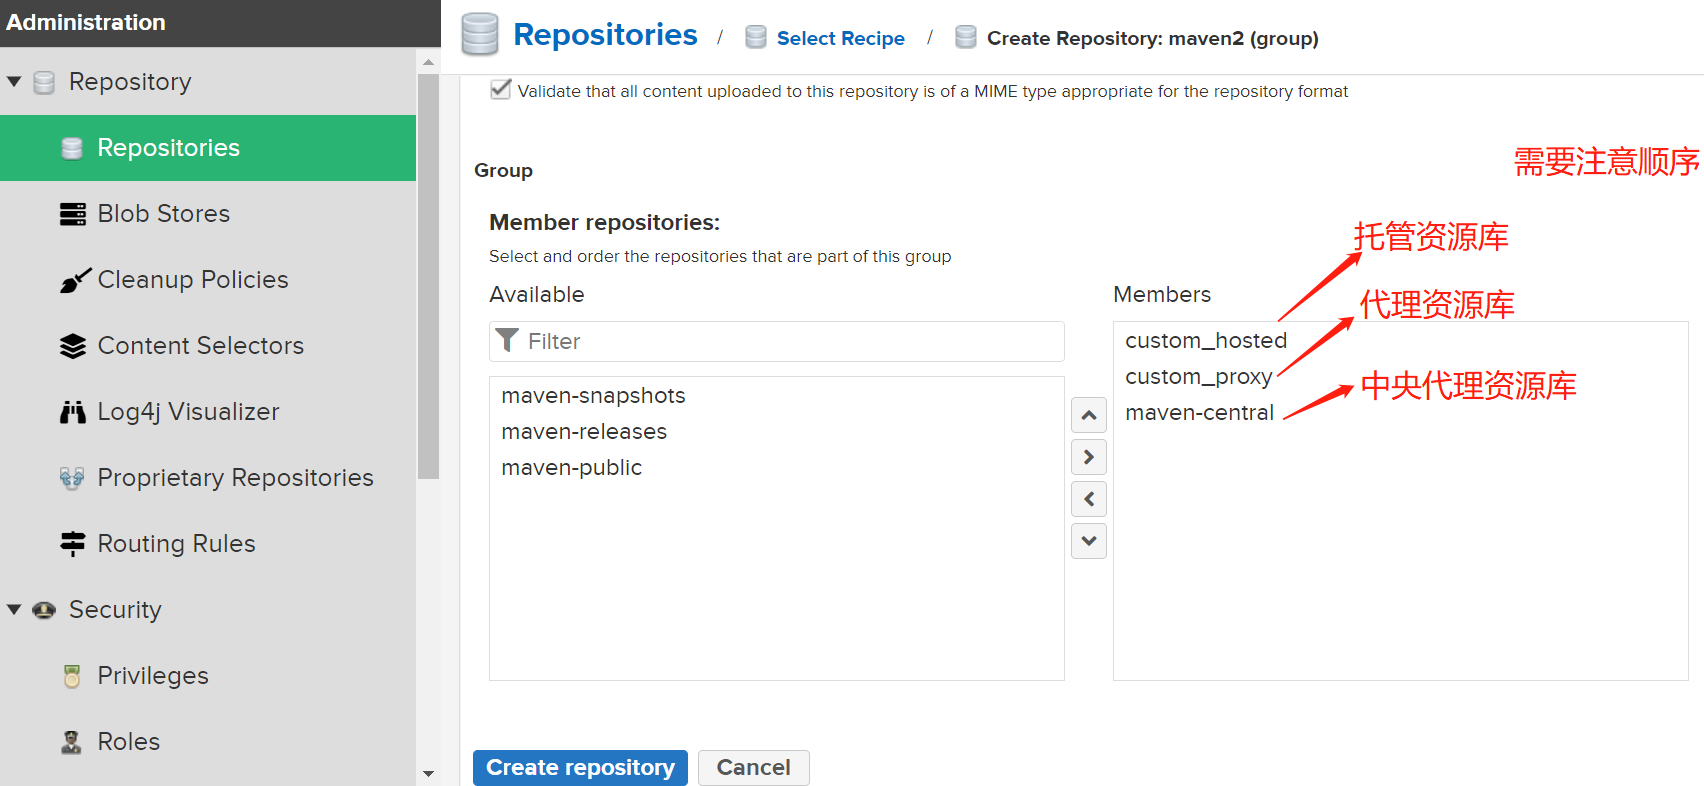
- 为什么要注意顺序?
官方文档中建议:

It is recommended practice to place hosted repositories higher in the list than proxy repositories. For proxy repositories, the repository manager needs to check the remote repository which will incur more overhead than a hosted repository lookup.

希望将hosted repositories【托管资源库】的顺序放在proxy repositories【代理资源库】之前,因为一个group【组资源库】中可以涵括这些托管资源库和代理资源库。而一整个的group是作为一个public,一个接口给别人使用的。所以当查找架包的时候,如果代理资源库在前面,那就是先从远程去查找jar,而不是先从托管资源库(本地仓库)去查找是否有jar。这样访问外网的消耗比起来在本地查找,当然是将托管资源库放在代理资源库之前的优先位置了。
Maven配置
Maven下的setting.xml文件和项目中的pom.xml文件的关系是:settting.xml文件是全局设置,而pom.xml文件是局部设置。pom.xml文件对于项目来说,是优先使用的。而pom.xml文件中如果没有配置镜像地址的话,就按照settting.xml中定义的地址去查找。
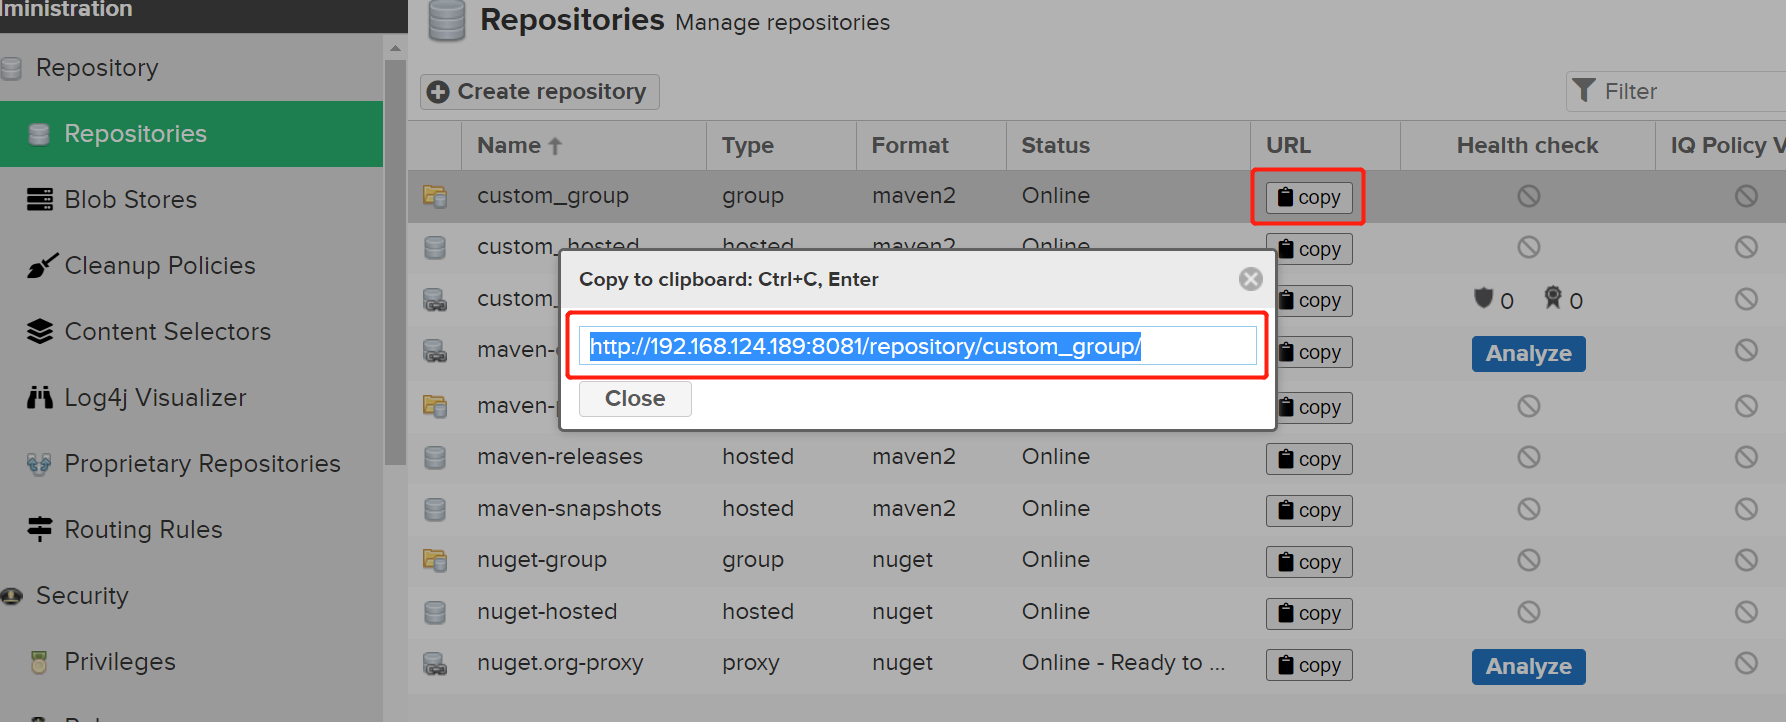
获取组仓库smart_group的仓库地址,修改setting.xml文件如下:
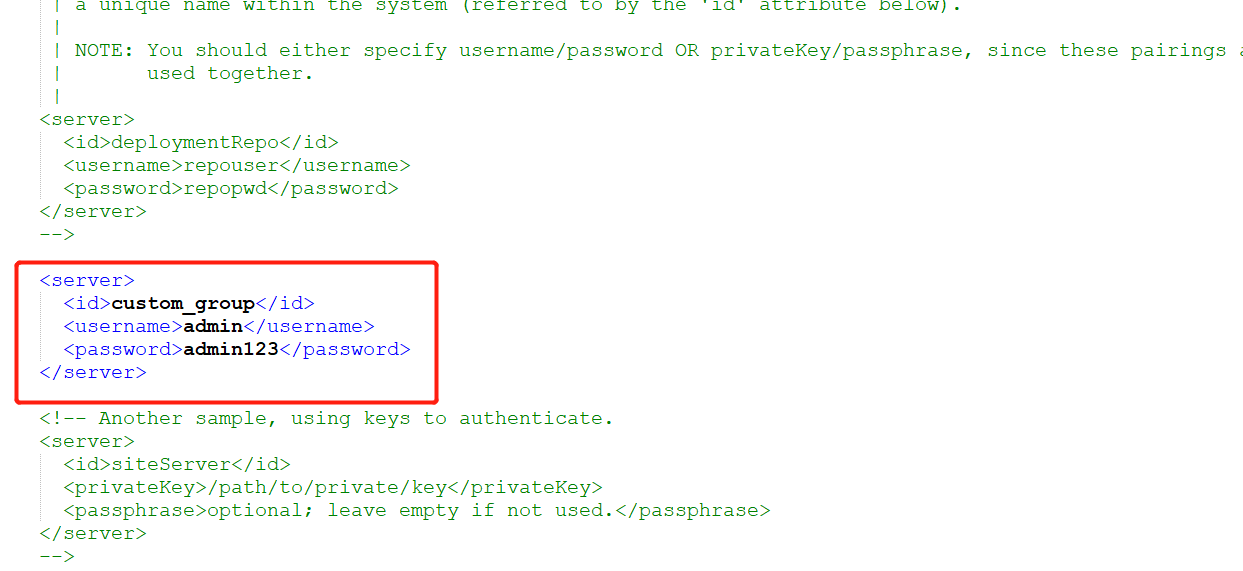
<!--nexus服务器,id为组仓库name-->
  <servers>
    <server>
        <id>custom_group</id>
        <username>admin</username>
        <password>admin123</password>
    </server>
  </servers>
  <!--仓库组的url地址,id和name可以写组仓库name,mirrorOf的值设置为central-->
  <mirrors>
    <mirror>
        <id>custom_group</id>
        <name>custom_group</name>
        <url>http://192.168.124.189:8081/repository/custom_group/</url>
        <mirrorOf>central</mirrorOf>
    </mirror>
  </mirrors>

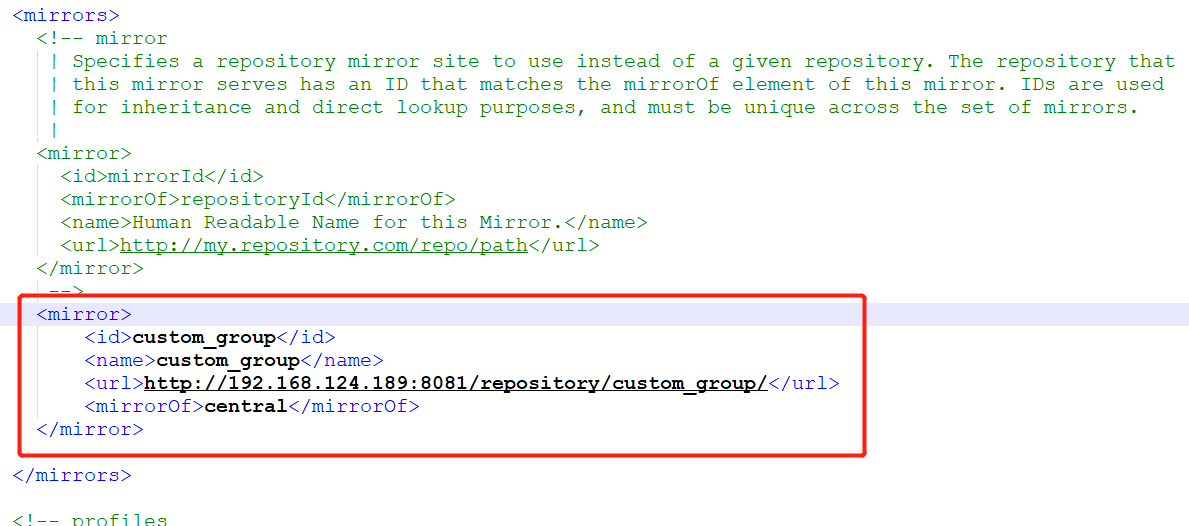
修改后可以重新编译项目,必须添加参数-U,(-U,--update-snapshots,强制更新releases、snapshots类型的插件或依赖库,否则maven一天只会更新一次snapshot依赖)。代理仓库会从远程中央仓库下载jar包
mvn clean compile -U
- 测试
新建SpringBoot项目,可以查看本地仓库,远程仓库的下载的Jar包

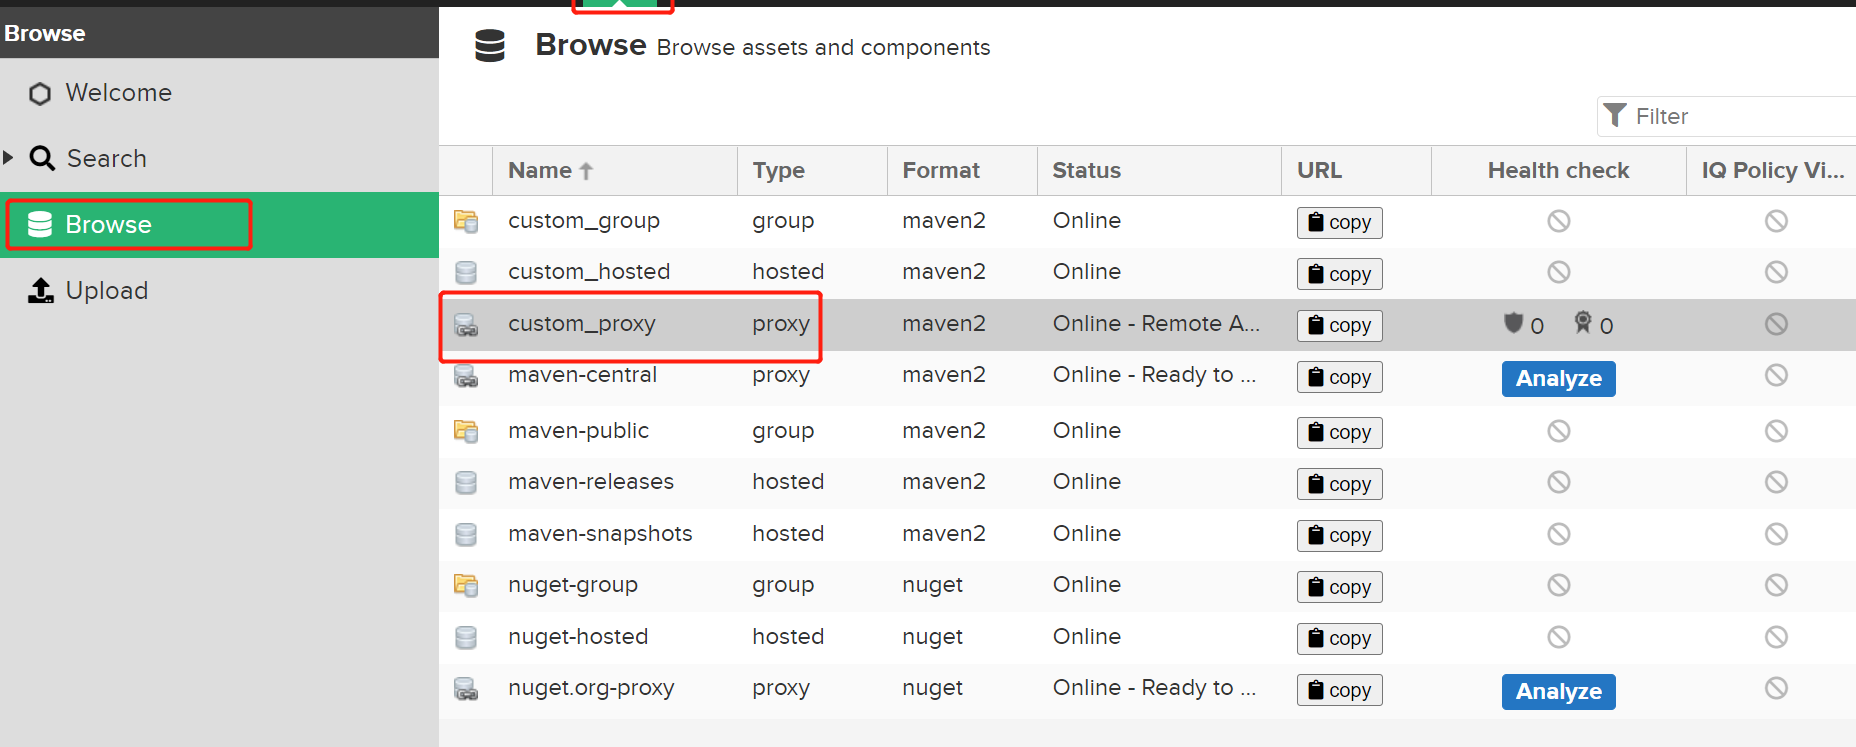
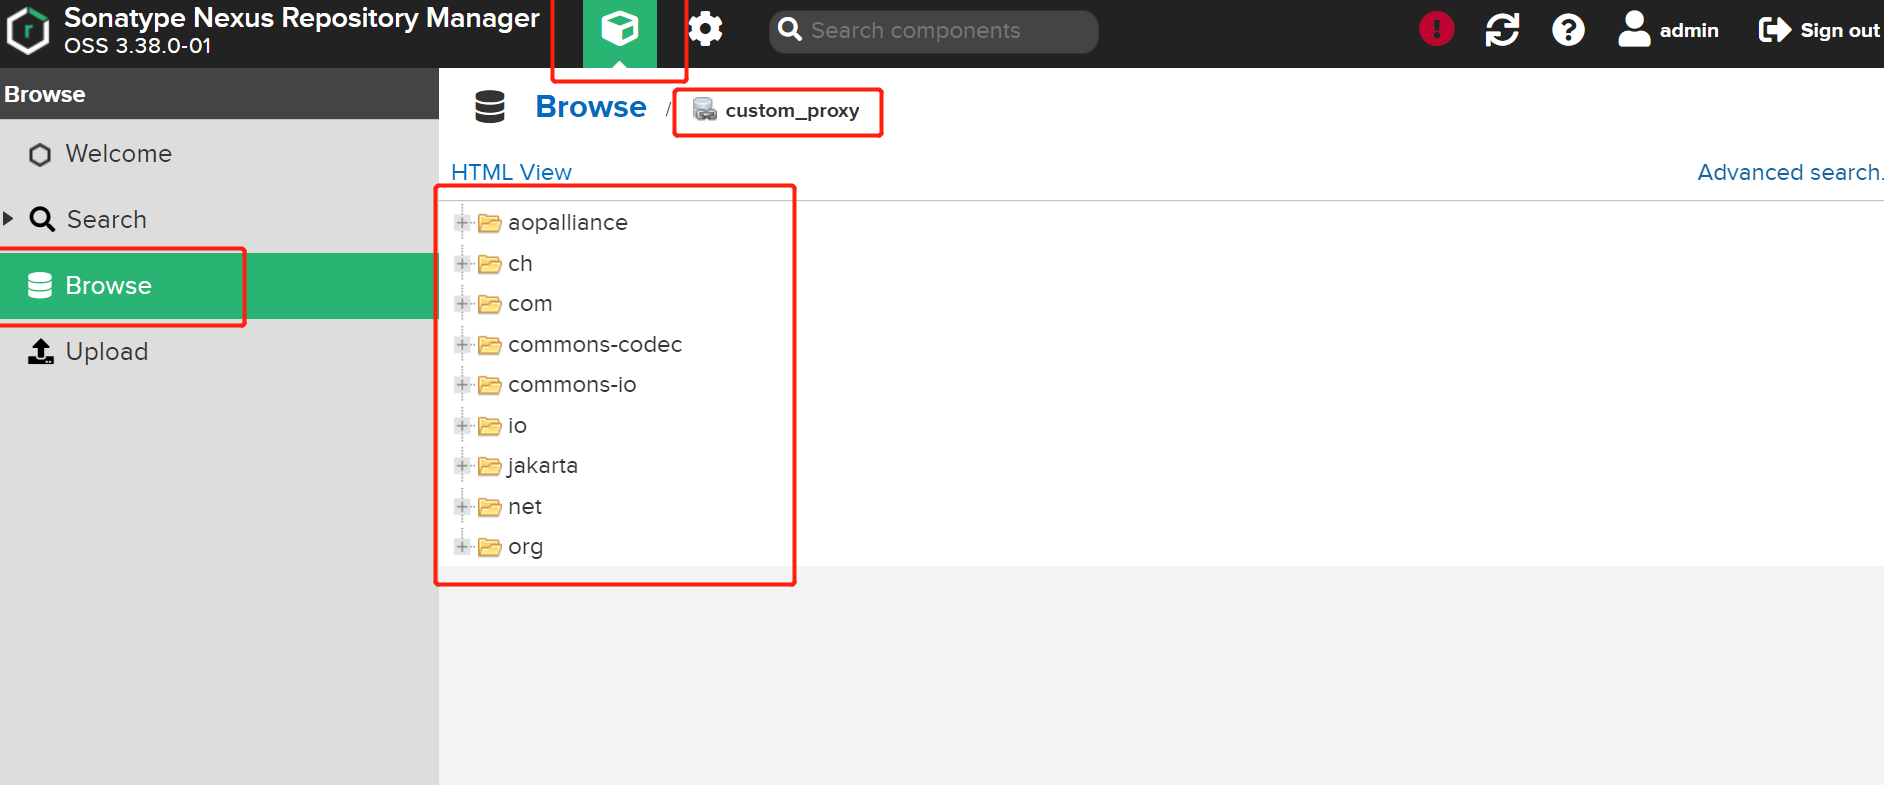
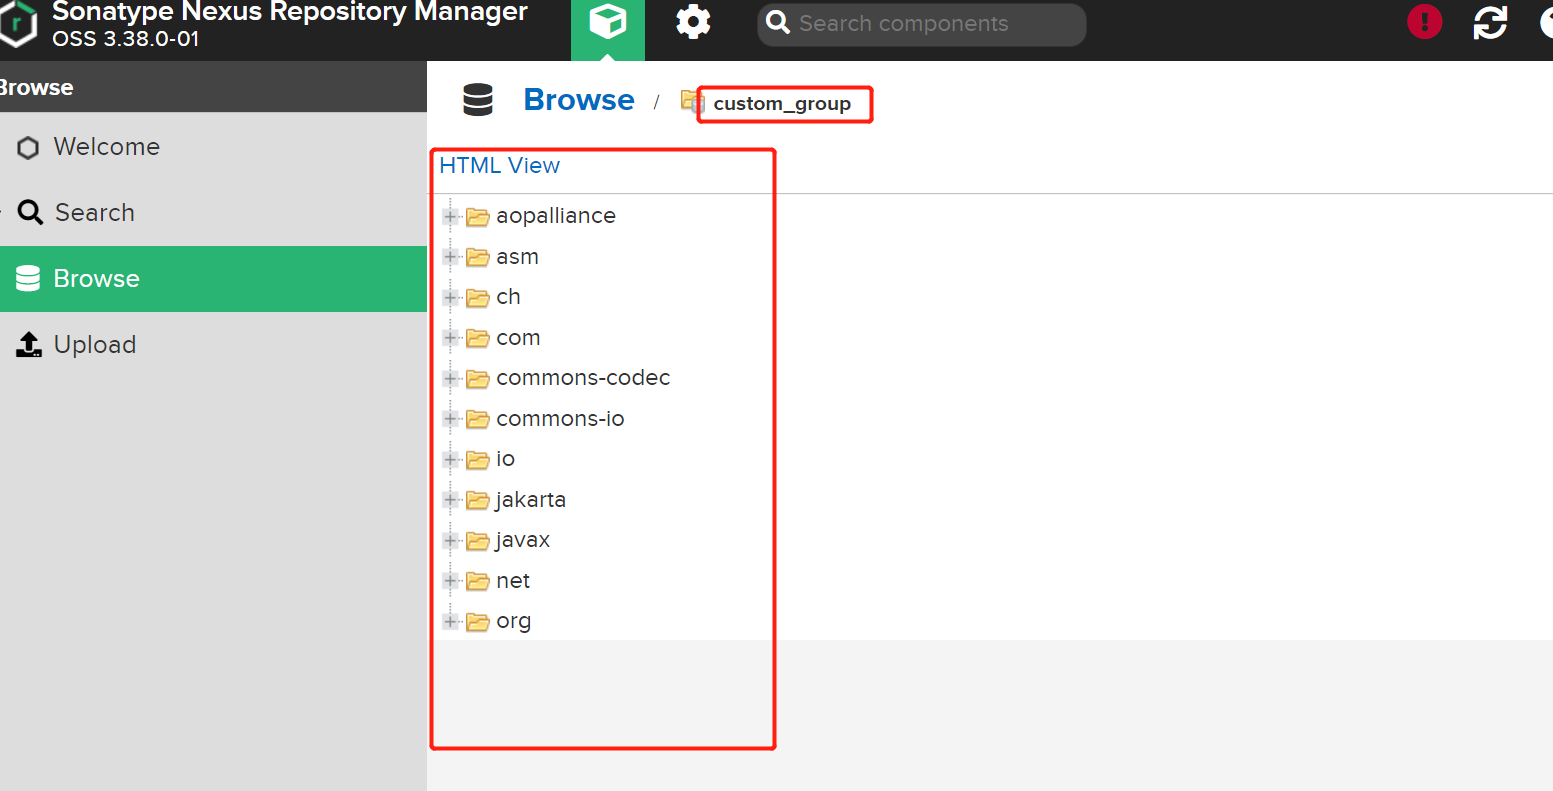
这个时候可以看到代理仓库已经从中央仓库下载了项目编译需要的jar包。同样地,在组仓库中也能看到所有的jar包,包括代理仓库和宿主仓库的。
管理平台上传三方jar包
有些jar是第三方提供的,在中央仓库中是没有的,我们可以上传这些本地三方jar包到hosted repository宿主仓库中。
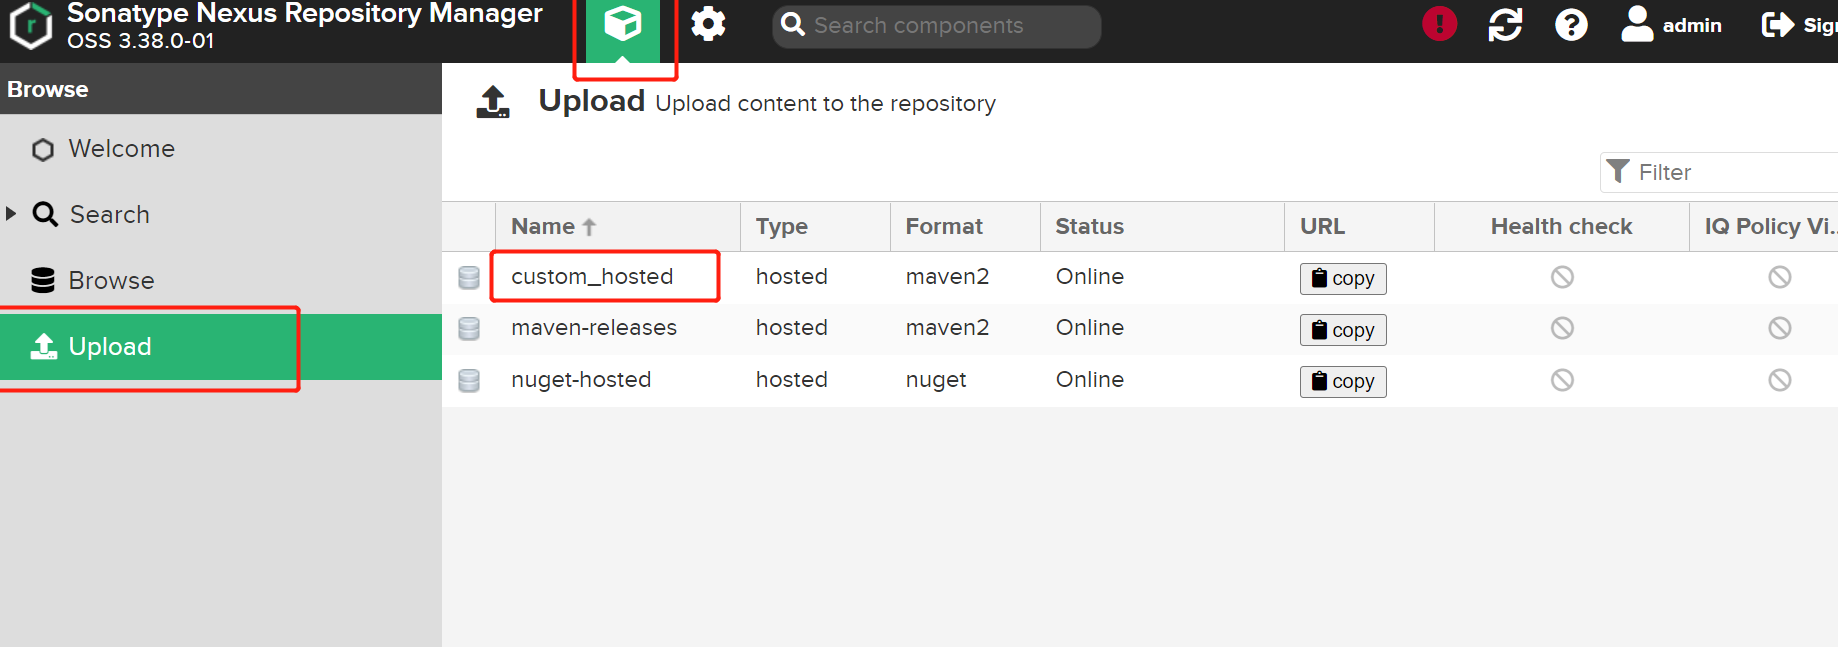
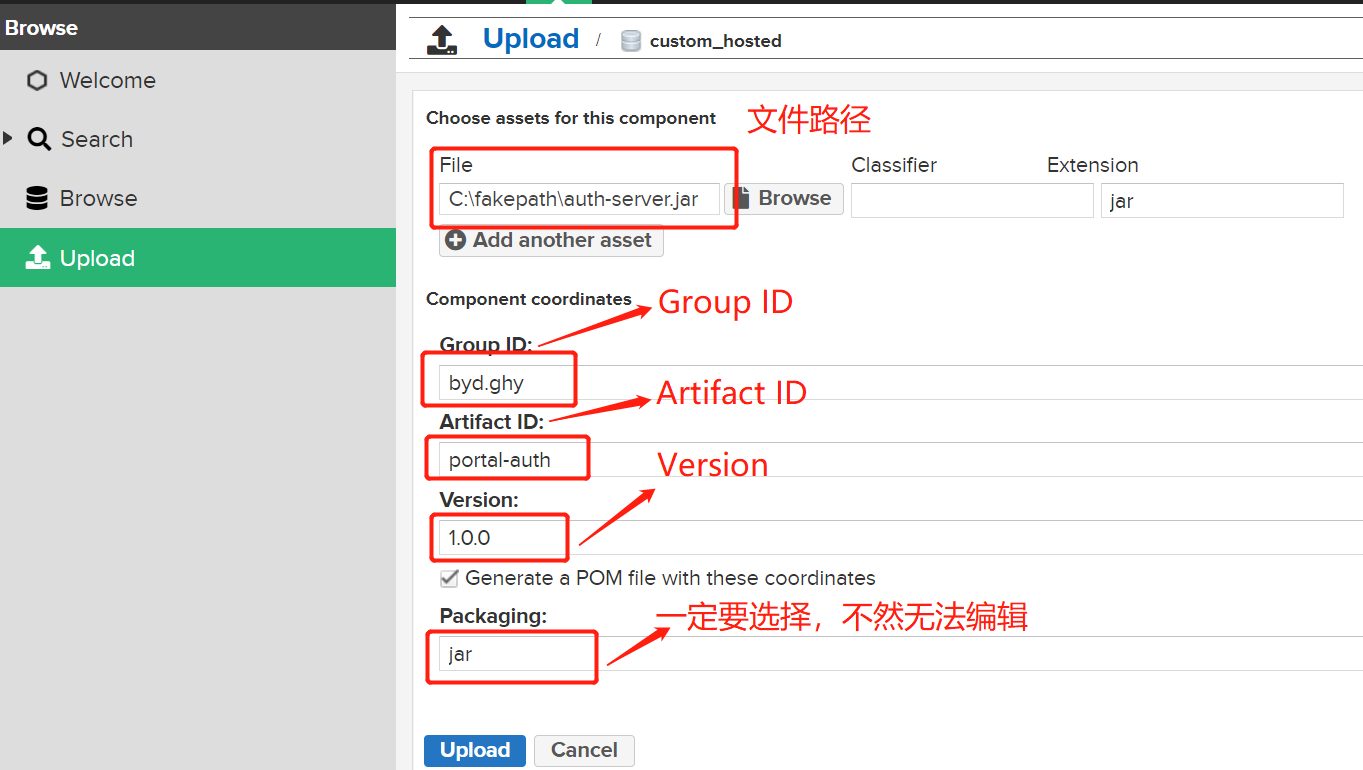
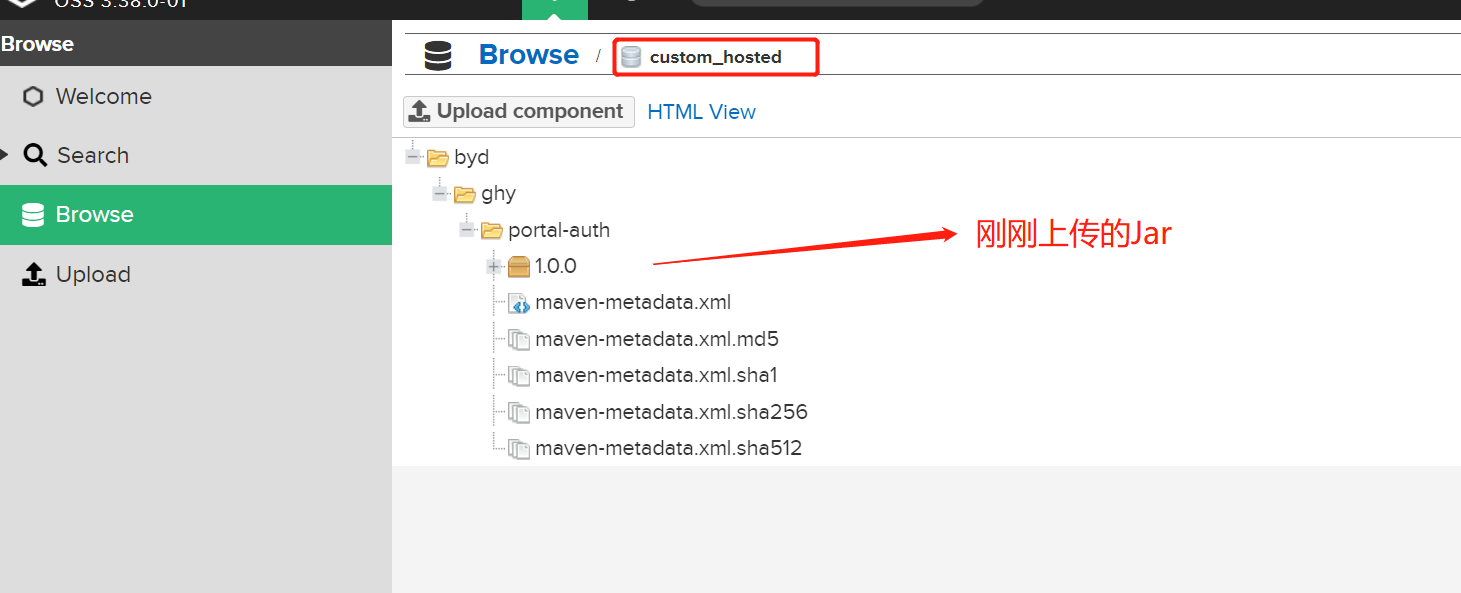
上传成功后,就可以看到hosted repository和group repository中已经有了刚上传的三方jar包

然后项目中通过编译打包就可以下载jar包到本地repository中了,记住maven clean、compile、package首次执行时加参数-U。

命令上传三方jar包
在setting.xml配置文件中添加hosted repository server
<!--id自定义,但是在使用命令上传的时候会用到-->
<server>
    <id>custom_hosted</id>
    <username>admin</username>
    <password>admin123</password>
</server>
使用如下命令上传jar包:
mvn deploy:deploy-file -DgroupId=byd.ghy -DartifactId=portal-auth -Dversion=1.0.0 -Dpackaging=jar -Dfile=D:\workspace_byd\workspace_ghy\workspace_portal-backend\portal-backend-jar-v2\target\auth-server.jar -Durl=http://192.168.124.189:8081/repository/custom_hosted/ -DrepositoryId=custom_hosted
命令解释:
-DgroupId=byd.ghy 自定义
-DartifactId=portal-auth 自定义
-Dversion=1.0.0 自定义,三个自定义,构成pom.xml文件中的标识
-Dpackaging=jar 传的类型是jar类型
-Dfile=D:\auth-server.jar jar包的本地磁盘位置
-Durl=http://ip:8081/repository/custom_hosted/ hosted资源库的地址
-DrepositoryId=custom_hosted 需要和setting.xml文件中配置的ID一致

上传成功后,hosted repository中已经可以看到了
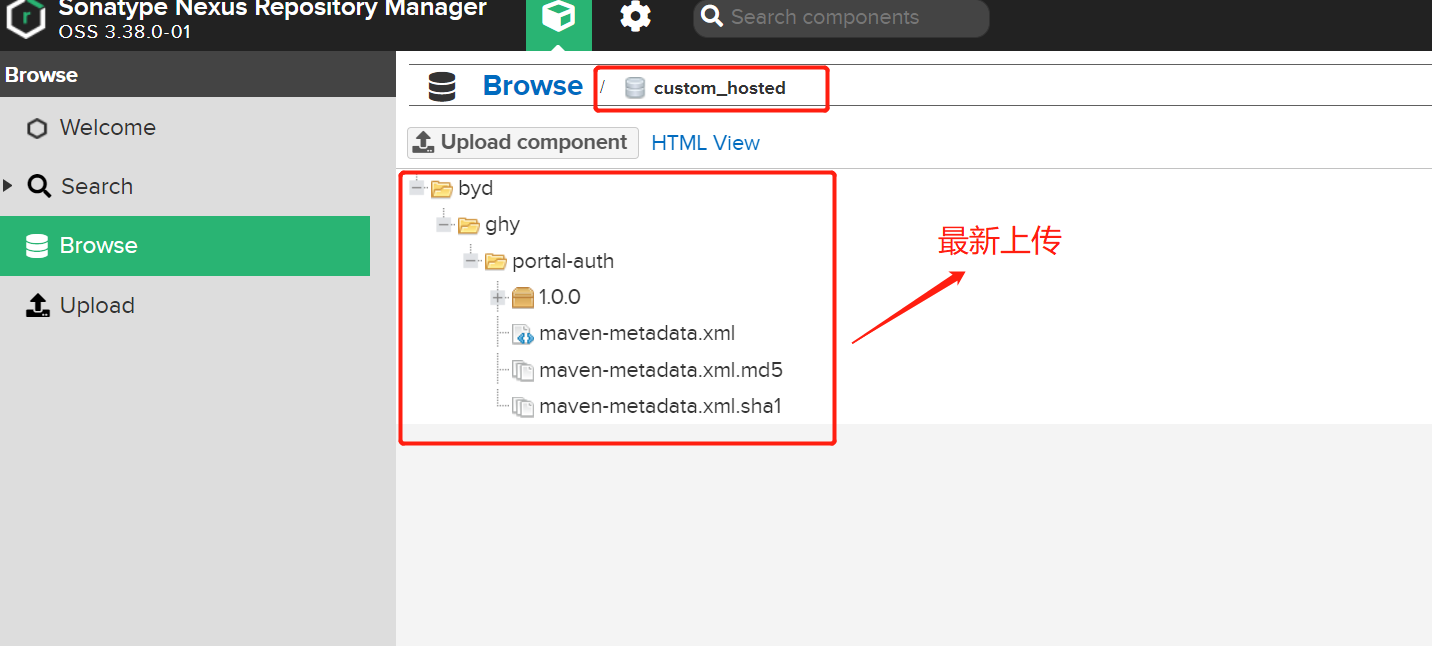
idea部署jar包到私服
maven的setting.xml文件配置
在servers标签里配置
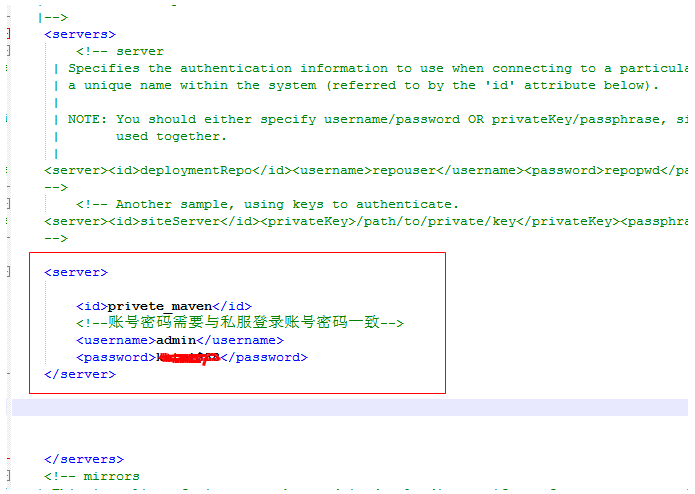
<server>
    <id>privete_maven</id>
    <!--账号密码需要与私服登录账号密码一致-->
    <username>admin</username>
    <password>123456</password>
</server>
在项目的pom.xml文件增加 这里的ID要和上面的ID对应

<distributionManagement>
    <repository>
        <id>privete_maven</id>
        <name>Nexus Release Repository</name>
        <url>http://192.168.1.2:8083/nexus/repository/maven-releases/</url>
    </repository>
</distributionManagement>
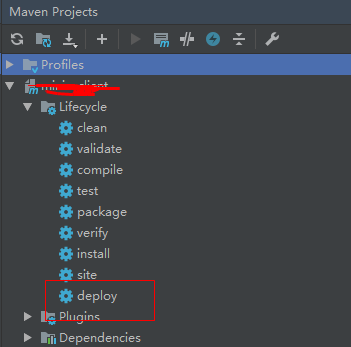
然后点击deploy
deploy部署jar包到私服
- release和snapshots jar包区别
SNAPSHOT版本代表不稳定(快照版本),还在处于开发阶段,随时都会有变化。
当上传同样的版本号jar包的时候,SNAPSHOT会在版本号的后面自动追加一串新的数字,即日志标签,
nexus会根据日志标签区分出不同的版本,在maven引用时,如果使用的是snapshot版本,
重新导入maven的时候,会去私库拉取最新上传的代码。

RELEASE则代表稳定的版本(发布版本),一般上线后都会改用RELEASE版本。
也就是说1.0,2.0这样的版本只能有一个,也就是说当前版本号下,不可能出现不同的jar。
- 创建snapshot仓库
可以在nexus上添加一个snapshot仓库,专门用于存放snapshot版本的jar包。snapshot仓库也是hosted类型的,创建方式和hosted repository类型一样。创建好后,加入到组仓库里面就可以了。

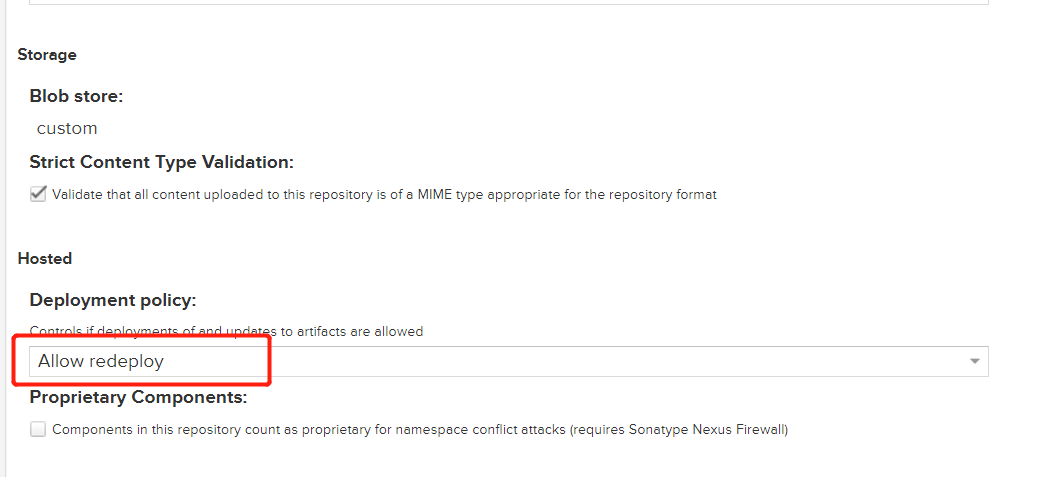
一定要选择Deployment Policy为allow redeploy
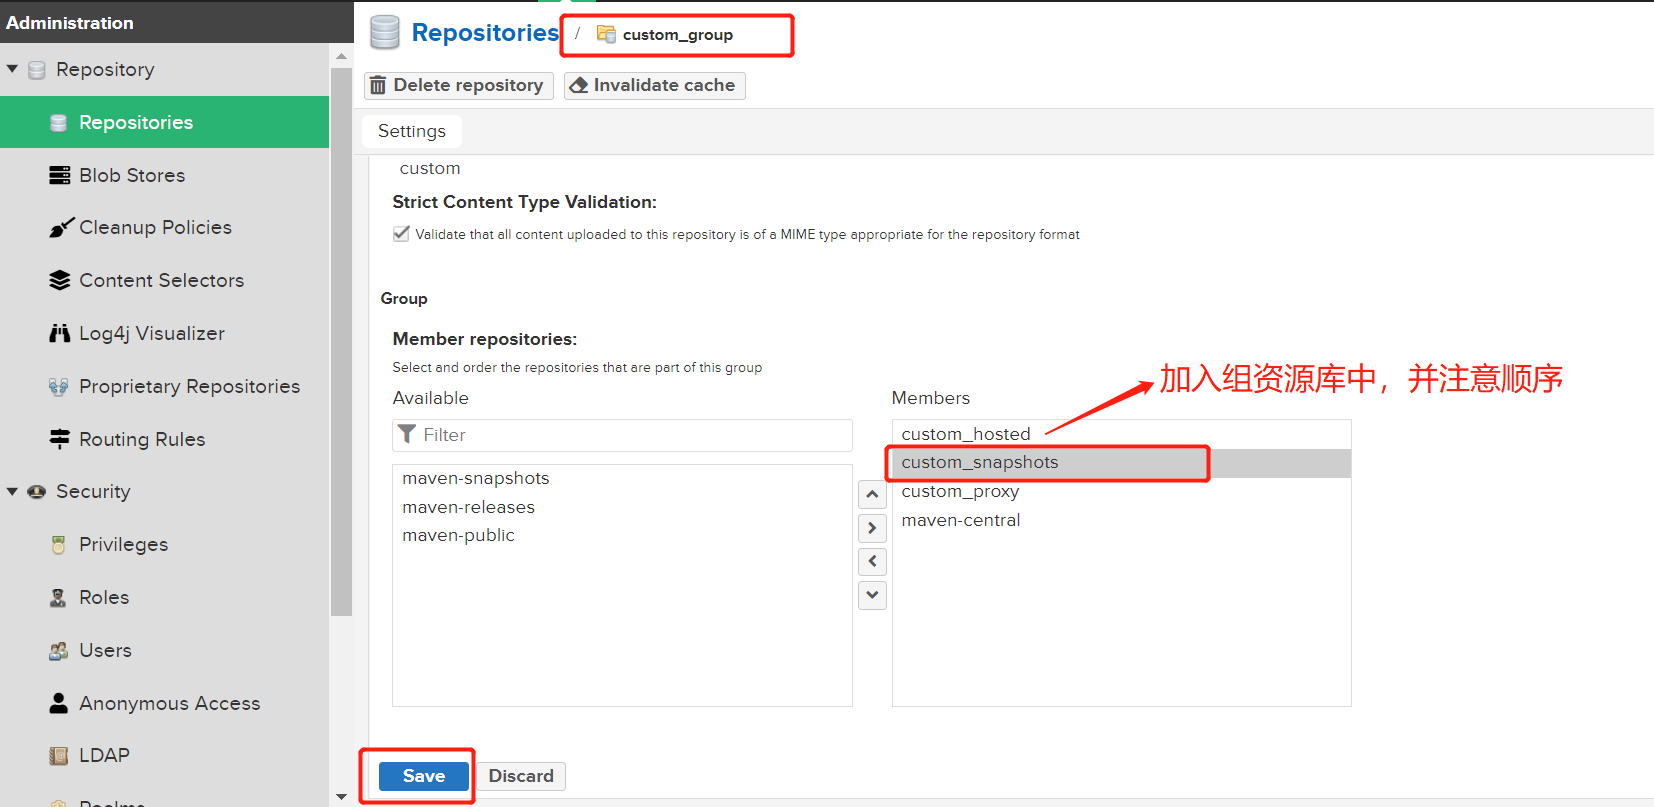
- 同样的操作,创建Release类型的仓库,并加入到组中
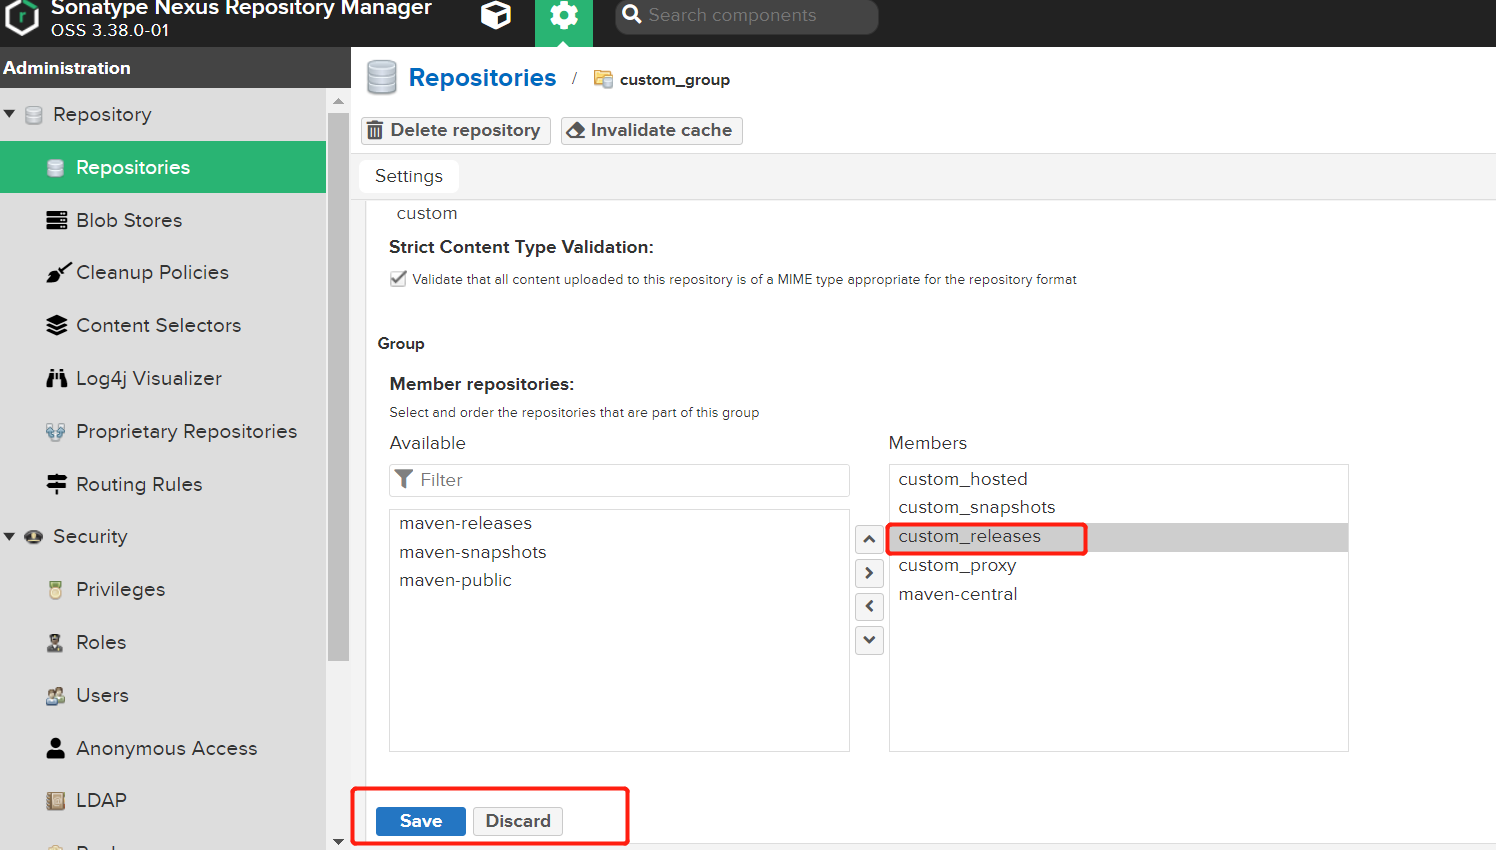
项目pom.xml文件配置
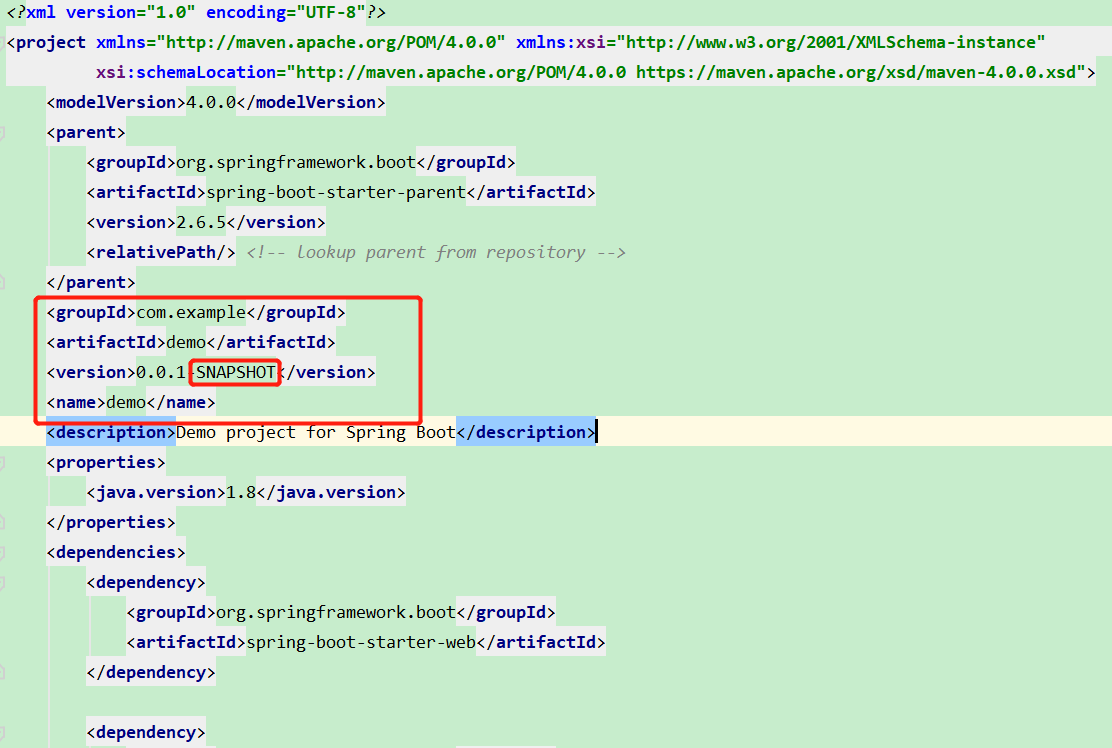
可以在项目的pom文件中设置具体的relaeses库和snapshots库。如果当前项目的版本号的后缀名中带着-SNAPSHOT,类似
***-SNAPSHOT ,就会将项目jar包提交到snapshots库中,没有带-SNAPSHOT的话会提交releases库中。
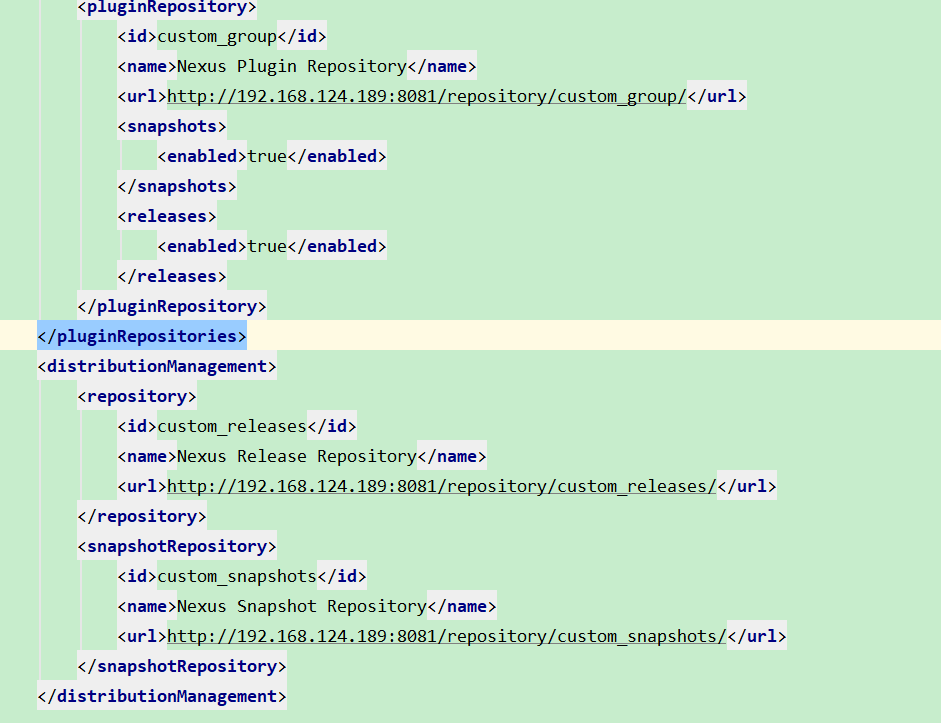
在pom.xml文件中配置 distributionManagement 节点如下,在项目中执行deploy命令后,jar包将会被上传到nexus中。
setting.xml中配置
<server>
    <id>custom_snapshots</id>
    <username>admin</username>
    <password>admin123</password>
</server>
<server>
    <id>custom_releases</id>
    <username>admin</username>
    <password>admin123</password>
</server>
pom.xml配置
    <repositories>
        <repository>
            <id>custom_group</id>
            <name>Nexus Repository</name>
            <url>http://192.168.124.189:8081/repository/custom_group/</url>
            <snapshots>
                <enabled>true</enabled>
            </snapshots>
            <releases>
                <enabled>true</enabled>
            </releases>
        </repository>
    </repositories>
    <pluginRepositories>
        <pluginRepository>
            <id>custom_group</id>
            <name>Nexus Plugin Repository</name>
            <url>http://192.168.124.189:8081/repository/custom_group/</url>
            <snapshots>
                <enabled>true</enabled>
            </snapshots>
            <releases>
                <enabled>true</enabled>
            </releases>
        </pluginRepository>
    </pluginRepositories>
<!--项目分发信息,在执行mvn deploy后表示要发布的位置。有了这些信息就可以把网站部署到远程服务器或者把构件jar等部署到远程仓库。 -->
    <distributionManagement>
        <repository><!--部署项目产生的构件到远程仓库需要的信息 -->
            <id>custom_releases</id><!-- 此处id和settings.xml的id保持一致 -->
            <name>Nexus Release Repository</name>
            <url>http://192.168.124.189:8081/repository/custom_releases/</url>
        </repository>
        <snapshotRepository><!--构件的快照部署到哪里?如果没有配置该元素,默认部署到repository元素配置的仓库,参见distributionManagement/repository元素 -->
            <id>custom_snapshots</id><!-- 此处id和settings.xml的id保持一致 -->
            <name>Nexus Snapshot Repository</name>
            <url>http://192.168.124.189:8081/repository/custom_snapshots/</url>
        </snapshotRepository>
    </distributionManagement>
默认地,maven编译打包不会下载SNAPSHOT版本的jar包,所以还需要在pom.xml文件中配置支持下载snapshot版本jar包。
mvn clean deploy -Dmaven.test.skip=true
- idea 控制台执行报
Unknown lifecycle phase ".test.skip=true". You must specify a valid lifecycle phase or a goal in the format错误解决
因为 idea 默认是使用 PowerShell 来运行命令,而在 PowerShell 下,参数 -Dmaven.test.skip=true 没有被正确地识别
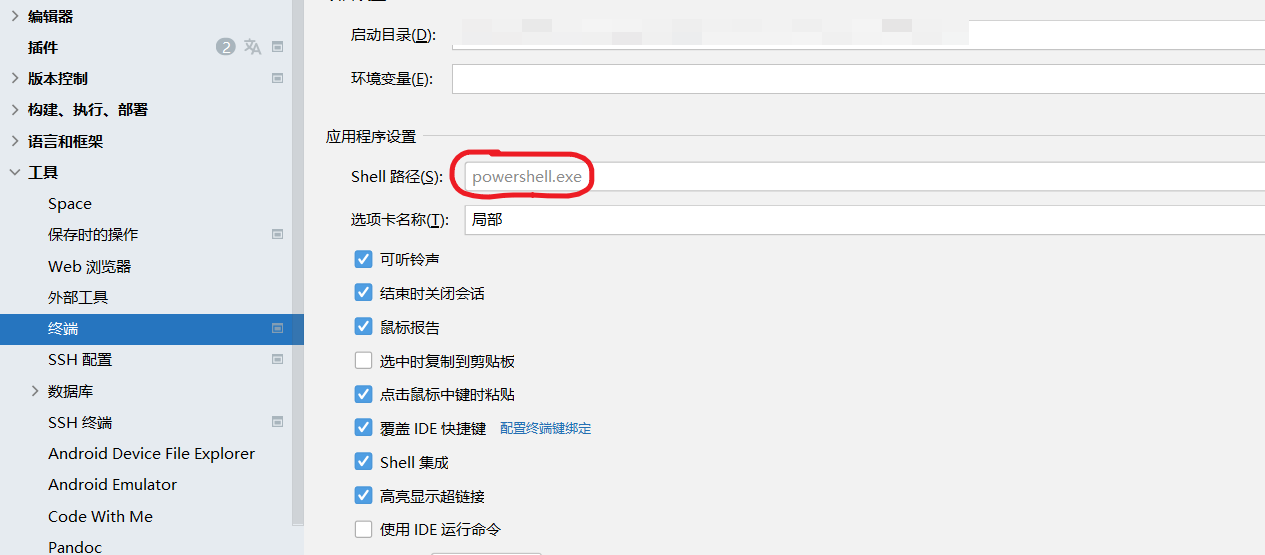
此时运行命令为 mvn package '-Dmaven.test.skip=true'
也可以选择将 IntelliJ IDEA 的终端设置成 CMD 模式(Command Prompt)

不建议这样做,因为 PowerShell 比原始的 CMD 要强大
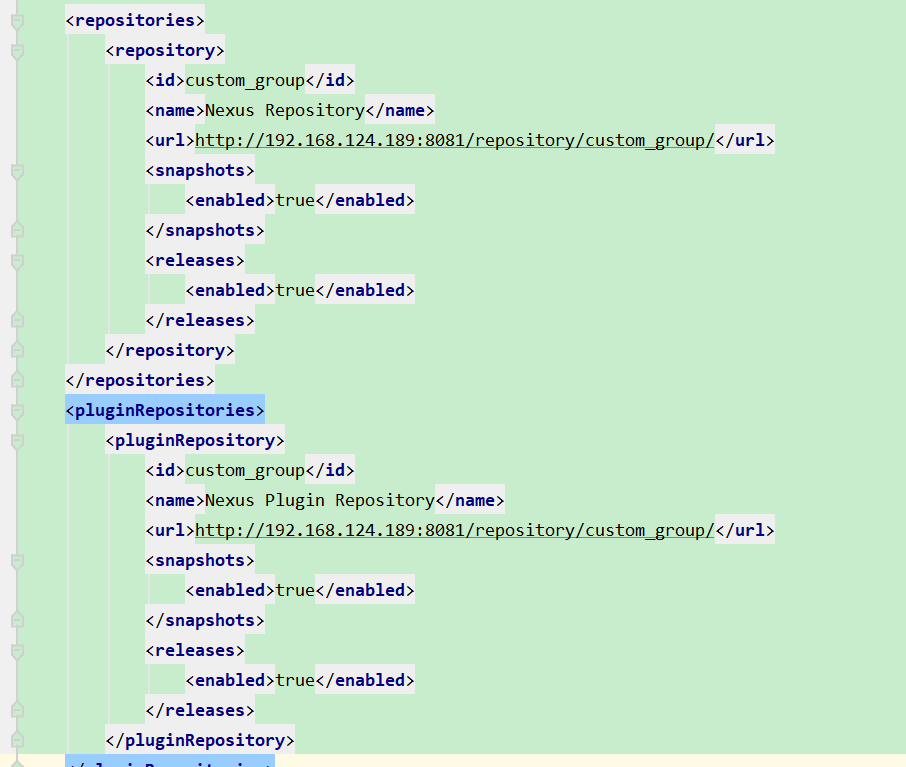
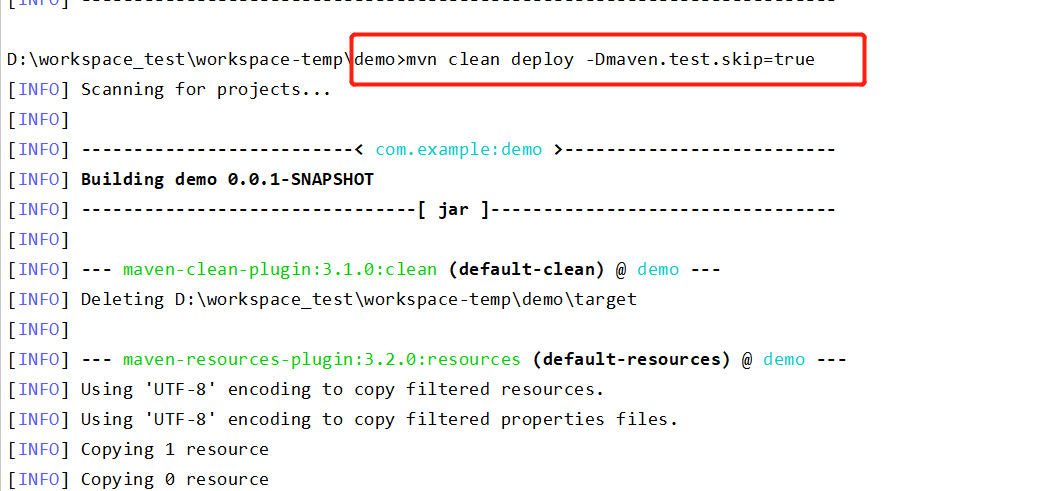
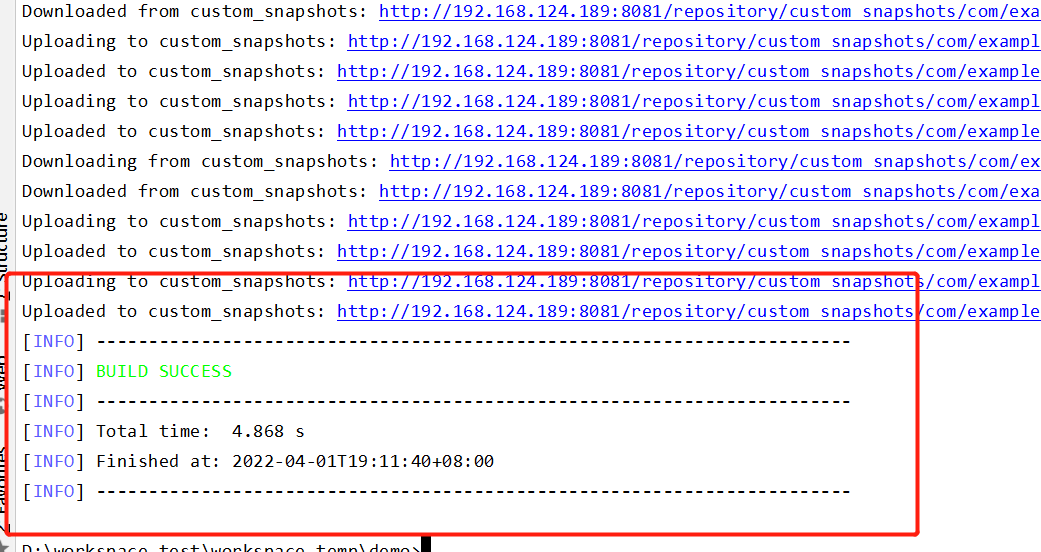
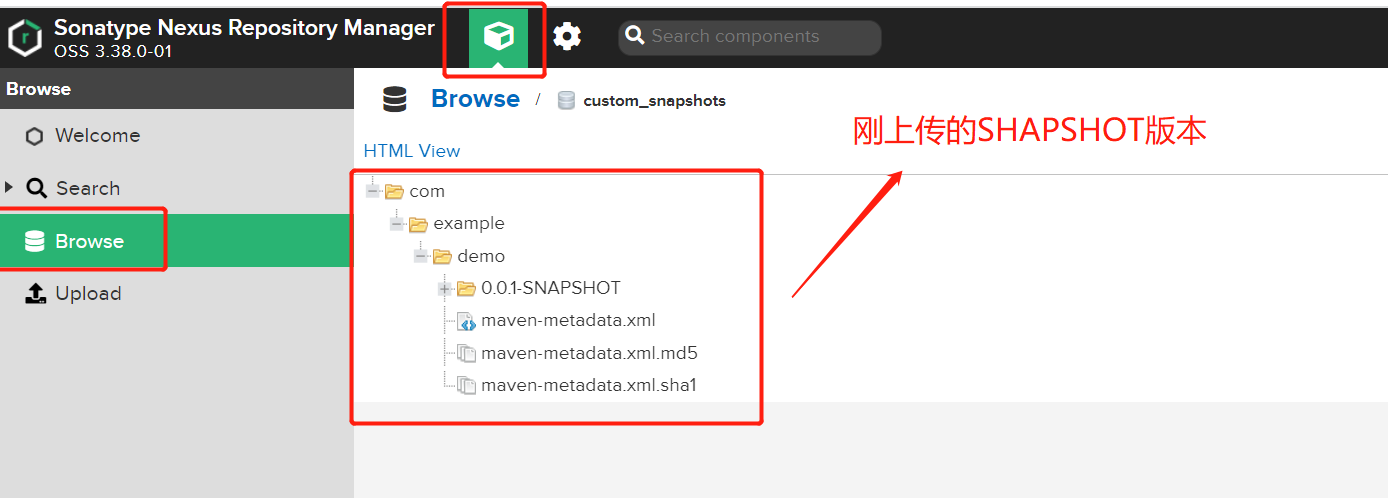
至此,nexus搭建完毕,支持本地部署依赖jar包
问题
- maven deploy 失败,报
Could not transfer artifact com.xxxx.javasdk:xxx-java:pom:0.0.1 from/to releases (https://xxxx/repository/maven-public/): Transfer failed for https://xxxxxx-java-0.0.1.pom 405 PUT错误
推送到哪个版本是 artifactId 结尾决定的,如果是 xxxxx-java-SNAPSHOT 就推送到snapshot快照仓库,反之就推送到release正式仓库
修改前:
<groupId>com.xxxxx.javasdk</groupId>
<name>xxxxx-java</name>
<artifactId>xxxxx-java</artifactId>
<version>0.0.1</version>
将 version 内容修改为 :
0.0.1-SNAPSHOT即可正常使用,snapshot快照仓库用于保存开发过程中的不稳定版本,release正式仓库则是用来保存稳定的发行版本。定义为快照版本,只需要在pom文件中在该模块的 version 后加上 -SNAPSHOT 即可(注意这里必须得是大写)
- nexus.log日志中报错内容如下
UNKNOWN com.sonatype.nexus.plugins.outreach.internal.outreach.SonatypeOutreach - Could not download page bundle
java.net.SocketException: Network is unreachable (connect failed)

解决:
-
访问Nexus管理站点,我这里是 http://192.168.124.184:8081,进入后,用管理员帐号登录。
-
点击 下图中上面的按钮,然后选择左侧Capabilities,然后点击右侧的 Outreach:Management
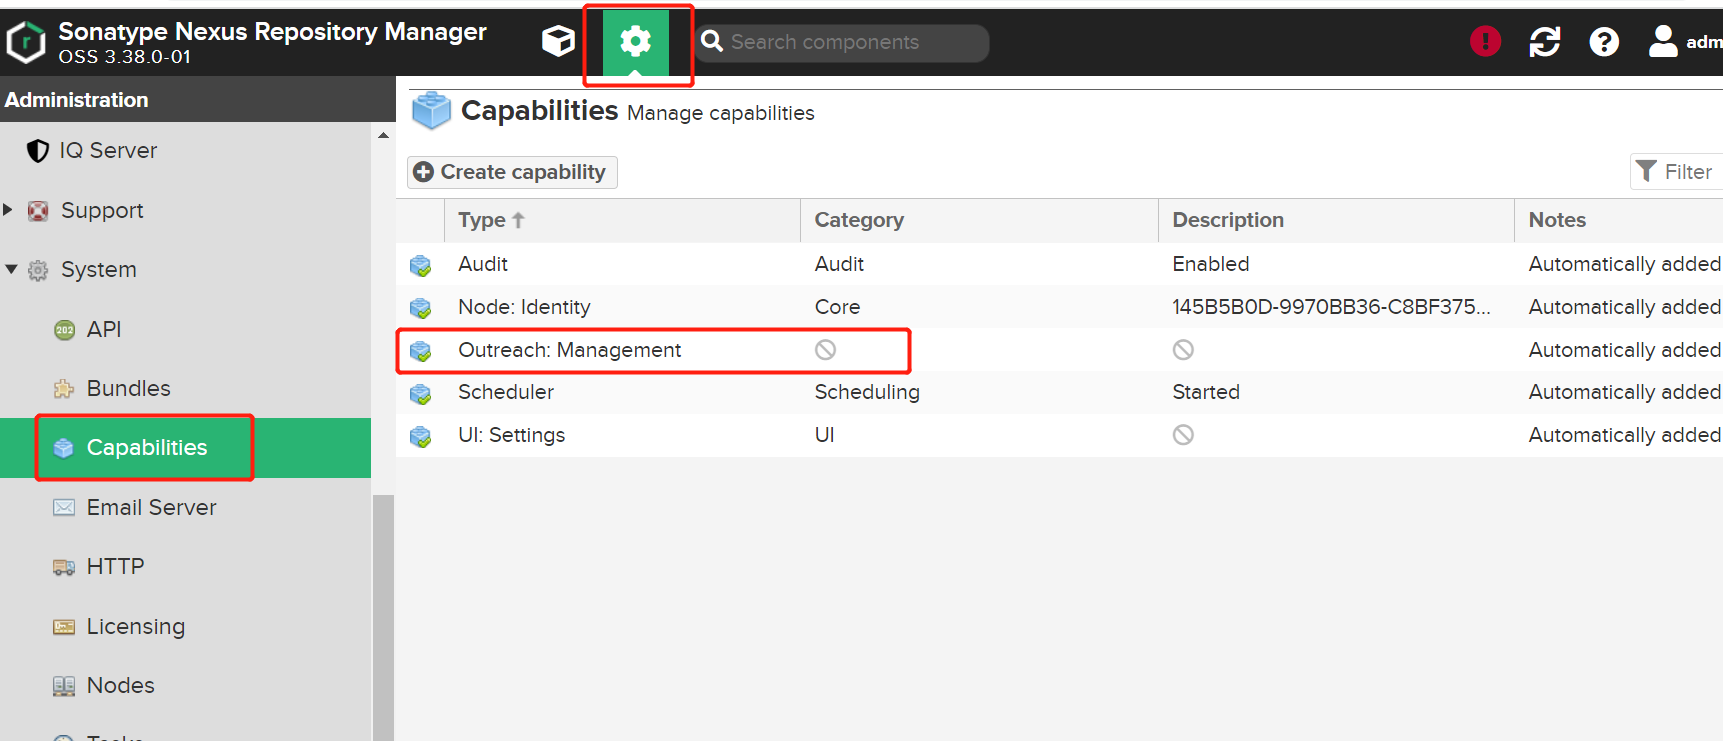
点击【disable】按钮,关闭Outreach服务

或者给Outreach设定新的URL,可以在标签页 Settings 中的 Override Outreach Content URL项中设定。Nexus支持的URL有如下三个:
http://links.sonatype.com and https://links.sonatype.com
http://download.sonatype.com and https://download.sonatype.com
http://sonatype-download.global.ssl.fastly.net and https://sonatype-download.global.ssl.fastly.net
参考链接:
https://blog.csdn.net/BThinker/article/details/123688143
http://wjhsh.net/pxblog-p-14943245.html

