SpringBoot使用thymeleaf+vue
因为 layui 下架了,虽然在 gitee 上面仍可以下载 layui ,现在 vue 很火爆,所以就尝试在thymeleaf里面使用vue
- 准备样式资源和资源
引入vue.js
<!-- 使用最新版本 -->
<script src="https://cdn.jsdelivr.net/npm/vue@2.6.14/dist/vue.js"></script>
<!-- 使用明确的版本号和构建文件 -->
<script src="https://cdn.jsdelivr.net/npm/vue@2.6.14"></script>
<!-- 使用原生 ES Modules -->
<script type="module">
  import Vue from 'https://cdn.jsdelivr.net/npm/vue@2.6.14/dist/vue.esm.browser.js'
</script>
引入 element-ui
<!-- 引入样式 -->
<link rel="stylesheet" href="https://unpkg.com/element-ui/lib/theme-chalk/index.css">
<!-- 引入组件库 -->
<script src="https://unpkg.com/element-ui/lib/index.js"></script>
element-ui 默认图标找不到:
进入 目录 https://unpkg.com/browse/element-ui@2.15.6/lib/theme-chalk/ 把fonts文件夹引入到element-ui同级目录下
- 使用
目录结构

登录界面
<!DOCTYPE html>
<!--<html lang="en" xmlns:th="http://www.thymeleaf.org">-->
<html lang="en">
<head>
<meta charset="UTF-8">
<title>用户登录</title>
<link rel="stylesheet" href="../css/element-ui.css">
<link rel="stylesheet" href="../css/fonts/iconfont.css">
<!-- 引入样式 -->
<!-- <link rel="stylesheet" href="https://unpkg.com/element-ui/lib/theme-chalk/index.css">-->
<style lang="scss">
body {
width: 1920px;
position: static;
background: url(../img/loginbg.png) 0% 0% / cover no-repeat;
}
#app {
width: 100%;
height: 100%;
}
/*登录框居中*/
.login_center {
width: 500px;
height: 400px;
position: absolute;
left: 50%;
top: 50%;
margin: -250px 0 0 -250px;
border-radius: 10px;
background-color: white;
}
.login_header {
width: 100%;
height: 20%;
background-color: #1890ff;
text-align: center;
color: white;
}
/*输入框宽度*/
.el-input {
width: 80%;
}
</style>
</head>
<body>
<div id="app">
<div class="login_center">
<div class="login_header">
<span style="font-size: 35px;font-weight: bold">管理系统</span><br>
<span style="font-size: 25px;">用户登录</span>
</div>
<div>
<el-form style="margin-top: 10%;" :model="ruleForm" status-icon :rules="rules" ref="ruleForm"
label-width="100px"
class="demo-ruleForm">
<el-form-item label="账号" prop="username">
<el-input prefix-icon="icon-al-zhanghao" v-model="ruleForm.username"
autocomplete="off"></el-input>
</el-form-item>
<el-form-item label="密码" prop="password">
<el-input prefix-icon="icon-al-mima" type="password" v-model="ruleForm.password"
autocomplete="off"></el-input>
</el-form-item>
<el-form-item style="text-align: center;">
<el-button style="margin-left: -100px;width: 200px;margin-top: 5%;" type="primary"
@click="submitForm('ruleForm')">
登录
</el-button>
</el-form-item>
</el-form>
</div>
</div>
</div>
</body>
<script src="../js/vue-2.js"></script>
<script src="../js/element-ui.js"></script>
<script src="../js/axios.js"></script>
<script src="../js/index/index.js"></script>
<!--<script src="../js/interceptor/interceptor.js"></script>-->
<!--<script src="https://cdn.jsdelivr.net/npm/vue@2.6.14"></script>-->
<!--<!– 引入组件库 –>-->
<!--<script src="https://unpkg.com/element-ui/lib/index.js"></script>-->
<script>
new Vue({
el: '#app',
data() {
var validateUsername = (rule, value, callback) => {
if (value === '') {
callback(new Error('请输入账号'));
} else {
callback();
}
};
var validatePassword = (rule, value, callback) => {
if (value === '') {
callback(new Error('请输入密码'));
} else {
callback();
}
};
return {
ruleForm: {
username: '',
password: ''
},
rules: {
username: [
{validator: validateUsername, trigger: 'blur'}
],
password: [
{validator: validatePassword, trigger: 'blur'}
]
}
};
},
created() {
},
methods: {
//表单提交
submitForm(formName) {
this.$refs[formName].validate((valid) => {
if (valid) {
const data = {client_id: "user-client", client_secret: 'stu_system', grant_type: 'password'};
Object.assign(data, this.ruleForm);
console.log(data)
login(data).then(res => {
if (res.status == 200) {
this.$notify.success("登录成功");
//存入token
window.sessionStorage.setItem("access_token", res.data.access_token);
window.sessionStorage.setItem("refresh_token", res.data.refresh_token);
//跳转到首页
window.location.href = "/pages/homePage";
} else {
this.$notify.info("登录失败");
return false;
}
});
}
});
},
}
})
</script>
</html>
- 在外部定义axios请求和axios拦截器全局添加请求头
外部定义请求方法 index.js
function login(data) {
    return axios({
        url: '/oauth/token',
        method: 'post',
        params: data,
        headers: {
            'Content-Type': 'application/x-www-form-urlencoded;charset=UTF-8'
        },
    });
}
拦截器 interceptor.js
// 请求拦截器
axios.interceptors.request.use(
    config => {
        // 从本地存储中获取token,携带在header中
        const token = sessionStorage.access_token;
        token && (config.headers.Authorization = 'Bearer' + ' ' + token);
        return config;
    },
    error => {
        return Promise.error(error);
    }
)
- thymeleaf 模块使用
定义两个组件,test01.html test02.html
<!DOCTYPE html>
<html lang="en" xmlns:th="http://www.thymeleaf.org">
<head>
    <meta charset="UTF-8">
    <title>test01</title>
</head>
<body>
<div th:fragment="showCenter">
    this is test01 page
</div>
</body>
</html>
在 homePage.html 里面使用
<!DOCTYPE html>
<!--<html lang="en" xmlns:th="http://www.thymeleaf.org"
                    xmlns:v-on="http://www.w3.org/1999/xhtml"
                    xmlns:sec="http://www.thymeleaf.org/thymeleaf-extras-springsecurity5">-->
<html lang="en" xmlns:th="http://www.thymeleaf.org">
<head>
    <meta charset="UTF-8">
    <title>首页</title>
    <link rel="stylesheet" href="../css/element-ui.css">
    <style>
        body {
            width: 1920px;
            position: static;
            margin: 0px;
        }

        #app {
            width: 100%;
            height: 100%;
        }

    </style>
</head>
<body>
<div id="app">
    <el-menu
            :default-active="activeIndex"
            class="el-menu-demo"
            mode="horizontal"
            @select="handleSelect"
            background-color="#545c64"
            text-color="#fff"
            active-text-color="#ffd04b">
        <el-menu-item index="1">处理中心</el-menu-item>
        <el-menu-item index="2">消息中心</el-menu-item>
        <el-submenu index="3">
            <template slot="title">我的工作台</template>
            <el-menu-item index="2-1">选项1</el-menu-item>
            <el-menu-item index="2-2">选项2</el-menu-item>
            <el-menu-item index="2-3">选项3</el-menu-item>
            <el-submenu index="2-4">
                <template slot="title">选项4</template>
                <el-menu-item index="2-4-1">选项1</el-menu-item>
                <el-menu-item index="2-4-2">选项2</el-menu-item>
                <el-menu-item index="2-4-3">选项3</el-menu-item>
            </el-submenu>
        </el-submenu>
        <el-menu-item style="float: right;" index="6"><a href="https://www.ele.me" target="_blank">订单管理</a>
        </el-menu-item>
    </el-menu>
    <div style="width: 100%;height: 500px;border: 1px solid red;">
        <div v-if="activeIndex==1">
            <div th:replace="~{fragment/test01.html :: showCenter}"></div>
        </div>
        <div v-if="activeIndex==2">
            <div th:replace="~{fragment/test02.html :: showCenter}"></div>
        </div>

    </div>
</div>
</body>
<script src="../js/vue-2.js"></script>
<script src="../js/element-ui.js"></script>
<script src="../js/axios.js"></script>
<script src="../js/vue-router.js"></script>
<script th:inline="javascript">
    //这里写thymeleaf的js
</script>
<script>
    new Vue({
        el: '#app',
        data() {
            return {
                activeIndex: '1',
            };
        },
        created() {
        },
        methods: {
            handleOpen(key, keyPath) {
                console.log(key, keyPath);
            },
            handleSelect(key, keyPath) {
                console.log(key, keyPath);
                this.activeIndex = key;
            }
        }
    });
</script>
</html>
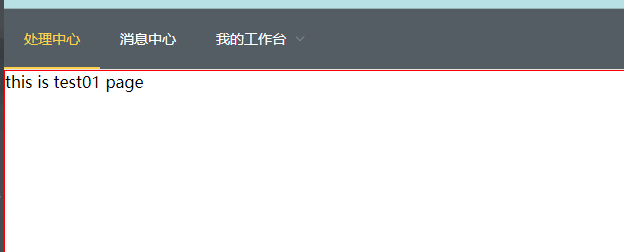
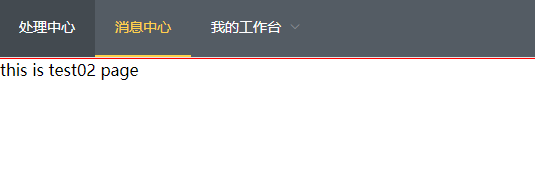
效果
- 在element-ui使用阿里图标方法
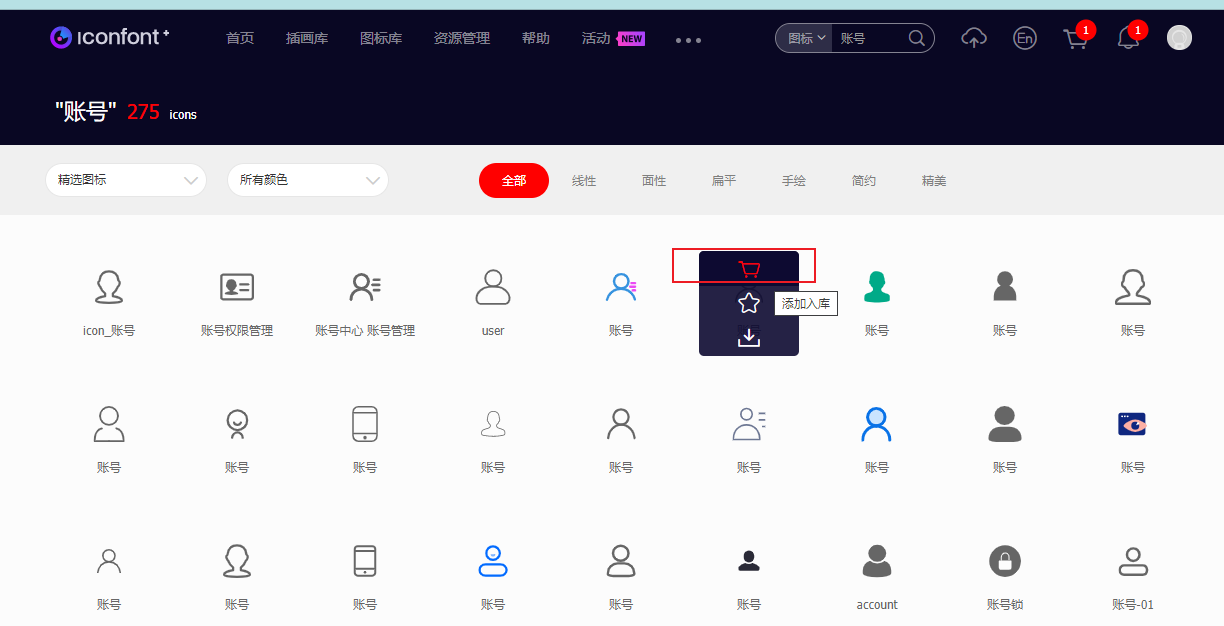
进入 阿里图标库 https://www.iconfont.cn/home/index

搜索自己想要的图标,点击加入库

点击添加至项目,选择项目没有项目选择新建项目选择添加

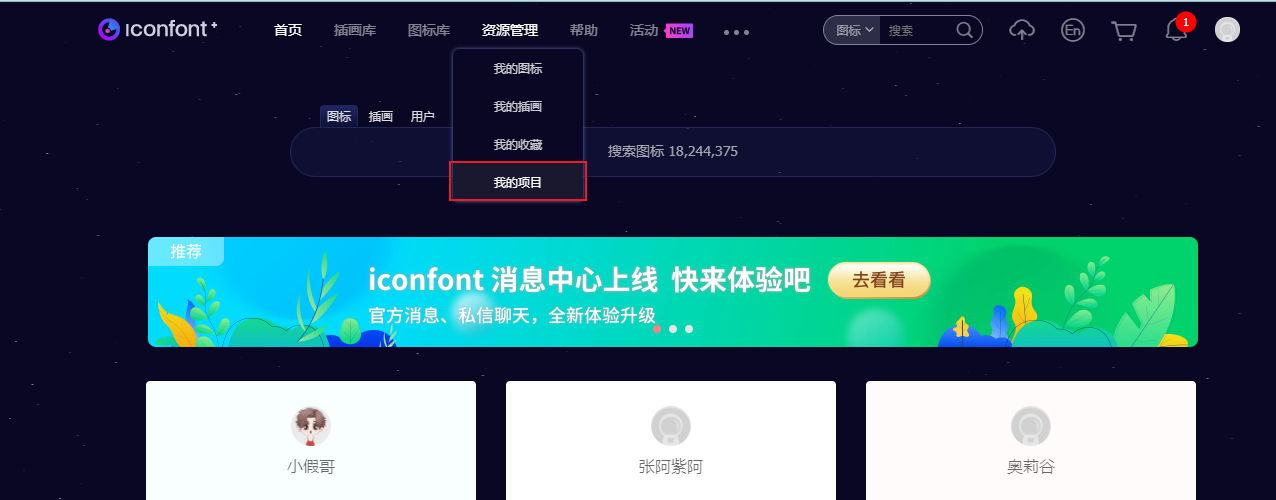
点击 资源管理-->我的项目
点击项目设置,将前缀设置自己想要的保存
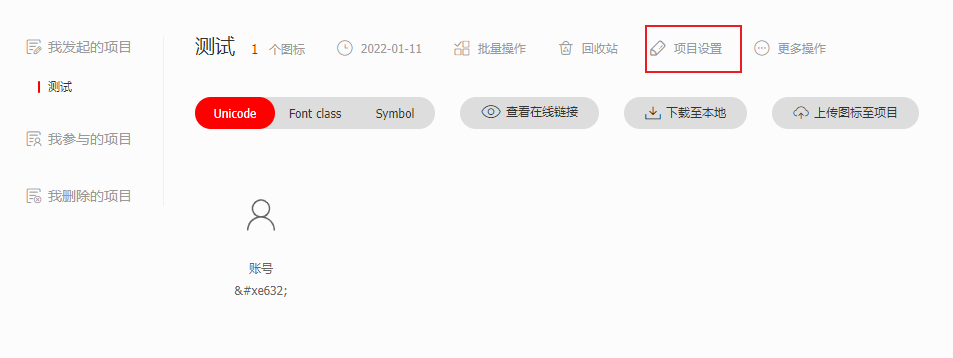
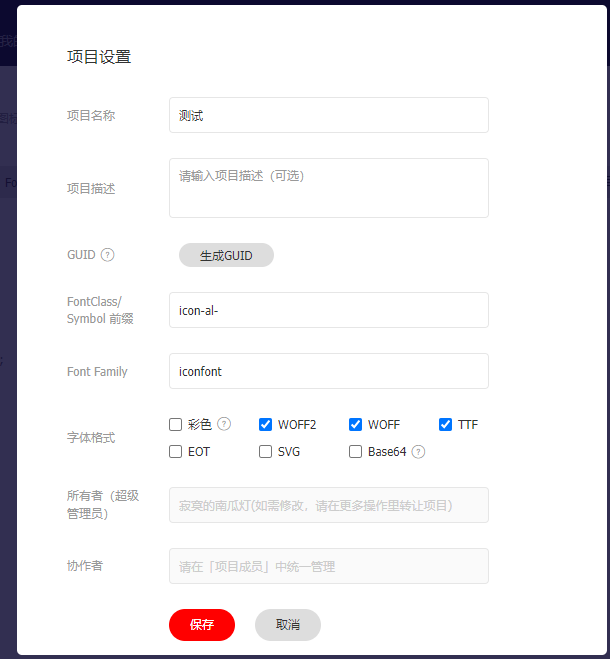
点击生成的链接,另存为css文件,将css文件引入

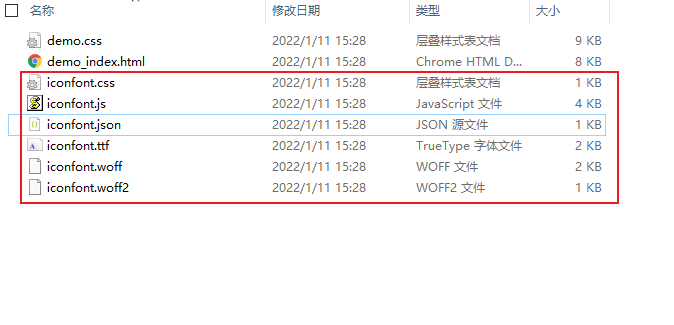
或者下载到本地将下面文件引入到 fonts 文件夹
使用


