Swagger配置和使用
1、在pom.xml中引入依赖
<!--引入swagger2的jar包-->
<dependency>
    <groupId>io.springfox</groupId>
    <artifactId>springfox-swagger2</artifactId>
    <version>2.9.2</version>
</dependency>
<!--引入接口文档页面UI-->
<dependency>
    <groupId>io.springfox</groupId>
    <artifactId>springfox-swagger-ui</artifactId>
    <version>2.9.2</version>
</dependency>
2、新建config文件夹,编写配置文件SwaggerConfig.java
package com.gxa.config;

import io.swagger.annotations.Api;
import org.springframework.context.annotation.Bean;
import org.springframework.context.annotation.Configuration;
import springfox.documentation.builders.ApiInfoBuilder;
import springfox.documentation.builders.PathSelectors;
import springfox.documentation.builders.RequestHandlerSelectors;
import springfox.documentation.service.ApiInfo;
import springfox.documentation.spi.DocumentationType;
import springfox.documentation.spring.web.plugins.Docket;
import springfox.documentation.swagger2.annotations.EnableSwagger2;

@Configuration    //依赖Spring注解
@EnableSwagger2
public class SwaggerConfig {

    @Value("${spring.application.name}")
    private String app;

    @Bean    //依赖Spring注解
    public Docket createRestApi() {
        return new Docket(DocumentationType.SWAGGER_2)   //使用2.0版本
                .enable(true)          // 是否禁用swagger,可以控制全局
                .useDefaultResponseMessages(false)   //是否使用默认响应消息的方式
                .apiInfo(apiInfo())        //创建api的基本信息,如:标题、描述、版本等
                .select()
                .apis(RequestHandlerSelectors.withClassAnnotation(Api.class))
                .paths(PathSelectors.any())
                .build();
                // .build().pathMapping("/resource-" + app); // 生成api接口请求项目地址
    }

    // 接口隔离
    @Bean
    public Docket restApi2() {
        return new Docket(DocumentationType.SWAGGER_2)
                .groupName("其他接口")
                .apiInfo(apiInfo("Other APIs", "2.0"))
                .select()
                .apis(RequestHandlerSelectors.basePackage("com.zl.other"))
                .paths(PathSelectors.regex("/other.*"))
                .build();
    }
    private ApiInfo apiInfo() {
        return new ApiInfoBuilder()
                .title("swagger API文档")
                .description("测试接口文档")
                .version("1.0")
                .build();
    }
}
使用了nginx作为服务器的反向代理后,swagger自动生成的接口文档可能请求路径不对,需要加上nginx的代理地址,用 .build().pathMapping("nginx代理路径");
或者在配置文件 application.properties 里面添加配置:server.servlet.context-path= nginx的代理路径(eg:/resource-data),然后再nginx配置文件里配置代理需要加上 nginx 代理路径(eg:/resource-data/)
3、在SpringMVC配置文件中配置扫描
    <!--  扫描com.gxa.config  -->
    <context:component-scan base-package="com.gxa.config"/>
4、swagger使用
4.1、@Api 修饰整个类,描述Controller的作用
@Controller
@Api(value = "用户数据test",tags = "用户数据接口API")  //value:代表代码级描述   tags:代表页面级描述
public class Swagger2Controller {
     // code..
}
在http://localhost:8080/swagger-ui.html地址中查看下面的效果

4.2、@ApiOperation 修饰一个方法,代表此方法为一个接口,通常配合Spring MVC RequestMapping注解一起放置在方法上
@RequestMapping(value = "/think_login",method = RequestMethod.GET)
@ApiOperation(value = "用户登录接口",notes = "验证用户的用户名和密码",httpMethod = "post", response = String.class)  //value:代表页面级接口描述 notes:代表完整接口说明 httpMethod:可选参数,代表调用的请求方式,但是swagger标示的spring mvc的请求方式,所以即使像上面那样,定义为了post,但是Spring MVC是get请求,在接口文档中还是呈现get方式。 response:可选参数,代表返回类型
public String login() {
    return "login";
}

4.3、@ApiImplicitParam 代表一个请求参数的定义,通常与Spring MVC的RequestParam注解一起使用。
@RequestMapping(value = "/think_login",method = RequestMethod.GET)
@ApiOperation(value = "用户登录接口",notes = "验证用户的用户名和密码",httpMethod = "post", response = String.class)
@ApiImplicitParam(name = "username",value = "用户名",required = true,dataType = "String",paramType = "query")
/**
 * name:代表页面级描述参数名
 * value:代表页面级描述参数说明
 * required:代表页面级展示是否一定要输入
 * dataType:代表页面级描述参数类型
 * paramType:
 *      path 以地址的形式提交数据
 *      query 直接跟参数完成自动映射赋值
 *      body 以流的形式提交 仅支持POST
 *      header 参数在request headers 里边提交
 *      form 以form表单的形式提交 仅支持POST
 * 被这个paramType坑过,当发POST请求的时候,当时接受的整个参数,不论用body还是query,后台都会报Body Missing错误;这个参数和SpringMvc中的@RequestBody冲突,去掉paramType对接口测试并没有影响。
 */
public String login(@RequestParam(name = "username") String username) {
    return username;
}

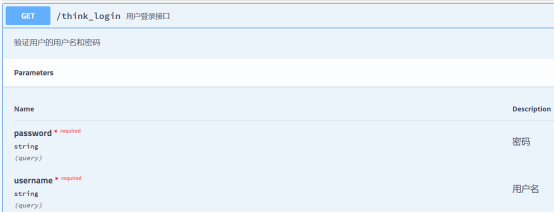
4.4、@ApiImplicitParams 代表多个形式参数的表达形式,内部是数组形态,可以包含多个@ApiImplicitParam注解标记
@RequestMapping(value = "/think_login",method = RequestMethod.GET)
@ApiOperation(value = "用户登录接口",notes = "验证用户的用户名和密码",httpMethod = "post", response = String.class)
@ApiImplicitParams({
        @ApiImplicitParam(name = "username",value = "用户名",paramType = "query",dataType = "String",required = true),
        @ApiImplicitParam(name = "password",value = "密码",paramType = "query",dataType = "String",required = true)
})
public String login(@RequestParam(name = "username") String username,
                    @RequestParam(name = "password") String password) {
    return username + password;
}
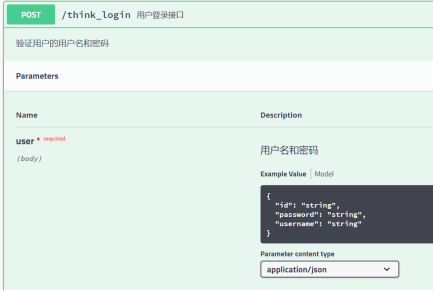
4.5、@ApiParam Json参数的定义,通常与Spring MVC的@RequestBody配合使用,特别注意的是,因为是json参数请求,所以接收方式必须是post,如果使用的get可能会出现错误
@RequestMapping(value = "/think_login",method = RequestMethod.POST)
@ResponseBody
@ApiOperation(value = "用户登录接口",notes = "验证用户的用户名和密码",httpMethod = "post", response = String.class)
public User login(@RequestBody @ApiParam(name = "user",value = "用户名和密码",required = true) User user) {  //name:页面级描述形式参数的名字 value:页面级形参的说明 required:页面级标注是否一定需要输入
    return user;
}
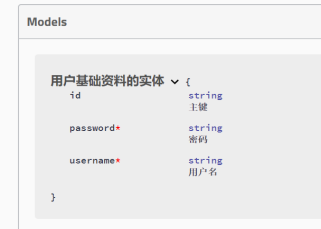
4.6、@ApiModel和@ApiProperty @ApiModel和@ApiModelProperty两个注解的作用是在接口文档中显示出entity的完整信息,@ApiModel定义在entity类名上,@ApiModelProperty定义在entity的属性上
@ApiModel(value = "用户基础资料的实体")
public class ThinkUser {
    @ApiModelProperty(name = "id",notes = "主键",dataType = "String",required = false) //name:页面级字段名展示 notes:页面级字段名描述 dataType:页面级字段类型说明 required:页面级标注字段是否必输
    private String id;

    @ApiModelProperty(name = "username",notes = "用户名",dataType = "String",required = true)
    private String username;

    @ApiModelProperty(name = "password",notes = "密码",dataType = "String",required = true)
    private String password;
// set、get方法...
}
注意:@ApiModel 的 value 值必须唯一,否则可能会出现参数混乱问题,解决办法:使用 @ApiModel(description = “用户基础资料的实体”)
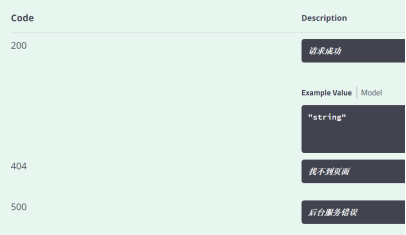
4.7、@ApiResponses和@ApiResponse @ApiResponses包含多个响应结果模板,在此注解中加入@ApiResponse代表每一种响应格式
@RequestMapping(value = "/think_login",method = RequestMethod.POST)
@ResponseBody
@ApiOperation(value = "用户登录接口",notes = "验证用户的用户名和密码",httpMethod = "post", response = String.class)
@ApiResponses({
        @ApiResponse(code=200,message="请求成功"),     //code:代表状态码 message:代表说明信息
        @ApiResponse(code=404,message="找不到页面"),
        @ApiResponse(code=500,message="后台服务错误")
})
public ThinkUser login(@RequestBody @ApiParam(name = "thinkUser",value = "用户名和密码",required = true) ThinkUser thinkUser) {
    return thinkUser;
}
4.8、@ApiIgnore 定义在类上,代表此类会swagger忽略,定义在方法上,代表此方法被swagger忽略

5、禁用Swagger 禁用处理最直接的方式,就是剥离掉所有的swagger注解
第一步,修改enable属性为false,这样处理以后再次访问swagger-ui.html页面会发现,页面中的信息不会暴露了,但是还会有对应的响应存在,这样会让外部人员知道此系统使用了swagger技术,如下效果:

@Bean
public Docket createRestApi() {
    return new Docket(DocumentationType.SWAGGER_2)
            .enable(false)          // 是否禁用swagger
            .useDefaultResponseMessages(false)
            .apiInfo(apiInfo())
            .select()
            .apis(RequestHandlerSelectors.withClassAnnotation(Api.class))
            .paths(PathSelectors.any())
            .build();
}
第二步,增加一个controller,管理/swagger-ui路径,如下:
@RequestMapping("/swagger-ui")
public String getUserInfo() {
    return "error";
}
这样的方式,是利用了spring mvc优先查找requestMapping的功能,这样相当于拦截了这个页面路径的请求,这时候访问swagger-ui.html当出现错误提示,可以根据业务需要修改为任意的跳转地址。

问题:如果配置了统一返回集,返回的值是特殊值,例如 Map<String,Object> ,在swagger文档里显示响应结果是Object,没有中文注释
解决:使用 swagger2 的 @ApiResponses 注解
    @ApiResponses({
        @ApiResponse(code = 200,message = "ok",response = User.class)
    })
注意:@ApiResponse 注解必须在 @ApiResponses 注解里才会生效
如果配置了 @ApiResponses 之后没有生效可以添加配置
springfox.documentation.swagger.use-model-v3=false
springfox:
  documentation:
    swagger:
      use-model-v3: false
swagger 问题
springboot整和knife4j出现错误:
knife4j是为Java MVC框架集成Swagger生成Api文档的增强解决方案
Knife4j的前身是swagger-bootstrap-ui,前身swagger-bootstrap-ui是一个纯swagger-ui的ui皮肤项目
一开始项目初衷是为了写一个增强版本的swagger的前端ui,但是随着项目的发展,面对越来越多的个性化需求,不得不编写后端Java代码以满足新的需求,在swagger-bootstrap-ui的1.8.5~1.9.6版本之间,采用的是后端Java代码和Ui都混合在一个Jar包里面的方式提供给开发者使用.这种方式虽说对于集成swagger来说很方便,只需要引入jar包即可,但是在微服务架构下显得有些臃肿。
因此,项目正式更名为knife4j,取名knife4j是希望她能像一把匕首一样小巧,轻量,并且功能强悍,更名也是希望把她做成一个为Swagger接口文档服务的通用性解决方案,不仅仅只是专注于前端Ui前端.
swagger-bootstrap-ui的所有特性都会集中在knife4j-spring-ui包中,并且后续也会满足开发者更多的个性化需求.
主要的变化是,项目的相关类包路径更换为com.github.xiaoymin.knife4j前缀,开发者使用增强注解时需要替换包路径
后端Java代码和ui包分离为多个模块的jar包,以面对在目前微服务架构下,更加方便的使用增强文档注解(使用SpringCloud微服务项目,只需要在网关层集成UI的jar包即可,因此分离前后端)
目前主要支持以Java开发为主,并且是依赖于大环境下使用的Spring MVC、Spring Boot、Spring Cloud框架.
当然,Knife4j也提供了离线版本,只要是符合Swagger的OpenAPI版本的规范JSON,都可以通过简单的配置进行适配,离线版本是适合于任何语言中使用Swagger的,非常的灵活、方便。
导包
<dependency>
    <groupId>com.github.xiaoymin</groupId>
    <artifactId>knife4j-spring-boot-starter</artifactId>
    <version>2.0.8</version>
</dependency>
<dependency>
    <groupId>org.projectlombok</groupId>
    <artifactId>lombok</artifactId>
</dependency>
配置
package com.eric.springbootknife4j.config;

import org.springframework.context.annotation.Bean;
import org.springframework.context.annotation.Configuration;
import springfox.documentation.builders.ApiInfoBuilder;
import springfox.documentation.builders.ParameterBuilder;
import springfox.documentation.builders.PathSelectors;
import springfox.documentation.builders.RequestHandlerSelectors;
import springfox.documentation.schema.ModelRef;
import springfox.documentation.service.ApiInfo;
import springfox.documentation.service.Contact;
import springfox.documentation.service.Parameter;
import springfox.documentation.spi.DocumentationType;
import springfox.documentation.spring.web.plugins.Docket;
import springfox.documentation.swagger2.annotations.EnableSwagger2WebMvc;

import java.util.ArrayList;
import java.util.List;

/**
 * Swagger2配置信息
 * 这里分了两组显示
 * 第一组是api,当作用户端接口
 * 第二组是admin,当作后台管理接口
 * 也可以根据实际情况来减少或者增加组
 *
 * @author Eric
 * @date 2023-07-30 22:17
 */

@Configuration
@EnableSwagger2WebMvc
public class Swagger2Config {

    private ApiInfo adminApiInfo() {
        return new ApiInfoBuilder()
                .title("Eric-SpringBoot整合Knife4j-API文档")
                .description("本文档描述了SpringBoot如何整合Knife4j")
                .version("1.0")
                .contact(new Contact("Eric", "https://blog.csdn.net/weixin_47316183?type=blog", "ericsyn@foxmail.com"))
                .build();
    }

    private ApiInfo webApiInfo() {
        return new ApiInfoBuilder()
                .title("Eric-SpringBoot整合Knife4j-API文档")
                .description("本文档描述了SpringBoot如何整合Knife4j")
                .version("1.0")
                .contact(new Contact("Eric", "https://blog.csdn.net/weixin_47316183?type=blog", "ericsyn@foxmail.com"))
                .build();
    }

    /**
     * 第一组:api
     * @return
     */
    @Bean
    public Docket webApiConfig() {
        List<Parameter> pars = new ArrayList<>();
        ParameterBuilder tokenPar = new ParameterBuilder();
        tokenPar.name("userId")
                .description("用户token")
                //.defaultValue(JwtHelper.createToken(1L, "admin"))
                .defaultValue("1")
                .modelRef(new ModelRef("string"))
                .parameterType("header")
                .required(false)
                .build();
        pars.add(tokenPar.build());

        Docket webApi = new Docket(DocumentationType.SWAGGER_2)
                .groupName("用户端接口")
                .apiInfo(webApiInfo())
                .select()
                //只显示api路径下的页面
                .apis(RequestHandlerSelectors.basePackage("com.eric.springbootknife4j"))
                .paths(PathSelectors.regex("/api/.*"))
                .build()
                .globalOperationParameters(pars);
        return webApi;
    }

    /**
     * 第二组:admin
     * @return
     */
    @Bean
    public Docket adminApiConfig() {
        List<Parameter> pars = new ArrayList<>();
        ParameterBuilder tokenPar = new ParameterBuilder();
        tokenPar.name("adminId")
                .description("用户token")
                .defaultValue("1")
                .modelRef(new ModelRef("string"))
                .parameterType("header")
                .required(false)
                .build();
        pars.add(tokenPar.build());

        Docket adminApi = new Docket(DocumentationType.SWAGGER_2)
                .groupName("后台接口")
                .apiInfo(adminApiInfo())
                .select()
                //只显示admin路径下的页面
                .apis(RequestHandlerSelectors.basePackage("com.eric.springbootknife4j"))
                .paths(PathSelectors.regex("/admin/.*"))
                .build()
                .globalOperationParameters(pars);
        return adminApi;
    }

}
放行Knife4j请求
@Configuration
public class WebMvcConfig extends WebMvcConfigurationSupport {

    @Override
    public void addResourceHandlers(ResourceHandlerRegistry registry) {
        registry.addResourceHandler("doc.html").addResourceLocations("classpath:/META-INF/resources/");
        registry.addResourceHandler("/webjars/**").addResourceLocations("classpath:/META-INF/resources/webjars/");
    }

}
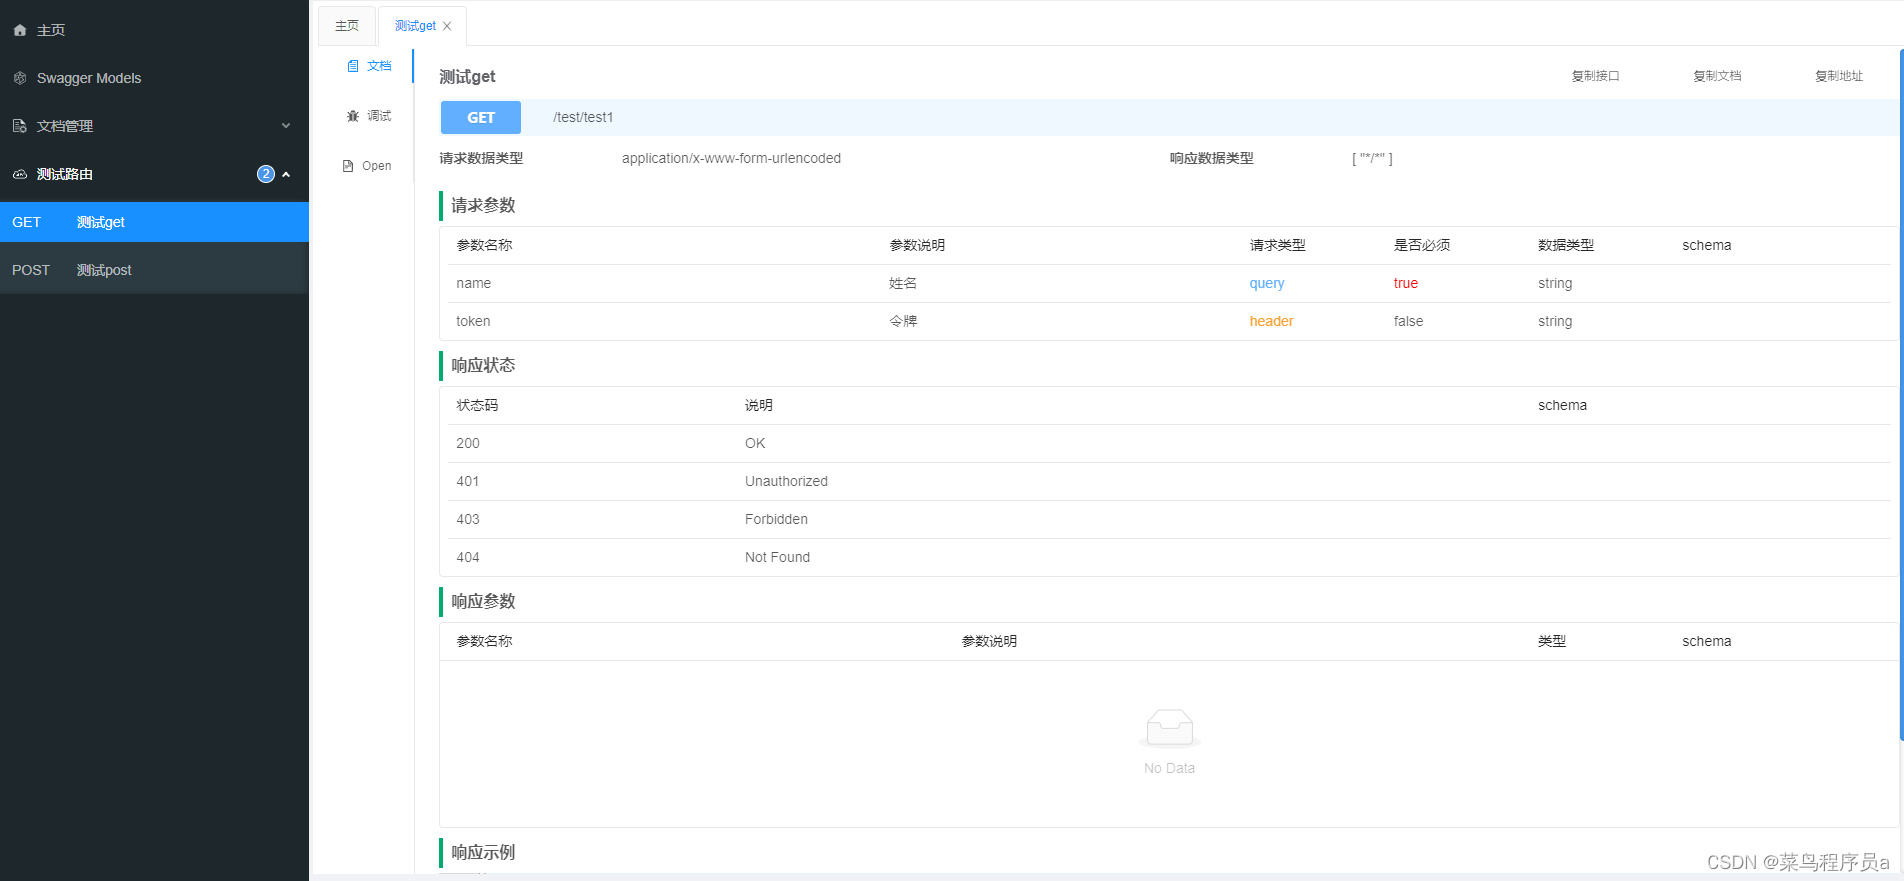
用法和swagger一样
页面:
整合出现错误:
org.springframework.context.ApplicationContextException: Failed to start bean ‘documentationPluginsBootstrapper’; nested exception is java.lang.NullPointerException
解决方法: 在配置文件中注入一个Bean
/**
 * 解决springboot整合knife4j的问题
 * @return
 */
@Bean
public static BeanPostProcessor springfoxHandlerProviderBeanPostProcessor() {
    return new BeanPostProcessor() {

        @Override
        public Object postProcessAfterInitialization(Object bean, String beanName) throws BeansException {
            if (bean instanceof WebMvcRequestHandlerProvider || bean instanceof WebFluxRequestHandlerProvider) {
                customizeSpringfoxHandlerMappings(getHandlerMappings(bean));
            }
            return bean;
        }

        private <T extends RequestMappingInfoHandlerMapping> void customizeSpringfoxHandlerMappings(List<T> mappings) {
            List<T> copy = mappings.stream()
                    .filter(mapping -> mapping.getPatternParser() == null)
                    .collect(Collectors.toList());
            mappings.clear();
            mappings.addAll(copy);
        }

        @SuppressWarnings("unchecked")
        private List<RequestMappingInfoHandlerMapping> getHandlerMappings(Object bean) {
            try {
                Field field = ReflectionUtils.findField(bean.getClass(), "handlerMappings");
                field.setAccessible(true);
                return (List<RequestMappingInfoHandlerMapping>) field.get(bean);
            } catch (IllegalArgumentException | IllegalAccessException e) {
                throw new IllegalStateException(e);
            }
        }
    };
}

