Spring Boot 安全框架 Spring Security 入门(一)

1. 概述

基本上,在所有的开发的系统中,都必须做认证(authentication)和授权(authorization),以保证系统的安全性。这里引用一个网上有趣的例子:

FROM 《认证 (authentication) 和授权 (authorization) 的区别》

  • authentication [ɔ,θɛntɪ'keʃən] 认证
  • authorization [,ɔθərɪ'zeʃən] 授权

打飞机举例子:

  • 【认证】你要登机,你需要出示你的 passport 和 ticket,passport 是为了证明你张三确实是你张三,这就是 authentication。
  • 【授权】而机票是为了证明你张三确实买了票可以上飞机,这就是 authorization。

论坛举例子:

  • 【认证】你要登录论坛,输入用户名张三,密码 1234,密码正确,证明你张三确实是张三,这就是 authentication。
  • 【授权】再一 check 用户张三是个版主,所以有权限加精删别人帖,这就是 authorization 。

所以简单来说:认证解决“你是谁”的问题,授权解决“你能做什么”的问题。另外,在推荐阅读下《认证、授权、鉴权和权限控制》 文章,更加详细明确

在 Java 生态中,目前有 Spring Security 和 Apache Shiro 两个安全框架,可以完成认证和授权的功能。本文,我们先来学习下 Spring Security 。其官方对自己介绍如下:

FROM 《Spring Security 官网》

Spring Security is a powerful and highly customizable authentication and access-control framework. It is the de-facto standard for securing Spring-based applications.
Spring Security 是一个功能强大且高度可定制的身份验证和访问控制框架。它是用于保护基于 Spring 的应用程序。

Spring Security is a framework that focuses on providing both authentication and authorization to Java applications. Like all Spring projects, the real power of Spring Security is found in how easily it can be extended to meet custom requirements
Spring Security 是一个框架,侧重于为 Java 应用程序提供身份验证和授权。与所有 Spring 项目一样,Spring 安全性的真正强大之处,在于它很容易扩展以满足定制需求。

2. 快速入门

示例代码对应仓库:lab-01-springsecurity-demo 。

在本小节中,我们来快速入门下 Spring Security ,实现访问 API 接口时,需要首先进行登录,才能进行访问。

2.1 引入依赖

在 pom.xml 文件中,引入相关依赖。

<?xml version="1.0" encoding="UTF-8"?>
<project xmlns="http://maven.apache.org/POM/4.0.0" xmlns:xsi="http://www.w3.org/2001/XMLSchema-instance"
xsi:schemaLocation="http://maven.apache.org/POM/4.0.0 https://maven.apache.org/xsd/maven-4.0.0.xsd">
<modelVersion>4.0.0</modelVersion>
<parent>
<groupId>org.springframework.boot</groupId>
<artifactId>spring-boot-starter-parent</artifactId>
<version>2.4.1</version>
<relativePath/> <!-- lookup parent from repository -->
</parent>
<groupId>com.example.zq</groupId>
<artifactId>spring_security</artifactId>
<version>0.0.1-SNAPSHOT</version>
<name>spring_security</name>
<description>Demo project for Spring Boot</description>

<properties>
<java.version>1.8</java.version>
</properties>

<dependencies>
<dependency>
<groupId>org.springframework.boot</groupId>
<artifactId>spring-boot-starter-data-jpa</artifactId>
</dependency>
<dependency>
<groupId>org.springframework.boot</groupId>
<artifactId>spring-boot-starter-web</artifactId>
</dependency>
<dependency>
<groupId>org.springframework.boot</groupId>
<artifactId>spring-boot-devtools</artifactId>
<scope>runtime</scope>
<optional>true</optional>
</dependency>
<dependency>
<groupId>mysql</groupId>
<artifactId>mysql-connector-java</artifactId>
<scope>runtime</scope>
</dependency>
<dependency>
<groupId>org.projectlombok</groupId>
<artifactId>lombok</artifactId>
<optional>true</optional>
</dependency>
<dependency>
<groupId>org.springframework.boot</groupId>
<artifactId>spring-boot-starter-test</artifactId>
<scope>test</scope>
</dependency>
<!-- 实现对 Spring Security 的自动化配置 -->
<dependency>
<groupId>org.springframework.boot</groupId>
<artifactId>spring-boot-starter-security</artifactId>
</dependency>
</dependencies>

<build>
<plugins>
<plugin>
<groupId>org.springframework.boot</groupId>
<artifactId>spring-boot-maven-plugin</artifactId>
<configuration>
<excludes>
<exclude>
<groupId>org.projectlombok</groupId>
<artifactId>lombok</artifactId>
</exclude>
</excludes>
</configuration>
</plugin>
</plugins>
</build>

</project>


2.2 Application

创建 SpringSecurityApplication.java 类,配置 @SpringBootApplication 注解即可。代码如下:


2.3 配置文件

在 application.yml 中,添加 Spring Security 配置,如下:


spring:
# Spring Security 配置项,对应 SecurityProperties 配置类
security:
# 配置默认的 InMemoryUserDetailsManager 的用户账号与密码。
user:
name: user # 账号
password: user # 密码
roles: ADMIN # 拥有角色


#这里为了防止端口被占用,所以设置了一个端口号
server:
port: 8000
 
  • 在 spring.security 配置项,设置 Spring Security 的配置,对应 SecurityProperties 配置类。
  • 默认情况下,Spring Boot UserDetailsServiceAutoConfiguration 自动化配置类,会创建一个内存级别的 InMemoryUserDetailsManager Bean 对象,提供认证的用户信息。
    • 这里,我们添加了 spring.security.user 配置项,UserDetailsServiceAutoConfiguration 会基于配置的信息创建一个用户 User 在内存中。
    • 如果,我们未添加 spring.security.user 配置项,UserDetailsServiceAutoConfiguration 会自动创建一个用户名为 "user" ,密码为 UUID 随机的用户 User 在内存中。

2.4 AdminController

在 spring_security\controller\ 包路径下,创建 AdminController 类,提供管理员 API 接口。代码如下:
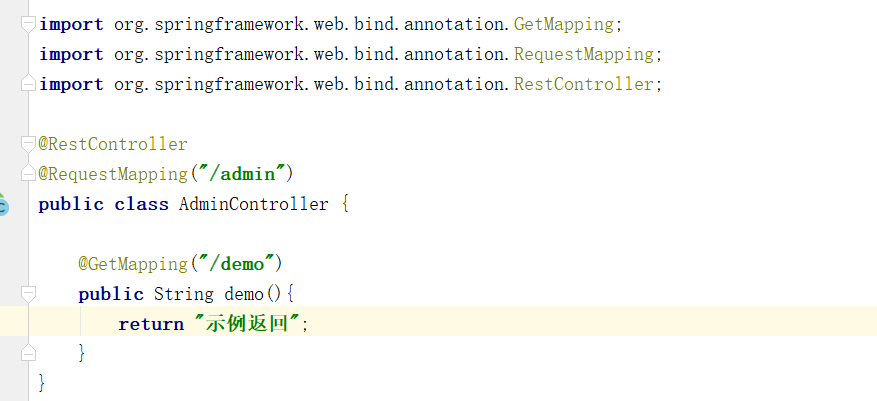


  • 这里,我们先提供一个 "/admin/demo" 接口,用于测试未登录时,会被拦截到登录界面

2.5 简单测试

执行 Application#main(String[] args) 方法,运行项目。

项目启动成功后,浏览器访问 http://127.0.0.1:8000/admin/demo 接口。因为未登录,所以被 Spring Security 拦截到登录界面。如下图所示:


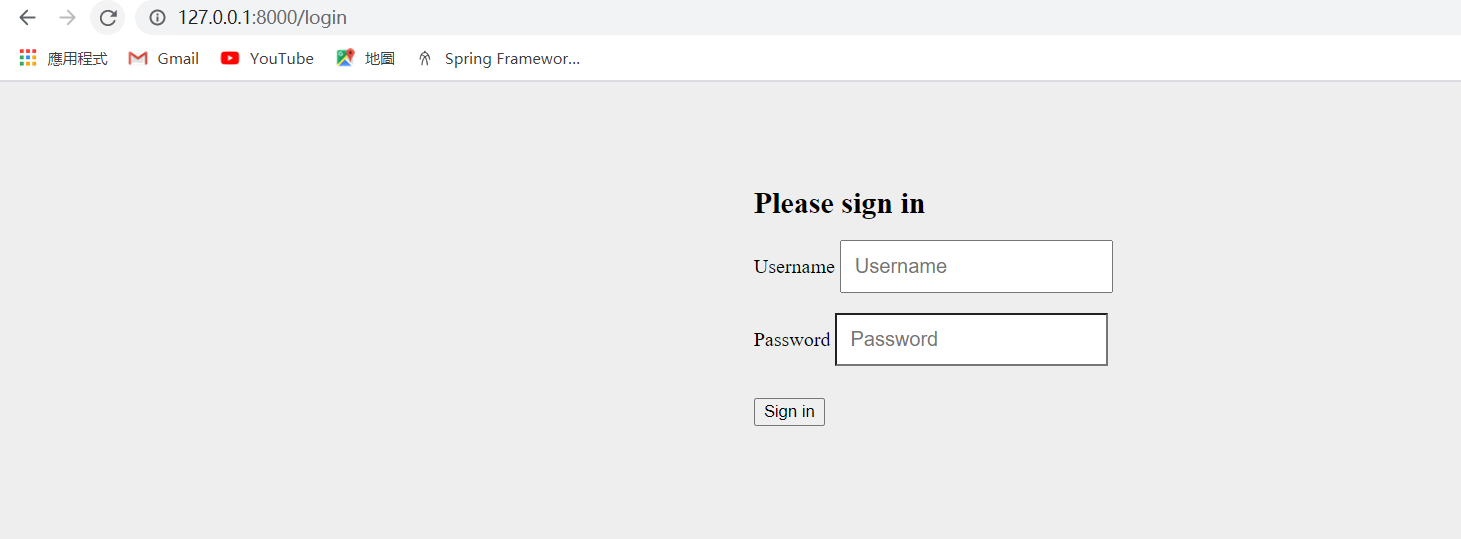
因为我们没有自定义登录界面,所以默认会使用 DefaultLoginPageGeneratingFilter 类,生成上述界面。

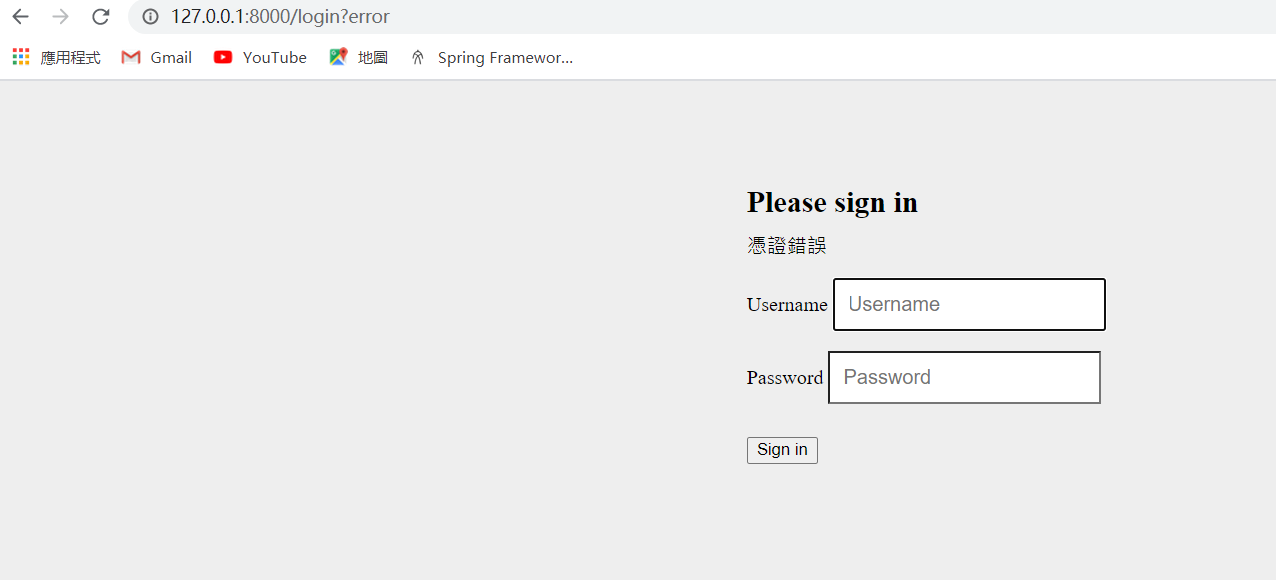
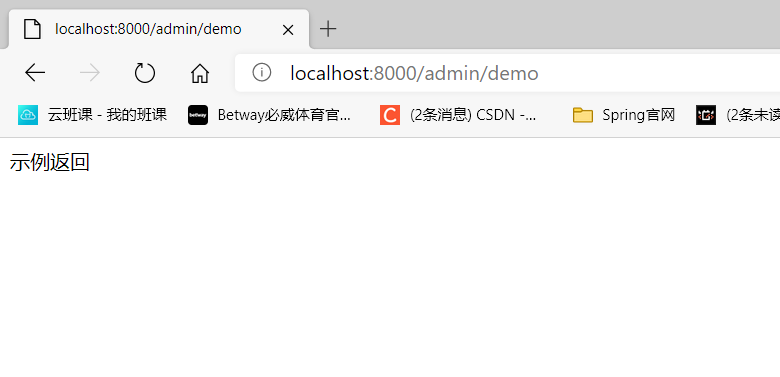
输入我们在「2.3 配置文件」中配置的「user/user」账号,进行登录。登录完成后,因为 Spring Security 会记录被拦截的访问地址,所以浏览器自动动跳转 http://127.0.0.1:8080/admin/demo 接口。访问结果如下图所示:


posted on 2021-01-18 22:43  茕茕孑立!  阅读(251)  评论(0)    收藏  举报