

SDN第七次上机实验
OpenDaylight
(1) 利用Mininet平台搭建下图所示网络拓扑,并连接OpenDaylight。
首先运用sudo mn --topo=single,3 --mac --controller=remote,ip=127.0.0.1,port=6633 --switch ovsk,protocols=OpenFlow10创建拓扑,再使用./distribution-karaf-0.6.4-Carbon/bin/karaf将拓扑链接到ODL平台
(2) 编写Python程序,调用OpenDaylight的北向接口下发指令删除s1上的流表数据。
 1 import requests
 2 from requests.auth import HTTPBasicAuth
 3 def http_delete(url):
 4     url= url
 5     headers = {'Content-Type':'application/json'}
 6     resp = requests.delete(url,headers=headers,auth=HTTPBasicAuth('admin', 'admin'))
 7     return resp
 8
 9 if __name__ == "__main__":
10     url='http://127.0.0.1:8181/restconf/config/opendaylight-inventory:nodes/node/openflow:1/'
11     with open('114test.json') as f:
12         jstr = f.read(
13     resp = http_delete(url)
14     print (resp.content)
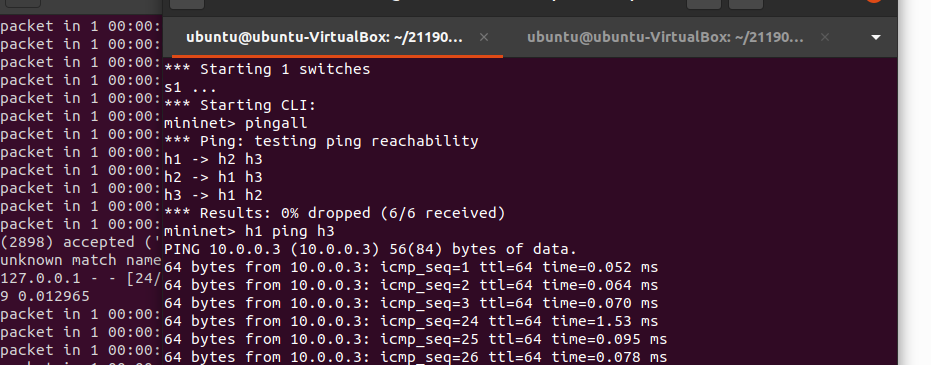
(3) 编写Python程序,调用OpenDaylight的北向接口下发硬超时流表,实现拓扑内主机h1和h3网络中断20s。
 1 import requests
 2 from requests.auth import HTTPBasicAuth
 3 def http_put(url,jstr):
 4     url= url
 5     headers = {'Content-Type':'application/json'}
 6     resp = requests.put(url,jstr,headers=headers,auth=HTTPBasicAuth('admin', 'admin'))
 7     return resp
 8
 9 if __name__ == "__main__":
10     url='http://127.0.0.1:8181/restconf/config/opendaylight-inventory:nodes/node/openflow:1/flow-node-inventory:table/0/flow/1'
11     with open('114test.json') as f:
12         jstr = f.read()
13     resp = http_put(url,jstr)
14     print (resp.content)
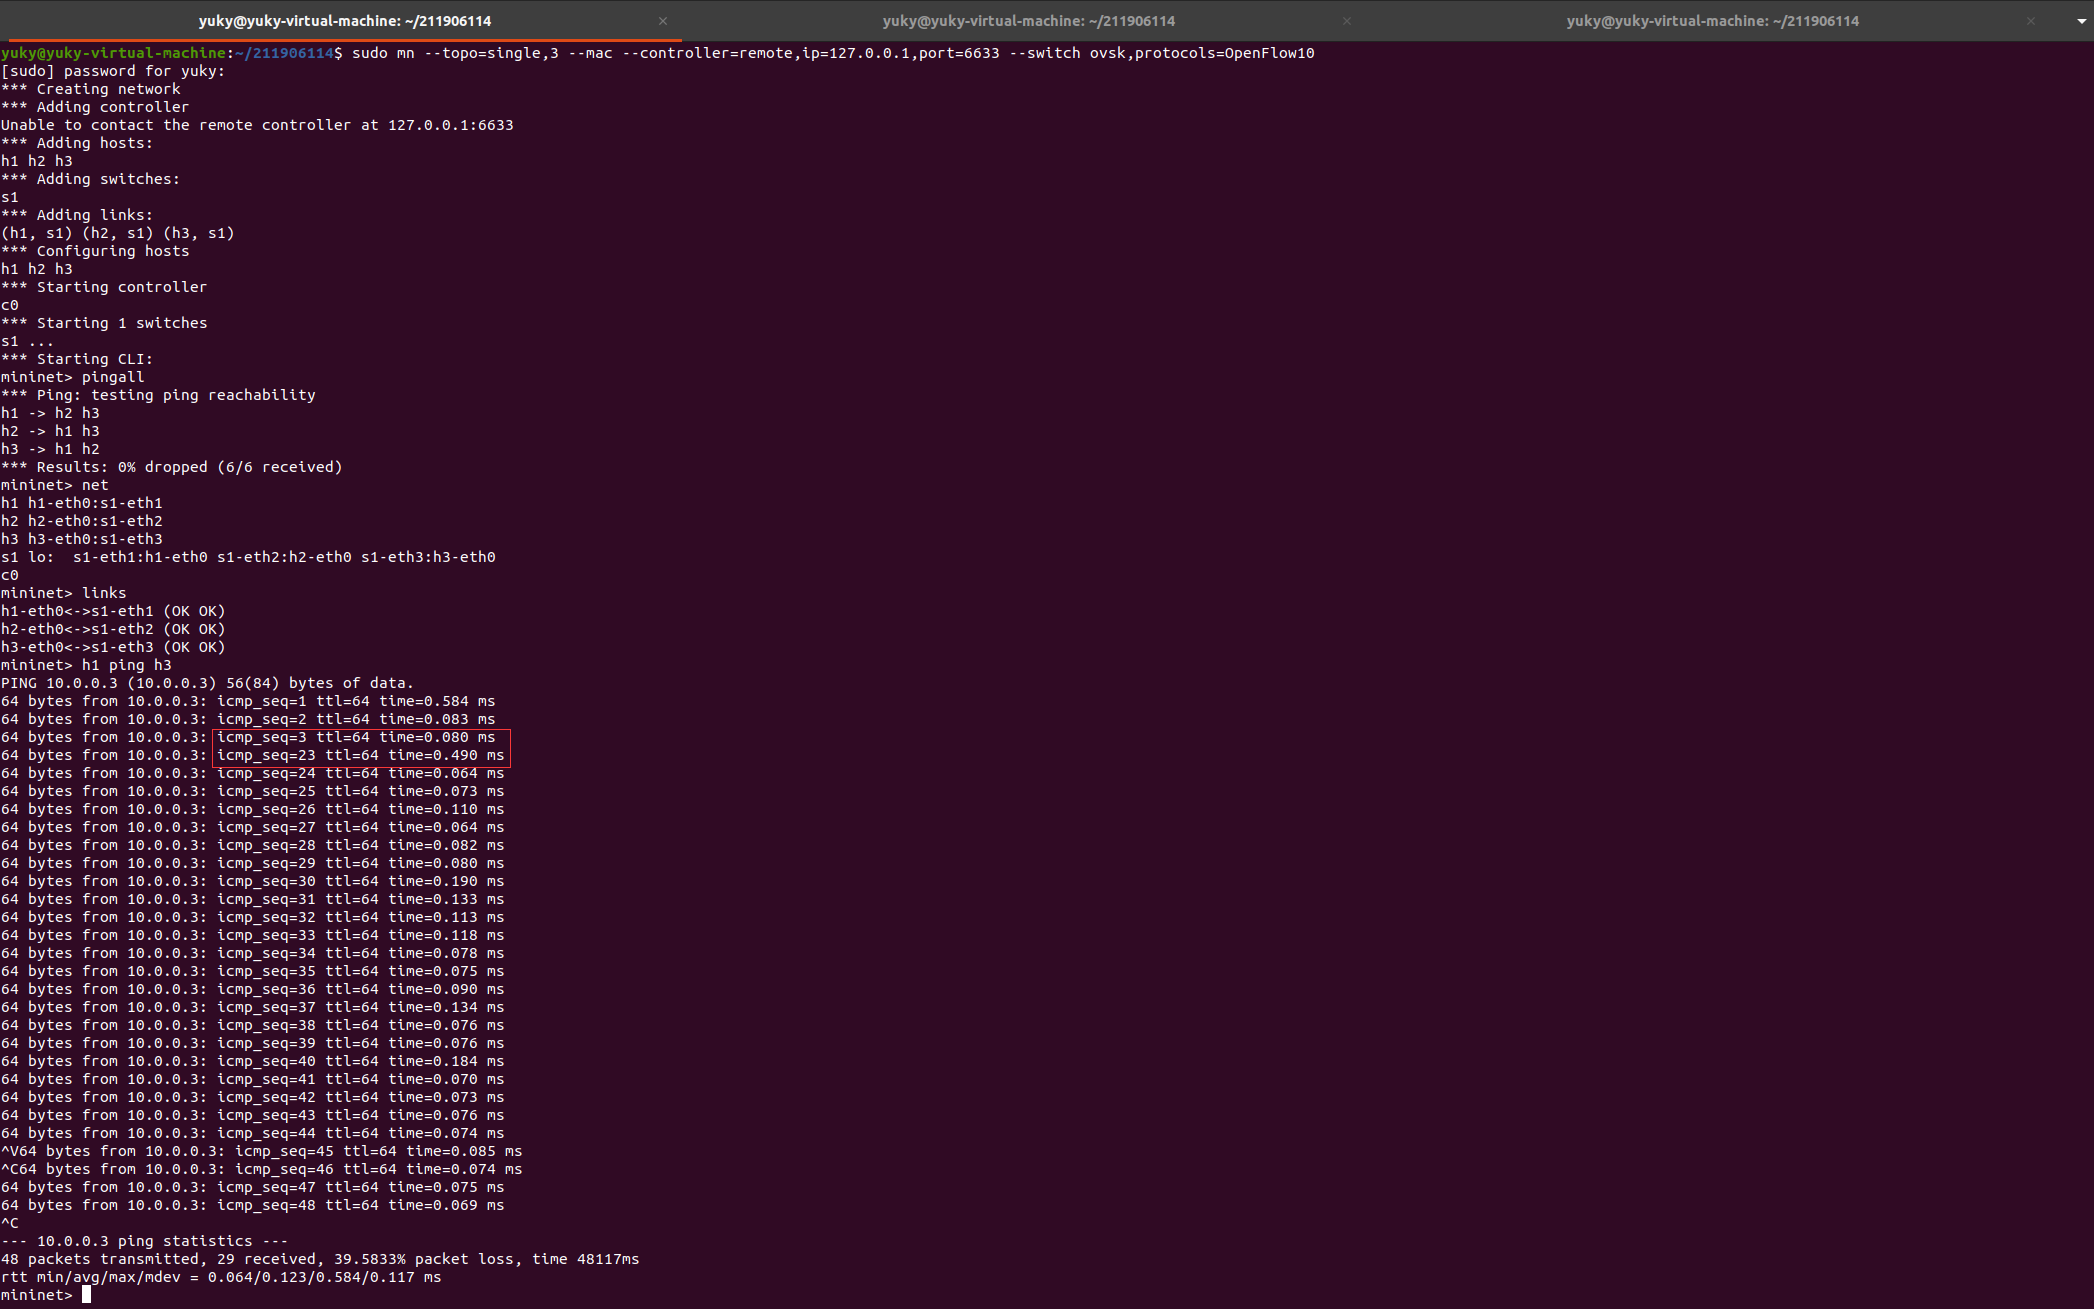
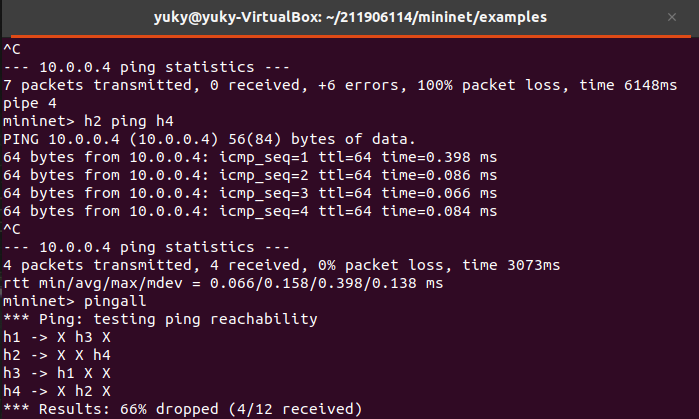
由上图Ping结果可得,H1和H3之间的网络中断了20秒
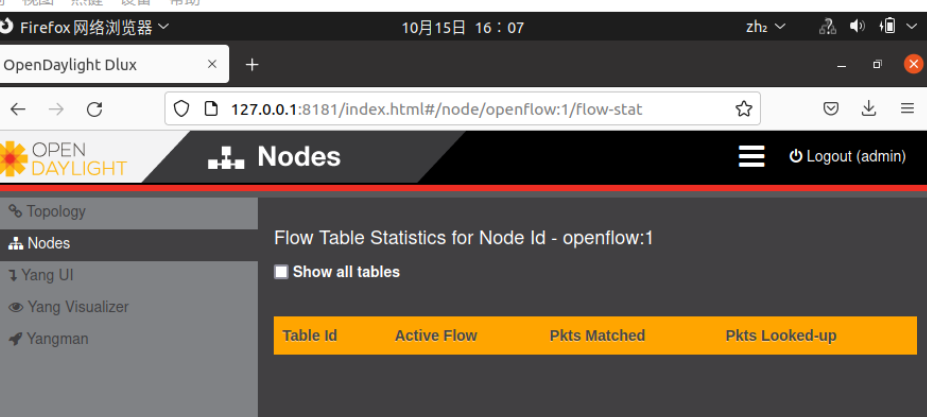
(4) 编写Python程序,调用OpenDaylight的北向接口获取s1上活动的流表数。
 1 import requests
 2 import json
 3 from requests.auth import HTTPBasicAuth
 4 def http_get(url):
 5     url= url
 6     headers = {'Content-Type':'application/json'}
 7     resp = requests.get(url,headers=headers,auth=HTTPBasicAuth('admin','admin'))
 8     return resp
 9
10 if __name__ == "__main__":
11      url = 'http://127.0.0.1:8181/restconf/operational/opendaylight-inventory:nodes/node/openflow:1/flow-node-inventory:table/0/opendaylight-flow-table-statistics:flow-table-statistics'
12     with open('114test.json') as f:
13         jstr = f.read()
14     resp = http_get(url)
15     print(resp.content)

运行python代码以获取流表数
Ryu
(1) 编写Python程序,调用Ryu的北向接口,实现上述OpenDaylight实验拓扑上相同的硬超时流表下发。
python部分代码
 1 import requests
 2 from requests.auth import HTTPBasicAuth
 3 def http_post(url,jstr):
 4     url= url
 5     headers = {'Content-Type':'application/json'}
 6     resp = requests.post(url,jstr,headers=headers)
 7     return resp
 8 if __name__ == "__main__":
 9     url='http://127.0.0.1:8080/stats/flowentry/add'
10     requests.adapters.DEFAULT_RETRIES = 5
11     with open('1.json') as f:
12         jstr = f.read()
13     resp = http_post(url,jstr)
14     print (resp.content)
15     s = requests.session()
16     s.keep_alive = False
json部分
 1 {
 2   "dpid": 1,
 3   "match": {
 4     "in-port": "1",
 5     "dl_dst": "00:00:00:00:00:03"
 6   },
 7   "priority": 65535,
 8   "hard_timeout": 20,
 9   "cookie": "2",
10   "table_id": 0,
11   "actions": []
12 }
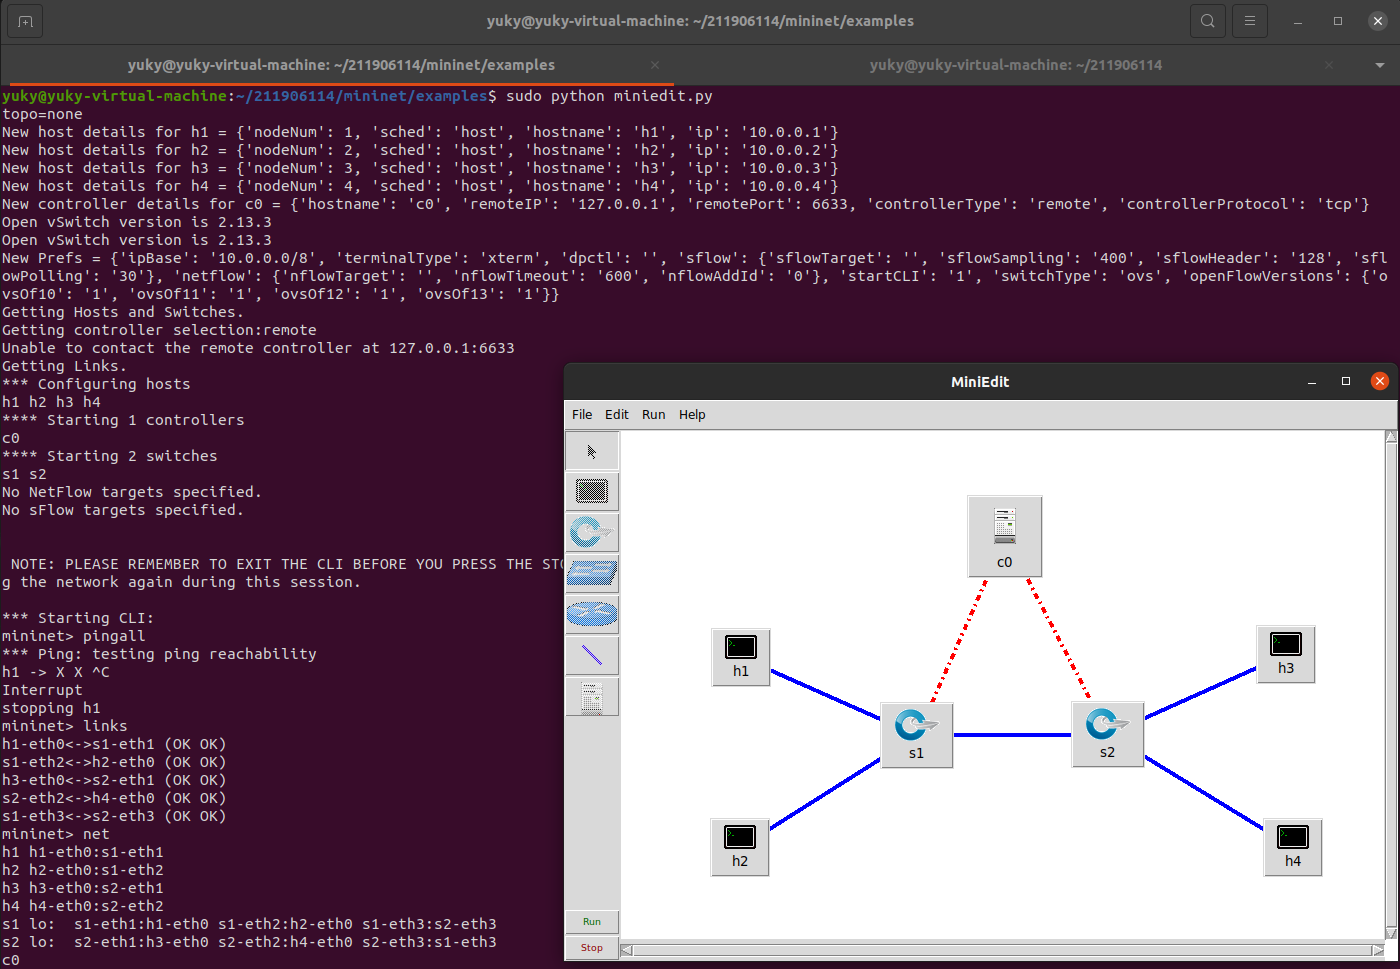
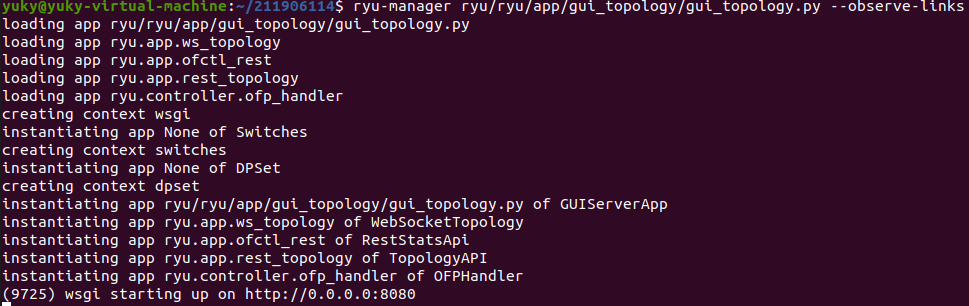
(2) 利用Mininet平台搭建下图所示网络拓扑,要求支持OpenFlow 1.3协议,主机名、交换机名以及端口对应正确。拓扑生成后需连接Ryu,且Ryu应能够提供REST API服务。
(3) 整理一个Shell脚本,参考Ryu REST API的文档,利用curl命令,实现和实验2相同的VLAN。
curl -X POST -d '{
  "dpid": 1,
  "match": {
    "in_port": 1
  },
  "actions": [
    {
      "type": "PUSH_VLAN",
      "ethertype": 33024
    },
    {
      "type": "SET_FIELD",
      "field": "vlan_vid",
      "value": 4096
    },
    {
      "type":"OUTPUT",
      "port": 3
    }
    ],
    "priority":5
}' http://localhost:8080/stats/flowentry/add

curl -X POST -d '
{
  "dpid": 1,
  "priority":5,
  "match": {
    "in_port": 2
  },
  "actions": [
    {
      "type": "PUSH_VLAN",
      "ethertype": 33024
    },
    {
      "type": "SET_FIELD",
      "field": "vlan_vid",
      "value": 4097
    },
    {
      "type":"OUTPUT",
      "port": 3
    }
    ]
}' http://localhost:8080/stats/flowentry/add

curl -X POST -d '
{
  "dpid": 1,
  "match": {
    "vlan_vid": 0
  },
  "actions": [
    {
      "type": "POP_VLAN",
      "ethertype": 33024
    },
    {
      "type":"OUTPUT",
      "port": 1
    }
    ],
    "priority":5
}
' http://localhost:8080/stats/flowentry/add

curl -X POST -d'
{
  "dpid": 1,
  "match": {
    "vlan_vid": 1
  },
  "actions": [
    {
      "type": "POP_VLAN",
      "ethertype": 33024
    },
    {
      "type":"OUTPUT",
      "port": 2
    }
    ],
    "priority":5
}
' http://localhost:8080/stats/flowentry/add
curl -X POST -d '{
  "dpid": 2,
  "match": {
    "in_port": 1
  },
  "actions": [
    {
      "type": "PUSH_VLAN",
      "ethertype": 33024
    },
    {
      "type": "SET_FIELD",
      "field": "vlan_vid",
      "value": 4096
    },
    {
      "type":"OUTPUT",
      "port": 3
    }
    ],
    "priority":5
}' http://localhost:8080/stats/flowentry/add

curl -X POST -d '
{
  "dpid": 2,
  "match": {
    "in_port": 2
  },
  "actions": [
    {
      "type": "PUSH_VLAN",
      "ethertype": 33024
    },
    {
      "type": "SET_FIELD",
      "field": "vlan_vid",
      "value": 4097
    },
    {
      "type":"OUTPUT",
      "port": 3
    }
    ],
    "priority":5
}' http://localhost:8080/stats/flowentry/add

curl -X POST -d '
{
  "dpid": 2,
  "match": {
    "vlan_vid": 0
  },
  "actions": [
    {
      "type": "POP_VLAN",
      "ethertype": 33024
    },
    {
      "type":"OUTPUT",
      "port": 1
    }
    ],
    "priority":5
}
' http://localhost:8080/stats/flowentry/add

curl -X POST -d'
{
  "dpid": 2,
  "match": {
    "vlan_vid": 1
  },
  "actions": [
    {
      "type": "POP_VLAN",
      "ethertype": 33024
    },
    {
      "type":"OUTPUT",
      "port": 2
    }
    ],
    "priority":5
}' http://localhost:8080/stats/flowentry/add
个人总结
本次实验相交前面几次的难度有明显提高,实验中出现的主要问题主要集中在python代码的编译运行部分,由于在实践前因为各种可能没有调配的设置和没有安装的环境而导致代码一运行就会有大量报错,在翻看多篇CSDN的博客文章后进行了一些设置和查错,勉勉强强把代码运行完了,其中也有同学们的大力援助,个人想要理顺这些代码运行还是有点难度。
