NETCORE - IdentityServer4 客户端凭据模式
NETCORE - IdentityServer4 客户端凭据模式
一. 创建服务端
项目:NETCORE.ID4.ClientSecrets.Server (.Net6 web api)
1. 安装IdentityServer4 依赖包

2. 创建config.cs配置类
using IdentityServer4;
using IdentityServer4.Models;
using System.Collections;
using System.Collections.Generic;

namespace NETCORE.ID4.ClientSecrets.Server
{
    public class Config
    {

        public static IEnumerable<IdentityResource> IdentityResources =>
            new IdentityResource[] { new IdentityResources.OpenId(), new IdentityResources.Profile() };


        // v4新增
        public static IEnumerable<ApiScope> ApiScopes =>
            new ApiScope[] { new ApiScope("OrderApi", "Order Api") };


        public static IEnumerable<ApiResource> GetApiResources()
        {
            return new List<ApiResource>
            {
                new ApiResource("API1", "第一个接口")
                {
                    //重要
                    Scopes = { "scope1" }
                }
            };
        }

        public static IEnumerable<Client> Clients =>
            new Client[]
            {
                //客户端的唯一标识  此模式可用于前端
                 new Client
                 {
                    // 客户端的唯一标识
                    ClientId="client",
                    // 客户端认证密码
                    ClientSecrets = { new Secret("ordersecret".Sha256()) },
                    // 指定授权模式,这里指定为客户端凭据模式
                    AllowedGrantTypes = GrantTypes.ClientCredentials,
                    // 指定客户端获取的Token能访问到的作用域
                    AllowedScopes={ "OrderApi" }
                }};
    }
}
3. 注入 IdentityServer,在Program.cs中
using NETCORE.ID4.ClientSecrets.Server;

var builder = WebApplication.CreateBuilder(args);

// Add services to the container.

builder.Services.AddControllers();
// Learn more about configuring Swagger/OpenAPI at https://aka.ms/aspnetcore/swashbuckle
builder.Services.AddEndpointsApiExplorer();
builder.Services.AddSwaggerGen();

// 使用内存存储,密钥,客户端和资源来配置身份服务器。
builder.Services.AddIdentityServer(options =>
    {
        //注意区分ApiScope和ApiResource,
        //这里的ApiScope并不会生成Access Token里面的Audience属性, 因此我们设置EmitStaticAudienceClaim = true(见IdentityServer的Starup文件)来指定一个固定的Audience。
        //如果需要使用Api的名称作为Audience,则要使用ApiResource
        options.EmitStaticAudienceClaim = true;
    })
    //添加开发人员签名凭据
    //开发时使用的 AddDeveloperSigningCredential(),不适合生产环境。
    //生产环境使用 AddSigningCredential
    .AddDeveloperSigningCredential()
    .AddInMemoryIdentityResources(Config.IdentityResources)
    .AddInMemoryApiScopes(Config.ApiScopes)
    .AddInMemoryClients(Config.Clients);


var app = builder.Build();

// Configure the HTTP request pipeline.
if (app.Environment.IsDevelopment())
{
    app.UseSwagger();
    app.UseSwaggerUI();
}

app.UseHttpsRedirection();


app.UseIdentityServer();//启动ids4中间件

//app.UseAuthentication();//添加鉴权验证

//app.UseAuthorization();

app.MapControllers();

app.Run();
访问发现文档: https://localhost:7022/.well-known/openid-configuration
{
    "issuer": "https://localhost:7022",
    "jwks_uri": "https://localhost:7022/.well-known/openid-configuration/jwks",
    "authorization_endpoint": "https://localhost:7022/connect/authorize",
    "token_endpoint": "https://localhost:7022/connect/token",
    "userinfo_endpoint": "https://localhost:7022/connect/userinfo",
    "end_session_endpoint": "https://localhost:7022/connect/endsession",
    "check_session_iframe": "https://localhost:7022/connect/checksession",
    "revocation_endpoint": "https://localhost:7022/connect/revocation",
    "introspection_endpoint": "https://localhost:7022/connect/introspect",
    "device_authorization_endpoint": "https://localhost:7022/connect/deviceauthorization",
    "frontchannel_logout_supported": true,
    "frontchannel_logout_session_supported": true,
    "backchannel_logout_supported": true,
    "backchannel_logout_session_supported": true,
    "scopes_supported": [
        "openid",
        "profile",
        "OrderApi",
        "offline_access"
    ],
    "claims_supported": [
        "sub",
        "name",
        "family_name",
        "given_name",
        "middle_name",
        "nickname",
        "preferred_username",
        "profile",
        "picture",
        "website",
        "gender",
        "birthdate",
        "zoneinfo",
        "locale",
        "updated_at"
    ],
    "grant_types_supported": [
        "authorization_code",
        "client_credentials",
        "refresh_token",
        "implicit",
        "urn:ietf:params:oauth:grant-type:device_code"
    ],
    "response_types_supported": [
        "code",
        "token",
        "id_token",
        "id_token token",
        "code id_token",
        "code token",
        "code id_token token"
    ],
    "response_modes_supported": [
        "form_post",
        "query",
        "fragment"
    ],
    "token_endpoint_auth_methods_supported": [
        "client_secret_basic",
        "client_secret_post"
    ],
    "id_token_signing_alg_values_supported": [
        "RS256"
    ],
    "subject_types_supported": [
        "public"
    ],
    "code_challenge_methods_supported": [
        "plain",
        "S256"
    ],
    "request_parameter_supported": true
}
从前端获取 token: https://localhost:7022/connect/token
参数:
|
client_id
|
client |
| client_secret | ordersecret |
| grant_type | client_credentials |

一. 创建客户端
项目:NETCORE.ID4.ClientSecrets.Client(.Net6 web api)
1. 安装 IdentityServer4.AccessTokenValidation 依赖包

创建 WEBAPI 控制器
using Microsoft.AspNetCore.Authorization;
using Microsoft.AspNetCore.Http;
using Microsoft.AspNetCore.Mvc;

namespace NETCORE.ID4.ClientSecrets.Client.Controllers
{
    [Route("api/[controller]")]
    [ApiController]
    public class ValuesController : ControllerBase
    {

        [HttpGet]
        [Route("get1")]
        public IActionResult Get1()
        {
            return Ok("ok by no auth");
        }


        [HttpGet]
        [Route("get2")]
        [Authorize]
        public IActionResult Get2()
        {
            return Ok("ok by no auth");
        }

    }
}
调用接口


调用 get2 方法时,没有设置 token 会报401
配置 token 后,可获取到数据

Identity Server4/生产模式/证书/certificate/AddSigningCredential
开发时使用的 AddDeveloperSigningCredential(),不适合生产环境。
戳几字,简单使用PowerShell读取.CER 文件, 使用.NET X509Certificate2这个类,生成、读取、删除证书。
打开 window powershell
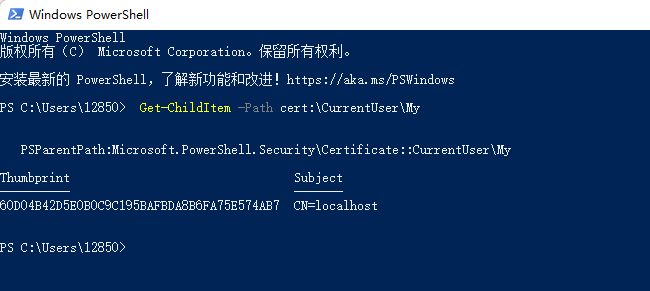
2. 读取证书
输入 Get-ChildItem -Path cert:\CurrentUser\My

3.创建证书
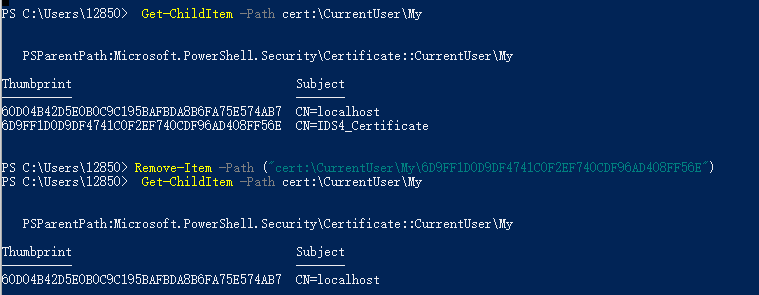
输入 New-SelfSignedCertificate -Subject "CN=IDS4_Certificate" -CertStoreLocation cert:\CurrentUser\My -Provider "Microsoft Strong Cryptographic Provider"
名为 IDS4_Certificate

删除证书,输入 Remove-Item -Path ("cert:\CurrentUser\My\" + $cert.Thumbprint)

5. 加载刚生成的证书,输入
$cert = Get-ChildItem -Path cert:\CurrentUser\My\(your certificate thumbprint)

6. 导出公钥到项目文件夹,输入
Export-Certificate -Type CERT -Cert $cert -FilePath "./publickey.cer"

导出私钥到项目文件夹
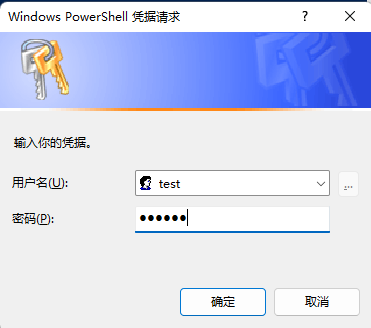
输入 $cred = Get-Credential 配置秘钥
用户名:test
密钥:123456


输入 Export-PfxCertificate -Cert $cert -Password $cred.Password -FilePath "./private.pfx"

配置identity server4 使用生成的证书
string certPath = "C://Users/12850/private.pfx";
var certificate = new X509Certificate2(certPath, "123456");

// 使用内存存储,密钥,客户端和资源来配置身份服务器。
builder.Services.AddIdentityServer(options =>
    {
        //注意区分ApiScope和ApiResource,
        //这里的ApiScope并不会生成Access Token里面的Audience属性, 因此我们设置EmitStaticAudienceClaim = true(见IdentityServer的Starup文件)来指定一个固定的Audience。
        //如果需要使用Api的名称作为Audience,则要使用ApiResource
        options.EmitStaticAudienceClaim = true;
    })
    //添加开发人员签名凭据
    //开发时使用的 AddDeveloperSigningCredential(),不适合生产环境。
    //生产环境使用 AddSigningCredential
    //.AddDeveloperSigningCredential()
    .AddSigningCredential(certificate)
    .AddInMemoryIdentityResources(Config.IdentityResources)
    .AddInMemoryApiScopes(Config.ApiScopes)
    .AddInMemoryClients(Config.Clients);
参考:https://www.cnblogs.com/yakniu/p/16175739.html
参考:https://blog.csdn.net/m0_62367247/article/details/127033649


