

NETCORE + VUE + SignalR 消息通信
NETCORE + VUE + SignalR 消息通信
分组通信:https://blog.csdn.net/qbc12345678/article/details/125215711
一. 创建 Net6 WebApi 项目
NETCORE.TSignalR
1. 创建 通信组件类:CustomHub.cs

using Microsoft.AspNetCore.SignalR;

namespace NETCORE.TSignalR
{
    public class CustomHub : Hub
    {
        private readonly ILogger<CustomHub> _logger;

        public CustomHub(ILogger<CustomHub> logger)
        {
            _logger = logger;
        }

        public override Task OnConnectedAsync()
        {
            return base.OnConnectedAsync();
        }

        public override Task OnDisconnectedAsync(Exception? exception)
        {
            return base.OnDisconnectedAsync(exception);
        }


        public Task SendMessageCaller( string msg)
        {
            _logger.LogInformation("接受数据{0}", msg);
            return Clients.Caller.SendAsync("ReceiveCaller", $"自已收到消息,回复信息:{msg}");
        }

        public Task SendMessage(string id, string msg)
        {
            _logger.LogInformation("接受数据{0},{1}", id, msg);
            return Clients.All.SendAsync("ReceiveMessage", $"全体人员注意,{msg},发送者:{id}");
        }


        public Task SendMessageOther(string id, string msg)
        {
            _logger.LogInformation("接受数据{0},{1}", id, msg);
            return Clients.Others.SendAsync("ReceiveMessage", $"其他人员注意,{msg},发送者:{id}");
        }
    }
}
2. 在 program.cs 中, 注入服务
using NETCORE.TSignalR;

var builder = WebApplication.CreateBuilder(args);

// Add services to the container.
builder.Services.AddControllers();
// Learn more about configuring Swagger/OpenAPI at https://aka.ms/aspnetcore/swashbuckle
builder.Services.AddEndpointsApiExplorer();
builder.Services.AddSwaggerGen();

// 注入SignalR所需服务
builder.Services.AddSignalR();

//解决跨域
builder.Services.AddCors(c =>
{
    c.AddPolicy("Any", policy =>
    {
        policy.AllowAnyOrigin()
              .AllowAnyHeader()//Ensures that the policy allows any header.
              .AllowAnyMethod();
    });
});


var app = builder.Build();

//解决跨域
app.UseCors("Any");

// Configure the HTTP request pipeline.
if (app.Environment.IsDevelopment())
{
    app.UseSwagger();
    app.UseSwaggerUI();
}

app.UseHttpsRedirection();

app.UseAuthorization();

 //开启路由节点 用来映射Signalr请求路径
app.MapHub<CustomHub>("/custom");

app.MapControllers();

app.Run();
3. 启动项目
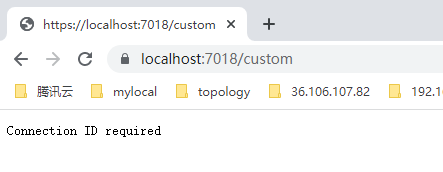
打开路径: https://localhost:7018/custom,出现【Connection ID required】表示服务启动成功。
二. 创建2个 Vue 客户端
1. 项目初始化
vue init webpack-simple single2
vue init webpack-simple single3
2. 安装插件
npm install @aspnet/signalr
3. Vue 页面
<template>
  <div class="home">
    <h1>前端演示SignalR</h1>
    <input v-model="user" type="text" />
    <input v-model="message" type="text" />
    <button @click="sendAll">发送全部</button>
    <button @click="sendOwn">对自己发送</button>
    <button @click="sendOther">对其他发送</button>
    <div>
      <ul v-for="(item, index) in messages" v-bind:key="index + 'itemMessage'">
        <li>{{ item.user }} says {{ item.message }}</li>
      </ul>
    </div>
  </div>
</template>

<script>
// @ is an alias to /src
import * as signalR from "@aspnet/signalr";
export default {
  name: "Home",
  components: {},
  data() {
    return {
      user: "s2", //用户
      message: "22222", //消息
      connection: "", //signalr连接
      messages: [], //返回消息
    };
  },
  methods: {
    //给全部发送消息
    sendAll: function () {
      this.connection
        .invoke("SendMessage", this.user, this.message)
        .catch(function (err) {
          return console.error(err);
        });
    },
    //只给自己发送消息
    sendOwn: function () {
      this.connection
        .invoke("SendMessageCaller", this.message)
        .catch(function (err) {
          return console.error(err);
        });
    },

    //给其他人员发送消息
    sendOther: function () {
      this.connection
        .invoke("SendMessageOther", this.user, this.message)
        .catch(function (err) {
          return console.error(err);
        });
    },
  },
  created: function () {
    let thisVue = this;
    this.connection = new signalR.HubConnectionBuilder()
      .withUrl("https://localhost:7018/custom", {
        skipNegotiation: true,
        transport: signalR.HttpTransportType.WebSockets,
      })
      .configureLogging(signalR.LogLevel.Information)
      .build();
    this.connection.on("ReceiveMessage", function (user, message) {
      debugger;
      thisVue.messages.push({ user, message });
      console.log({ user, message });
    });
    this.connection.on("ReceiveCaller", function (message) {
      debugger;
      let user = "自己"; //这里为了push不报错,我就弄了一个默认值。
      thisVue.messages.push({ user, message });
      console.log({ user, message });
    });
    this.connection.start();
  },
};
</script>
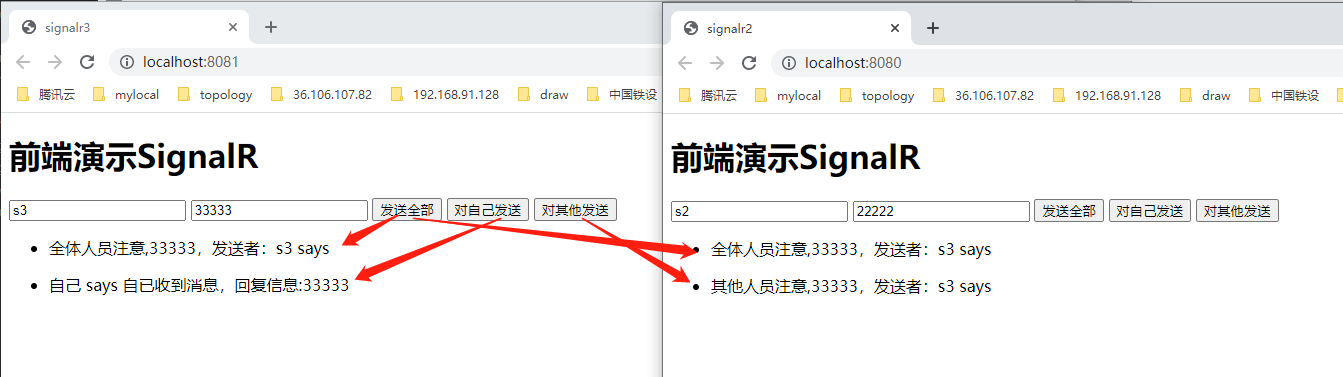
三. 测试
其他通迅组件FreeIM:https://github.com/2881099/FreeIM


【推荐】国内首个AI IDE,深度理解中文开发场景,立即下载体验Trae
【推荐】编程新体验,更懂你的AI,立即体验豆包MarsCode编程助手
【推荐】抖音旗下AI助手豆包,你的智能百科全书,全免费不限次数
【推荐】轻量又高性能的 SSH 工具 IShell:AI 加持,快人一步
· TypeScript + Deepseek 打造卜卦网站:技术与玄学的结合
· Manus的开源复刻OpenManus初探
· AI 智能体引爆开源社区「GitHub 热点速览」
· C#/.NET/.NET Core技术前沿周刊 | 第 29 期(2025年3.1-3.9)
· 从HTTP原因短语缺失研究HTTP/2和HTTP/3的设计差异
2020-01-09 Docker部署Python应用程序