Android_(控件)使用ListView显示Android系统中联系人信息
使用ListView显示手机中联系人的姓名和电话号码
父类布局activity_main.xml,子类布局line.xml(一个文件的单独存放)
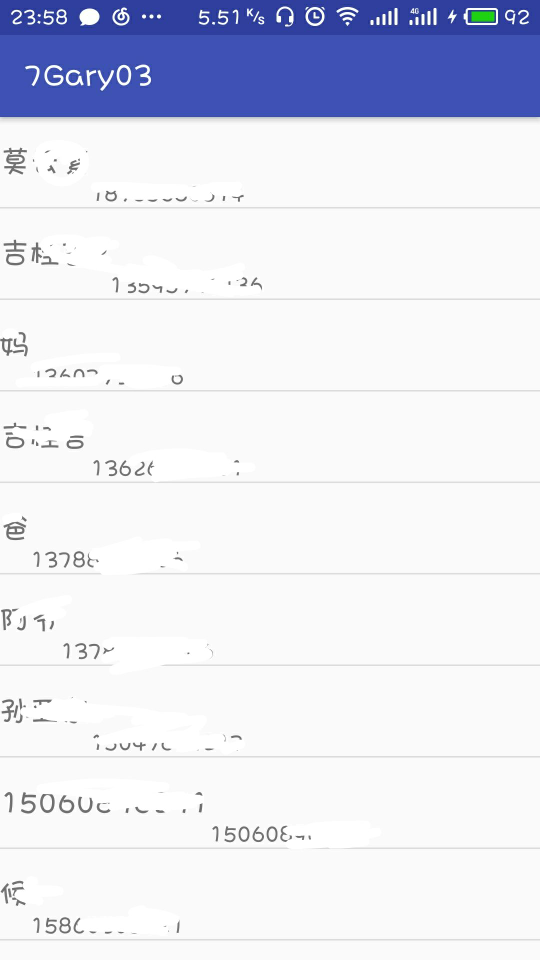
运行截图:

(避免泄露信息对部分地方进行了涂鸦O(∩_∩)O!)
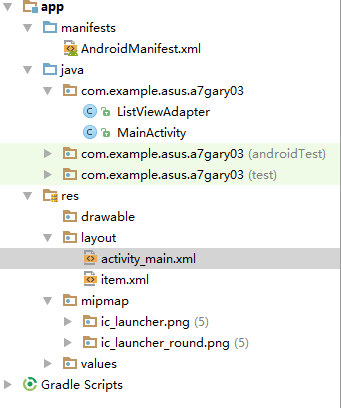
程序结构


<?xml version="1.0" encoding="utf-8"?>
<manifest xmlns:android="http://schemas.android.com/apk/res/android"
    package="com.example.asus.a7gary03">

    <!-- 读取通讯录权限 -->
    <uses-permission android:name="android.permission.READ_CONTACTS" />


    <application
        android:allowBackup="true"
        android:icon="@mipmap/ic_launcher"
        android:label="@string/app_name"
        android:roundIcon="@mipmap/ic_launcher_round"
        android:supportsRtl="true"
        android:theme="@style/AppTheme">
        <activity android:name=".MainActivity">
            <intent-filter>
                <action android:name="android.intent.action.MAIN" />

                <category android:name="android.intent.category.LAUNCHER" />
            </intent-filter>
        </activity>
    </application>

</manifest>

package com.example.asus.a7gary03;

import android.support.v7.app.AppCompatActivity;

import android.database.Cursor;
import android.os.Bundle;
import android.provider.ContactsContract;
import android.widget.ListView;

import java.util.ArrayList;
import java.util.List;


public class MainActivity extends AppCompatActivity {

    ListView lv;
    List<String> list_phone, list_name;

    @Override
    protected void onCreate(Bundle savedInstanceState) {
        super.onCreate(savedInstanceState);
        setContentView(R.layout.activity_main);
        lv = (ListView) findViewById(R.id.lv);
        list_name = new ArrayList<String>();
        list_phone = new ArrayList<String>();
        Cursor c = getContentResolver().query(
                ContactsContract.CommonDataKinds.Phone.CONTENT_URI, null, null,
                null, null);
        //获取通讯录的信息
        startManagingCursor(c);
        int phoneIndex = 0, nameIndex = 0;
        if (c.getCount() > 0) {
            phoneIndex = c
                    .getColumnIndex(ContactsContract.CommonDataKinds.Phone.NUMBER);
            // 获取手机号码的列名
            nameIndex = c
                    .getColumnIndex(ContactsContract.CommonDataKinds.Phone.DISPLAY_NAME);
            // 获取用户名的列名
        }
        while (c.moveToNext()) {
            String phone = c.getString(phoneIndex);
            // 获取手机号码
            list_phone.add(phone);
            String name = c.getString(nameIndex);
            // 获取用户名
            list_name.add(name);

        }

        ListViewAdapter adapter = new ListViewAdapter(this, list_name,
                list_phone);
        lv.setAdapter(adapter);
    }

}

package com.example.asus.a7gary03;

/**
 * Created by ASUS on 2018/5/24.
 */

import java.util.List;

import android.annotation.SuppressLint;
import android.content.Context;
import android.view.LayoutInflater;
import android.view.View;
import android.view.ViewGroup;
import android.widget.BaseAdapter;
import android.widget.TextView;

@SuppressLint("InflateParams")
public class ListViewAdapter extends BaseAdapter {
    List<String> names, phones;
    LayoutInflater inflater;

    @SuppressWarnings("static-access")
    public ListViewAdapter(Context context, List<String> names,
                           List<String> phones) {
        inflater = inflater.from(context);
        this.names = names;
        this.phones = phones;
    }

    @Override
    public int getCount() {
        return names.size();
    }

    @Override
    public Object getItem(int position) {
        return position;
    }

    @Override
    public long getItemId(int position) {
        return position;
    }

    @Override
    public View getView(int position, View convertView, ViewGroup parent) {
        View view;
        if (convertView == null) {
            view = inflater.inflate(R.layout.item, null);
            TextView tv_name = (TextView) view.findViewById(R.id.tv_name);
            TextView tv_phone = (TextView) view.findViewById(R.id.tv_number);
            tv_name.setText(names.get(position));
            tv_phone.setText(phones.get(position));
        } else {
            view = convertView;
        }
        return view;
    }

}

<?xml version="1.0" encoding="utf-8"?>
<RelativeLayout xmlns:android="http://schemas.android.com/apk/res/android"
    xmlns:app="http://schemas.android.com/apk/res-auto"
    xmlns:tools="http://schemas.android.com/tools"
    android:layout_width="match_parent"
    android:layout_height="match_parent"
    tools:context="com.example.asus.a7gary03.MainActivity">

    <ListView
        android:id="@+id/lv"
        android:layout_width="match_parent"
        android:layout_height="match_parent" >
    </ListView>

</RelativeLayout>

<?xml version="1.0" encoding="utf-8"?>
<LinearLayout xmlns:android="http://schemas.android.com/apk/res/android"
    android:layout_width="match_parent"
    android:layout_height="match_parent"
    android:orientation="vertical" >

    <LinearLayout
        android:layout_width="match_parent"
        android:layout_height="60sp"
        android:orientation="horizontal" >

        <TextView
            android:id="@+id/tv_name"
            android:layout_width="wrap_content"
            android:layout_height="wrap_content"
            android:layout_gravity="center_vertical"
            android:text="1111"
            android:textSize="20sp" />

        <TextView
            android:id="@+id/tv_number"
            android:layout_width="wrap_content"
            android:layout_height="wrap_content"
            android:layout_gravity="bottom"
            android:text="2222"
            android:textSize="15sp" />
    </LinearLayout>

</LinearLayout>
一、获取手机存储卡权限
    读取通讯录权限
<uses-permission android:name="android.permission.READ_CONTACTS" />
二、界面布局
activity_main.xml布局中
TextView中显示手机联系人的的文本框,ListView列出手机中的联系人
item.xml布局中
两个TextView,一个显示联系人的姓名,一个显示联系人的电话号码
三、实现程序功能
1、获取手机电话号码和联系人信息
        Cursor c = getContentResolver().query(
                ContactsContract.CommonDataKinds.Phone.CONTENT_URI, null, null,
                null, null);
        //获取通讯录的信息
        startManagingCursor(c);
        int phoneIndex = 0, nameIndex = 0;
        if (c.getCount() > 0) {
            phoneIndex = c
                    .getColumnIndex(ContactsContract.CommonDataKinds.Phone.NUMBER);
            // 获取手机号码的列名
            nameIndex = c
                    .getColumnIndex(ContactsContract.CommonDataKinds.Phone.DISPLAY_NAME);
            // 获取用户名的列名
        }
        while (c.moveToNext()) {
            String phone = c.getString(phoneIndex);
            // 获取手机号码
            list_phone.add(phone);
            String name = c.getString(nameIndex);
            // 获取用户名
            list_name.add(name);

        }
Cursor:Android使用的数据库是SQLite数据库,对于数据库记录的操作,可以使用Cursor来进行 (传送门)
getColumnIndex(String columnName) -------->返回指定列的名称 ,如果不存在返回-1
Cursor c = getContentResolver.query(uri , String[ ] , where , String[ ] , sort);
这条语句相信大家一定经常看到用到,查看sdk帮助文档也很容易找到其中五个参数的意思
第一个参数:是一个URI,指向需要查询的表;
第二个参数:需要查询的列名,是一个数组,可以返回多个列;
第三个参数:需要查询的行,where表示需要满足的查询条件,where语句里面可以有?号;
第四个参数:是一个数组,用来替代上面where语句里面的问号;
第五个参数:表示排序方式;
2、添加BaseAdapter适配器
simpleAdapter的扩展性最好,可以自定义各种各样的布局出来,可以放上ImageView(图片),还可以放上Button(按钮),CheckBox(复选框)等等
ListView和Adapter数据适配器的简单介绍:传送门
public View getView(int position, View convertView, ViewGroup parent) {
        View view;
        if (convertView == null) {
            view = inflater.inflate(R.layout.item, null);
            TextView tv_name = (TextView) view.findViewById(R.id.tv_name);
            TextView tv_phone = (TextView) view.findViewById(R.id.tv_number);
            tv_name.setText(names.get(position));
            tv_phone.setText(phones.get(position));
        } else {
            view = convertView;
        }
        return view;
    }
LayoutInflater类的作用类似于findViewById()
不同点是LayoutInflater是用来找res/layout/下的xml布局文件,并且实例化
而findViewById()是找xml布局文件下的具体widget控件(如Button、TextView等)。
(如需转载学习,请标明出处)


