git merge 命令详解
1. 前言
2. 合并场景之 Fast-forward(快速合并)
3. 合并场景之 three way merge(三路合并之正常合并)
4. 合并场景之 three way merge(三路合并之冲突合并)
5. 中止合并
1. 前言
将指定分支合并到当前分支
git merge <branch>
如果当前指针指向的是 master 分支,那么下面代码就是将 dev 分支合并到 master 分支
git merge dev
合并流程分析:
当分支进行合并时,首先会自动合并。如果可以自动合并成功,只需要修改下合并后的备注信息,然后会自动提交到版本库;如果自动合并失败,会出现文件冲突的提示,我们需要手动将冲突处理掉,然后再将文件提交到版本库
2. 合并场景之 Fast-forward(快速合并)
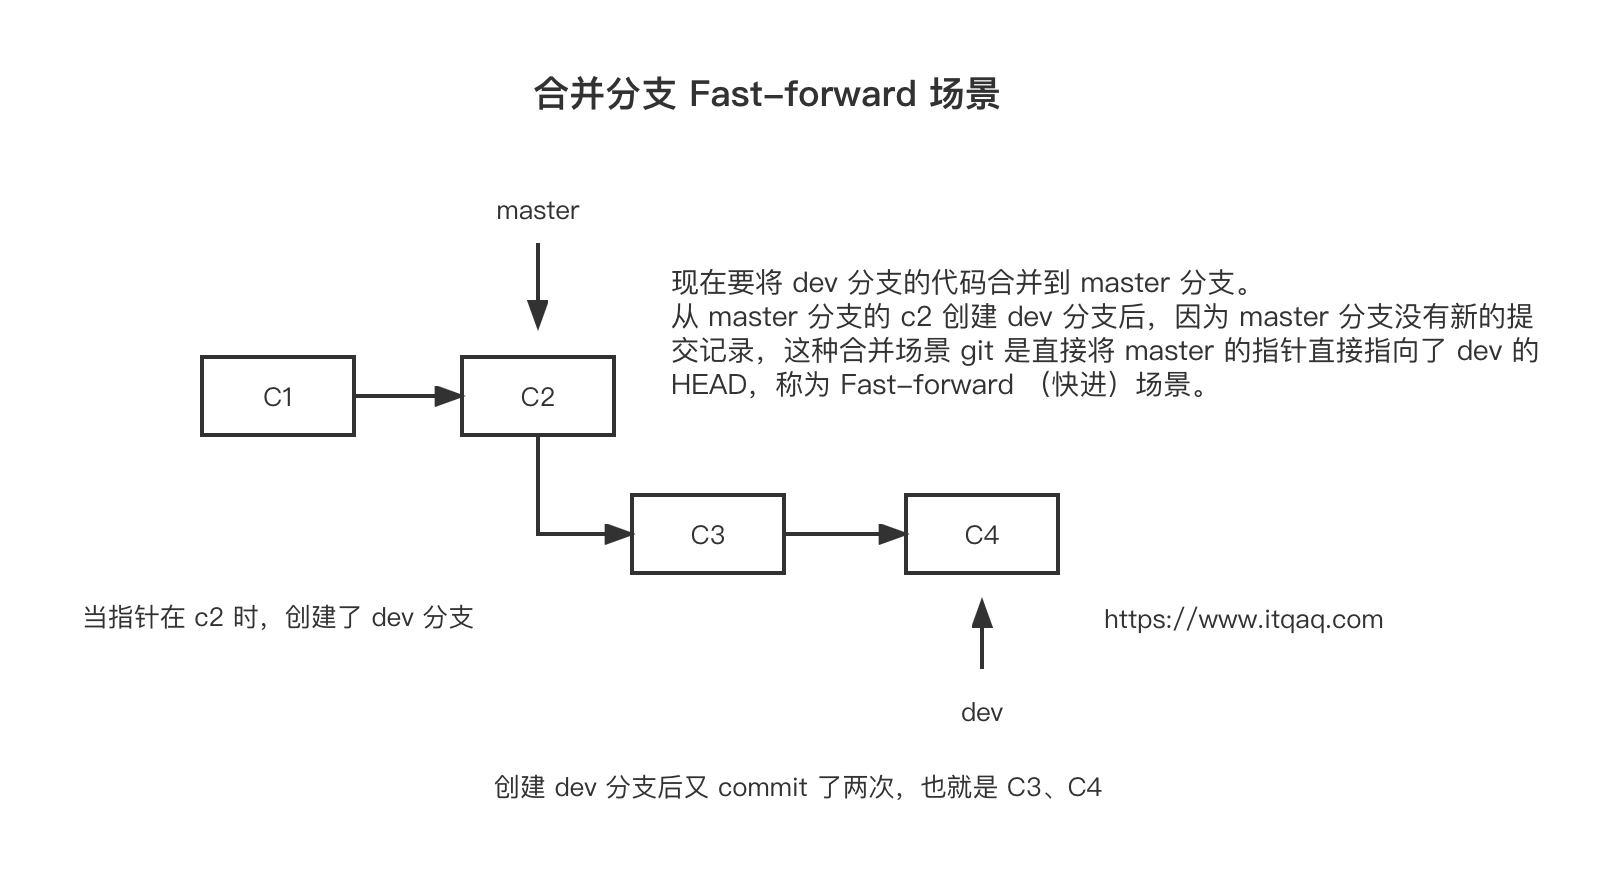
什么是 Fast-forward 场景 ?

在 Fast-forward 场景下,合并分支会绝对成功,不会产生冲突。测试合并:
# 初始化 git 仓库,完成一次提交echo abc >> 1.txtgit initgit add 1.txtgit commit -m 'add 1.txt'# 以当前分支为起点,创建一个 dev 分支,修改 1.txt 内容,提交到到本地库git checkout -b devecho def >> 1.txtgit add 1.txtgit commit -m '修改 1.txt'# 切换到 master 分支git checkout master
将 dev 分支合并到当前分支(master)
Updating 5e443b0..c657494:commit id 由 5e443b0 变为了 c657494
$ git merge devUpdating 5e443b0..c657494Fast-forward1.txt | 1 +1 file changed, 1 insertion(+)
结论: 创建 dev 分支后,因 master 分支没有做任何修改,故将 dev 分支合并到 master 分支时会绝对成功
3. 合并场景之 three way merge(三路合并之正常合并)
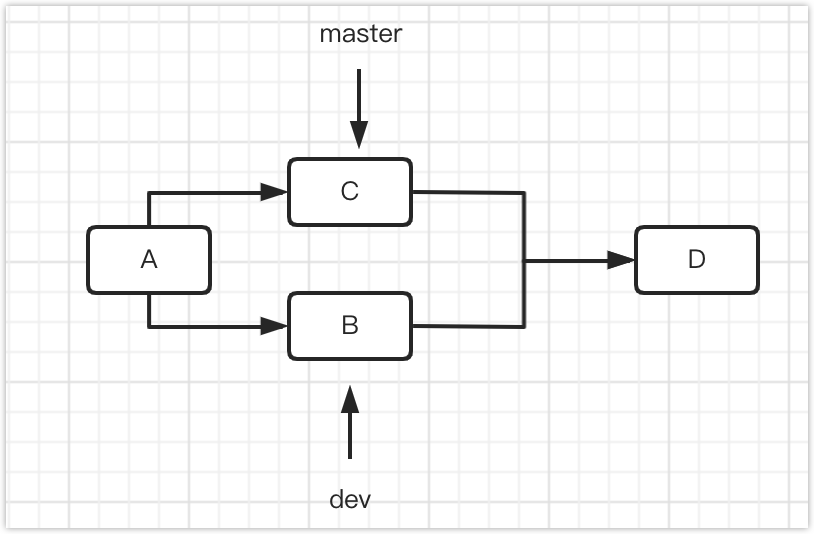
我们先来理解下什么是 three way merge(三路合并)
图中的 A、B、C 表示三向,三路合并存在两种情况:1. 正常合并 2. 发生文件冲突,合并失败

三路合并之合并成功示例:
$ git merge devMerge made by the 'recursive' strategy.2.txt | 01 file changed, 0 insertions(+), 0 deletions(-)create mode 100644 2.txt
命令中的提示翻译
# 通过“递归”策略进行合并Merge made by the 'recursive' strategy.
4. 合并场景之 three way merge(三路合并之冲突合并)
冲突产生的原因
两个分支在同一个文件的同一个位置有两套完全不同的修改,git 无法替我们决定使用哪一个,必须人为决定文件内容
自动合并失败时的提示
# 自动合并 1.txtAuto-merging 1.txt# 冲突(内容): 将冲突合并到 1.txt 中CONFLICT (content): Merge conflict in 1.txt# 自动合并失败;修复冲突然后提交结果Automatic merge failed; fix conflicts and then commit the result.
查看状态
# 你有未合并的内容You have unmerged paths.# 修改冲突,然后运行 "git commit"(fix conflicts and run "git commit")# 使用 "git merge --abort" 中止合并(use "git merge --abort" to abort the merge)# 未合并的内容Unmerged paths:# 使用 "git add" 标记已解决冲突(use "git add <file>..." to mark resolution)both modified: 1.txtno changes added to commit (use "git add" and/or "git commit -a")
5. 中止合并
已经执行了 git merge 合并分支,突然不想合并了,可以使用以下命令中止当前正在进行的合并
git merge --abort


【推荐】国内首个AI IDE,深度理解中文开发场景,立即下载体验Trae
【推荐】编程新体验,更懂你的AI,立即体验豆包MarsCode编程助手
【推荐】抖音旗下AI助手豆包,你的智能百科全书,全免费不限次数
【推荐】轻量又高性能的 SSH 工具 IShell:AI 加持,快人一步
· TypeScript + Deepseek 打造卜卦网站:技术与玄学的结合
· 阿里巴巴 QwQ-32B真的超越了 DeepSeek R-1吗?
· 【译】Visual Studio 中新的强大生产力特性
· 10年+ .NET Coder 心语 ── 封装的思维:从隐藏、稳定开始理解其本质意义
· 【设计模式】告别冗长if-else语句:使用策略模式优化代码结构