
LNMP构架搭建论坛
LNMP指的是一个基于CentOS/Debian编写的Nginx、PHP、MySQL、phpMyAdmin、eAccelerator一键安装包。
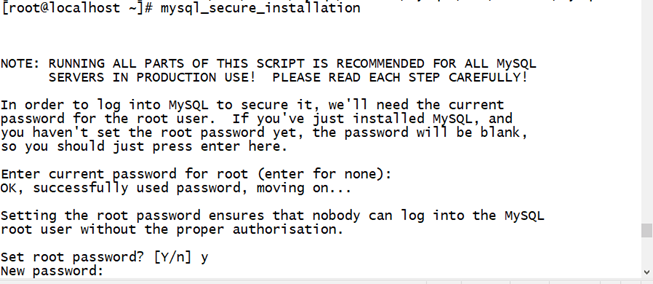
一. 配置 MySQL服务
- 搭建lnmp首先配置yum源,挂载镜像
mount /dev/cdrom opt
![]()
-
![]()
- 安装yum软件仓库
![]()
- 软件包安装 代码: yum install -y apr* autoconf automake bison bzip2 bzip2* compat* cpp curl curl-devel fontconfig fontconfig-devel freetype freetype* freetype-devel gcc gcc-c++ gd gettext gettext-devel glibc kernel kernel-headers keyutils keyutils-libs-devel krb5-devel libcom_err-devel libpng libpng-devel libjpeg* libsepol-devel libselinux-devel libstdc++-devel libtool* libgomp libxml2 libxml2-devel libXpm* libtiff libtiff* make mpfr ncurses* ntp openssl openssl-devel patch pcre-devel perl php-common php-gd policycoreutils telnet t1lib t1lib* nasm nasm* wget zlib-devel
![]()
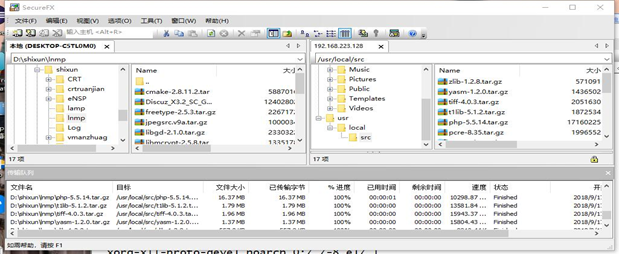
- lnmp需要的压缩包,存放在/usr/local/src目录下
![]()
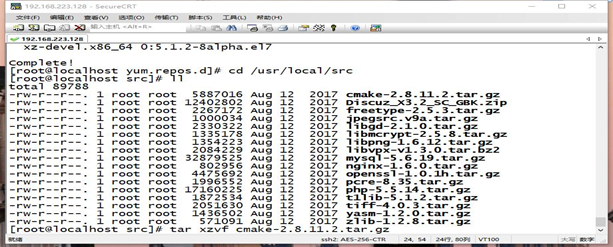
- 进入/usr/local/src目录下查看压缩文件
![]()
- 解压cmake..文件
tar xzvf cmake-
2.8.11.2.tar.gz
![]()
-
进入目录cmake-2.8.11.2,编译源码包代码
./configure
![]()
-
运行服务程序安装包
![]()
-
在src目录下,创建MySQL数据用户
useradd mysq -s /sbin/nologin
![]()
- 创建用于保存真实数据库文件的目录 mkdir -p /usr/local/mysql/var
![]()
- 将/usr/local/mysql所属组,所属者权限改为mysql
![]()
- 解压MySQL-5.6.19,
![]()
- Cmake是Linux系统中一款常用的编译工具。1参数用于数据库服务程序的保存目录,2参数用于真实数据文件的目录,3定义MySQL数据库配置文件的保存目录
Cmake –DCMAKE_INSTALL_PREFIX=/usr/local/mysql –DMYSQL_DATADIR=/usr/local/mysql/var –DSYSCONFDIR=/etc
![]()
- 运行服务程序安装包
![]()
![]()
- 删除/etc/mv.cnf文件
![]()
- -basedir参数指定MySQL服务程序的保存目录,-datadir指定MySQL真实数据库的文件保存目录,生成系统数据库文件,也生成新的MySQL服务配置文件./scripts/mysql_install_db --user=mysql --basedir=/usr/local/mysql --datadir=/usr/local/mysql/var
![]()
-
新的MySQL数据库配置文件链接到/etc下
![]()
- 将程序目录中的开机程序文件复制到/etc/rc.d/init.d目录中
![]()
- 数据库脚本文件的权限改成755,以便用户有执行该脚本的权限
![]()
- 进入配置文件/etc/rc.d/init.d/mysql,把46 47行分别修改为MySQL数据库程序的保存目录和真实的数据库内容
vi /etc/rc.d/init.d/mysqld
![]()
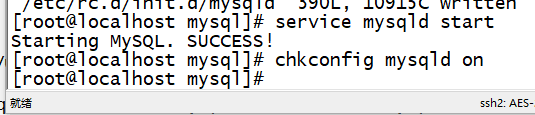
- 启动数据库服务,把服务程序加入到开机启动项中
![]()
-
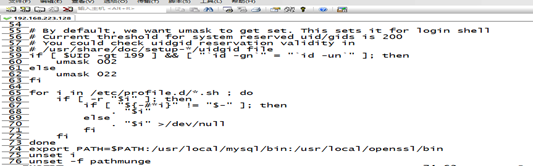
进入文件/etc/profile下,写入追加命令目录,当物理设备在下一次重启时就会永久生效
vi /etc/profile![]()
- 如果不想重启就可以使用source命令加载一下/etc/profile文件。这样新的path变量就可以立即生效
source /etc/profile
![]()
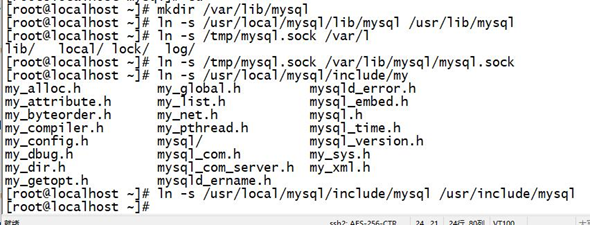
-
创建目录,以手动方式把文件链接起来
ln -s /usr/local/mysql/lib/mysql /usr/lib/mysql
ln -s /tmp/mysql.sock /var/lib/mysql/mysql.sock
ln -s /usr/local/mysql/include/mysql /usr/include/mysql
![]()
![]()


二.配置Nginx服务
- 关闭防火墙,保存防火墙的现在状态
![]()
![]()
-
进入/usr/local/src目录下,解压pcre-8.35.tar.gz文件,pcre软件包用于提供Perl语言兼容的正则表达式库
![]()
-
对文件进行编译,然后安装
./configure --prefix=/usr/local/pcre
make
make install
![]()
![]()
![]()
-
回到目录src目录下,解压文件openssl-1.0.1h.tar.gz,openssl软件包是用于提供网站加密证书服务的程序文件
![]()
-
对文件进行编译,然后安装
cd openssl-1.0.1h
./config --prefix=/usr/local/openssl
make
make install
![]()
![]()
![]()
-
将目录/usr/local/openssl/bin添加到PATH环境变量中,并写入到配置文件74行中
74 行 export PATH=$PATH:/usr/local/mysql/bin:/usr/local/openssl/bin
![]()
![]()
-
执行source命令以便让新的PATH环境变量内容可以立即生效
source /etc/profile
![]()
-
cd ..回到src目录下解压zlib-1.2.8文件,zlib软件包是用于提供压缩功能的函数库文件
tar xzvf zlib-1.2.8.tar.gz
-
对文件进行编译,然后安装
./configure --prefix=/usr/local/zlib
make
make install
![]()
![]()
![]()
-
安装完成后cd ..回到src目录下, 创建一个用于执行Nginx服务程序的账户
useradd www -s /sbin/nologin
![]()
-
解压文件nginx-1.6.0.tar.gz
![]()
-
解压软件源码包的解压路径,并进行安装。--prefix参数用于定义服务程序稍后安装到的位置,--user与--group参数用于指定执行Nginx服务程序的用户名和用户组
./configure --prefix=/usr/local/nginx --without-http_memcached_module --user=www --group=www --with-http_stub_status_module --with-http_ssl_module --with-http_gzip_static_module --with-openssl=/usr/local/src/openssl-1.0.1h --with-zlib=/usr/local/src/zlib-1.2.8 --with-pcre=/usr/local/src/pcre-8.35
make
make install
![]()
![]()
![]()
-
启动Nginx服务程序,以及加入到开机启动项中。现在需要配置脚本文件 ,脚本文件如下
vim /etc/rc.d/init.d/nginx
#!/bin/bash
# nginx - this script starts and stops the nginx daemon
# chkconfig: - 85 15
# description: Nginx is an HTTP(S) server, HTTP(S) reverse \
# proxy and IMAP/POP3 proxy server
# processname: nginx
# config: /etc/nginx/nginx.conf
# config: /usr/local/nginx/conf/nginx.conf
# pidfile: /usr/local/nginx/logs/nginx.pid
# Source function library.
. /etc/rc.d/init.d/functions
# Source networking configuration.
. /etc/sysconfig/network
# Check that networking is up.
[ "$NETWORKING" = "no" ] && exit 0
nginx="/usr/local/nginx/sbin/nginx"
prog=$(basename $nginx)
NGINX_CONF_FILE="/usr/local/nginx/conf/nginx.conf"
[ -f /etc/sysconfig/nginx ] && . /etc/sysconfig/nginx
lockfile=/var/lock/subsys/nginx
make_dirs() {
# make required directories
user=`$nginx -V 2>&1 | grep "configure arguments:" | sed 's/[^*]*--user=\([^ ]*\).*/\1/g' -`
if [ -z "`grep $user /etc/passwd`" ]; then
useradd -M -s /bin/nologin $user
fi
options=`$nginx -V 2>&1 | grep 'configure arguments:'`
for opt in $options; do
if [ `echo $opt | grep '.*-temp-path'` ]; then
value=`echo $opt | cut -d "=" -f 2`
if [ ! -d "$value" ]; then
# echo "creating" $value
mkdir -p $value && chown -R $user $value
fi
fi
done
}
start() {
[ -x $nginx ] || exit 5
[ -f $NGINX_CONF_FILE ] || exit 6
make_dirs
echo -n $"Starting $prog: "
daemon $nginx -c $NGINX_CONF_FILE
retval=$?
echo
[ $retval -eq 0 ] && touch $lockfile
return $retval
}
stop() {
echo -n $"Stopping $prog: "
killproc $prog -QUIT
retval=$?
echo
[ $retval -eq 0 ] && rm -f $lockfile
return $retval
}
restart() {
#configtest || return $?
stop
sleep 1
start
}
reload() {
#configtest || return $?
echo -n $"Reloading $prog: "
killproc $nginx -HUP
RETVAL=$?
echo
}
force_reload() {
restart
}
configtest() {
$nginx -t -c $NGINX_CONF_FILE
}
rh_status() {
status $prog
}
rh_status_q() {
rh_status >/dev/null 2>&1
}
case "$1" in
start)
rh_status_q && exit 0
$1
;;
stop)
rh_status_q || exit 0
$1
;;
restart|configtest)
$1
;;
reload)
rh_status_q || exit 7
$1
;;
force-reload)
force_reload
;;
status)
rh_status
;;
condrestart|try-restart)
rh_status_q || exit 0
;;
*)
echo $"Usage: $0 {start|stop|status|restart|condrestart|try-restart|reload|force-reload|configtest}"
exit 2
esac
-
对/etc/rc.d/init.d/nginx赋予755权限
![]()
-
Nginx服务程序重启
![]()
-
将Nginx服务程序添加到开机启动项中
![]()


-
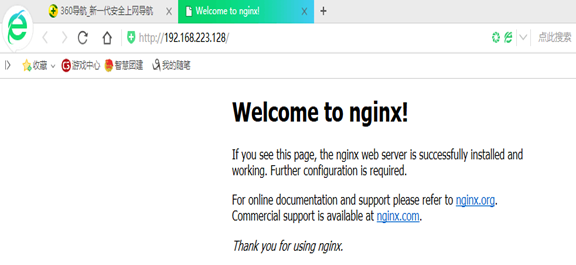
Nginx服务程序搭建完成,从浏览器中登录自己的IP地址
![]()
三.配置PHP服务
PHP(Hypertxt Preprocessor,超文本预处理器)是一种通用的开源脚本语言,发明于1995年,它吸取了C语言、Java语言及Perl语言的很多优点,具有开源、免费、快捷、跨平台性强、效率高等优良特性,是目前Web开发领域最常用的语言之一。
- src目录下 解压文件yasm源码包是一款常见的开源汇编器 tar zxvf yasm-1.2.0.tar.gz
![]()
- 编译、生成安装服务程序
./configure
make
make install
![]()
![]()
![]()
-
src目录下解压文件libmcrypt源码包是用于加密算法的扩展库程序
![]()
-
编译、生成、安装服务程序
![]()
![]()
![]()
-
src目录下解压文件libvpx源码包是用于提供视频编码器的服务程序,libvpx-v1.3.0.tar.bz2,则此处解压方式为:tar xjvf
![]()
-
编译、生成、安装服务程序
![]()
![]()
![]()
-
src目录下解压文件 tiff源码包是用于提供标签图像文件格式的服务程序
![]()
-
编译、生成、安装服务程序
![]()
![]()
![]()
-
src目录下解压文件 libpng源码包是用于提供png图片格式支持函数库的服务程序
![]()
-
编译、生成、安装服务程序
![]()
![]()
![]()
-
src目录下,解压文件freetype源码包是用于提供字体支持引擎的服务程序
![]()
- 编译、生成、安装服务程序
![]()
![]()
![]()
-
src目录下解压文件 jpeg源码包是用于提供jpeg图片格式支持函数库的服务程序
![]()
-
编译、生成、安装服务程序
![]()
![]()
![]()
-
src目录下,解压文件libgd源码包是用于提供图形处理的服务程序
![]()
-
编译、生成、安装服务程序
./configure --prefix=/usr/local/libgd --enable-shared --with-jpeg=/usr/local/jpeg --with-png=/usr/local/libpng --with-freetype=/usr/local/freetype --with-fontconfig=/usr/local/freetype --with-xpm=/usr/ --with-tiff=/usr/local/tiff --with-vpx=/usr/local/libvpx
![]()
![]()
![]()
-
src目录下,解压文件t1lib源码包是用于提供图片生成函数库的服务程序
![]()
-
编译、生成、安装服务程序
![]()
![]()
![]()
-
把/usr/lib64目录中的函数文件链接到/usr/lib目录中
![]()
![]()
-
src目录下解压php文件
![]()
-
定义一个名为LD_LIBRARY_PATH的全局环境变量,该环境变量的作用是帮助系统找到指定的动态链接库文件
![]()
-
编译、生成、安装服务程序
./configure --prefix=/usr/local/php --with-config-file-path=/usr/local/php/etc --with-mysql=/usr/local/mysql --with-mysqli=/usr/local/mysql/bin/mysql_config --with-mysql-sock=/tmp/mysql.sock --with-pdo-mysql=/usr/local/mysql --with-gd --with-png-dir=/usr/local/libpng --with-jpeg-dir=/usr/local/jpeg --with-freetype-dir=/usr/local/freetype --with-xpm-dir=/usr/ --with-vpx-dir=/usr/local/libvpx/ --with-zlib-dir=/usr/local/zlib --with-t1lib=/usr/local/t1lib --with-iconv --enable-libxml --enable-xml --enable-bcmath --enable-shmop --enable-sysvsem --enable-inline-optimization --enable-opcache --enable-mbregex --enable-fpm --enable-mbstring --enable-ftp --enable-gd-native-ttf --with-openssl --enable-pcntl --enable-sockets --with-xmlrpc --enable-zip --enable-soap --without-pear --with-gettext --enable-session --with-mcrypt --with-curl --enable-ctype
![]()
![]()
![]()
-
在php源码包程序安装完成后,需要删除当前默认的配置文件,然后将php服务程序目录中相应的配置文件复制过来
![]()
![]()
![]()
![]()
-
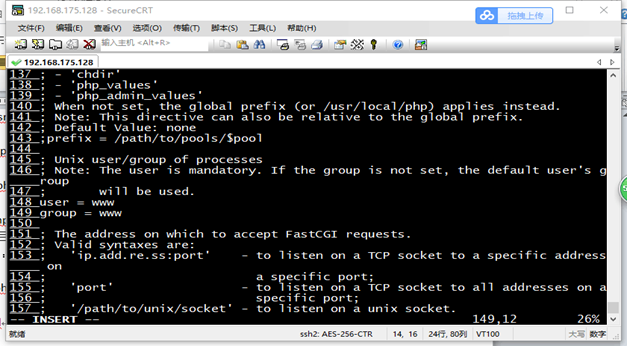
启用该配置文件vim /usr/local/php/etc/php-fpm.conf
中第25行左右的pid文件保存目录,然后分别将第148和149行的user与group参数分别修改为www账户和用户组名称
![]()
-
配置妥当后便把用于管理php服务的脚本文件复制到/etc/rc.d/init.d,为脚本赋予755权限
![]()
-
把php-fpm服务程序加入到开机启动项中
chkconfig php-fpm on
-
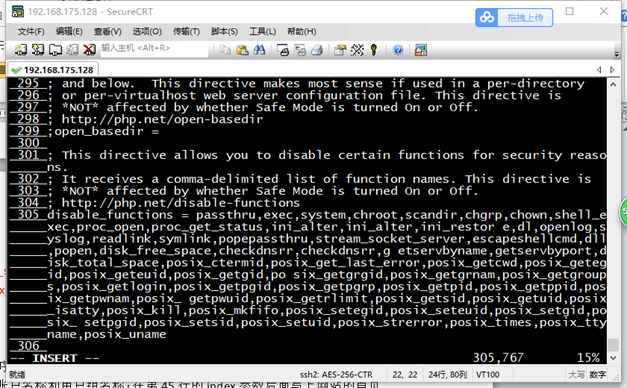
编辑php.ini配置文件,在305行的disable_functions参数后面追加上要禁止的功能 305行加入:=passthru,exec,system,chroot,scandir,chgrp,chown,shell_exec,proc_open,proc_get_status,ini_alter,ini_alter,ini_restor e,dl,openlog,syslog,readlink,symlink,popepassthru,stream_socket_server,escapeshellcmd,dll,popen,disk_free_space,checkdnsrr,checkdnsrr,g etservbyname,getservbyport,disk_total_space,posix_ctermid,posix_get_last_error,posix_getcwd,posix_getegid,posix_geteuid,posix_getgid,po six_getgrgid,posix_getgrnam,posix_getgroups,posix_getlogin,posix_getpgid,posix_getpgrp,posix_getpid,posix_getppid,posix_getpwnam,posix_ getpwuid,posix_getrlimit,posix_getsid,posix_getuid,posix_isatty,posix_kill,posix_mkfifo,posix_setegid,posix_seteuid,posix_setgid,posix_ setpgid,posix_setsid,posix_setuid,posix_strerror,posix_times,posix_ttyname,posix_uname
![]()
![]()
-
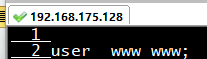
编辑Nginx服务程序的主配置文件,把第2行的井号(#)删除,然后在后面写上负责运行Nginx服务程序的账户名称和用户组名称;在第45行的index参数后面写上网站的首页名称。最后是将第65~71行参数前的井号(#)删除来启用参数,主要是修改第69行的脚本名称路径参数
![]()
![]()
![]()
![]()
-
重启Nginx服务与php-fpm服务
![]()
![]()
-
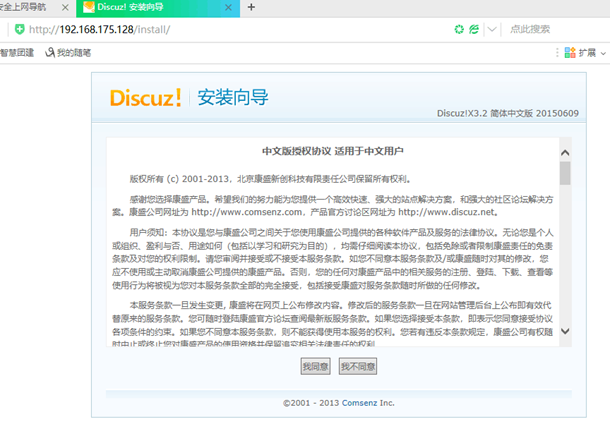
搭建Discuz论坛 解压文件Discuz,删除文件
![]()
![]()
-
把upload全部复制到/usr/local/nginx/html下
![]()
-
对文件赋予权限
![]()
![]()
-
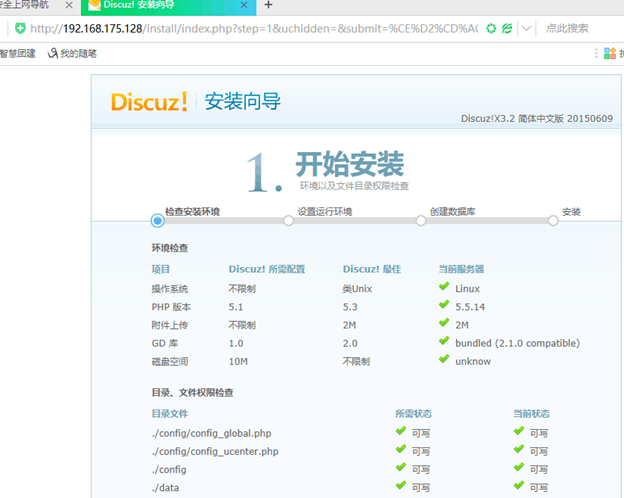
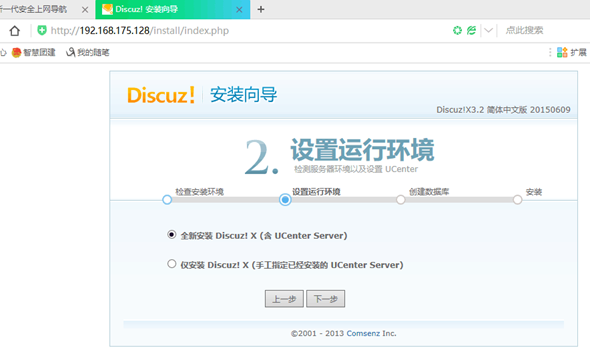
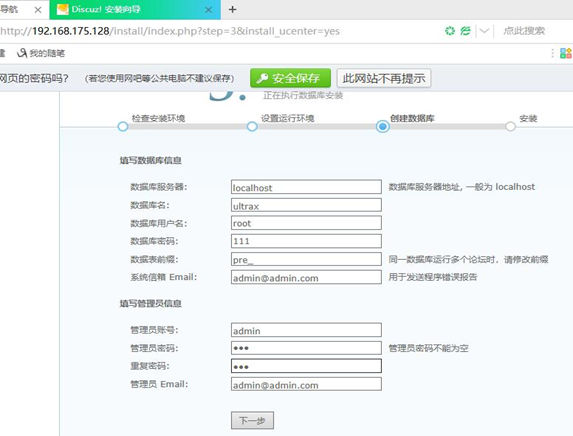
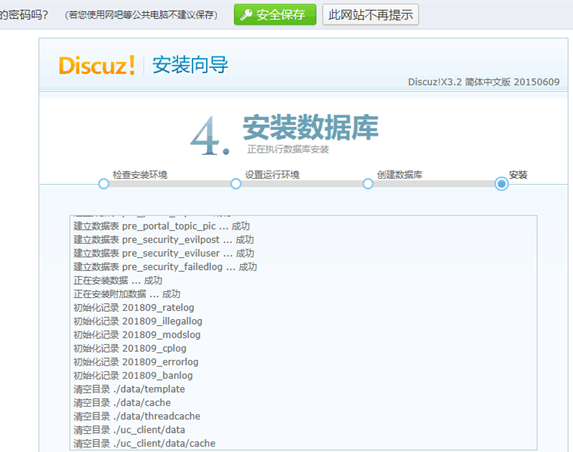
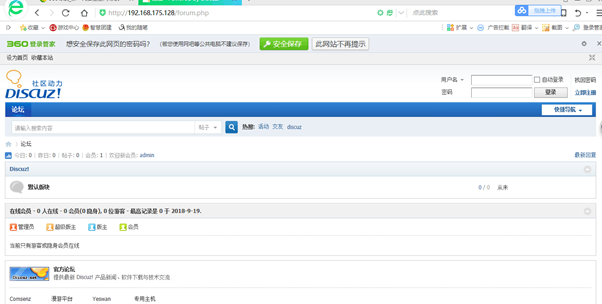
浏览器输入自己的IP地址,进行安装,步骤如下
![]()
![]()
![]()
![]()
![]()
![]()
![]()


 浙公网安备 33010602011771号