Robot Framework_Ride(Run标签)
前言
我一直在想 Robot Framework 不要 RIDE 可不可以。对于编写测试用例来说,只要掌握 Robot
Framework 的语法规则,随便在一个你顺手的编辑器下编写也没问题,甚至效率更高。为什么要填写
那个该死的“表格”。
直到运行案例的时候我才意识到 RIDE 的好处。在 RIDE 中运行测试用例,就是勾选想要运行的
用例,然后点击按钮即可。想想我们在做单元测试的时候可不会这么方便,调用 addTest()方法将一个
个想要运行的测试方法添加到测试套件中,或者一行行的注释掉不添加到测试套件的测试用例的
addTest()方法,这是个极其痛苦的过程
Run 标签
下面是 Run 标签的截图:

第一眼看上去,Run 标签提供了丰富的操作和日志。按照截图我们依次来说明 Run 标签上的按钮和输
入框的作用:
1) Execution Profile:选择运行方式,里面有 pybot、jybot 和 custom script。其中我们默认是用 pybot
来运行案例,pybot 的运行 Python 编译器完成。jybot 需要安装 Jython 的支持。custom script 是选择自定义
的脚本来运行。
2) Start 和 Stop:用例的运行和停止。
3) Report 和 Log:报告和日志,要运行之后才能点击。他们之间的区别:报告更多是结果上的展示,
日志更多是过程的记录,在测试用例调试的过程中更多使用日志来查看执行错误。当只想知道测试用例的
最终执行情况时用报告。
4) Autosave:自动保存,如果不勾选,在修改了用例之后如果没有保存的话,运行案例时会提示是否
保存。勾选则在运行时自动保存了。
5) Arguments:pybot 的参数(或者 jybot 等),可以在这里输入 pybot 的命令完成相应的操作。
6) Only Run Tests with these Tags:只运行这些标记的测试案例。
7) Skip Tests with these Tags: 跳过这些标记的测试案例。
下面的两个区域,中间区域记录用例的执行过程,底部的区域输出用例的执行结果。


运行与停止
在 Run 标签页提供了运行与停止的按钮,使用很简单。可是你知道到点击“运行”按钮的时候,Robot
Framework 是怎么执行“测试套件.txt”文件的么?点击“停止”按钮的时候,Robot Framework 又做了什
么操作来终止用例的执行的?带着这样的疑问,我们来简单的读一下 RIDE 的 run 代码。
首先打开 C:\Python27\Lib\site-packages\robotide\run 目录下的 process.py 文件
import os
import time
import tempfile
import subprocess
class Process(object):
……
def start(self):
self._out_fd, self._out_path = \
tempfile.mkstemp(prefix='rfproc_', suffix='.txt',
text=True)
self._out_file = open(self._out_path)
if not self._command:
self._error = 'The command is missing from this run configuration.'
return
try:
self._process = subprocess.Popen(self._command, stdout=self._out_fd,
stderr=subprocess.STDOUT)
except OSError, err:
self._error = str(err)
……
def stop(self):
try:
self._process.kill()
except AttributeError:
raise AttributeError('Stopping process is possible only with '
'Python 2.6 or newer')
……
def get_output(self, wait_until_finished=False):
"""Returns the output produced by the process.
If ``wait_until_finished`` is True, blocks until the process is
finished and returns all output. Otherwise the currently available
output is returned immediately.
Currently available output depends on buffering and might not include
everything that has been written by the process.
"""
if self._error:
self._close_outputs()
return self._error
if wait_until_finished:
self._process.wait()
output = self._out_file.read()
if self.is_finished():
self._close_outputs()
return output
def _close_outputs(self):
self._out_file.close()
os.close(self._out_fd)
self._remove_tempfile()
首先看 start()方法,通过 tempfile 模块的 mkstemp()方法找到“txt”文件,也就是“测试套件.txt”文这类件。接着通过 open()方法打开。
在 get_output()方法中通过 read()方法来读取“txt”文件。最后把读取的文件的赋值给变量 output 并返回。
在_close_outputs()方法中通过 close()关闭打开的“txt”文件。
停止测试用例的执行非常单间,由 stop()方法实现,通过调用 kill()将用例的执行进程杀死。
代码读到这里只是开始,get_output()方法读到的文件返回给谁了呢?或者谁会调用 get_output()方法
呢?继续打开 C:\Python27\Lib\site-packages\robotide\run 目录下的 ui.py 文件
……
from robotide.run.process import Process
……
class Runner(wx.EvtHandler):
def __init__(self, config, notebook):
wx.EvtHandler.__init__(self)
self.Bind(wx.EVT_TIMER, self.OnTimer)
self.name = config.name
self._timer = wx.Timer(self)
self._config = config
self._window = self._get_output_window(notebook)
def _get_output_window(self, notebook):
return _OutputWindow(notebook, self)
def run(self):
self._process = Process(self._config.command)
self._process.start()
self._timer.Start(500)
def OnTimer(self, event=None):
finished = self._process.is_finished()
self._window.update_output(self._process.get_output(), finished)
if finished:
self._timer.Stop()
def stop(self):
try:
self._process.stop()
except Exception, err:
wx.MessageBox(str(err), style=wx.ICON_ERROR)
……
ui.py 文件调用 process.py 文件的方法来运行测试用例。如果读者精通于 Python 语言的话可以顺着这条
线继续读下去,看看哪个方法会调用 Runer 类。因为本文档的重点的不是分析 Robot Framework 代码,所
以不在再继续。但这里想传达的思路是知其然,一定要知其所以然;用工具而不要受制于工具
3 报告与日志
当用例运行结束,Robot Framework 生成三个文件:output.xml、log.html 和 report.html。output.xml 记录的测试结果是 xml 文件,这个文件不够直观。根据特定的需要可以编写脚本读取 xml
文件并生成特定的测试报告。
相比较而言 log.html 和 report.html 报告要直观得多,因为是 html 格式的嘛。
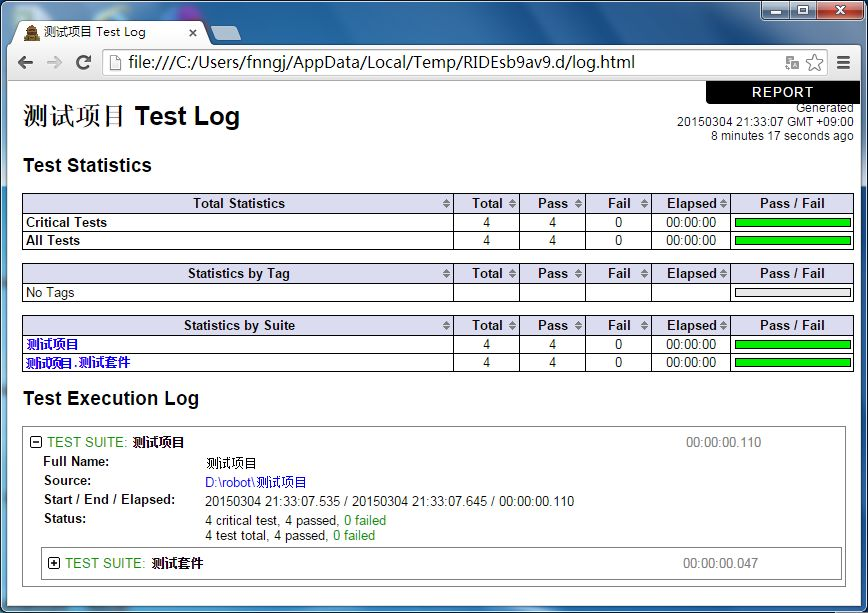
查看 log.html 文件,点击 Run 标签而上的“Log”按钮,通过默认浏览器打开

在 log.html 文件中可以查看用例执行的每一步,适合跟踪定义问题。

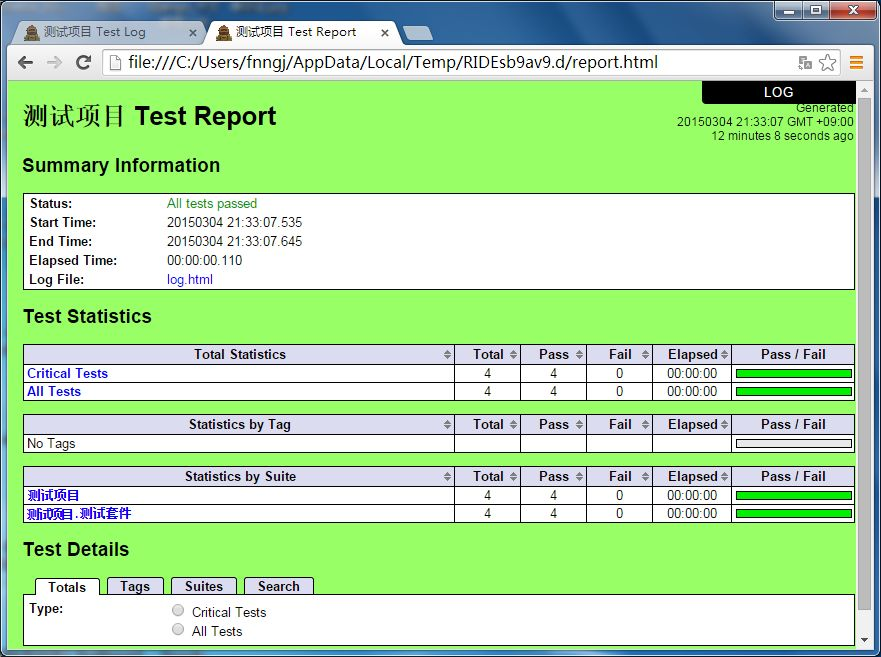
查看 report.html,点击 Run 标签而上的“Report”按钮,通过默认浏览器打开

report.html 用于最终结果的展示,适合了解测试用例的执行情况:测试了哪些模块,用例数、失败率等。
4、筛选执行用例
这一节来探讨一下,几中方式可以筛选要运行的运用例。
第一种:勾选用例
在要执行的用例前面打勾。

这种方法最简单和直观,要运行哪条用例就勾选哪一条。如果全部不勾选,点击“运行”按钮会运行所有用例
也可以在“测试套件”上右键选择:

Select All Test:选择当前套件的所有用例。
Select Only Failed Test:选择当前套件下运行失败的用例。
Select Only Passed Test:选择当前套件下运行成功的用例。
对于一个测试套件下有几十上百个用例来说,这几选项将非常有用。
第二种:用命令
这就用到 Run 标签中的 Arguments 功能。

在 Arguments 的输入框内输入“-t testcase4”。点击“Start”按钮,只执行了 test case4 这一条用例。
Arguments 能做的事情可不止于此。想了解更多多命令。可以在 cmd.exe 下执行“pybot.bat --help”

第三种:筛选标记
这种方式就非常有意思的,对于不同的人来说会有一些标记,比如某富二代的标记就是“任性”。对
于用例来说也可以打上标记。比如“重要”、“一般”、“基础”等。
点击某个用例,你会看到“Setting>>”的按钮,点击按钮展开:

在最下面将会看到“Tags”的选项,在“<Add New>”的输入框内输入“重要”。这条用例就打上了
“重要”的标记。
现在切换到 Run 标签,我要运行带“重要”标记的用例了,如何去做了?这就要用到:
Only Run Tests with these Tags:只运行这些标记的测试案例。
Skip Tests with these Tags: 跳过这些标记的测试案例

因为“test case3”被打上了“重要”的标记,所以它被执行了。
对于一个用例来说,我们可以为它添加多个标记。勾选“Skip Tests with these Tags”选项可以跳过某些标记的用例。


