

来时的路,没有归途,相互沉默挥一挥手,那就了解VRRP协议原理与配置
一.VRRP协议介绍
- 局域网中的用户终端通常采用配置一个默认网关的形式访问外部网络,如果此时默认网关设备发生故障,将中断所有用户终端的网络访问,这很能会给用户带来不可预计的损失,所以可以通过部署多个网关的方式来解决单点故障问题,那么如何让多给网关能够协同工作但又不会相互冲突就成了迫切需要解决的问题。
- 于是VRRP应运而生,它既可以实现网关的备份,又能解决多个网关之间互相冲突的问题。
二.VRRP基本概述
- VRRP能够在不改变组网的情况下,将多台路由虚拟路由器,通过配置虚拟路由器的IP地址为默认网关,实现网关备份
- 协议版本:VRRv2(常用)和VRRPv3
- VRRPv2仅适用于IP v4网络,VRRPv3适用于IP v4和IP v6两种网络
- VRRP协议报文
- 只有一种报文:Advertisemen报文,其目的IP地址是224.0.0.18,目的MAC地址是01-00-5e-00-00-12,协议号是112
注:224.0.0.18是主播地址
三.VRRP
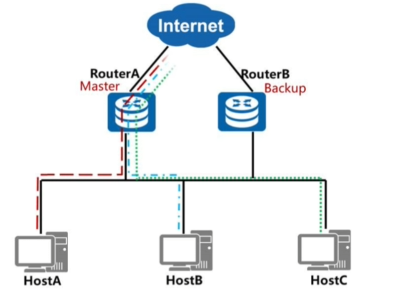
3.1单网关的缺陷
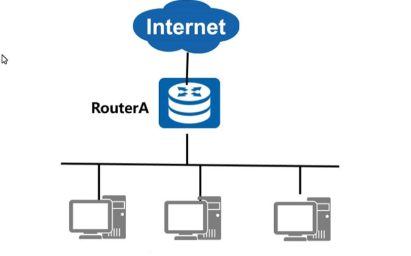
当网关路由器RouterA出现故障时,本网段内以该设备为网关的主机都不能与internet进行通信
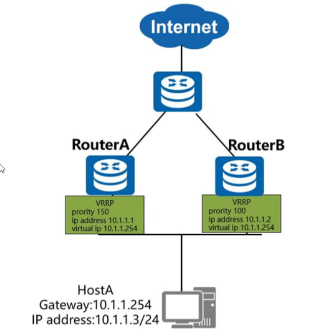
3.2多网关存在的问题

- 通过部署多网关的方式实现网关的备份。
- 但多网关可能会出现一些问题:网关间IP地址冲突,主机会频繁切换网络出口
3.3VRRP基本结构
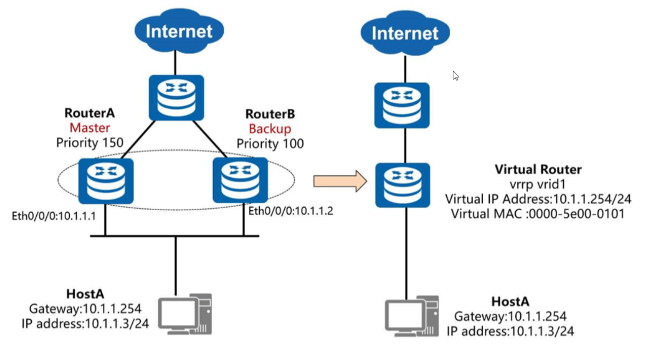
源IP:1.3 源mac:自己
目标:公网 目标:网关的MAC
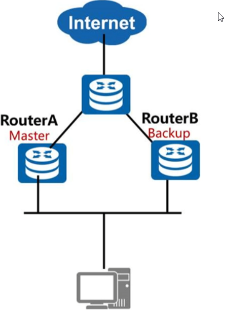
3.4VRRP主备备份工作过程
1.选择出master
2.状态维持master设备周期性地发送VRRP通告报文给组内其他设备,以通知自己处于正常的工作状态。
3.5VRRP主备路由器切换过程
1.backup在master-down-interval时间内未收到master发送的状态通告报文,则立即成为master
2.如果原master故障恢复,则主备回切的过程

发现收到router b的vrrp报文中的优先级比自己低,router a立即抢占成为master
3.6VRRP联动功能

解决方法:利用VRRP的联动功能监视上行接口或链路故障,主动进行主备切换。
3.7VRRP负载分担工作过程
传统的主备方式流量都经由单个master转发,master负担过重
backup:通过配置不同的备份组,使router b成为新备份组的master,这样就可以分担网络中的流量了
四.VRRP实验
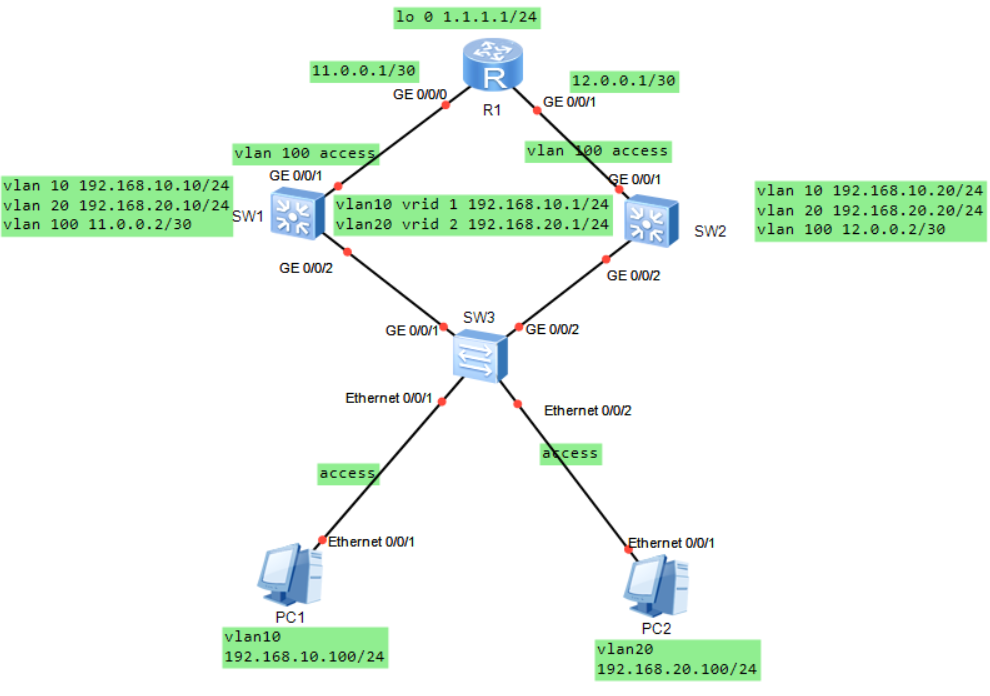
配置sw3

 1 <Huawei>sys
 2 [Huawei]sys
 3 [Huawei]sysname sw3
 4 [sw3]undo info
 5 [sw3]undo info-center en
 6
 7 [sw3]v b 10 20
 8 [sw3]int e0/0/1
 9 [sw3-Ethernet0/0/1]p l a
10 [sw3-Ethernet0/0/1]p d v 10
11 [sw3-Ethernet0/0/1]un sh
12 Info: Interface Ethernet0/0/1 is not shutdown.
13 [sw3-Ethernet0/0/1]int e0/0/2
14 [sw3-Ethernet0/0/2]p l a
15 [sw3-Ethernet0/0/2]p d v 20
16 [sw3-Ethernet0/0/2]un sh
17 Info: Interface Ethernet0/0/2 is not shutdown.
18 [sw3-Ethernet0/0/2]int g0/0/1
19 [sw3-GigabitEthernet0/0/1]p l t
20 [sw3-GigabitEthernet0/0/1]p t a v 10 20
21 [sw3-GigabitEthernet0/0/1]un sh
22 Info: Interface GigabitEthernet0/0/1 is not shutdown.
23 [sw3-GigabitEthernet0/0/1]int g0/0/2
24 [sw3-GigabitEthernet0/0/2]p l t
25 [sw3-GigabitEthernet0/0/2]p t a v 10 20
26 [sw3-GigabitEthernet0/0/2]un sh
配置sw1
 1 <Huawei>sys
 2 Enter system view, return user view with Ctrl+Z.
 3 [Huawei]sys
 4 [Huawei]sysname sw1
 5 [sw1]undo info-center en
 6 [sw1]v b 10 20 100
 7 Info: This operation may take a few seconds. Please wait for a moment...done.
 8 [sw1]int g0/0/2
 9 [sw1-GigabitEthernet0/0/2]p l t
10 [sw1-GigabitEthernet0/0/2]p t a v 10 20
11 [sw1-GigabitEthernet0/0/2]un sh
12 Info: Interface GigabitEthernet0/0/2 is not shutdown.
13 [sw1-GigabitEthernet0/0/2]int g0/0/1
14 [sw1-GigabitEthernet0/0/1]p l a
15 [sw1-GigabitEthernet0/0/1]p d v 100
16 [sw1-GigabitEthernet0/0/1]un sh
17 Info: Interface GigabitEthernet0/0/1 is not shutdown.
18 [sw1-GigabitEthernet0/0/1]q
19 [sw1]int vlanif 10
20 [sw1-Vlanif10]ip add 192.168.10.10 24
21 [sw1-Vlanif10]vrrp vrid 1 virtual-ip 192.168.10.1    ###设置vrrp的I虚拟IP地址
22 [sw1-Vlanif10]vrrp vrid 1 priority 120               ###设置优先级
23 [sw1-Vlanif10]vrrp vrid 1 track int g0/0/2           ###设置监听端口
24 [sw1-Vlanif10]vrrp vrid 1 track int g0/0/1           ###设置监听端口
25 [sw1-Vlanif10]int vlanif 20
26 [sw1-Vlanif20]ip add 192.168.20.10 24
27 [sw1-Vlanif20]vrrp vrid 2 virtual-ip 192.168.20.1    ###设置vrrp的虚拟IP地址
28 [sw1-Vlanif20]vrrp vrid 2 priority 115               ###设置优先级
29 [sw1-Vlanif20]int vlanif 100
30 [sw1-Vlanif100]ip add 11.0.0.2 30
31 [sw1-Vlanif100]un sh
32 Info: Interface Vlanif100 is not shutdown.
33 [sw1-Vlanif100]q
34 [sw1]ip route-static 0.0.0.0 0.0.0.0 11.0.0.1
35 [sw1] User interface con0 is available
配置sw2
<Huawei>sys
Enter system view, return user view with Ctrl+Z.
[Huawei]sysname sw2
[sw2]undo info-center en
Info: Information center is disabled.
[sw2]v b 10 20 100
Info: This operation may take a few seconds. Please wait for a moment...done.
[sw2]int g0/0/2
[sw2-GigabitEthernet0/0/2]p l t
[sw2-GigabitEthernet0/0/2]p t a v 10 20
[sw2-GigabitEthernet0/0/2]un sh
Info: Interface GigabitEthernet0/0/2 is not shutdown.
[sw2-GigabitEthernet0/0/2]int g0/0/1
[sw2-GigabitEthernet0/0/1]p l a
[sw2-GigabitEthernet0/0/1]p d v 100
[sw2-GigabitEthernet0/0/1]un sh
Info: Interface GigabitEthernet0/0/1 is not shutdown.
[sw2-GigabitEthernet0/0/1]q
[sw2]int vlanif 10
[sw2-Vlanif10]ip add 192.168.10.20 24
[sw2-Vlanif10]vrrp vrid 1 virtual-ip 192.168.10.1    ###设置vrrp的虚拟IP地址
[sw2-Vlanif10]vrrp vrid 1 priority 115               ###设置优先级
[sw2-Vlanif10]int vlanif 20
[sw2-Vlanif20]ip add 192.168.20.20 24
[sw2-Vlanif20]vrrp vrid 2 virtual-ip 192.168.20.1    ###设置vrrp的虚拟IP地址vlanif20的
[sw2-Vlanif20]vrrp vrid 2 priority 120               ###设置优先级
[sw2-Vlanif20]vrrp vrid 2 track int g0/0/2           ###设置监听端口
[sw2-Vlanif20]vrrp vrid 2 track int g0/0/1           ###设置监听端口
[sw2-Vlanif20]int vlanif 100
[sw2-Vlanif100]ip add 12.0.0.2 30
[sw2-Vlanif100]un sh
Info: Interface Vlanif100 is not shutdown.
[sw2-Vlanif100]q
[sw2]ip route-static 0.0.0.0 0.0.0.0 12.0.0.1
配置R1
 1 <Huawei>sys
 2 Enter system view, return user view with Ctrl+Z.
 3 [Huawei]sysname R1
 4 [R1]undo info-center en
 5 Info: Information center is disabled.
 6 [R1]int g0/0/0
 7 [R1-GigabitEthernet0/0/0]i a 11.0.0.1 30
 8 [R1-GigabitEthernet0/0/0]un sh
 9 Info: Interface GigabitEthernet0/0/0 is not shutdown.
10 [R1-GigabitEthernet0/0/0]int g0/0/1
11 [R1-GigabitEthernet0/0/1]i a 12.0.0.1 30
12 [R1-GigabitEthernet0/0/1]un sh
13 Info: Interface GigabitEthernet0/0/1 is not shutdown.
14 [R1-GigabitEthernet0/0/1]int loo 0
15 [R1-LoopBack0]i a 1.1.1.1 24
16 [R1-LoopBack0]q
17 [R1]ip route-static 192.168.10.0 24 11.0.0.2
18 [R1]ip route-static 192.168.10.0 24 12.0.0.2 preference 70   ###浮动路由
19 [R1]ip route-static 192.168.20.0 24 12.0.0.2
20 [R1]ip route-static 192.168.20.0 24 11.0.0.2 preference 70   ###浮动路由
总结:vrrp这一章节要明白vrrp的基本结构以及主备备份、切换过程。以及它的配置命令。
希望和悲伤,都是一缕光。总有一天,我们会再相遇。


【推荐】国内首个AI IDE,深度理解中文开发场景,立即下载体验Trae
【推荐】编程新体验,更懂你的AI,立即体验豆包MarsCode编程助手
【推荐】抖音旗下AI助手豆包,你的智能百科全书,全免费不限次数
【推荐】轻量又高性能的 SSH 工具 IShell:AI 加持,快人一步
· 从 HTTP 原因短语缺失研究 HTTP/2 和 HTTP/3 的设计差异
· AI与.NET技术实操系列:向量存储与相似性搜索在 .NET 中的实现
· 基于Microsoft.Extensions.AI核心库实现RAG应用
· Linux系列:如何用heaptrack跟踪.NET程序的非托管内存泄露
· 开发者必知的日志记录最佳实践
· winform 绘制太阳,地球,月球 运作规律
· TypeScript + Deepseek 打造卜卦网站:技术与玄学的结合
· Manus的开源复刻OpenManus初探
· 写一个简单的SQL生成工具
· AI 智能体引爆开源社区「GitHub 热点速览」