


目录
cookie、session、token介绍
1.cookie:存储在客户端浏览器上的k:v键值对
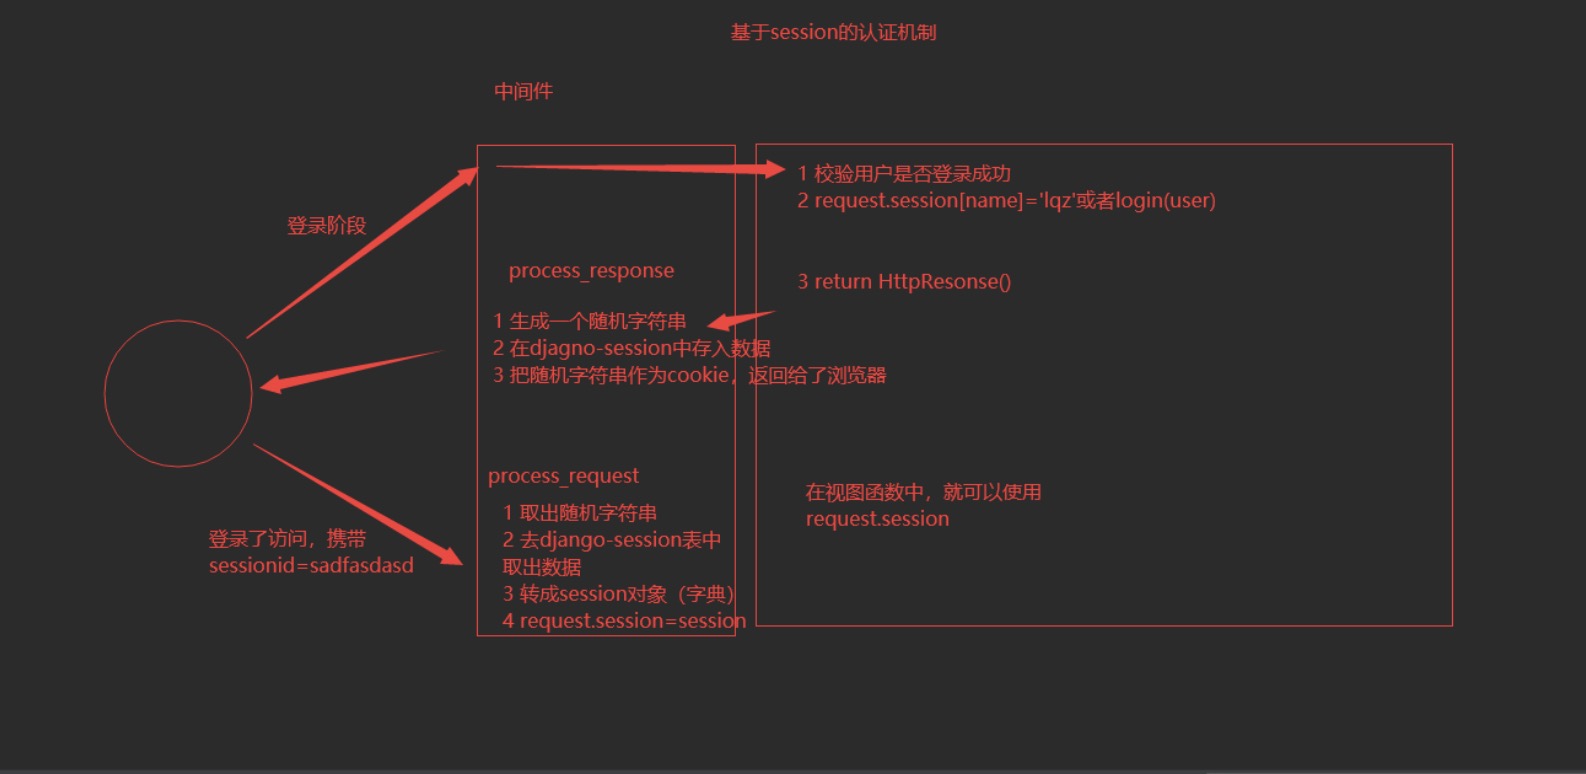
2.session:存储在服务端session表中的k:v键值对
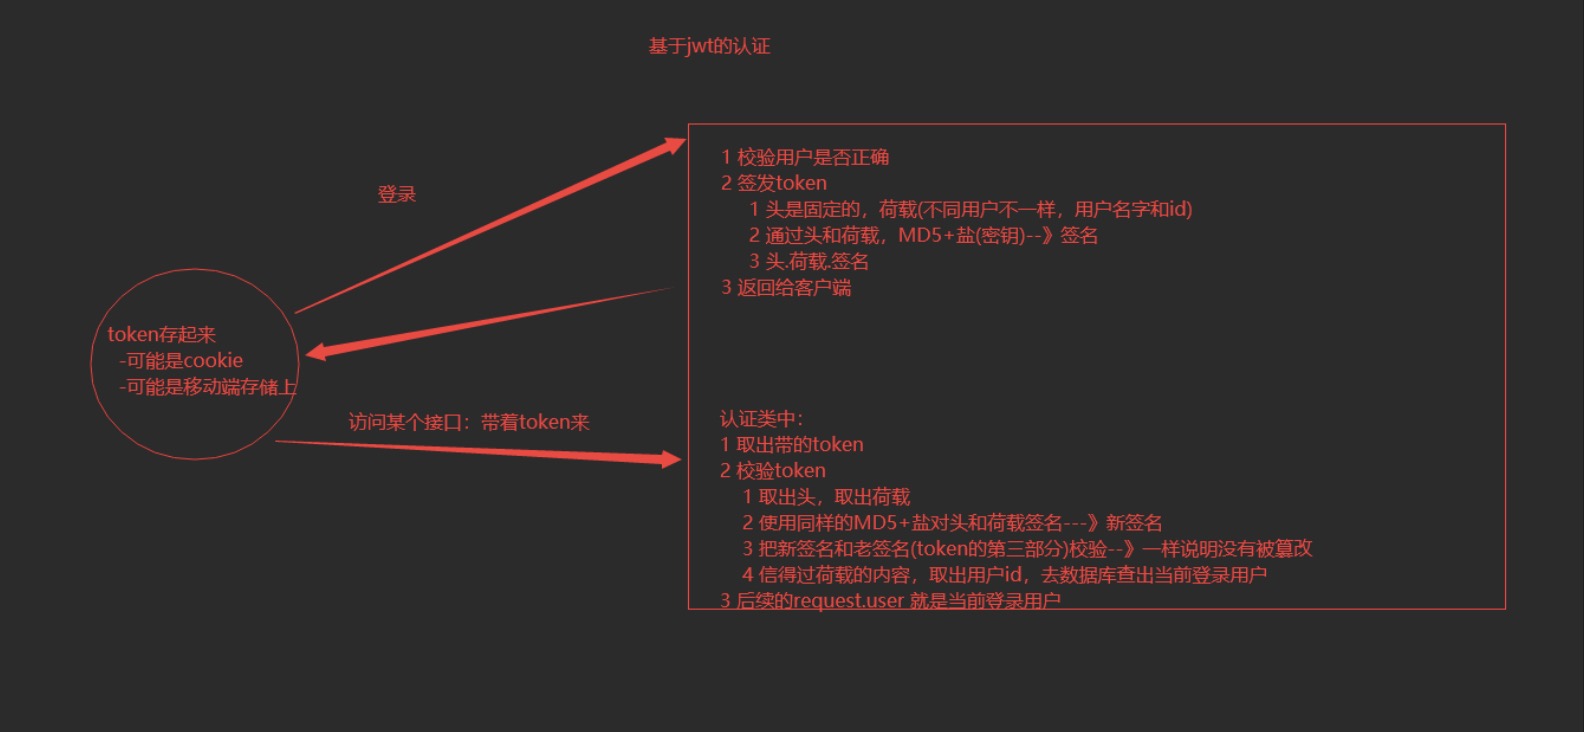
3.token:存放在客户端浏览器cookie中或者移动端中的三段式
第一段:头:公司信息、加密方式
第二段:荷载:真正的数据
第三段:签名 通过第一段和第二段 通过某种加密方式得到


session执行机制
token执行机制
jwt
jwt原理
1.Json web token简称:JWT
token的应用于web方向的称之为jwt
2.构成:
JWT就是一段字符串,由三段信息构成的,将这三段信息文本用.链接一起就构成了Jwt字符串
如:
eyJhbGciOiJIUzI1NiIsInR5cCI6IkpXVCJ9.eyJzdWIiOiIxMjM0NTY3ODkwIiwibmFtZSI6IkpvaG4gRG9lIiwiYWRtaW4iOnRydWV9.TJVA95OrM7E2cBab30RMHrHDcEfxjoYZgeFONFh7HgQ
2.1 header:头
    1.声明类型,这里是jwt
    2.声明加密的算法 通常直接使用 HMAC SHA256
    3.公司信息
    {
        'typ': 'JWT',
        'alg': 'HS256'
    }
     通过base64的编码:
     	eyJhbGciOiJIUzI1NiIsInR5cCI6IkpXVCJ9
 2.2 payload:荷载
    1. exp: jwt的过期时间,这个过期时间必须要大于签发时间
    2. iat: jwt的签发时间
    3. 用户信息: 用户信息
        {
            "exp": "1234567890",
            "name": "John Doe",
            "userid": 3
        }
    通过base64的编码:
  eyJzdWIiOiIxMjM0NTY3ODkwIiwibmFtZSI6IkpvaG4gRG9lIiwiYWRtaW4iOnRydWV9
2.3 signature:签名
    把头和荷载加密后得到的:TJVA95OrM7E2cBab30RMHrHDcEfxjoYZgeFONFh7HgQ
drf-jwt快速使用
1.django中使用jws方式
1.-https://github.com/jpadilla/django-rest-framework-jwt (比较老)
2.-https://github.com/jazzband/djangorestframework-simplejwt (比较新)
2.基于djangorestframework-jwt的操作
一:登录-token生成
1.安装:pip install djangorestframework-jwt
2.基于auth的user表:做表迁移
python manage.py makemigration
python manage.py migrate
3.创建超级用户:
python manage.py createsuperuser
4.路由匹配:
from rest_framework_jwt.views import obtain_jwt_token
urlpatterns = [path('login/', obtain_jwt_token)]
5.登录:http://127.0.0.1:8000/login/
返回token
二、认证
视图类:认证以及权限局部配置
class BookView(ModelViewSet):
queryset = Book.objects.all()
serializer_class = BookSerializer
authentication_classes = [JSONWebTokenAuthentication, ]
permission_classes = [IsAuthenticated,]
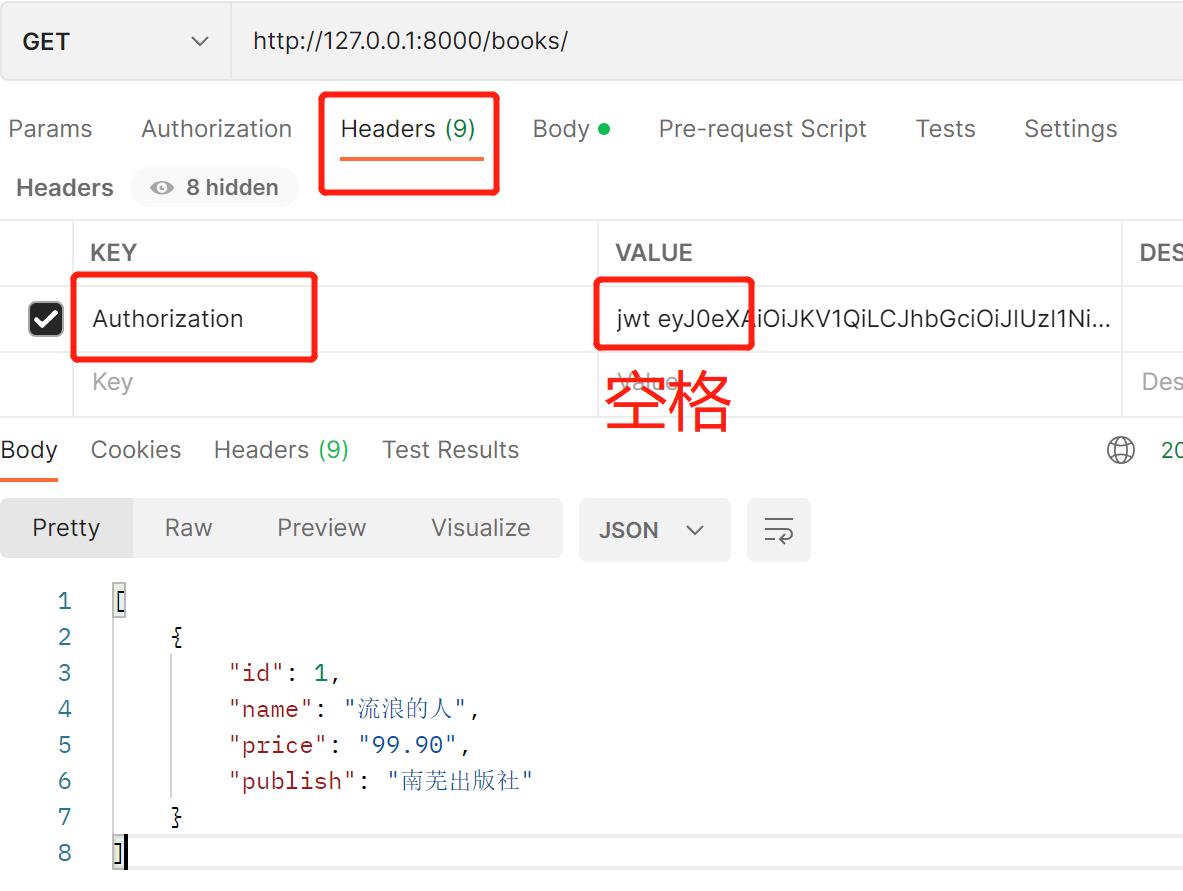
访问:http://127.0.0.1:8000/books/
注:请求头中需要带token:k:Authorization v:jwt+空格+token
3.基于djangorestframework-simplejwt的操作
一:登录-token生成
1.安装:pip install djangorestframework-simplejwt
2.基于auth的user表:做表迁移
python manage.py makemigration
python manage.py migrate
3.创建超级用户:
python manage.py createsuperuser
4.路由匹配:
from rest_framework_simplejwt.views import token_obtain_pair
urlpatterns = [path('login/', token_obtain_pair)]
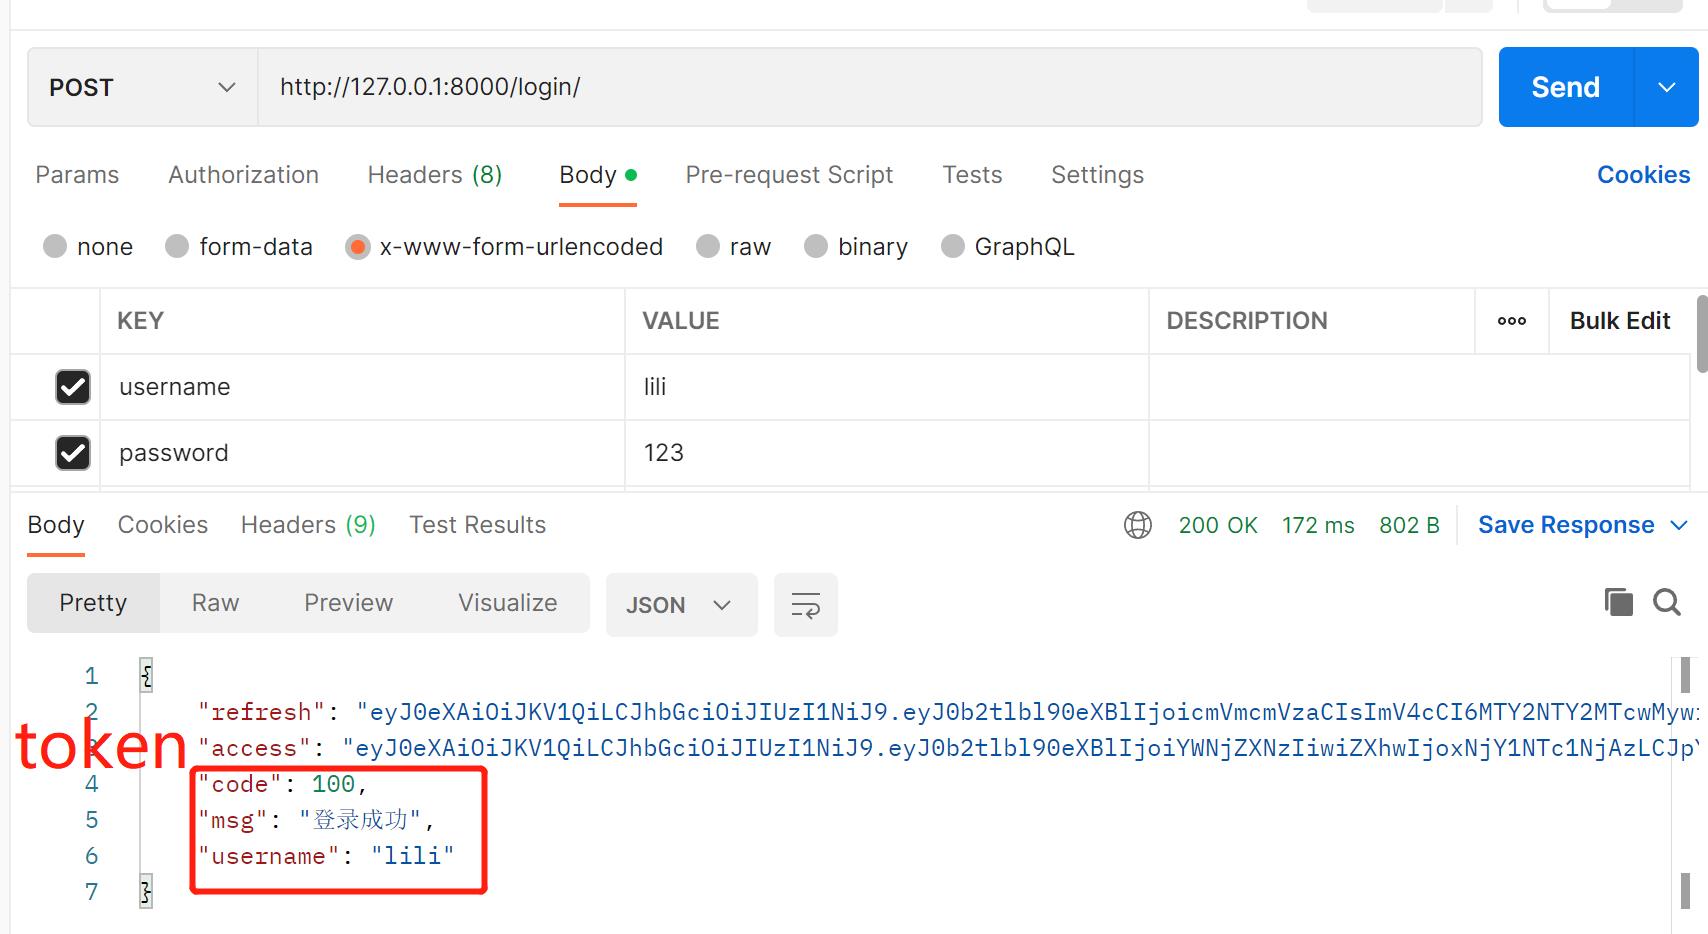
5.登录:http://127.0.0.1:8000/login/
返回token(refresh/access)
二、认证
视图类:认证以及权限局部配置
from rest_framework_simplejwt.authentication import JWTTokenUserAuthentication
class BookView(ModelViewSet):
queryset = Book.objects.all()
serializer_class = BookSerializer
authentication_classes = [JWTTokenUserAuthentication, ]
permission_classes = [IsAuthenticated,]
访问:http://127.0.0.1:8000/books/
注:请求头中需要带token:k:Authorization v:Bearer +空格+access
drf-jwt修改返回格式-django-rest-framework-jwt
1.通过rest_framework_jwt的配置文件查询到需要写一个函数
 在返回值中修改返回格式
def jwt_response_payload_handler(token, user=None, request=None):
    return {
        'code': 100,
        'msg': '登录成功',
        'user': user.username,
        'token': token
    }
2.配置文件中配置:
JWT_AUTH = {
    'JWT_RESPONSE_PAYLOAD_HANDLER':
        'app01.token.jwt_response_payload_handler',
}
base64的编码和解码
1.base64:将字符串编码成数字、大小写字母的随机组合
2.应用场景:
  jwt中使用
  字符串
  图片
3.编码
    import json
    import base64

    d = {'name': 'lili', 'age': 18}
    res = json.dumps(d)   # 转为字符串
    a = base64.b64encode(res.encode('utf-8'))
    print(a)   # b'eyJuYW1lIjogImxpbGkiLCAiYWdlIjogMTh9'
3.解码
b = base64.b64decode(b'eyJuYW1lIjogImxpbGkiLCAiYWdlIjogMTh9')
print(b)   # b'{"name": "lili", "age": 18}'
注:token是将头、荷载、签名进行了base64的编码
自定义user表 签发token-django-rest-framework-jwt
1.models.py文件中创建User表模型
2.写登录接口
3.从前端传入的data中获取用户名及密码 获取user对象
4.通过user对象 签发token
通过djangorestframework-jws模块提供的签发token的函数 生成token
5.通过user对象与jwt_payload_handler函数获取荷载
6.通过jwt_encode_handler函数与荷载获取token
from rest_framework.views import APIView
from rest_framework_jwt.utils import jwt_payload_handler
from rest_framework_jwt.utils import jwt_encode_handler
from rest_framework.response import Response
from rest_framework.exceptions import APIException
class UserView(APIView):
    def post(self, request):
        try:
            username = request.data.get('username')
            password = request.data.get('password')
            user = User.objects.get(username=username, password=password)
            payload = jwt_payload_handler(user)
            token = jwt_encode_handler(payload)
            return Response({'code': 100, 'msg': '登录成功', 'token':token})
        except Exception as e:
            raise APIException('用户名或密码错误')
扩展
1 通过djangorestframework-simplejwt修改返回格式
1.通过rest_framework_simplejwt的配置文件查询到需要写一个序列化类
 from rest_framework_simplejwt.serializers import TokenObtainPairSerializer
   class UserTokenObtainSlidingSerializer(TokenObtainSlidingSerializer):
    def validate(self, attrs):
        data = super().validate(attrs)

        token = self.get_token(self.user)
        data['code'] = 100
        data['msg'] = '登录成功'
        data['username'] = self.user.username
        data["token"] = str(token)
        return data
2.在配置文件中配置
REST_FRAMEWORK = {
    'TOKEN_OBTAIN_SERIALIZER': 'app01.token.UserTokenObtainSlidingSerializer'
}
2 自定义认证类,验证token
认证类:
from rest_framework_jwt.authentication import BaseJSONWebTokenAuthentication
from rest_framework.exceptions import AuthenticationFailed
from rest_framework_jwt.authentication import jwt_decode_handler, get_authorization_header, jwt_get_username_from_payload
from jwt import ExpiredSignature, DecodeError, InvalidTokenError

class UserBaseJSONWebTokenAuthentication(BaseJSONWebTokenAuthentication):
    def authenticate(self, request):
        jwt_value = get_authorization_header(request)[4:]
        if not jwt_value:
            raise AuthenticationFailed('必填')
        try:
            payload = jwt_decode_handler(jwt_value)
        except ExpiredSignature:
            raise AuthenticationFailed('签证过期')
        except DecodeError:
            raise AuthenticationFailed('解码错误')
        except InvalidTokenError:
            raise AuthenticationFailed('非法用户')
        user = self.authenticate_credentials(payload)
        return (user, jwt_value)
视图类-局部配置
class BookView(ModelViewSet):
    queryset = Book.objects.all()
    serializer_class = BookSerializer
    permission_classes = [IsAuthenticated, ]
    authentication_classes = [UserBaseJSONWebTokenAuthentication, ]
3.请求头中:X_FORWARDED_FOR
X-Forwarded-For 是一个扩展头。
HTTP/1.1(RFC 2616)协议并没有对它的定义,它最开始是由 Squid 这个缓存代理软件引入,用来表示 HTTP 请求端真实 IP,现在已经成为事实上的标准,被各大 HTTP 代理、负载均衡等转发服务广泛使用,并被写入 RFC 7239(Forwarded HTTP Extension)标准之中.
4.集群 ,分布式
1.集群:集群是串联工作的
  将几台服务器集中在一起,实现同一业务。
2.分布式:分布式是指将不同的业务分布在不同的地方
  分布式中的每一个节点,都可以做集群
 posted on
