实验7:基于REST API的SDN北向应用实践
实验7:基于REST API的SDN北向应用实践
一、实验目的
- 能够编写程序调用OpenDaylight REST API实现特定网络功能;
- 能够编写程序调用Ryu REST API实现特定网络功能。
二、实验环境
- 下载虚拟机软件Oracle VisualBox或VMware;
- 在虚拟机中安装Ubuntu 20.04 Desktop amd64,并完整安装Mininet、OpenDaylight(Carbon版本)、Postman和Ryu;
三、实验要求
(一)基本要求
- OpenDaylight
(1)利用Mininet平台搭建下图所示网络拓扑,并连接OpenDaylight;

- 构建对应拓扑,同时启动连接ODL控制器,打开图形界面进行查看

(2)编写Python程序,调用OpenDaylight的北向接口下发指令删除s1上的流表数据。 - py程序代码
import requests
from requests.auth import HTTPBasicAuth

if __name__ == "__main__":

    url = 'http://127.0.0.1:8181/restconf/config/opendaylight-inventory:nodes/node/openflow:1/'
    headers = {'Content-Type': 'application/json'}
    res = requests.delete(url, headers=headers, auth=HTTPBasicAuth('admin', 'admin'))
    print (res.content)
- 文件位置及py程序运行结果

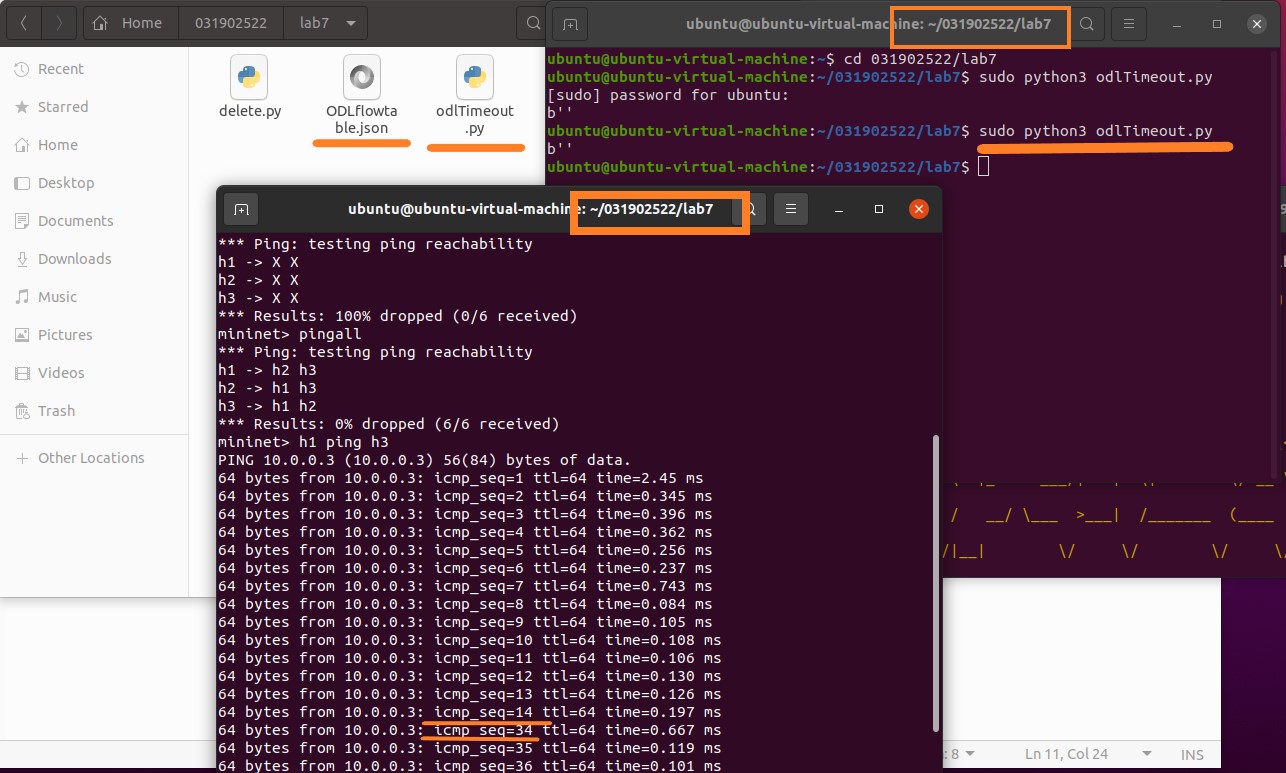
(3)编写Python程序,调用OpenDaylight的北向接口下发硬超时流表,实现拓扑内主机h1和h3网络中断20s。 - py程序代码
import requests
from requests.auth import HTTPBasicAuth

if __name__ == "__main__":
    url = 'http://127.0.0.1:8181/restconf/config/opendaylight-inventory:nodes/node/openflow:1/flow-node-inventory:table/0/flow/1'
    with open("./ODLflowtable.json") as f:
        jstr = f.read()
    headers = {'Content-Type': 'application/json'}
    res = requests.put(url, jstr, headers=headers, auth=HTTPBasicAuth('admin', 'admin'))
    print (res.content)
- json文件内容
{
  "flow": [
    {
      "id": "1",
      "match": {
        "in-port": "1",
        "ethernet-match": {
          "ethernet-type": {
            "type": "0x0800"
          }
        },
        "ipv4-destination": "10.0.0.3/32"
      },
      "instructions": {
        "instruction": [
          {
            "order": "0",
            "apply-actions": {
              "action": [
                {
                  "order": "0",
                  "drop-action": {}
                }
              ]
            }
          }
        ]
      },
      "flow-name": "flow1",
      "priority": "65535",
      "hard-timeout": "20",
      "cookie": "2",
      "table_id": "0"
    }
  ]
}
- 文件位置及py程序运行结果
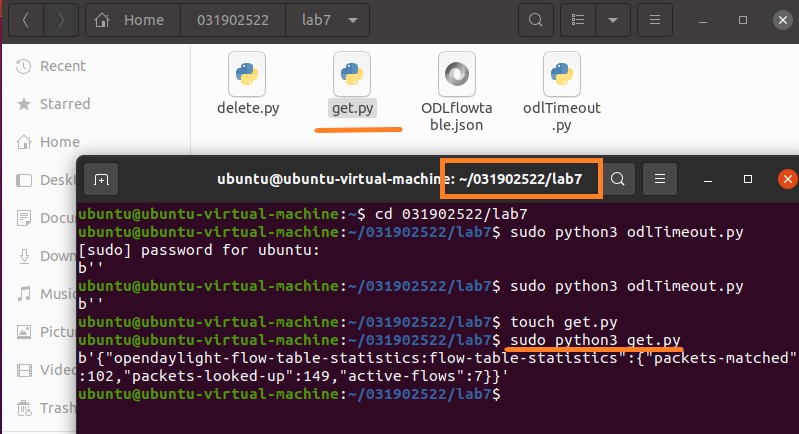
(4)编写Python程序,调用OpenDaylight的北向接口获取s1上活动的流表数。 - py程序代码
import requests
from requests.auth import HTTPBasicAuth

if __name__ == "__main__":
    url = 'http://127.0.0.1:8181/restconf/operational/opendaylight-inventory:nodes/node/openflow:1/flow-node-inventory:table/0/opendaylight-flow-table-statistics:flow-table-statistics'
    headers = {'Content-Type': 'application/json'}
    res = requests.get(url,headers=headers, auth=HTTPBasicAuth('admin', 'admin'))
    print (res.content)
- 文件位置及py程序运行结果
- Ryu
(1)编写Python程序,调用Ryu的北向接口,实现上述OpenDaylight实验拓扑上相同的硬超时流表下发。
- py程序代码
import requests

if __name__ == "__main__":
    url = 'http://127.0.0.1:8080/stats/flowentry/add'
    with open("./RYUflowtable.json") as f:
        jstr = f.read()
    headers = {'Content-Type': 'application/json'}
    res = requests.post(url, jstr, headers=headers)
    print (res.content)
- json文件内容
{
    "dpid": 1,
    "cookie": 1,
    "cookie_mask": 1,
    "table_id": 0,
    "hard_timeout": 20,
    "priority": 65535,
    "flags": 1,
    "match":{
        "in_port":1,
    },
    "actions":[

    ]
 }
- 文件位置及py程序运行结果

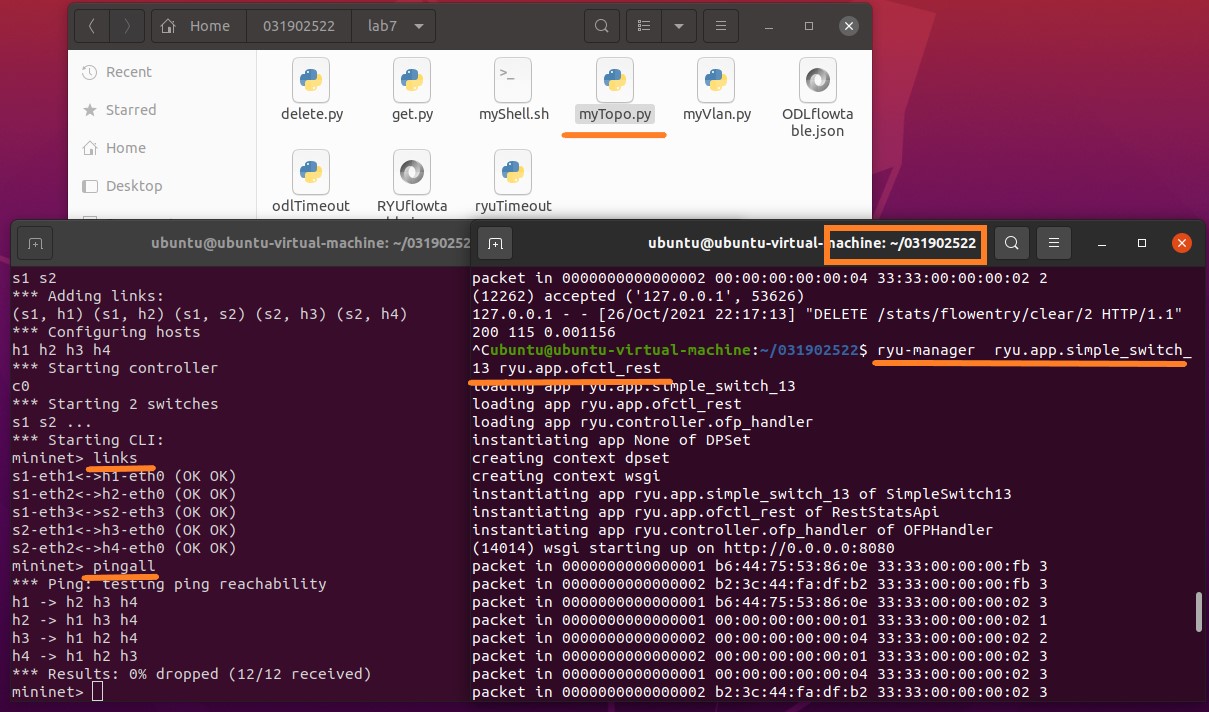
(2)利用Mininet平台搭建下图所示网络拓扑,要求支持OpenFlow 1.3协议,主机名、交换机名以及端口对应正确。拓扑生成后需连接Ryu,且Ryu应能够提供REST API服务。
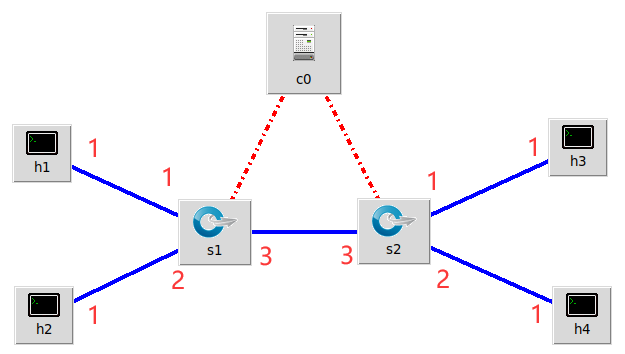
- py程序代码
from mininet.topo import Topo

class MyTopo(Topo):
    def __init__(self):
        # initilaize topology
        Topo.__init__(self)

        self.addSwitch("s1")
        self.addSwitch("s2")

        self.addHost("h1")
        self.addHost("h2")
        self.addHost("h3")
        self.addHost("h4")

        self.addLink("s1", "h1")
        self.addLink("s1", "h2")
        self.addLink("s2", "h3")
        self.addLink("s2", "h4")
        self.addLink("s1", "s2")

topos = {'mytopo': (lambda: MyTopo())}
- 运行py程序,同时启动Ryu
(3)整理一个Shell脚本,参考Ryu REST API的文档,利用curl命令,实现和实验2相同的VLAN。
| VLAN_ID | Hosts |
|---|---|
| 0 | h1 h3 |
| 1 | h2 h4 |
- shell脚本
# 将主机1,2发送来的数据包打上vlan标记
curl -X POST -d '{
    "dpid": 1,
    "priority": 1,
    "match":{
        "in_port": 1
    },
    "actions":[
        {
            "type": "PUSH_VLAN",
            "ethertype": 33024
        },
        {
            "type": "SET_FIELD",
            "field": "vlan_vid",
            "value": 4096
        },
        {
            "type": "OUTPUT",
            "port": 3
        }
    ]
 }' http://localhost:8080/stats/flowentry/add

 curl -X POST -d '{
    "dpid": 1,
    "priority": 1,
    "match":{
        "in_port": 2
    },
    "actions":[
        {
            "type": "PUSH_VLAN",
            "ethertype": 33024
        },
        {
            "type": "SET_FIELD",
            "field": "vlan_vid",
            "value": 4097
        },
        {
            "type": "OUTPUT",
            "port": 3
        }
    ]
 }' http://localhost:8080/stats/flowentry/add

# 将主机3,4发送来的数据包取出vlan标记
 curl -X POST -d '{
    "dpid": 1,
    "priority": 1,
    "match":{
        "vlan_vid": 0
    },
    "actions":[
        {
            "type": "POP_VLAN",
            "ethertype": 33024
        },
        {
            "type": "OUTPUT",
            "port": 1
        }
    ]
 }' http://localhost:8080/stats/flowentry/add

 curl -X POST -d '{
    "dpid": 1,
    "priority": 1,
    "match":{
        "vlan_vid": 1
    },
    "actions":[
        {
            "type": "POP_VLAN",
            "ethertype": 33024
        },
        {
            "type": "OUTPUT",
            "port": 2
        }
    ]
 }' http://localhost:8080/stats/flowentry/add

# 将主机3,4发送来的数据包打上vlan标记
 curl -X POST -d '{
    "dpid": 2,
    "priority": 1,
    "match":{
        "in_port": 1
    },
    "actions":[
        {
            "type": "PUSH_VLAN",
            "ethertype": 33024
        },
        {
            "type": "SET_FIELD",
            "field": "vlan_vid",
            "value": 4096
        },
        {
            "type": "OUTPUT",
            "port": 3
        }
    ]
 }' http://localhost:8080/stats/flowentry/add

 curl -X POST -d '{
    "dpid": 2,
    "priority": 1,
    "match":{
        "in_port": 2
    },
    "actions":[
        {
            "type": "PUSH_VLAN",
            "ethertype": 33024
        },
        {
            "type": "SET_FIELD",
            "field": "vlan_vid",
            "value": 4097
        },
        {
            "type": "OUTPUT",
            "port": 3
        }
    ]
 }' http://localhost:8080/stats/flowentry/add

 curl -X POST -d '{
    "dpid": 2,
    "priority": 1,
    "match":{
        "vlan_vid": 0
    },
    "actions":[
        {
            "type": "POP_VLAN",
            "ethertype": 33024
        },
        {
            "type": "OUTPUT",
            "port": 1
        }
    ]
 }' http://localhost:8080/stats/flowentry/add

 curl -X POST -d '{
    "dpid": 2,
    "priority": 1,
    "match":{
        "vlan_vid": 1
    },
    "actions":[
        {
            "type": "POP_VLAN",
            "ethertype": 33024
        },
        {
            "type": "OUTPUT",
            "port": 2
        }
    ]
 }' http://localhost:8080/stats/flowentry/add
-
流表删除
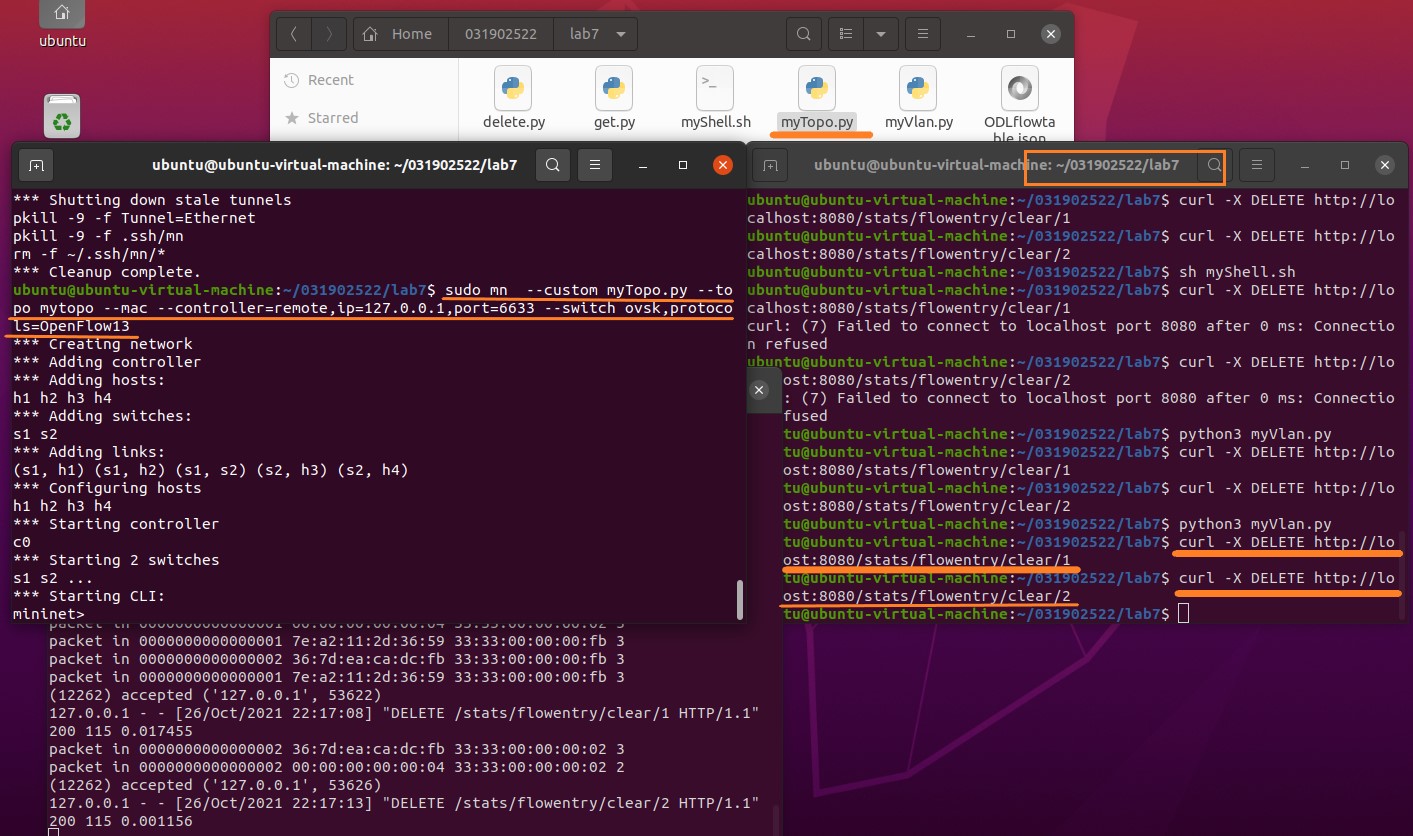
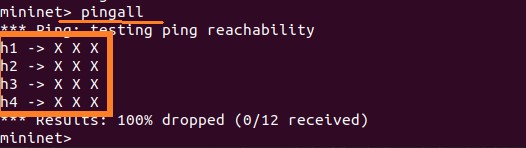
-
删除流表后进行ping连通测试(全部ping不通)
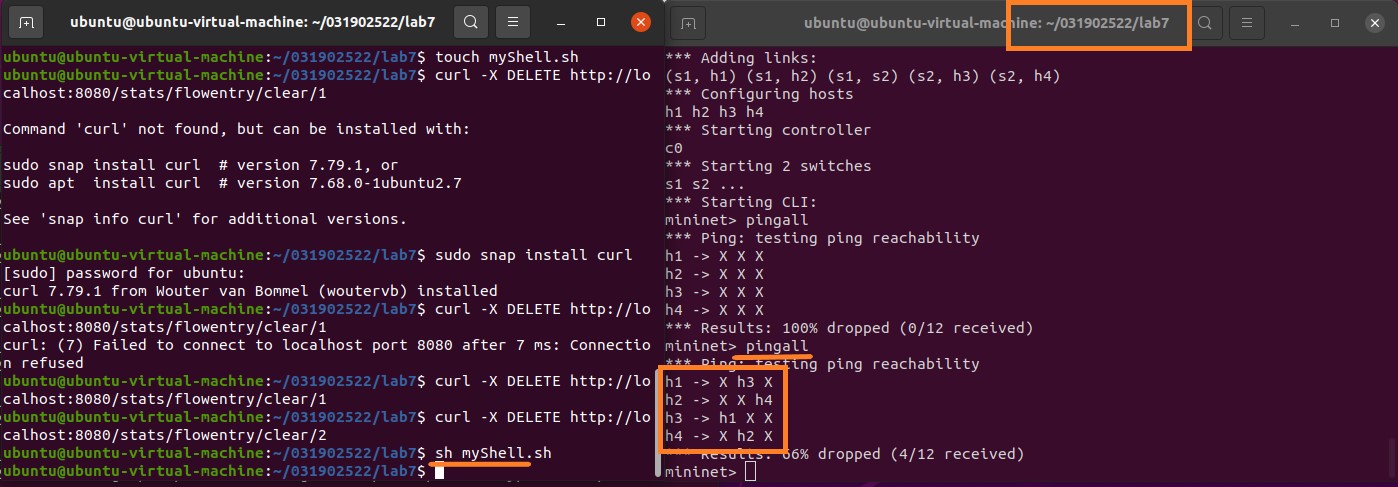
-
运行脚本后再次进行ping连通测试(实现h1和h3以及h2和h4之间的连通)
(二)进阶要求
编程实现基本要求第2部分Ryu(3)中的VLAN划分。
- py程序代码
import json

import requests

if __name__ == "__main__":
    url = 'http://127.0.0.1:8080/stats/flowentry/add'
    headers = {'Content-Type': 'application/json'}
    flow1 = {
        "dpid": 1,
        "priority": 1,
        "match":{
            "in_port": 1
        },
        "actions":[
            {
                "type": "PUSH_VLAN",
                "ethertype": 33024
            },
            {
                "type": "SET_FIELD",
                "field": "vlan_vid",
                "value": 4096
            },
            {
                "type": "OUTPUT",
                "port": 3
            }
        ]
    }
    flow2 = {
        "dpid": 1,
        "priority": 1,
        "match":{
            "in_port": 2
        },
        "actions":[
            {
                "type": "PUSH_VLAN",
                "ethertype": 33024
            },
            {
                "type": "SET_FIELD",
                "field": "vlan_vid",
                "value": 4097
            },
            {
                "type": "OUTPUT",
                "port": 3
            }
        ]
    }
    flow3 = {
        "dpid": 1,
        "priority": 1,
        "match":{
            "vlan_vid": 0
        },
        "actions":[
            {
                "type": "POP_VLAN",
                "ethertype": 33024
            },
            {
                "type": "OUTPUT",
                "port": 1
            }
        ]
    }
    flow4 = {
        "dpid": 1,
        "priority": 1,
        "match": {
            "vlan_vid": 1
        },
        "actions": [
            {
                "type": "POP_VLAN",
                "ethertype": 33024
            },
            {
                "type": "OUTPUT",
                "port": 2
            }
        ]
    }
    flow5 = {
        "dpid": 2,
        "priority": 1,
        "match": {
            "in_port": 1
        },
        "actions": [
            {
                "type": "PUSH_VLAN",
                "ethertype": 33024
            },
            {
                "type": "SET_FIELD",
                "field": "vlan_vid",
                "value": 4096
            },
            {
                "type": "OUTPUT",
                "port": 3
            }
        ]
    }
    flow6 = {
        "dpid": 2,
        "priority": 1,
        "match": {
            "in_port": 2
        },
        "actions": [
            {
                "type": "PUSH_VLAN",
                "ethertype": 33024
            },
            {
                "type": "SET_FIELD",
                "field": "vlan_vid",
                "value": 4097
            },
            {
                "type": "OUTPUT",
                "port": 3
            }
        ]
    }
    flow7 = {
        "dpid": 2,
        "priority": 1,
        "match": {
            "vlan_vid": 0
        },
        "actions": [
            {
                "type": "POP_VLAN",
                "ethertype": 33024
            },
            {
                "type": "OUTPUT",
                "port": 1
            }
        ]
    }
    flow8 = {
        "dpid": 2,
        "priority": 1,
        "match": {
            "vlan_vid": 1
        },
        "actions": [
            {
                "type": "POP_VLAN",
                "ethertype": 33024
            },
            {
                "type": "OUTPUT",
                "port": 2
            }
        ]
    }
    res1 = requests.post(url, json.dumps(flow1), headers=headers)
    res2 = requests.post(url, json.dumps(flow2), headers=headers)
    res3 = requests.post(url, json.dumps(flow3), headers=headers)
    res4 = requests.post(url, json.dumps(flow4), headers=headers)
    res5 = requests.post(url, json.dumps(flow5), headers=headers)
    res6 = requests.post(url, json.dumps(flow6), headers=headers)
    res7 = requests.post(url, json.dumps(flow7), headers=headers)
    res8 = requests.post(url, json.dumps(flow8), headers=headers)
- py程序在拓扑进行流表删除后运行,产生对应效果

实验心得
- 在本次实验中,学习了SDN应用层与控制层之间的北向接口REST API。通过前几次实验所使用到的控制器对交换机以可编程的方式进行转发控制。与此同时,我又重新回顾熟悉了相关控制器的使用,对控制器的启动,下发流表等操作基本能快速顺利地完成,并且在实践中通过阅读相关文档,查阅资料,了解到了北向接口API其实并没有一个统一的标准,不同的控制器对应着的API也有所区别,最后也得知了如何在程序中调用北向接口API,动态地修改控制流表,算是真正实际地体会到了SDN框架的灵活性和可编程性。本次实验难度较大,相较于前几次实验较为综合,需要用到多种控制器(前几次实验中用过的),并且编程的部分明显增多。
- 在实验过程中遇到的问题及解决
- 在一开始的实验中,我发现自己对ODL、RYU等控制器的使用都还是比较生疏,尽管这些控制器在前几次的实验中均有涉及。因此,我重新复习了老师发过的几次实验指南书以及我之前撰写的实验报告博客 ,熟悉并巩固了对于这些常用控制器的使用,之后完成实验的速度明显加快,对于ODL和RYU等控制器的操作也愈发娴熟。
- 在对RYU控制器进行删除流表操作,终端上提示
Command 'curl' not found,查看提示信息后发现还需要下载curl,于是通过命令行进行下载后,再次键入删除流表的操作后,终端再次报错Failed to connect to localhost port 8080,检查另一个终端上的Ryu控制器是否启动成功,发现Ryu在上一个实验操作时不小心中断退出了。于是重新启动运行Ryu控制器,并键入命令,本次的命令成功执行。
