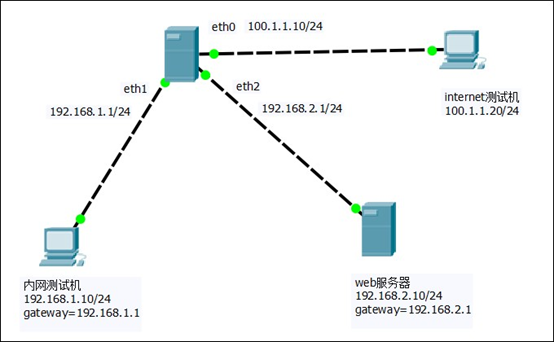
firewall配置
词解释
在具体介绍zone之前学生先给大家介绍几个相关的名词,因为如果不理解这几个名词zone就无从入手。
-
target:目标,这个前面学生也已经给大家介绍过了,可以理解为默认行为,有四个可选值:default、ACCEPT、%%REJECT%%、DROP,如果不设置默认为default
-
service:这个在前面学生已经给大家解释过了,他表示一个服务
-
port:端口,使用port可以不通过service而直接对端口进行设置
-
interface:接口,可以理解为网卡
-
source:源地址,可以是ip地址也可以是ip地址段
-
icmp-block:icmp报文阻塞,可以按照icmp类型进行设置
-
masquerade:ip地址伪装,也就是按照源网卡地址进行NAT转发
-
forward-port:端口转发
-
rule:自定义规则
哪个zone在起作用
我们知道每个zone就是一套规则集,但是有那么多zone,对于一个具体的请求来说应该使用哪个zone(哪套规则)来处理呢?这个问题至关重要,如果这点不弄明白其他的都是空中楼阁,即使规则设置的再好,不知道怎样用、在哪里用也不行。
对于一个接受到的请求具体使用哪个zone,firewalld是通过三种方法来判断的:
1、source,也就是源地址
2、interface,接收请求的网卡
3、firewalld.conf中配置的默认zone
这三个的优先级按顺序依次降低,也就是说如果按照source可以找到就不会再按interface去查找,如果前两个都找不到才会使用第三个,也就是学生在前面给大家讲过的在firewalld.conf中配置的默认zone。
好了,我们现在知道其原理了,下面学生就给大家介绍每一种方式所对应的配置方法。
配置source
source是在zone的xml文件中配置的,其格式为
|
1
2
3
|
<zone> <source address="address[/mask]"/></zone> |
只要我们将source节点放入相应的zone配置文件中就可以了,节点的address属性就是源地址,不过我们要注意相同的source节点只可以在一个zone中进行配置,也就是说同一个源地址只能对于一个zone,另外,直接编辑xml文件之后还需要reload才可以起作用,这些学生前面已经给大家讲过,这里就不再重述了。
另外,我们当然也可以使用firewall-cmd命令进行配置,这里主要有五个相关命令(参数)
|
1
2
3
4
5
|
firewall-cmd [--permanent] [--zone=zone] --list-sourcesfirewall-cmd [--permanent] [--zone=zone] --query-source=source[/mask]firewall-cmd [--permanent] [--zone=zone] --add-source=source[/mask]firewall-cmd [--zone=zone] --change-source=source[/mask]firewall-cmd [--permanent] [--zone=zone] --remove-source=source[/mask] |
我们分别来介绍一下
-
--list-sources:用于列出指定zone的所有绑定的source地址
-
--query-source:用于查询指定zone是否跟指定source地址进行了绑定
-
--add-source:用于将一个source地址绑定到指定的zone(只可绑定一次,第二次绑定到不同的zone会报错)
-
--change-source:用于改变source地址所绑定的zone,如果原来没有绑定则进行绑定,这样就跟--add-source的作用一样了
-
--remove-source:用于删除source地址跟zone的绑定
另外,大家可以看到上面的命令中有两个可选参数:--permanent和--zone,--permanent学生在前面已经给大家介绍过了,表示是否存储到配置文件中(如果存储到配置文件中这不会立即生效),--zone用于指定所要设置的zone,如果不指定则使用默认zone。
我们来看个例子
|
1
|
[root@excelib.com ~]# firewall-cmd --zone=drop --change-source=1.2.3.4 |
这样就可以将1.2.3.4绑定到drop这个zone中了,如果没有修改过drop规则的话所有来自1.2.3.4这个ip的连接将会被drop。
至于什么时候使用add什么时候使用change,如果我们就是想将某源地址绑定到指定的zone那么最好使用change,而如果想在源地址没绑定的时候进行绑定,如果已经绑定过则不绑定那么就使用add。
配置interface
interface有两个可以配置的位置:1、zone所对应的xml配置文件2、网卡配置文件(也就是ifcfg-*文件)。
第一种配置跟source大同小异,学生这里就不再细述了,interface在zone配置文件中的节点为
|
1
2
3
|
<zone> <interface name="string"/></zone> |
相关的firewall-cmd命令为
|
1
2
3
4
5
|
firewall-cmd [--permanent] [--zone=zone] --list-interfacesfirewall-cmd [--permanent] [--zone=zone] --add-interface=interfacefirewall-cmd [--zone=zone] --change-interface=interfacefirewall-cmd [--permanent] [--zone=zone] --query-interface=interfacefirewall-cmd [--permanent] [--zone=zone] --remove-interface=interface |
另外,我们还可以在网卡配置文件中进行配置,比如可以在ifcfg-em1文件中添加下面的配置
|
1
|
ZONE=public |
这行配置就相当于下面的命令
|
1
|
[root@excelib.com ~]# firewall-cmd --zone=public --change-interface=em1 |
这样配置之后来自em1的连接就会使用public这个zone进行管理(如果source匹配了其他的zone除外)。
配置默认zone
默认zone的配置学生前面已经给大家介绍过了,他是通过firewalld.conf配置文件的DefaultZone配置项来配置的,当然也可以使用firewall-cmd命令来配置
|
1
|
firewall-cmd --set-default-zone=zone |
另外还可以通过--get-default-zone来获取默认zone的值。
查看当前起作用的zone
我们可以使用下面的命令来查看当前所有起作用的zone
|
1
|
firewall-cmd --get-active-zones |
这个命令会返回所有绑定了source、interface以及默认的zone,并会说明在什么情况下使用。
反向查询
firewalld还给我们提供了反向查询的命令,也就是根据source或者interface查询所对应的zone,其命令如下
|
1
2
|
firewall-cmd --get-zone-of-interface=interfacefirewall-cmd --get-zone-of-source=source[/mask] |
有了这两个命令我们就可以检查我们的设置是否正确了。
好了,现在大家就明白了一个接收到的请求具体使用哪个zone了,那么zone具体的规则怎么配置呢?下面学生就来给大家详细介绍。
zone规则配置
target
zone规则中首先最重要的是target的设置,他默认可以取四个值:default、ACCEPT、%%REJECT%%、DROP,其含义很容易理解,这里学生就不介绍了,下面来说怎么配置。
在xml文件中target是zone节点的一个属性,比如drop.xml中为
|
1
|
<zone target="DROP"> |
block.xml中为
|
1
|
<zone target="%%REJECT%%"> |
如果使用firewall-cmd命令来操作,命令如下
|
1
2
|
firewall-cmd --permanent [--zone=zone] --get-targetfirewall-cmd --permanent [--zone=zone] --set-target=target |
我们要特别注意,这里的--permanent不是可选的,也就是说使用firewall-cmd命令也不可以让他直接生效,也需要reload才可以。
service
service学生在前面也已经给大家介绍过了,他的配置和我们上面所介绍的source基本相同,只不过同一个service可以配置到多个不同的zone中,当然也就不需要--change命令了,他在zone配置文件中的节点为
|
1
2
3
|
<zone> <service name="string"/></zone> |
相应的配置命令为
|
1
2
3
4
|
firewall-cmd [--permanent] [--zone=zone] --list-servicesfirewall-cmd [--permanent] [--zone=zone] --add-service=service [--timeout=seconds]firewall-cmd [--permanent] [--zone=zone] --remove-service=servicefirewall-cmd [--permanent] [--zone=zone] --query-service=service |
具体每个命令的含义大家对照上面的source很容易就理解了,不过这里的--add命令中多了一个--timeout选项,学生这里给大家介绍一下。
--add-service中的--timeout的含义是这样的:添加一个服务,但是不是一直生效而是生效一段时间,过期之后自动删除。
这个选项非常有用,比如我们想暂时开放一个端口进行一些特殊的操作(比如远程调试),等处理完成后再关闭,不过有时候我们处理完之后就忘记关闭了,而现在的--timeout选项就可以帮我们很好地解决这个问题,我们在打开的时候就可以直接设置一个时间,到时间之后他自动就可以关闭了。另外,这个参数还有更有用的用法,学生会在下面给大家讲到。当然--timeout和--permanent是不可以一起使用的。
另外,这里我们主要讲的是怎么在zone中使用service,而service自己的配置学生下节再给大家详细介绍。
port
port是直接对端口的操作,他和service非常相似,所以这里也不详细介绍了,port在zone中的配置节点为
|
1
2
3
|
<zone> <port port="portid[-portid]" protocol="tcp|udp"/></zone> |
相应命令为
|
1
2
3
4
|
firewall-cmd [--permanent] [--zone=zone] --list-portsfirewall-cmd [--permanent] [--zone=zone] --add-port=portid[-portid]/protocol [--timeout=seconds]firewall-cmd [--permanent] [--zone=zone] --remove-port=portid[-portid]/protocolfirewall-cmd [--permanent] [--zone=zone] --query-port=portid[-portid]/protocol |
icmp-block
icmp-block是按照icmp的类型进行设置阻塞,比如我们不想接受ping报文就可以使用下面的命令来设置
|
1
|
[root@excelib.com ~]# firewall-cmd --add-icmp-block=echo-request |
当然,如果需要长久保存就需要加--permanent选项,不过那样就需要reload才能生效。
icmp-block在zone配置文件中的节点为
|
1
2
3
|
<zone> <icmp-block name="string"/></zone> |
相应操作命令为
|
1
2
3
4
|
firewall-cmd [--permanent] [--zone=zone] --list-icmp-blocksfirewall-cmd [--permanent] [--zone=zone] --add-icmp-block=icmptype [--timeout=seconds]firewall-cmd [--permanent] [--zone=zone] --remove-icmp-block=icmptypefirewall-cmd [--permanent] [--zone=zone] --query-icmp-block=icmptype |
masquerade
masquerade大家应该都比较熟悉,其作用就是ip地址伪装,也就是NAT转发中的一种,具体处理方式是将接收到的请求的源地址设置为转发请求网卡的地址,这在路由器等相关设备中非常重要,比如大家很多都使用的是路由器连接的局域网,而想上互联网就得将我们的ip地址给修改一下,要不大家都是192.168.1.XXX的内网地址,那请求怎么能正确返回呢?所以在路由器中将请求实际发送到互联网的时候就会将请求的源地址设置为路由器的外网地址,这样请求就能正确地返回给路由器了,然后路由器再根据记录返回给我们发送请求的主机了,这就是masquerade。
其设置非常简单,在zone中是一个没有参数(属性)的节点
|
1
2
3
|
<zone> <masquerade/></zone> |
操作命令为
|
1
2
3
|
firewall-cmd [--permanent] [--zone=zone] --add-masquerade [--timeout=seconds]firewall-cmd [--permanent] [--zone=zone] --remove-masqueradefirewall-cmd [--permanent] [--zone=zone] --query-masquerade |
forward-port
这项也非常容易理解,他是进行端口转发的,比如我们要将在80端口接收到tcp请求转发到8080端口可以使用下面的命令
|
1
|
[root@excelib.com ~]# firewall-cmd --add-forward-port=port=80:proto=tcp:toport=8080 |
forward-port还支持范围转发,比如我们还可以将80到85端口的所有请求都转发到8080端口,这时只需要将上面命令中的port修改为80-85即可。
在zone配置文件中节点如下
|
1
2
3
|
<zone> <forward-port port="portid[-portid]" protocol="tcp|udp" [to-port="portid[-portid]"] [to-addr="ipv4address"]/></zone> |
相关操作命令如下
|
1
2
3
4
|
firewall-cmd [--permanent] [--zone=zone] --list-forward-portsfirewall-cmd [--permanent] [--zone=zone] --add-forward-port=port=portid[-portid]:proto=protocol[:toport=portid[-portid]][:toaddr=address[/mask]][--timeout=seconds]firewall-cmd [--permanent] [--zone=zone] --remove-forward-port=port=portid[-portid]:proto=protocol[:toport=portid[-portid]][:toaddr=address[/mask]]firewall-cmd [--permanent] [--zone=zone] --query-forward-port=port=portid[-portid]:proto=protocol[:toport=portid[-portid]][:toaddr=address[/mask]] |
rule
rule可以用来定义一条复杂的规则,其在zone配置文件中的节点定义如下
|
1
2
3
4
5
6
7
8
9
10
11
12
13
14
15
16
17
|
<zone> <rule [family="ipv4|ipv6"]> [ <source address="address[/mask]" [invert="bool"]/> ] [ <destination address="address[/mask]" [invert="bool"]/> ] [ <service name="string"/> | <port port="portid[-portid]" protocol="tcp|udp"/> | <protocol value="protocol"/> | <icmp-block name="icmptype"/> | <masquerade/> | <forward-port port="portid[-portid]" protocol="tcp|udp" [to-port="portid[-portid]"] [to-addr="address"]/> ] [ <log [prefix="prefixtext"] [level="emerg|alert|crit|err|warn|notice|info|debug"]/> [<limit value="rate/duration"/>] </log> ] [ <audit> [<limit value="rate/duration"/>] </audit> ] [ <accept/> | <reject [type="rejecttype"]/> | <drop/> ] </rule></zone> |
可以看到这里一条rule的配置的配置项非常多,比zone本身还多出了destination、log、audit等配置项。其实这里的rule就相当于使用iptables时的一条规则。rule的操作命令如下
|
1
2
3
4
|
firewall-cmd [--permanent] [--zone=zone] --list-rich-rulesfirewall-cmd [--permanent] [--zone=zone] --add-rich-rule='rule' [--timeout=seconds]firewall-cmd [--permanent] [--zone=zone] --remove-rich-rule='rule'firewall-cmd [--permanent] [--zone=zone] --query-rich-rule='rule' |
这里的参数'rule'代表一条规则语句,语句结构就是直接按照上面学生给大家的节点结构去掉尖括号来书写就可以了,比如要设置地址为1.2.3.4的source就可以写成source address="1.2.3.4",也就是直接写标签名,然后跟着写属性就可以了,我们来看个例子
|
1
|
[root@excelib.com ~]# firewall-cmd --add-rich-rule='rule family="ipv4" source address="1.2.3.4" drop' |
这条规则就会将1.2.3.4这个源地址的连接全部给drop掉。
使用rule结合--timeout我们可以实现一些非常好玩和有用的功能,比如我们可以写个自动化脚本,当发现有异常的连接时就可以添加一条rule将其相应的地址drop掉,而且还可以使用--timeout给设置个时间段,过了之后再自动开放!

器的主机名
[root@localhost ~]# vi /etc/hostname
web
2:网站服务器环境的搭建
(1)验证firewalld在网站服务器上是否启动并且正常运行
[root@web ~]# systemctl status firewalld
(2)安装httpd和mod_ssl软件包
[root@web ~]# yum install -y httpd mod_ssl
(3)启用并启动httpd服务
[root@web ~]# systemctl start httpd
[root@web ~]# systemctl enable httpd
(4)创建网罩首页测试页index.html
[root@web ~]# vi /var/www/html/index.html
test web
(5)更改ssh的监听端口,并重启服务,关闭SELinux
[root@web ~]# setenforce 0
[root@web ~]# vi /etc/ssh/sshd_config
Port 12345
[root@web ~]# systemctl restart sshd
3:在网站服务器上配置firewalld防火墙
(1)设置默认区域为dmz区域
[root@web ~]# firewall-cmd --set-default-zone=dmz
(2)为dmz区域打开https服务并添加TCP的12345端口
[root@web ~]# firewall-cmd --zone=dmz --add-service=https --permanent
[root@web ~]# firewall-cmd --zone=dmz --add-port=12345/tcp --permanent
(3)禁止ping
[root@web ~]# firewall-cmd --add-icmp-block=echo-request --zone=dmz --permanent
(4)因为预定于的ssh服务已经更改了端口,所以要将预定于ssh服务移除
[root@web ~]# firewall-cmd --zone=dmz --remove-service=ssh --permanent
(5)重新加载firewalld配置。并查看之前的配置
[root@web ~]# firewall-cmd --reload
[root@web ~]# firewall-cmd --list-all
dmz (active)
target: default
icmp-block-inversion: no
interfaces: eth0
sources:
services: https
ports: 12345/tcp
protocols:
masquerade: no
forward-ports:
sourceports:
icmp-blocks: echo-request
rich rules:
4:在网关服务器上配置firewalld防火墙
(1)验证firewalld在网关服务器上是否启动并且正在运行
[root@gateway-server ~]# systemctl status firewalld
(2)设置默认区域为external区域,并查看配置结果
[root@gateway-server ~]# firewall-cmd --set-default-zone=external
[root@gateway-server ~]# firewall-cmd --list-all
external (active)
target: default
icmp-block-inversion: no
interfaces: eth0 eth1 eth2
sources:
services: ssh
ports:
protocols:
masquerade: yes
forward-ports:
sourceports:
icmp-blocks:
rich rules:
(3)将eth1网卡配置到trusted区域,将eth2配置到dmz区域
[root@gateway-server ~]# firewall-cmd --change-interface=eth1 --zone=trusted
[root@gateway-server ~]# firewall-cmd --change-interface=eth2 --zone=dmz
(4)查看配置情况
[root@gateway-server ~]# firewall-cmd --get-active-zone
dmz
interfaces: eth2
external
interfaces: eth0
trusted
interfaces: eth1
(5)在企业内网测试计算机上访问网站服务器
https:192.168.2.10
(6)关闭SELinux,更改ssh的监听端口,并重启服务
[root@gateway-server ~]# setenforce 0
[root@gateway-server ~]# vi /etc/ssh/sshd_config
Port 12345
[root@gateway-server ~]# systemctl restart sshd
(7)配置external区域添加TCP的12345端口
[root@gateway-server ~]# firewall-cmd --zone=external --add-port=12345/tcp --permanent
(8)配置external区域移除ssh服务
[root@gateway-server ~]# firewall-cmd --zone=external --remove-service=ssh --permanent
(9)配置external区域禁止ping
[root@gateway-server ~]# firewall-cmd --zone=external --add-icmp-block=echo-request --permanent
(10)重新加载防火墙配置
[root@gateway-server ~]# firewall-cmd --reload
(11)在互联网测试机上通过ssh登录网关玩不接口地址的12345端口
[root@localhost ~]# ssh -p 12345 100.1.1.10
(12)在企业内网测试机上ssh登录web网站服务器的12345端口
[root@localhost ~]# ssh -p 12345 192.168.2.10
2.2:配置IP伪装与端口转发
1:内网用户通过网关服务器共享上网
(1)外网测试机搭建网站服务,并添加测试网页
[root@localhost ~]# hostname internet
[root@localhost ~]# bash
[root@internet ~]# yum install -y httpd
[root@internet ~]# vi /var/www/html/index.html
internet web
[root@internet ~]# systemctl enable httpd
[root@internet ~]# systemctl start httpd
(2)在企业内网测试机上访问外网网站,结果是可以访问的
https://100.1.1.20
(3)在dmz的网站服务器上测试,同样可以访问
http://100.1.1.20
(4)查看网关服务器的external区域是否开启了地址伪装
[root@internet ~]# firewall-cmd --list-all --zone=external
external
target: default
icmp-block-inversion: no
interfaces:
sources:
services: ssh
ports:
protocols:
masquerade: yes
forward-ports:
sourceports:
icmp-blocks:
rich rules:
(5)源地址192.168.1.0/24网段的地址开启IP伪装
在网关服务器上关闭external的地址伪装,添加富规则,要求external区域内源地址为192。168.1.0/24网段的地址开启地址IP伪装
[root@gateway-server ~]# firewall-cmd --remove-masquerade --zone=external
[root@gateway-server ~]# firewall-cmd --zone=external --add-rich='rule family=ipv4 source address=192.168.1.0/24 masquerade'
(6)在dmz的网站服务器上测试访问外网,应该不能访问外网
htt[s://100.1.120
2:配置端口转发实现互联网用户访问内部web服务器
(1)在网关服务器上配置端口转发
[root@gateway-server ~]# firewall-cmd --zone=external --add-forward-port=port=443:proto=tcp:toaddr=192.168.2.10
(2)在互联网测试机上访问内部web服务器,可以访问成功
https://100.1.1.10
(3)端口转发也可以使用富规则,这样就可以更大程度的控制端口转发规则,如给内网的web服务器申请类=了一个新的公网ip地址100.1.1.15,需要将新的公网地址100.1.1.15配置在网关服务器的外网接口eth0上,作为第二个Ip地址
firewall-cmd --zone=external --add-rich-rule="rule2 family="ipv4" source address="192.168.2.0/24" masquerade"
[root@gateway-server ~]# vi /etc/sysconfig/network-scripts/ifcfg-eth0
TYPE=Ethernet
BOOTPROTO=static
NAME=eth0
DEVICE=eth0
ONBOOT=yes
IPADDR1=100.1.1.15
PREFIX1=24
IPADDR0=100.1.1.10
PREFIX=24
[root@gateway-server ~]# systemctl restart NetworkManager
[root@gateway-server ~]# ip add
1: lo: <LOOPBACK,UP,LOWER_UP> mtu 65536 qdisc noqueue state UNKNOWN qlen 1
link/loopback 00:00:00:00:00:00 brd 00:00:00:00:00:00
inet 127.0.0.1/8 scope host lo
valid_lft forever preferred_lft forever
inet6 ::1/128 scope host
valid_lft forever preferred_lft forever
2: eth0: <BROADCAST,MULTICAST,UP,LOWER_UP> mtu 1500 qdisc pfifo_fast state UP qlen 1000
link/ether 00:0c:29:ae:7f:64 brd ff:ff:ff:ff:ff:ff
inet 100.1.1.10/8 brd 100.255.255.255 scope global eth0
valid_lft forever preferred_lft forever
inet 100.1.1.15/24 brd 100.1.1.255 scope global eth0
valid_lft forever preferred_lft forever
使用富规则配置端口转发
[root@gateway-server ~]# firewall-cmd --zone=external --add-rich-rule='rule family=ipv4 destination address=100.1.1.15/32 forward-port port=443 protocol=tcp to-addr=192.168.2.10'
在互联网测试机上访问,可以访问成功
https://10.1.1.15

