Nginx
一、Nginx的安装
1.安装pcre pcre-devel openssl openssl-devel
2.Nginx官网:https://nginx.org/ Nginx下载地址:https://nginx.org/en/download.html
3.开始编译安装
[root@localhost nginx-1.10.1]# useradd nginx -s /sbin/nologin -M
[root@localhost src]# tar -xvf nginx-1.10.1.tar.gz
[root@localhost src]# cd nginx-1.10.1/
[root@localhost nginx-1.10.1]# ./configure --user=nginx --group=nginx --prefix=/usr/local/nginx-1.10.1 --with-http_stub_status_module --with-http_ssl_module
[root@localhost nginx-1.10.1]# make -j 4 && make install
[root@localhost nginx-1.10.1]# ln /usr/local/nginx-1.10.1 /usr/local/nginx


--prefix=PATH        # 设置安装路径
--user=USER         # 进程设置用户权限
--gruop=GROUP    # 进程用户组权限
--with-http_stub_status_module        # 激活状态信息
--with-http_ssl_module        # 激活ssl功能
4.启动并检查安装结果
1.启动前检测文件语法
[root@localhost ~]# /usr/local/nginx/sbin/nginx -t
nginx: the configuration file /usr/local/nginx-1.10.1/conf/nginx.conf syntax is ok
nginx: configuration file /usr/local/nginx-1.10.1/conf/nginx.conf test is successful
2.启动Nginx服务
[root@localhost ~]# /usr/local/nginx/sbin/nginx
3.查看Nginx服务对应的端口是否成功启动
[root@localhost ~]# lsof -i :80
COMMAND PID USER FD TYPE DEVICE SIZE/OFF NODE NAME
nginx 33395 root 6u IPv4 109858 0t0 TCP *:http (LISTEN)
nginx 33396 nginx 6u IPv4 109858 0t0 TCP *:http (LISTEN)
4.疑难杂症
1. nginx: [emerg] getpwnam("nginx") failed 是因为没有nginx用户,执行以下代码
root@localhost ~]# /usr/local/nginx/sbin/nginx    # 启动
nginx: [emerg] getpwnam("nginx") failed (2: No such file or directory)    # 启动失败
[root@localhost ~]# useradd nginx -s /sbin/nologin -M      # 创建用户
[root@localhost ~]# /usr/local/nginx/sbin/nginx           # 再次启动
2.如何查看Nginx参数
[root@localhost ~]# /usr/local/nginx/sbin/nginx -V
3.浏览器、wget、curl等软件无法访问Nginx页面
Centos 6
setenforce 0
service iptables stop
Centos 7
setenforce 0
systemctl stop firewalld
二、Nginx深入
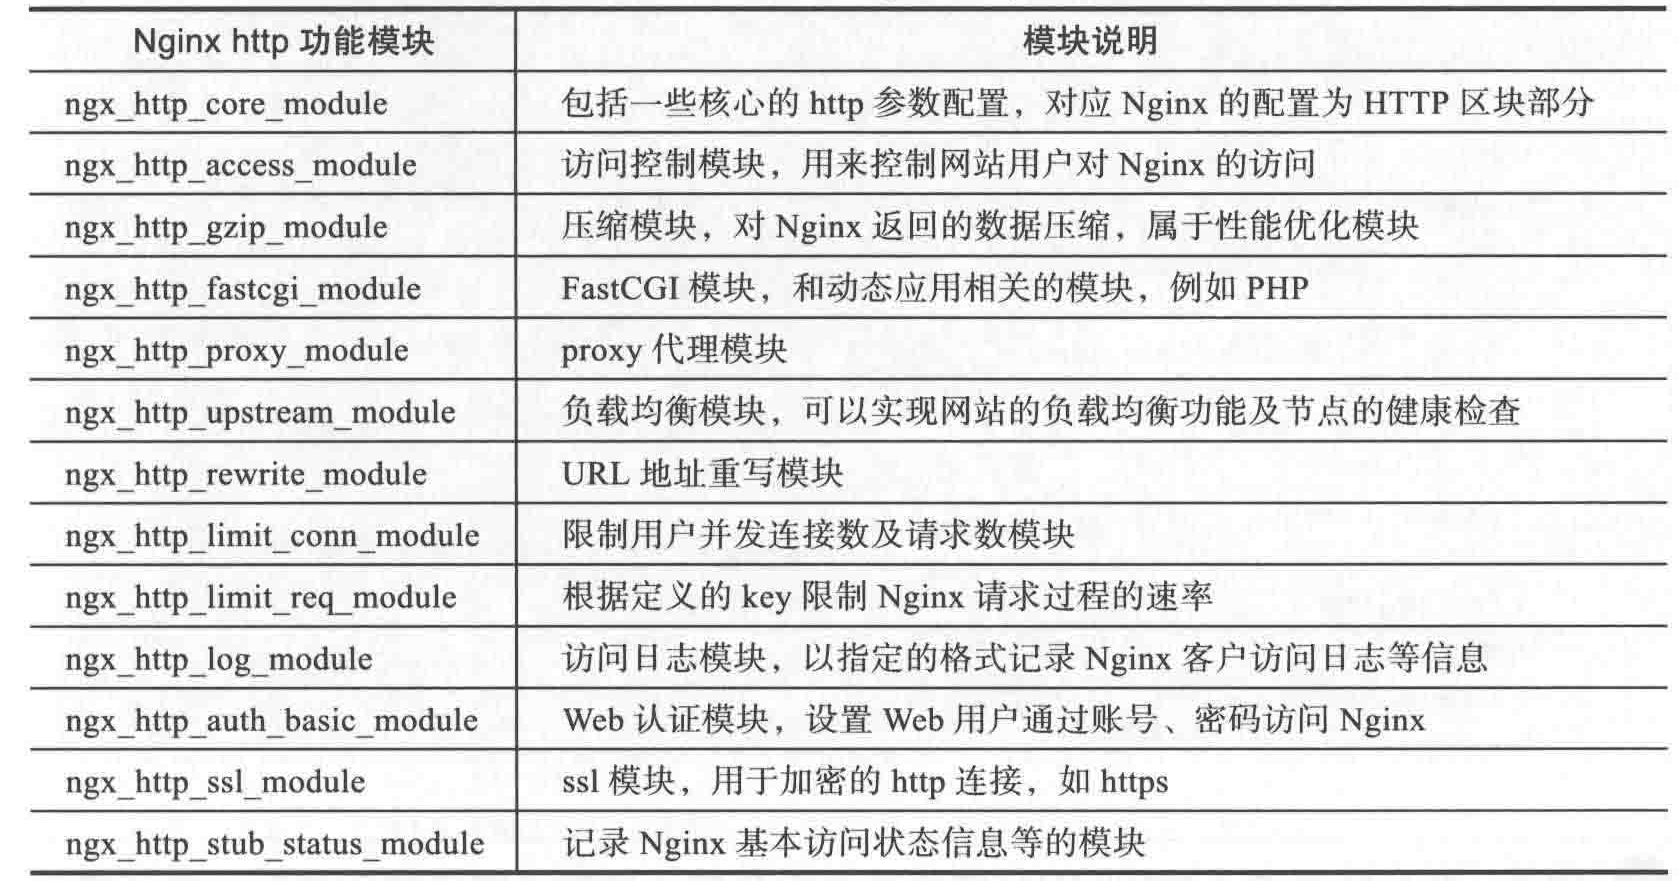
2.1:Nginx模块说明
2.2:目录说明
.
├── client_body_temp
├── conf # 这是Nginx所有配置的目录,极其重要
│ ├── fastcgi.conf # fastcgi相关参数配置文件
│ ├── fastcgi.conf.default # fastcgi.conf的原始备份
│ ├── fastcgi_params # fastcgi的参数文件
│ ├── fastcgi_params.default
│ ├── koi-utf
│ ├── koi-win
│ ├── mime.types # 媒体类型
│ ├── mime.types.default
│ ├── nginx.conf # Nginx的主配置文件
│ ├── nginx.conf.default
│ ├── scgi_params # scgi相关参数文件,一般用不到
│ ├── scgi_params.default
│ ├── uwsgi_params # uwsgi相关参数文件,一般用不到
│ ├── uwsgi_params.default
│ └── win-utf
├── fastcgi_temp # fastcgi 临时数据目录
├── html # 这是编译安装Nginx的牧人站点目录,类似Apache的默认站点htdocs目录
│ ├── dir
│ │ ├── 50x.html # 错误页面优雅的替代文件
│ │ └── index.html
│ └── index.html # 网站首页文件
├── logs
│ ├── access.log # 访问日志
│ ├── error.log # 错误日志
│ └── nginx.pid # Nginx的pid文件,Nginx启动后,会把进程的pid写到此文件
├── proxy_temp
├── sbin # 这是Nginx的命令目录,如Nginx的启动命令nginx
│ └── nginx
├── scgi_temp # 临时目录
└── uwsgi_temp # 临时目录
其中,所有以default的文件都是备份文件
2.3.Nginx主配置文件nginx.conf
2.3.1:Nginx区块
①1-3为Main区,Nginx的核心功能
 main区
main区②4-6行为events区,Nginx核心功能模块

     4  events {
     5      worker_connections  1024;
     6  }
③第七行是HTTP区的开始,Nginx http核心模块,内容参数如下
     7  http {              //HTTP区开始,Nginx的核心模块
     8      include       mime.types;
     9      default_type  application/octet-stream;
    10      sendfile        on;
    11      keepalive_timeout  65;
    12      server {         //server区块
    13          listen       80;
    14          server_name  www.p-pp.cn;
    15          location / {               //location区块
    16              root   html;
    17              index  index.html index.htm;
    18          }
    19          error_page   500 502 503 504  /50x.html;
    20          location = /50x.html {               //location区块
    21              root   html;
    22          }
    23      }
    24  }
2.3.2:nginx.conf中文注释
[root@redhat nginx]#grep -v '#\|^$' conf/nginx.conf
worker_processes  1;                //work进程的数量
error_log  logs/error.log;
pid        logs/nginx.pid;
events {            //时间区块开始
    worker_connections  1024;               //每个worker进程支持最大连接数
}            //时间区块结束
http {            //http块开始
    include       mime.types;            //Nginx支持的媒体类型库文件
    default_type  application/octet-stream;            //默认的媒体类型
    sendfile        on;            //开启高校传输
    keepalive_timeout  65;            //连接超时
    server {            //第一个server区块开始,表示一个独立的虚拟主机站点
        listen       80;            //提供服务的端口
        server_name  localhost;            //提供服务的域名主机名
        location / {            //第一个location区块开始
            root   html;                //站点根目录,相当于Nginx的根目录
            index  index.html index.htm;            //默认的首页文件,多个用空格分割
        }            //第一个location结束
        error_page   500 502 503 504  /50x.html;            //出现对应的状态码时,使用50x.html回应客户
        location = /50x.html {            //location区块开始
            root   html;            //指定对应站点的目录
        }
    }
}                    //http区块结束
三、Nginx虚拟主机配置
3.1:虚拟主机概念

3.2:虚拟主机类型
3.3:配置虚拟主机
3.3.1:如下所示,在HTTP语句块中添加黑体字即可
http {
    include       mime.types;
    default_type  application/octet-stream;
    sendfile        on;
    keepalive_timeout  65;
    server {
        listen       80;
        server_name  localhost;
        location / {
            root   html;
            index  index.html index.htm;
        }
        error_page   500 502 503 504  /50x.html;
        location = /50x.html {
            root   html;
        }
    }
        server {
                listen 80;              # 端口
                server_name n1.p-pp.cn;       # 主机名
                location / {
                        root /var/www/html/www;  # 网站的目录
                        index index.html;      # 网站的主页文件名
                }
        }
}
3.3.2:创建/var/www/html这个目录,然后项目中添加index.html文件,内容自行填写即可,自己在做bbs.p-pp.cn和blog.p-pp.cn
3.3.3:然后做以下操作
[root@redhat nginx]#sbin/nginx -t                # 检查语句块
nginx: the configuration file /usr/local/nginx-1.10.1/conf/nginx.conf syntax is ok
nginx: configuration file /usr/local/nginx-1.10.1/conf/nginx.conf test is successful
[root@redhat nginx]#sbin/nginx -s reload                # 重新启动
3.3.4:客户端修改hosts文件,指定IP和对应的主机名,然后使用浏览器访问即可
3.3.5企业中重启Nginx后的检查策略
curl -I -s --connect-timeout 2 bbs.p-pp.cn | head -1 | tr " " "\n" # 这个命令可以查看网站的返回状态,可以写一个脚本进行检测
四、Nginx常用功能配置
4.1:规范优化Nginx配置文件
4.1.1:简介
- 如果了解过Apache软件,就会知道Apache主配置文件包含虚拟主机子文件的方法,这里借鉴Apache这种包含方法。
- Nginx的主配置文件nginx.conf,主配置文件包含的所有虚拟主机的自配置文件会统一放入extra目录中
- 这里使用的i参数nclude,下面是include语法include file | mask
它可以放到nginx的任何位置:例如
include www.conf; # 包含单个文件
include vhosts/*.conf; # 包含目录下的所有conf结尾的文件
4.1.2:配置
[root@redhat conf]#vim nginx.conf
[root@redhat conf]#sed -n '117,124p' nginx.conf > extra/n1.conf                # 将b1的server语句块写到extra/www.conf 文件中
[root@redhat conf]#sed -n '125,132p' nginx.conf > extra/bbs.conf                  # 将bbs的server语句块写到extra/bbs.conf 文件中
[root@redhat conf]#sed -n '133,140p' nginx.conf > extra/blog.conf                   # 将blog的server语句块写到extra/blog.conf 文件中
[root@redhat conf]#sed -i '117,140d' nginx.conf                  # 删除nginx.conf中的语句块
[root@redhat conf]#vim nginx.conf
 include     extra/*.conf;         # 可以放到nginx.conf的任何位置
4.1.3:重新加载nginx
4.2:Nginx别名配置
4.2.1.虚拟主机的别名介绍及配置
- 所为虚拟主机的别名,就是为虚拟主机设置除了主域名以外多个域名名字,这样就实现用户访问的多个域名对应同一个虚拟主机的功能。
- 以n1.p-pp.cn域名的虚拟主机为例,为其增加一个别名,n2.p-pp.cn。使其访问n2.p-pp.cn的时候,得到的结果是一样的
- 更改后的配置文件如下
[root@redhat nginx]#vim conf/extra/N1.conf
server {
        listen 80;
        server_name n1.p-pp.cn n2.p-pp.cn;
        location / {
                root /var/www/html/www;
                index index.html;
        }
}
4.2.2:虚拟主机应用场景:可以用于检测判断每个节点下面的节气是否正常
4.3:Nginx状态信息功能
4.3.1:Nginx status介绍
- Nginx软件的功能模块中有一个ngx_http_status+module模块,这个模块的主要功能是记录Nginx的基本访问状态信息,让使用者了解Nginx的工作状态,例如连接数等。要使用模块,必须增加http_stub_status_module模块来支持
- 可通过一下方法检测编译安装Nginx是否设定了上述模块
[root@redhat nginx]#sbin/nginx -V
nginx version: nginx/1.10.1
built by gcc 4.8.5 20150623 (Red Hat 4.8.5-36) (GCC)
built with OpenSSL 1.0.2k-fips  26 Jan 2017
TLS SNI support enabled
configure arguments: --user=nginx --group=nginx --prefix=/usr/local/nginx-1.10.1 --with-http_stub_status_module --with-http_ssl_module
4.3.2:配置Nginx status
①生成状态配置,并增加配置参数
[root@redhat nginx]#vim conf/extra/status.conf
##status
server {
        listen 80;
        server_name status.p-pp.cn;
        location / {
                stub_status on;
                access_log off;
        }
}
②请确保主配置文件导入了extra下边的文件
[root@redhat nginx]#grep 'extra' conf/nginx.conf
    include     extra/*.conf;
③客户端访问
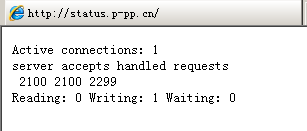
Active connections: 1                    // 有1个正在连接
server accepts handled requests
4166 4166 4300
//第一个server表示Nginx启动到现在处理了4166个连接
//第二个accepts表示创建了4166个握手
    //请求丢失数=(握手数 - 连接数),可以看出,本次窗台没有丢失请求
//第三个 handled requests,表示处理了 4300从请求
Reading: 0 Writing: 1 Waiting: 0
//reading为Nginx读取到客户端的Header信息数
//Writing为Nginx返回客户端的Header信息数
//Writing为Nginx已经处理完正在等候下一次请求指令的驻留连接。在开启keep-alive的情况下,这个值等于active-(reading + writing)
五、Nginx访问日志(access_log)
5.1:Nginx访问日志介绍
- Nginx软件会把每个用户的访问网站日志信息记录到指定文件,供网站提供者分析用户浏览行为,此功能由ngx_http_log_module模块负责。
5.2:访问日志参数
Nginx的访问日志主要由两个参数控制
| 参数 | 说明 |
| log_format | 用来定义记录日志的格式(可以定义多种日志格式,取不同名字即可) |
| access_log | 用来指定日志文件的路径及使用日志格式记录日志 |
Nginx日志格式中默认的参数如下:
log_format main '$remote_addr - $remote_user [$time_local] "$request" '
'$status $body_bytes_sent "$http_referer" '
'"$http_user_agent" "$http_x_forwarded_for"';
Nginx记录日志的默认参数配置如下:
#access_log logs/access.log main;
5.3:访问日志配置说明
5.3.1:日志格式说明定义
- 定义语法 log_format name string ...;
- 其配置文件在http标签内
log_format main '$remote_addr - $remote_user [$time_local] "$request" '
'$status $body_bytes_sent "$http_referer" '
'"$http_user_agent" "$http_x_forwarded_for"';
其中,log_format未入职关键参数,不能变
main是日志个指定的标签,记录日志通过这个main标签选择指定的格式。其后所接所有内容都是可以记录的日志信息,具体如下,所有日志以空格分割,一行可以记录多个
Nginx日志变量 说明 $remote_addr 记录访问网站的客户端地址 $http_x_forwarded_for 当前端有代理服务器时,设置Web节点记录客户端地址的配置,此参数有效前提是代理服务器上进行了相关的x_forewalld_for设置 $remote_user 远程客户端用户名称 $time_local 记录访问时间与时区 $request 用户的http请求起始行信息 $status http状态码,记录请求返回的状态,例如:200、204、30等 $body_bytes_sent 服务器发送给客户端的响应body字节数 $http_referer 记录此次请求是从那个链接访问过来的,可以根据referer进行防盗链设置 $http_user_agent 记录客户端访问信息,例如:浏览器、收集客户端等
5.3.2:access_log参数说明
语法:
- access_log path [format [ buffer=size [flush=time] ] [if=condition]];
- access_log path format gzip[=level] [buffer=size] [flush=time] [if=condtion];
- access_log syslog:server=address[,parameter=value] [format [if=condition]];
- buffer=size为存放访问日志的缓冲区大小
- flush=time为缓冲区的日志刷新到磁盘的时间
- gzip[=level]表示压缩级别
- [if=condition]表示其他条件。一般这些参数都无序配置,极端优化时才可能考虑
access_log off,表示不记录访问日志
默认配置:access_log logs/access_log combined;
放置的位置在http、server、location、if in location、limit_except中
5.3.4:访问日志配置
①编辑主文件nginx.conf,配置日志的格式,如下,红色加粗为添加的内容
[root@redhat nginx]#vim conf/nginx.conf
....
http {
    include       mime.types;
    include     extra/*.conf;
    default_type  application/octet-stream;

    log_format  main  '$remote_addr - $remote_user [$time_local] "$request" '
                      '$status $body_bytes_sent "$http_referer" '
                      '"$http_user_agent" "$http_x_forwarded_for"';
....
②对虚拟主机进行配置,使其使用上述格式记录用户访问日志,添加红色部分
[root@redhat nginx]#vim conf/extra/N1.conf
server {
        listen 80;
        server_name n1.p-pp.cn n2.p-pp.cn;
        location / {
                root /var/www/html/www;
                index index.html;
        }
        access_log logs/n1_access.log main;
}
③检查语并重新加载
[root@redhat nginx]#sbin/nginx -t
nginx: the configuration file /usr/local/nginx-1.10.1/conf/nginx.conf syntax is ok
nginx: configuration file /usr/local/nginx-1.10.1/conf/nginx.conf test is successful
[root@redhat nginx]#sbin/nginx -s reload
④使用客户端访问,并查看logs/N1.access.log文件,可以和上述的log_format对比,看看是否对应
⑤可以在记录日志中添加buffer和flush选项,这样可以在高并发场景下提升网站访问性能
[root@redhat nginx]#vim conf/extra/N1.conf
server {
        listen 80;
        server_name n1.p-pp.cn n2.p-pp.cn;
        location / {
                root /var/www/html/www;
                index index.html;
        }
        access_log logs/n1_access.log main gzip buffer=32k flush=5s;
}
5.3.5:Nginx访问日志轮训切割
默认情况Nginx会把所有的访问日志生成到一个指定的访问文件access_log里,但这样一来,时间长了就会导致日志个头很大,不利于入职的分析和处理,因此,有必要对Nginx日志按天、按小时进行切割,时期分成不同的文件保存。
#!/bin/bash
logdir="/var/log/nginx/"
basedir="/usr/local/nginx/"
Year=`date +%Y`
mounth=`date +%m`
day=`date +%d`
hour=`date +%H`
name="logs"

[ -d ${logdir}${Year}/${mounth}/${day}/${hour} ] || mkdir -p ${logdir}${Year}/${mounth}/${day}/${hour}
/usr/bin/rm -rf ${basedir}${name} && /usr/bin/ln -s ${logdir}${Year}/${mounth}/${day}/${hour} ${basedir}${name}
/usr/bin/chown nginx: ${basedir}
/usr/bin/chown nginx: ${logdir}
# ${basedir}sbin/nginx -c ${basedir}conf/nginx.conf
${basedir}sbin/nginx -s reload
上边的这个脚本是让每小时将logs的软连接更改位置,使其每小时会将文件放在新的文件夹
curl -s -o /dev/null -I -w "%{http_code}\n" n1.p-pp.cn/xuan1/ # 可以查看服务器的返回代码
六:location
6.1location正则写法
location  = / {
  # 精确匹配 / ,主机名后面不能带任何字符串
  [ configuration A ]
}

location  / {
  # 因为所有的地址都以 / 开头,所以这条规则将匹配到所有请求
  # 但是正则和最长字符串会优先匹配
  [ configuration B ]
}

location /documents/ {
  # 匹配任何以 /documents/ 开头的地址,匹配符合以后,还要继续往下搜索
  # 只有后面的正则表达式没有匹配到时,这一条才会采用这一条
  [ configuration C ]
}

location ~ /documents/Abc {
  # 匹配任何以 /documents/ 开头的地址,匹配符合以后,还要继续往下搜索
  # 只有后面的正则表达式没有匹配到时,这一条才会采用这一条
  [ configuration CC ]
}

location ^~ /images/ {
  # 匹配任何以 /images/ 开头的地址,匹配符合以后,停止往下搜索正则,采用这一条。
  [ configuration D ]
}

location ~* \.(gif|jpg|jpeg)$ {
  # 匹配所有以 gif,jpg或jpeg 结尾的请求
  # 然而,所有请求 /images/ 下的图片会被 config D 处理,因为 ^~ 到达不了这一条正则
  [ configuration E ]
}

location /images/ {
  # 字符匹配到 /images/,继续往下,会发现 ^~ 存在
  [ configuration F ]
}

location /images/abc {
  # 最长字符匹配到 /images/abc,继续往下,会发现 ^~ 存在
  # F与G的放置顺序是没有关系的
  [ configuration G ]
}

location ~ /images/abc/ {
  # 只有去掉 config D 才有效:先最长匹配 config G 开头的地址,继续往下搜索,匹配到这一条正则,采用
    [ configuration H ]
}

location ~* /js/.*/\.js
- 已
=开头表示精确匹配
如 A 中只匹配根目录结尾的请求,后面不能带任何字符串。 ^~开头表示uri以某个常规字符串开头,不是正则匹配- ~ 开头表示区分大小写的正则匹配;
- ~* 开头表示不区分大小写的正则匹配
- / 通用匹配, 如果没有其它匹配,任何请求都会匹配到
顺序 no优先级:
(location =) > (location 完整路径) > (location ^~ 路径) > (location ~,~* 正则顺序) > (location 部分起始路径) > (/)
上面的匹配结果
按照上面的location写法,以下的匹配示例成立:
- / -> config A
精确完全匹配,即使/index.html也匹配不了 - /downloads/download.html -> config B
匹配B以后,往下没有任何匹配,采用B - /images/1.gif -> configuration D
匹配到F,往下匹配到D,停止往下 - /images/abc/def -> config D
最长匹配到G,往下匹配D,停止往下
你可以看到 任何以/images/开头的都会匹配到D并停止,FG写在这里是没有任何意义的,H是永远轮不到的,这里只是为了说明匹配顺序 - /documents/document.html -> config C
匹配到C,往下没有任何匹配,采用C - /documents/1.jpg -> configuration E
匹配到C,往下正则匹配到E - /documents/Abc.jpg -> config CC
最长匹配到C,往下正则顺序匹配到CC,不会往下到E
实际使用建议
所以实际使用中,个人觉得至少有三个匹配规则定义,如下:
#直接匹配网站根,通过域名访问网站首页比较频繁,使用这个会加速处理,官网如是说。
#这里是直接转发给后端应用服务器了,也可以是一个静态首页
# 第一个必选规则
location = / {
    proxy_pass http://tomcat:8080/index
}
# 第二个必选规则是处理静态文件请求,这是nginx作为http服务器的强项
# 有两种配置模式,目录匹配或后缀匹配,任选其一或搭配使用
location ^~ /static/ {
    root /webroot/static/;
}
location ~* \.(gif|jpg|jpeg|png|css|js|ico)$ {
    root /webroot/res/;
}
#第三个规则就是通用规则,用来转发动态请求到后端应用服务器
#非静态文件请求就默认是动态请求,自己根据实际把握
#毕竟目前的一些框架的流行,带.php,.jsp后缀的情况很少了
location / {
    proxy_pass http://tomcat:8080/
}
六、rewrite:
6.1:rewrite
rewrite功能就是,使用nginx提供的全局变量或自己设置的变量,结合正则表达式和标志位实现url重写以及重定向。rewrite只能放在server{},location{},if{}中,并且只能对域名后边的除去传递的参数外的字符串起作用,例如 http://seanlook.com/a/we/index.php?id=1&u=str 只对/a/we/index.php重写。语法rewrite regex replacement [flag];
如果相对域名或参数字符串起作用,可以使用全局变量匹配,也可以使用proxy_pass反向代理。
表明看rewrite和location功能有点像,都能实现跳转,主要区别在于rewrite是在同一域名内更改获取资源的路径,而location是对一类路径做控制访问或反向代理,可以proxy_pass到其他机器。很多情况下rewrite也会写在location里,它们的执行顺序是:
- 执行server块的rewrite指令
- 执行location匹配
- 执行选定的location中的rewrite指令
如果其中某步URI被重写,则重新循环执行1-3,直到找到真实存在的文件;循环超过10次,则返回500 Internal Server Error错误。
6.2:flag标志位
last: 相当于Apache的[L]标记,表示完成rewritebreak: 停止执行当前虚拟主机的后续rewrite指令集redirect: 返回302临时重定向,地址栏会显示跳转后的地址permanent: 返回301永久重定向,地址栏会显示跳转后的地址
因为301和302不能简单的只返回状态码,还必须有重定向的URL,这就是return指令无法返回301,302的原因了。这里 last 和 break 区别有点难以理解:
- last一般写在server和if中,而break一般使用在location中
- last不终止重写后的url匹配,即新的url会再从server走一遍匹配流程,而break终止重写后的匹配
- break和last都能组织继续执行后面的rewrite指令
6.3:if指令与全局变量
if判断指令
语法为if(condition){...},对给定的条件condition进行判断。如果为真,大括号内的rewrite指令将被执行,if条件(conditon)可以是如下任何内容:
- 当表达式只是一个变量时,如果值为空或任何以0开头的字符串都会当做false
- 直接比较变量和内容时,使用
=或!= ~正则表达式匹配,~*不区分大小写的匹配,!~区分大小写的不匹配
-f和!-f用来判断是否存在文件-d和!-d用来判断是否存在目录-e和!-e用来判断是否存在文件或目录-x和!-x用来判断文件是否可执行
例如:
if ($http_user_agent ~ MSIE) {
    rewrite ^(.*)$ /msie/$1 break;
} //如果UA包含"MSIE",rewrite请求到/msid/目录下

if ($http_cookie ~* "id=([^;]+)(?:;|$)") {
    set $id $1;
 } //如果cookie匹配正则,设置变量$id等于正则引用部分

if ($request_method = POST) {
    return 405;
} //如果提交方法为POST,则返回状态405(Method not allowed)。return不能返回301,302

if ($slow) {
    limit_rate 10k;
} //限速,$slow可以通过 set 指令设置

if (!-f $request_filename){
    break;
    proxy_pass  http://127.0.0.1;
} //如果请求的文件名不存在,则反向代理到localhost 。这里的break也是停止rewrite检查

if ($args ~ post=140){
    rewrite ^ http://example.com/ permanent;
} //如果query string中包含"post=140",永久重定向到example.com

location ~* \.(gif|jpg|png|swf|flv)$ {
    valid_referers none blocked www.jefflei.com www.leizhenfang.com;
    if ($invalid_referer) {
        return 404;
    } //防盗链
}
全局变量
下面是可以用作if判断的全局变量
$args: #这个变量等于请求行中的参数,同$query_string$content_length: 请求头中的Content-length字段。$content_type: 请求头中的Content-Type字段。$document_root: 当前请求在root指令中指定的值。$host: 请求主机头字段,否则为服务器名称。$http_user_agent: 客户端agent信息$http_cookie: 客户端cookie信息$limit_rate: 这个变量可以限制连接速率。$request_method: 客户端请求的动作,通常为GET或POST。$remote_addr: 客户端的IP地址。$remote_port: 客户端的端口。$remote_user: 已经经过Auth Basic Module验证的用户名。$request_filename: 当前请求的文件路径,由root或alias指令与URI请求生成。$scheme: HTTP方法(如http,https)。$server_protocol: 请求使用的协议,通常是HTTP/1.0或HTTP/1.1。$server_addr: 服务器地址,在完成一次系统调用后可以确定这个值。$server_name: 服务器名称。$server_port: 请求到达服务器的端口号。$request_uri: 包含请求参数的原始URI,不包含主机名,如:”/foo/bar.php?arg=baz”。$uri: 不带请求参数的当前URI,$uri不包含主机名,如”/foo/bar.html”。$document_uri: 与$uri相同。
例:http://localhost:88/test1/test2/test.php
$host:localhost
$server_port:88
$request_uri:http://localhost:88/test1/test2/test.php
$document_uri:/test1/test2/test.php
$document_root:/var/www/html
$request_filename:/var/www/html/test1/test2/test.php
常用正则
.: 匹配除换行符以外的任意字符?: 重复0次或1次+: 重复1次或更多次*: 重复0次或更多次\d:匹配数字^: 匹配字符串的开始$: 匹配字符串的介绍{n}: 重复n次{n,}: 重复n次或更多次[c]: 匹配单个字符c[a-z]: 匹配a-z小写字母的任意一个
小括号()之间匹配的内容,可以在后面通过$1来引用,$2表示的是前面第二个()里的内容。正则里面容易让人困惑的是\转义特殊字符。
rewrite实例
例1:
http {
    # 定义image日志格式
    log_format imagelog '[$time_local] ' $image_file ' ' $image_type ' ' $body_bytes_sent ' ' $status;
    # 开启重写日志
    rewrite_log on;

    server {
        root /home/www;

        location / {
                # 重写规则信息
                error_log logs/rewrite.log notice;
                # 注意这里要用‘’单引号引起来,避免{}
                rewrite '^/images/([a-z]{2})/([a-z0-9]{5})/(.*)\.(png|jpg|gif)$' /data?file=$3.$4;
                # 注意不能在上面这条规则后面加上“last”参数,否则下面的set指令不会执行
                set $image_file $3;
                set $image_type $4;
        }

        location /data {
                # 指定针对图片的日志格式,来分析图片类型和大小
                access_log logs/images.log mian;
                root /data/images;
                # 应用前面定义的变量。判断首先文件在不在,不在再判断目录在不在,如果还不在就跳转到最后一个url里
                try_files /$arg_file /image404.html;
        }
        location = /image404.html {
                # 图片不存在返回特定的信息
                return 404 "image not found\n";
        }
}
对形如/images/ef/uh7b3/test.png的请求,重写到/data?file=test.png,于是匹配到location /data,先看/data/images/test.png文件存不存在,如果存在则正常响应,如果不存在则重写tryfiles到新的image404 location,直接返回404状态码。
例2:
rewrite ^/images/(.*)_(\d+)x(\d+)\.(png|jpg|gif)$ /resizer/$1.$4?width=$2&height=$3? last;
对形如/images/bla_500x400.jpg的文件请求,重写到/resizer/bla.jpg?width=500&height=400地址,并会继续尝试匹配location。
七、Nginx认证
7.1:认证可以添加在location、server、http、limit_except都可以
7.2:认证的参数
auth_basic:指定提示符
语法:
         auth_basic string|off;
例子:
        auth_basic      "Plase input you user and pass!!!";
auth_basic_user_file:指定存放用户的文件
语法:
         auth_basic_user_file file;
例子:
auth_basic_user_file /usr/local/nginx/conf/pass;
7.3生成密码文件的两种方式
7.3.1:使用openssl
[root@redhat ~]#echo -n "user:" >> /usr/local/nginx/conf/pass        //user为用户名(不用是系统用户),:为用户和密码的分隔符
[root@redhat ~]#openssl passwd -apr1 >> /usr/local/nginx/conf/pass       //apr1是加密方式,执行后输入user的密码即可
7.3.2:使用apache自带的htpasswd
[root@redhat ~]#which htpasswd
/usr/local/bin/htpasswd        //先确定软件的位置,如果没有,可以使用yum安装httpd会带有htpasswd
/usr/local/bin/htpasswd
[root@redhat ~]#/usr/local/bin/htpasswd -bc /usr/local/nginx/conf/pass user1 pass1        //添加user1用户,密码为pass1,其中要注意,-c选项是当文件不存在的时候需要指定,如果存在该文件,不需要指定-c选项,因为-c选项会将原有用户清空
[root@redhat ~]#chmod 400 /usr/local/nginx/conf/pass
[root@redhat ~]#chown nginx: /usr/local/nginx/conf/pass
7.3.3:重新加载配置文件即可,当下次访问的时候,会提示输入账户密码

 浙公网安备 33010602011771号