OpenCV实例(六)行人检测
OpenCV实例(六)行人检测
作者:Xiou
1.行人检测概述
行人检测是目标检测的一个分支。目标检测的任务是从图像中识别出预定义类型目标,并确定每个目标的位置。用来检测行人的目标检测系统被称为行人检测系统。
行人检测主要用来判断输入图片(或视频)内是否包含行人。若检测到行人,则给出其具体的位置信息。该位置信息是智能视频监控、人体行为分析、智能驾驶、智能机器人等应用的关键基础。由于行人可能处于移动状态,也可能处于静止状态,且外观容易受到体型、姿态、衣着、拍摄角度、遮挡等多种因素的影响,因此行人检测在计算机视觉领域内成为研究热点与难点。
一种比较常用的行人检测方式是统计学习方法,即根据大量样本构建行人检测分类器。提取的特征主要有目标的灰度、边缘、纹理、颜色、梯度等信息。分类器主要包括人工神经网络、SVM、Adaboost及卷积神经网络等。
OpenCV采用的行人检测算法是基于Dalal的论文实现的,我们可以直接调用行人检测器实现行人检测。
2.行人检测基础实现
2.1基本流程
在OpenCV中直接调用行人检测器即可完成行人检测,具体过程如下:
● 调用hog=cv2.HOGDescriptor(),初始化HOG描述符。
● 调用setVMDetector,将SVM设置为预训练的行人检测器。该检测器通过cv2.HOGDescriptor_getDefaultPeopleDetector()函数加载。
● 使用detectMultiScale函数检测图像中的行人,返回值为行人对应的矩形框和矩形框的权重值。在该函数中待检测图像是必选参数,除此之外,还有若干个很重要的可选参数,19.3节将对这些可选参数进行介绍。
2.2实现程序
代码实例:使用OpenCV自带的行人检测器实现行人检测。
import cv2
image = cv2.imread("back.jpg")
hog = cv2.HOGDescriptor()   #初始化方向梯度直方图描述子
#设置SVM为一个预先训练好的行人检测器
hog.setSVMDetector(cv2.HOGDescriptor_getDefaultPeopleDetector())
#调用函数detectMultiScale,检测行人对应的边框
(rects, weights) = hog.detectMultiScale(image)
#遍历每一个矩形框,将之绘制在图像上
for (x, y, w, h) in rects:
    cv2.rectangle(image, (x, y), (x + w, y + h), (0, 0, 255), 2)
cv2.imshow("image", image)     #显示检测结果
cv2.waitKey(0)
cv2.destroyAllWindows()
输出结果:
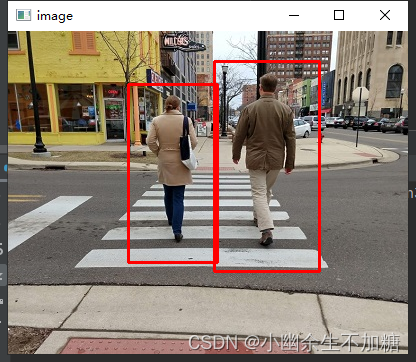
从本例的运行结果可以看出,当前识别效果还不错。但是,在面对复杂情况时,该程序的识别效果将差很多,还需要进一步的优化。
2.3参数优化
OpenCV为了提高自带的行人检测器的识别准确率提供了非常多的参数。函数detectMultiScale的语法格式如下:

其中:
● rects表示检测到的行人对应的矩形框。
● weights表示矩形框的权重值。
● image表示待检测行人的输入图像。
● winStride表示HOG检测窗口移动步长。
● padding表示边缘扩充的像素个数。
● scale表示构造金字塔结构图像时使用的缩放因子,默认值为1.05。
● useMeanshiftGrouping表示是否消除重叠的检测结果。
参数winStride
● WinStride值越小,覆盖的对象越多,能够找到的对象越多,但是运算效率会降低。● WinStride值越大,覆盖的对象越少,能够找到的对象越少,但是运算效率会提高,具有更好的实时性。通常,需要在实时性和提取精度之间取得平衡。一般,将WinStride设置为(4,4)会有比较好的效果。
代码实例:观察不同的winStride值的使用情况
import cv2
import time
def detect(image,winStride):
    imagex=image.copy()   #函数内部做个副本,让每个函数运行在不同的图像上
    hog = cv2.HOGDescriptor()   #初始化方向梯度直方图描述子
    #设置SVM为一个预先训练好的行人检测器
    hog.setSVMDetector(cv2.HOGDescriptor_getDefaultPeopleDetector())
    #调用函数detectMultiScale,检测行人对应的边框
    time_start = time.time()     #记录开始时间
    #获取(行人对应的矩形框、对应的权重)
    (rects, weights) = hog.detectMultiScale(imagex,winStride=winStride)
    time_end = time.time()    #记录结束时间
    # 绘制每一个矩形框
    for (x, y, w, h) in rects:
        cv2.rectangle(imagex, (x, y), (x + w, y + h), (0, 0, 255), 2)
    print("size:",winStride,",time:",time_end-time_start)
    name=str(winStride[0]) + "," + str(winStride[0])
    cv2.imshow(name, imagex)     #显示原始效果
    # cv2.imwrite( str(time.time())+".bmp" ,imagex)   #保存,书稿用的
image = cv2.imread("back.jpg")
detect(image,(4,4))
detect(image,(12,12))
detect(image,(24,24))
cv2.waitKey(0)
cv2.destroyAllWindows()
输出结果:
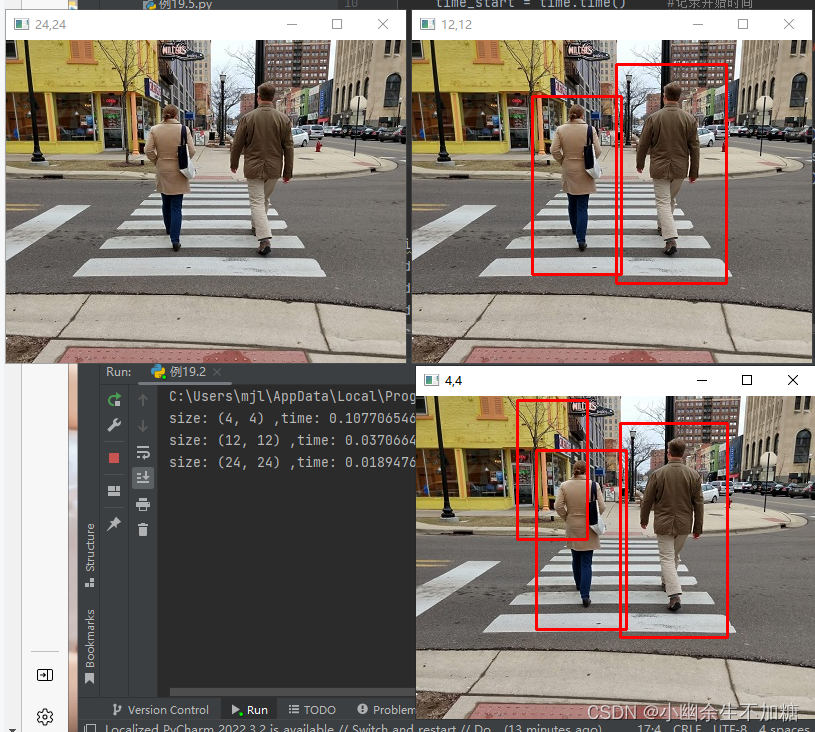
从程序输出结果可以看出,当步长较小时,遍历的区域更多,花费的时间更长。
参数padding
代码实例:观察参数padding不同值的检测效果。
import cv2
import time
def detect(image,padding):
    imagex=image.copy()   #函数内部做个副本,让每个函数运行在不同的图像上
    hog = cv2.HOGDescriptor()   #初始化方向梯度直方图描述子
    #设置SVM为一个预先训练好的行人检测器
    hog.setSVMDetector(cv2.HOGDescriptor_getDefaultPeopleDetector())
    #调用函数detectMultiScale,检测行人对应的边框
    time_start = time.time()     #记录开始时间
    #获取(行人对应的矩形框、对应的权重)
    (rects, weights) = hog.detectMultiScale(imagex,
                        winStride=(16,16),padding=padding)
    time_end = time.time()    #记录结束时间
    # 绘制每一个矩形框
    for (x, y, w, h) in rects:
        cv2.rectangle(imagex, (x, y), (x + w, y + h), (0, 0, 255), 2)
    print("Padding size:",padding,",time:",time_end-time_start)
    name=str(padding[0]) + "," + str(padding[0])
    cv2.imshow(name, imagex)     #显示原始效果
image = cv2.imread("backPadding2.jpg")
detect(image,(0,0))
detect(image,(8,8))
cv2.waitKey(0)
cv2.destroyAllWindows()
输出结果:
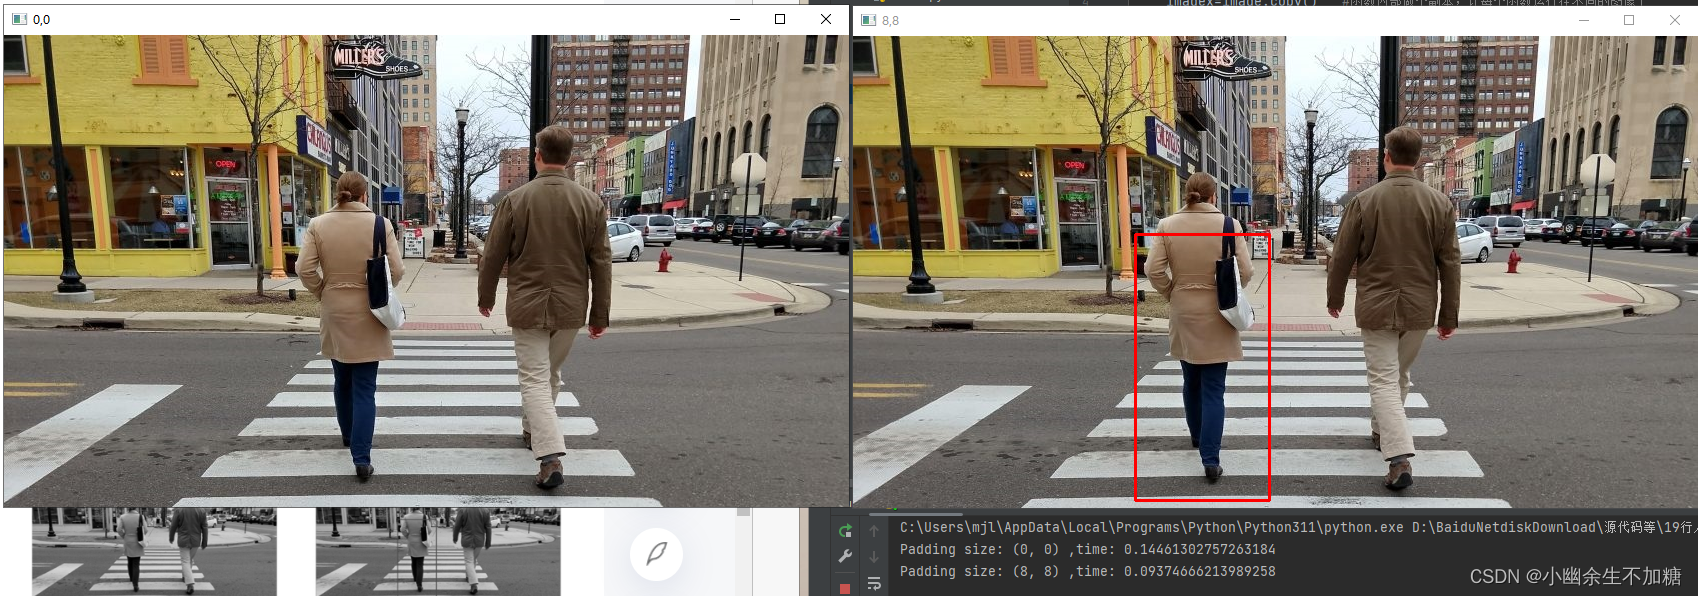
由程序输出结果可以看出,在扩边后可检测到靠近图像边缘的行人,但是运算量加大,耗时更长。
参数scale
参数scale是检测过程构造金字塔结构图像使用的比例值。
代码实例:观察不同scale参数值的检测效果
import cv2
import time
def detect(image,scale):
    imagex=image.copy()   #函数内部做个副本,让每个函数运行在不同的图像上
    hog = cv2.HOGDescriptor()   #初始化方向梯度直方图描述子
    #设置SVM为一个预先训练好的行人检测器
    hog.setSVMDetector(cv2.HOGDescriptor_getDefaultPeopleDetector())
    #调用函数detectMultiScale,检测行人对应的边框
    time_start = time.time()     #记录开始时间
    #获取(行人对应的矩形框、对应的权重)
    (rects, weights) = hog.detectMultiScale(imagex,scale=scale)
    time_end = time.time()    #记录结束时间
    # 绘制每一个矩形框
    for (x, y, w, h) in rects:
        cv2.rectangle(imagex, (x, y), (x + w, y + h), (0, 0, 255), 2)
    print("sacle size:",scale,",time:",time_end-time_start)
    name=str(scale)
    cv2.imshow(name, imagex)     #显示原始效果
image = cv2.imread("back.jpg")
detect(image,1.01)
detect(image,1.05)
detect(image,1.3)
cv2.waitKey(0)
cv2.destroyAllWindows()
输出结果:
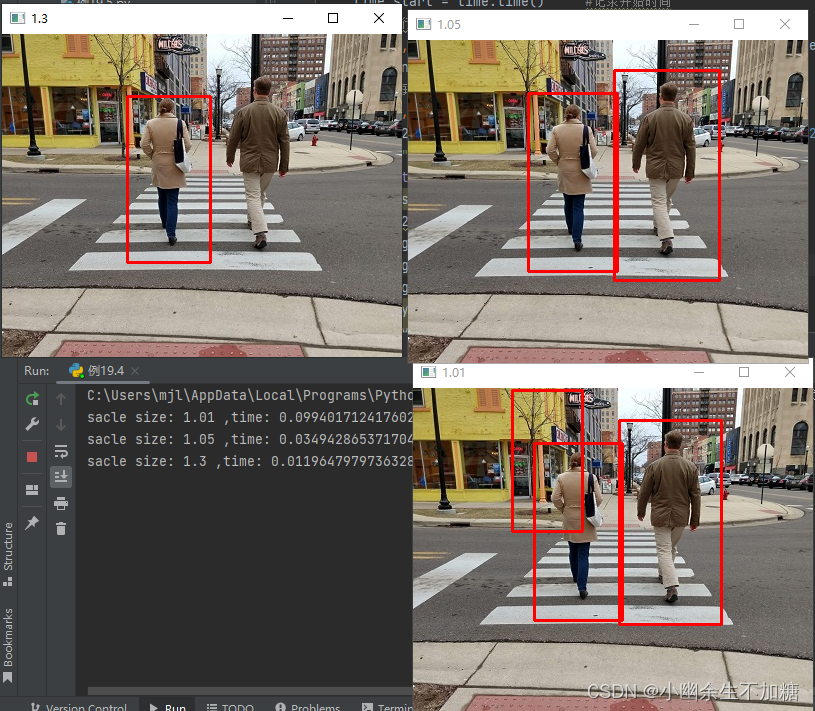
从程序输出结果可以看出,使用小的scale值能够更好地检测到图像内的行人目标,但是耗时较长;使用较大的scale值,速度较快,实时性好,但是可能会发生漏检。因此,需要在二者之间取得平衡。通常情况下,scale值的设置范围为[1.01,1.5]。
参数useMeanshiftGrouping
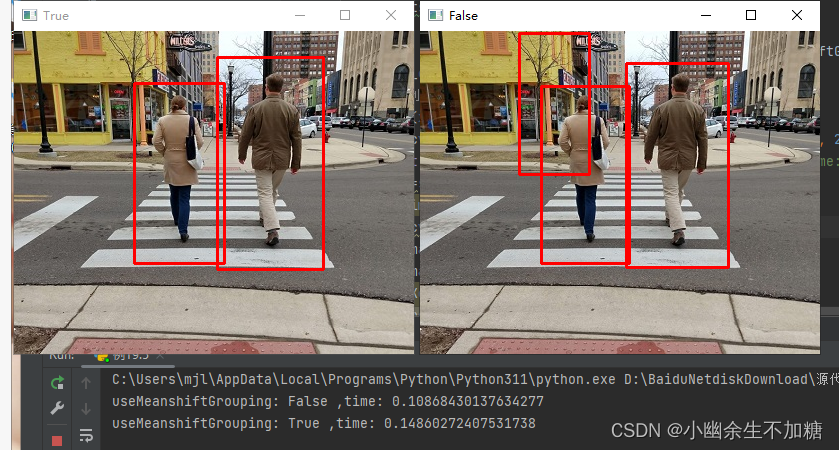
参数useMeanshiftGrouping用来控制是否消除重叠的检测结果。
代码实例:观察重叠边界处理结果
import cv2
import time
def detect(image,useMeanshiftGrouping):
    imagex=image.copy()   #函数内部做个副本,让每个函数运行在不同的图像上
    hog = cv2.HOGDescriptor()   #初始化方向梯度直方图描述子
    #设置SVM为一个预先训练好的行人检测器
    hog.setSVMDetector(cv2.HOGDescriptor_getDefaultPeopleDetector())
    #调用函数detectMultiScale,检测行人对应的边框
    time_start = time.time()     #记录开始时间
    #获取(行人对应的矩形框、对应的权重)
    (rects, weights) = hog.detectMultiScale(imagex,
                            scale=1.01,
                            useMeanshiftGrouping=useMeanshiftGrouping)
    time_end = time.time()    #记录结束时间
    # 绘制每一个矩形框
    for (x, y, w, h) in rects:
        cv2.rectangle(imagex, (x, y), (x + w, y + h), (0, 0, 255), 2)
    print("useMeanshiftGrouping:",useMeanshiftGrouping,",time:",time_end-time_start)
    name=str(useMeanshiftGrouping)
    cv2.imshow(name, imagex)     #显示原始效果
image = cv2.imread("back.jpg")
detect(image,False)
detect(image,True)
cv2.waitKey(0)
cv2.destroyAllWindows()
输出结果:
3.完整行人检测程序
代码实例:
import cv2
def detect(image,winStride,padding,scale,useMeanshiftGrouping):
    hog = cv2.HOGDescriptor()   #初始化方向梯度直方图描述子
    #设置SVM为一个预先训练好的行人检测器
    hog.setSVMDetector(cv2.HOGDescriptor_getDefaultPeopleDetector())
    #获取(行人对应的矩形框、对应的权重)
    (rects, weights) = hog.detectMultiScale(image,
                            winStride = winStride,
                            padding = padding,
                            scale = scale,
                            useMeanshiftGrouping=useMeanshiftGrouping)
    # 绘制每一个矩形框
    for (x, y, w, h) in rects:
        cv2.rectangle(image, (x, y), (x + w, y + h), (0, 0, 255), 2)
    cv2.imshow("result", image)     #显示原始效果
image = cv2.imread("back.jpg")
winStride = (8,8)
padding = (2,2)
scale = 1.03
useMeanshiftGrouping=True
detect(image,winStride,padding,scale,useMeanshiftGrouping)
cv2.waitKey(0)
cv2.destroyAllWindows()
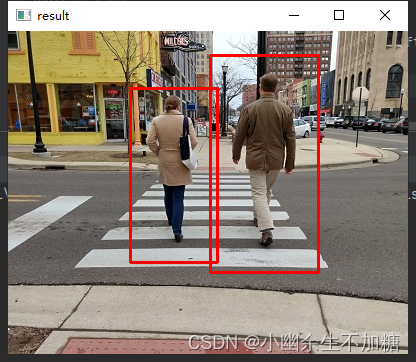
输出结果:


 浙公网安备 33010602011771号