
Day11-综合案例
1.面向接口的开发(spring的ioc) 掌握
1.问题
我们之前在servlet中创建业务层对象:
UserServiceImpl service = new UserServiceImpl();
UserServiceImpl属于一个类
弊端:如果我想针对UserServiceImpl类中的内容进行扩展。我们可以在定义一个类似UserServiceImpl这样的类UserServiceImpl2,然后我们在servlet中创建UserServiceImpl2类的对象。如果在继续扩展,定义UserServiceImpl3类,在servlet中又修改创建业务层对象代码。
解决问题思路:就是每次对于UserServiceImpl扩展类创建对象,我们不要去修改servlet源码,我们可以修改配置文件方式,源码达到零修改。
2.使用面向接口编程来解决上述问题

【1】定义一个接口
package com.itheima.case2.service;

import com.itheima.case2.vo.PageBean;

public interface UserService {
    //1.定义方法接收web层传递的数据
     public PageResult selectByPage(QueryPageBean queryPageBean);
}
【2】定义接口实现类
package com.itheima.case2.service.impl;

import com.itheima.case2.dao.UserMapper;
import com.itheima.case2.pojo.User;
import com.itheima.case2.service.UserService;
import com.itheima.case2.utils.SqlSessionUtil;
import com.itheima.case2.vo.PageBean;
import org.apache.ibatis.session.SqlSession;

import java.util.List;

public class UserServiceImpl implements UserService{
    //分页查询所有用户的角色
    public PageResult selectByPage(QueryPageBean queryPageBean) {
        //1. 参数处理
            // 以前计算数据库索引, 现在不算 TODO:
//        queryPageBean.getOffset();
        //2. 数据库查询
        SqlSession session = SqlSessionUtil.getSession();
        UserMapper mapper = session.getMapper(UserMapper.class);
        List<User> list = mapper.findUserByPage(queryPageBean);
//        Long total = mapper.findUserTotal(queryPageBean);
        Long total = mapper.findUserTotal();
        //3. 结果封装
        PageResult pageResult = new PageResult(total, list);
        session.close();
        return pageResult;
    }
}
【3】UserServlet
【4】beans.properties配置文件:
userService=com.itheima.case2.service.impl.UserServiceImpl
注意:
上述面向接口编程优势:
1.扩展性更强
2.对源代码进行修改的时候达到零修改,如果增加类只需要修改配置文件
3.将使用反射和读取配置文件的代码抽取到工具类中替换new方式创建对象(工厂类)
工厂类使用反射和读取配置文件的方式取代new创建对象。
工厂类中定义方法:
1.定义静态方法获取单例(对象)---单例设计模式
1.单例设计模式
设计模式属于一种是思想。单例设计模式解决产生一个对象。
单例设计模式分类:
饿汉式:类一加载就创建对象。没有多线程安全问题。
懒汉式:什么时候使用对象,什么时候创建对象。有多线程安全问题。
【1】工厂类单例模式的方法:
package com.itheima.case2.utils;
import com.itheima.case2.service.UserService;
import java.util.HashMap;
import java.util.ResourceBundle;
/*
用来生产对象的工具类
*/
public class BeansFactory {
//1.定义静态方法生成单例对象
/*
1.创建一个Map集合对象,new HashMap<String,Object>
key : 配置文件等号左边的内容userService roleService
value:保存对象
2.创建静态方法生成单例对象
3.在静态方法体中根据集合对象调用集合中的get方法根据key获取value value = map.get(key)
4.判断获取的value是否等于null
5.如果value等于null,说明集合中还没有存储对象,创建对象
6.将创建的对象和key存储到map集合中 map:userService obj
7.返回对象
*/
/*
1.创建一个Map集合对象,new HashMap<String,Object>
key : 配置文件等号左边的内容userService roleService
value:保存对象
*/
private static HashMap<String, Object> map = new HashMap<String, Object>();
//2.创建静态方法生成单例对象
/*
以下方法具有多线程安全问题:
t1:第一次执行obj是null,执行if语句,还没执行完,cpu切换到t2
t2:第一次执行obj依然是null,执行if语句,正常创建一个对象,放到map集合,返回t2创建的对象,此时cpu切换到t1线程
t1线程又创建一个对象,并返回,那么此时会有多个对象,线程不安全了
*/
public static synchronized Object getSingleInstance(String beanName) throws Exception {
//3.在静态方法体中根据集合对象调用集合中的get方法根据key获取value value = map.get(key)
Object obj = map.get(beanName);
//4.判断获取的value是否等于null
if (obj == null) {
// 5.如果value等于null,说明集合中还没有存储对象,创建对象
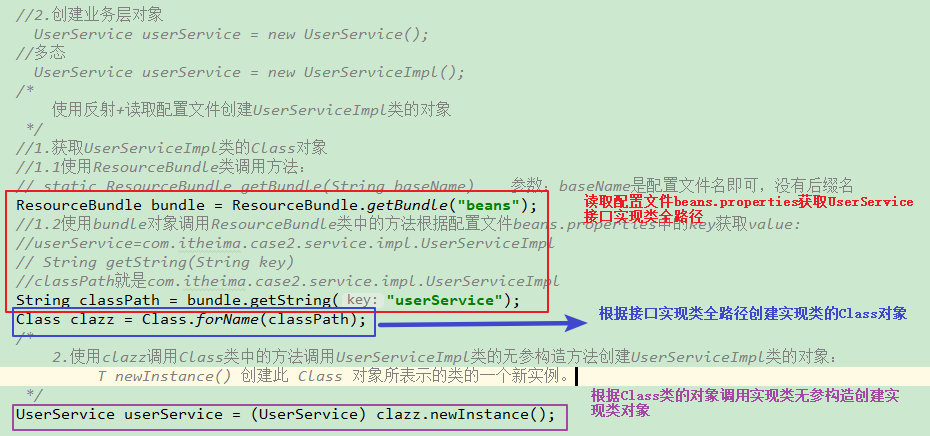
// 5.1.读取保存实现类的配置文件
ResourceBundle bundle = ResourceBundle.getBundle("beans");
//userServiceStr="com.itheima.case2.service.impl.UserServiceImpl"
String userServiceStr = bundle.getString(beanName);
// 5.2.使用反射根据上述读取的实现类全路径创建对象
Class clazz = Class.forName(userServiceStr);
// 5.3.使用clazz调用实现类UserServiceImpl的无参构造方法创建对象
obj = clazz.newInstance();
// 6.将创建的对象和key存储到map集合中 map:userService obj
map.put(beanName, obj);
}
//7.返回对象
return obj;
}
}
小结:
1.单例设计模式保证对象只有一个,无论调用多少次,对象是唯一的
2.上述单例设计模式的懒汉式具有多线程安全问题,需要给方法加上同步锁
4.Spring的ioc
什么是ioc(Inversion of Control):控制反转,以前我们要获取对象,我们自己new.主动获取。现在有了工厂模式,我们需要获取对象,是工厂创建,我们被动接受工厂创建的对象.这就是控制反转.说白了ioc就是采用工厂模式创建对象达到解耦合.
IOC:采用工厂模式(反射+读取配置文件)方式取代了之前是new创建对象的方式。
好处:解耦合。扩展性更强。
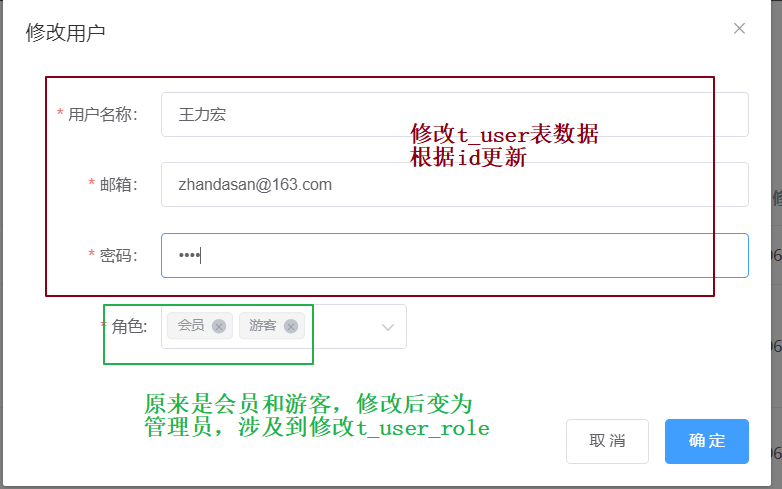
2.用户模块的修改用户
1.流程
1.点击修改按钮:
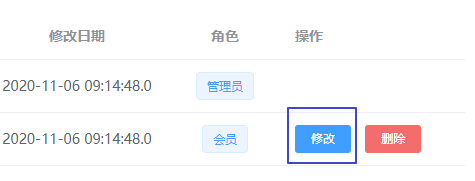
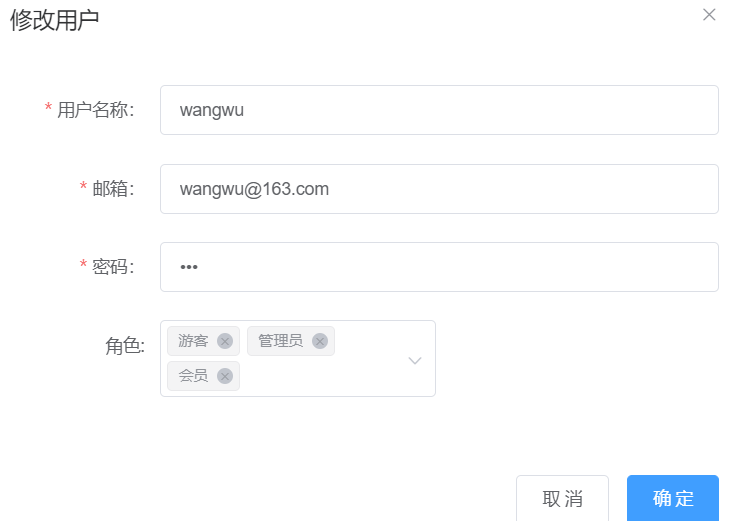
弹出修改页面:
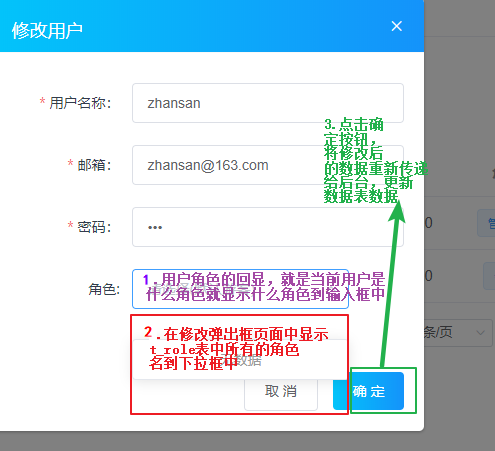
小结:
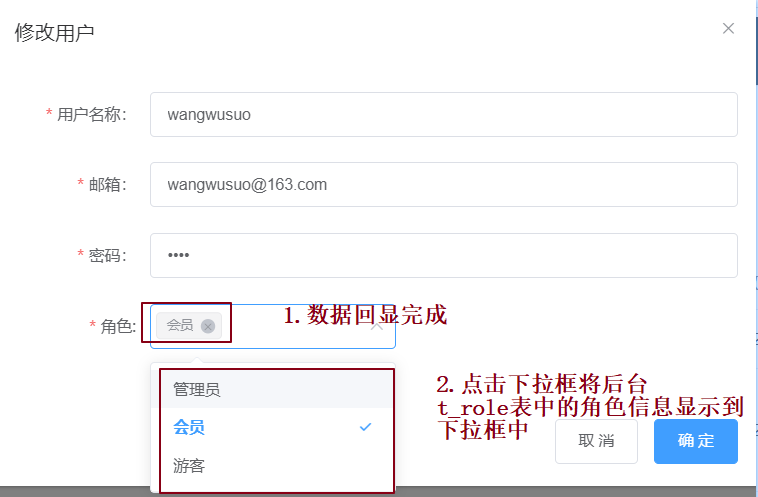
1.用户角色回显:就是将当前用户的角色名回显到角色的输入框中:
例如:张三原来是管理员,那么输入框就回显管理员
2.点击修改按钮到数据表t_role中查询角色名显示到下拉框中
3.当我们完成对用户的修改,然后点击修改输入框的确定按钮,将修改的信息提交到后台,并更新数据表。
注意:更新数据表注意多表联动。
2.数据回显
1.用户信息的回显
 			//修改用户 数据回显
            handleUpdate(row) {//row=scope.row,表示当前行对象
                var t = this;
                if (t.$refs['uptForm']) {
                    t.$refs['uptForm'].resetFields();
                }
                //当前行对象的id值(row.id)赋值给vue中data中的updateUser中的id
                t.updateUser.id = row.id;
                t.updateUser.username = row.username;
                t.updateUser.password = row.password;
                t.updateUser.email = row.email;

                //遍历取出此用户所有的角色id
                let roleIds = [];
                /*
                    1.一个用户有多个角色,我们在查询用户的时候,用户对象中会保存多个角色的容器roles
                        row表示当前行:
                        row.roles 表示获取当前行的所有角色对象
                        王五用户扮演的角色:roles=[{id:1,name:管理员},{id:2,name:会员},{id:3,name:游客}]
                */
                for(let i=0;i< row.roles.length; i++){
                    //row.roles[i].id 获取每个角色的id
                    //roleIds[i]存储当前用户的角色id
                    //举例:roleIds = [1,2,3]
                    roleIds[i] = row.roles[i].id;
                }
                //将当前用户的角色id数组赋值给updateUser中的roleIds
                t.updateUser.roleIds = roleIds;
                // dialogUptFormVisible: false,//修改窗口显示状态 默认值是false表示隐藏弹出框,值是true表示显示弹出框
                t.dialogUptFormVisible = true;

            },
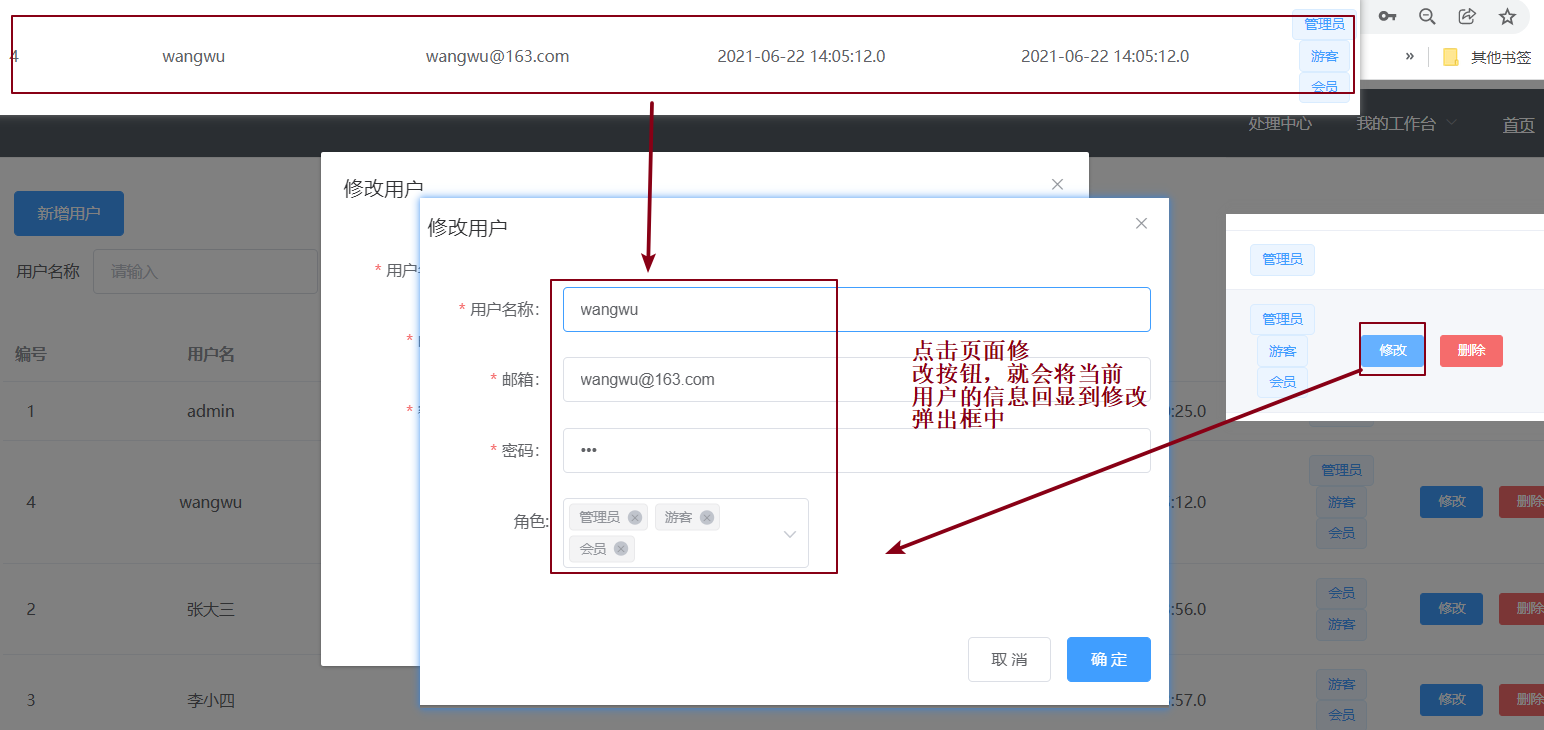
通过上述讲解,我们知道点击修改按钮之后将当前行所有数据赋值给data中的updateUser数组了,那么怎么就在修改弹出框中显示数据了呢?

只要updateUser中有数据,那么input输入框中就会显示数据。
页面实现输入框校验:
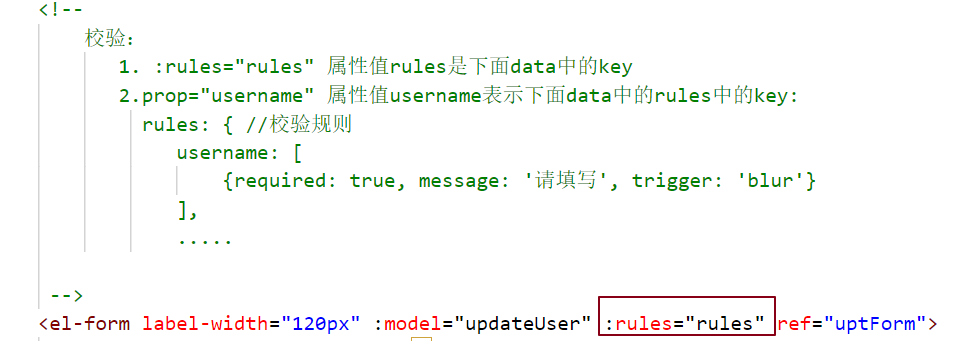
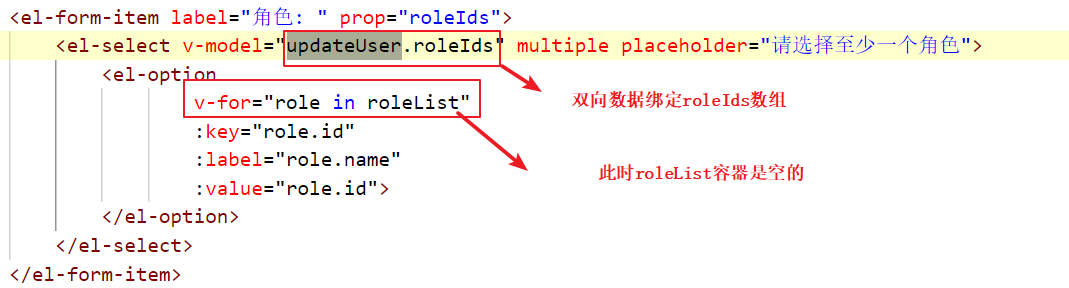
2.角色信息回显
【1】角色回显的不是角色名,而是角色id
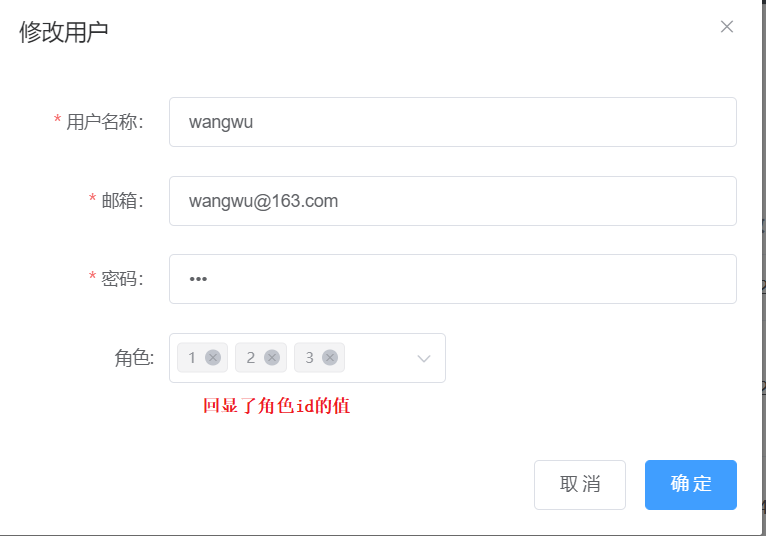
原因:因为我们在回显的时候将角色的id赋值给vue中data中的updateUser的roleIds属性了,并且在html标签中

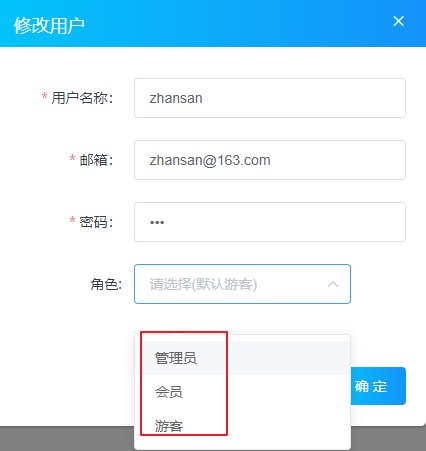
3.点击修改按钮到数据表t_role中查询角色名显示到下拉框中
0.页面效果
2.前端页面
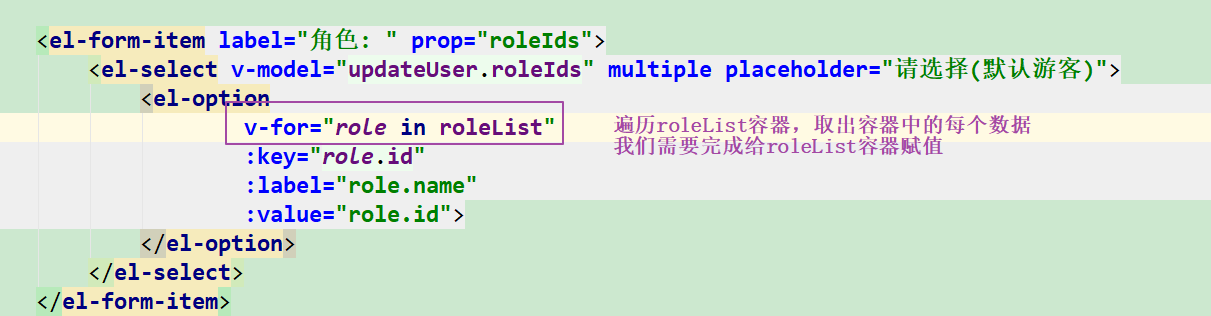
我们在加载页面之前需要将数据准备好,然后vue的生命周期函数就会将数据自动装载到视图中。
我们在vue的生命周期函数created中向后台请求角色信息的数据,将数据放到roleList容器中。
  /*
            当前页面的视图准备好之前,去后台加载数据,先把数据准备好,然后执行到挂载mounted的生命周期的时候将数据挂载到视图上
   */

	created() {

          /*  axios.post("http://127.0.0.1:8080/userServlet").then(response => {
                console.log(response.data);
            });*/
            //分页查询用户列表
            this.getUserList();

            //我们在这里调用getRoleList函数,向后台发送异步请求,请求角色信息,将角色信息放到vue中data中的 roleList: []中
            //我们在created函数中先去准备数据,然后随着vue的生命周期mounted挂载的时候就会将数据自动挂载到视图上:
            /*      <el-option

                    </el-option>
            */
            this.getRoleList();

        },
    		//TODO: 查询角色表
            getRoleList() {
              	//后台服务器地址
                let url = "role/query";
                axios.post(url).then(response=>{
                    //将查询的角色信息数据赋值给roleList
                    this.roleList = response.data;
                })

            },
小结:
1.在页面视图准备好之前我们需要在生命周期函数created中向后台发送请求获取角色信息,将数据准备好,赋值给roleList
2.web层
【1】步骤:
1.创建角色的Servlet,继承BaseServlet,书写路径是/role
2.在Servlet中定义查询所有角色信息的方法findAllRoles
3.在方法体内部创建业务层对象
4.使用业务层对象调用查询所有角色信息的方法返回List
5.将list响应个浏览器
package com.itheima.case2.web;


import com.itheima.case2.pojo.po.Role;
import com.itheima.case2.service.RoleServiceImpl;
import com.itheima.case2.utils.BaseController;

import javax.servlet.annotation.WebServlet;
import javax.servlet.http.HttpServletRequest;
import javax.servlet.http.HttpServletResponse;
import java.io.IOException;
import java.util.List;

@WebServlet("/role/*")
//public class RoleServlet extends HttpServlet {
public class RoleServlet extends BaseServlet {

    public void query(HttpServletRequest request, HttpServletResponse response) throws IOException {
             //获取请求参数
            //调用业务层的查询方法
            RoleServiceImpl service = new RoleServiceImpl();
            List<Role> list = service.findAllRoles();

            //响应给客户端
            BaseController.printResult(response,list);
    }


}
3.service层
【1】步骤:
1.创建接口RoleService
2.创建实现类RoleServiceImpl
3.在实现类实现接口方法
4.在方法体中获取RoleMapper接口代理对象
5.使用接口代理对象调用接口中查询所有角色方法,返回集合
6.将集合返回给web层
接口:
package com.itheima.case2.service;

import com.itheima.case2.pojo.Role;

import java.util.List;

public interface RoleService {
    //查询所有角色
    List<Role> findAllRoles();
}
实现类:
package com.itheima.case2.service.impl;

import com.itheima.case2.pojo.Role;
import com.itheima.case2.service.RoleService;
import com.itheima.case2.utils.SqlSessionUtil;

import java.util.List;

public class RoleServiceImpl implements RoleService {
    //3.在实现类实现接口方法
    @Override
    public List<Role> findAllRoles() {
        SqlSession session = SqlSessionUtil.getSession();
        RoleMapper mapper = session.getMapper(RoleMapper.class);
        List<Role> list = mapper.findAll();
        return list;
    }
}
配置文件:
roleService=com.itheima.case2.service.impl.RoleServiceImpl
注意:注意配置文件类的全路径别写错。
4.dao层
【1】步骤:
1.创建RoleMapper接口
2.在接口中定义插叙所有角色的方法
3.在方法上面使用注解查询所有角色信息
package com.itheima.case2.dao;

import com.itheima.case2.pojo.Role;
import org.apache.ibatis.annotations.Select;

import java.util.List;

public interface RoleMapper {
    @Select("select * from t_role")
    List<Role> findAll();
}
5.显示结果
4.当我们完成对用户的修改,然后点击修改输入框的确定按钮,将修改的信息提交到后台,并更新数据表。
4.1分析
注意:更新数据表注意多表联动。

修改t_user_role的时候需要根据用户id删除原来信息,然后将修改后的数据插入到数据表t_user_role中
说明:
更新用户的名称 邮箱 密码直接更改t_user表即可。
而更新用户对应的角色信息,首先和中间表t_user_role有关,当我们更新了角色信息,中间表也要更新:
1)更新t_user表中的名称 邮箱 密码
2)根据当前用户id删除中间表t_user_role所有和当前用户有关的信息
3)然后向中间表t_user_role中插入当前用户和角色的id
点击确定按钮完成数据修改:
1.用新的用户名 邮箱 密码直接修改t_user表
2.修改角色的时候修改中间表:t_user_role.
  举例: 张三原来角色:管理员(1)  会员(2)
         修改后张三角色:游客(3)

      user_id   role_id
        2         1
        2         2

实际做法:删除当前用户在中间表所有数据,然后重新插入新的数据
	 user_id   role_id
       	    2	     3
4.2代码实现
1.前端页面
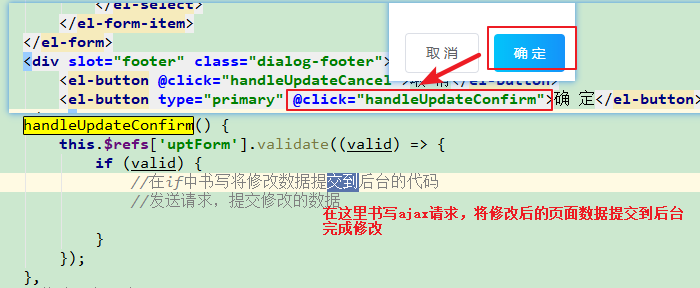
			//修改用户确定 TODO
            handleUpdateConfirm() {
                this.$refs['uptForm'].validate((valid) => {
                    if (valid) {
                        let url = "/user/update";
                        let param = this.updateUser;
                        axios.post(url,param).then(response=>{
                            console.log(response.data);
                            if(response.data.flag){
                                //隐藏修改弹出框
                                this.dialogUptFormVisible = false;
                                this.$message.success(response.data.message)
                            }else{
                                this.$message.error(response.data.message)
                            }
                        }).finally(()=>{
                            this.getUserList()
                        })
                    }
                });
            }
小结:
我们在userList.vue组件中点击修改弹框中的确定按钮时触发了handleUpdateConfirm事件函数,然后向后台发送ajax请求并携带修改弹框中数据到后台。
2.web层
【1】步骤:
1.在UserServlet中定义方法updateUserById
2.在该方法体中使用工具类将页面提交的updateUser中的数据封装到User实体类中
3.创建业务层对象
4.使用业务层对象调用修改方法将User实体类中的对象传递给业务层
5.跳转到分页查询的servlet中
 	//修改用户
    private void update(HttpServletRequest request, HttpServletResponse response) throws IOException {
        try {
            //接收请求参数
            UpdateUser uu = BaseController.parseJSON2Object(request, UpdateUser.class);

            UserServiceImpl service = new UserServiceImpl();
            service.updateUser(uu);

            BaseController.printResult(response,new Result(true,"修改成功!"));

        } catch (IOException e) {
            BaseController.printResult(response,new Result(false,"修改失败!"));
        }

    }
3.servcie层
【1】分析:
1.更新用户表
2.根据用户id到用户角色中间表删除信息
3.将当前用户的id和新的角色id插入到用户角色中间
【2】步骤:
1.使用工具类调用方法获取UserMapper接口的代理对象
2.使用UserMapper接口的代理对象调用接口中的根据用户id更新的方法更新用户表
3.使用工具类调用方法获取UserRoleMapper接口的代理对象
4.使用UserRoleMapper接口的代理对象调用接口UserRoleMapper中的根据用户id删除的方法
5.循环遍历存储多个角色id的List集合,取出每个角色id
6.在循环体中使用UserRoleMapper接口的代理对象调用接口中的添加用户id和角色id的方法
 public void updateUser(UpdateUser uu) {

        SqlSession session = SqlSessionUtil.getSession();
        UserMapper mapper = session.getMapper(UserMapper.class);

        //1). 修改t_user表
        mapper.updateUser(uu);
        //2). 修改t_user_role表 : 先删除再添加
        mapper.deleteRoleByUid(uu.getId());

        //3). 向t_user_role表中添加用户和新角色的id

        mapper.addRoleByUid(uu.getId(), uu.getRoleIds());

        session.close();
    }
小结:
1.更新t_user表中的名称 邮箱 密码
2.根据当前用户id删除中间表t_user_role所有和当前用户有关的信息
3.然后向中间表t_user_role中插入当前用户和角色的id
4.dao层
【1】步骤
1.在UserMapper接口中定义根据用户id更新用户的方法
2.创建UserRoleMapper接口
3.在UserRoleMapper接口中定义根据用户id删除的方法
4.在UserRoleMapper接口中定义添加用户和角色id的方法
UserMapper接口
	//更新用户表
    @Update("update t_user set username=#{username},password=#{password},email=#{email} where id = #{id}")
    void updateUser(UpdateUser uu);
	//根据用户id删除中间表的用户和角色id
    @Delete("delete from t_user_role where user_id = #{id}")
    void deleteRoleByUid(@Param("id") Integer id);
	//向中间表添加用户id和角色id
    void addRoleByUid(@Param("uid") Integer uid, @Param("ids") List<String> roleId);
UserMapper.xml
<!--
        ids = {1,2,3}
        uid = 5

         insert into t_user_role values(5,1),(5,2),(5,3)
    -->
    <insert id="addRoleByUid" >
        insert into t_user_role values
                <foreach collection="ids" item="rid" separator=",">
                   (#{uid},#{rid})
                </foreach>
    </insert>
小结:
1.在UserMapper接口中更新用户表的用户名 邮箱和密码
2.在UserRoleMapper中先根据用户id删除信息在插入新的数据
5.完整的userList.vue组件
<template>
<div id="div">
<div class="content-header common-search-border1" style="margin : 10px">
<el-button type="primary" class="butAdd" @click="handleCreate"> 新增用户
</el-button>
</div>
<div class="app-container">
<div class="box common-search-border2">
<div class="filter-container">
<!-- TODO: 搜索栏 -->
<!--
:inline="true 行内表单模式 (表单项横向排列)
:model="queryParams" 数据绑定
ref="queryParams" 用于找到本表单使用
-->
<el-form :inline="true" :model="queryParams" ref="queryParams"
class="formInfo">
<el-form-item label="用户名称" label-width="80px">
<el-input placeholder="请输入" v-model="queryParams.username"
style="width: 200px;" class="filter-item"></el-input>
</el-form-item>
<el-form-item>
<el-button @click="handleRest">清除</el-button>
<el-button type="primary" class="butOK" @click="handleSearch">搜索</el-button>
</el-form-item>
</el-form>
</div>
</div>
<div class="box common-table-border" style="margin:8px 0 0;">
<!--
TODO: 用户列表
-->
<!--
data 显示的数据
fit 列的宽度是否自撑开
-->
<el-table
:data="userList"
fit
style="width: 100%;">
<el-table-column label="编号" width="50px" align="center" prop="id">
</el-table-column>
<el-table-column label="用户名" align="center" prop="username">
</el-table-column>
<el-table-column label="邮箱" align="center" prop="email">
</el-table-column>
<el-table-column label="创建日期" align="center" prop="createTime">
</el-table-column>
<el-table-column label="修改日期" align="center" prop="updateTime">
</el-table-column>
<el-table-column
label="角色"
width="120"
align="center">
<!--
slot-scope = "scope"
用于指定当前的数据(本案例是userList中的当前行元素)
-->
<template slot-scope="scope">
<!--
如果要将页面1 test.vue的作为独立的组件应用在另一个页面上2上,
并需要以弹框形式打开,可在页面2上直接引入,在页面2中使用el-popover组件,将其插入:
悬浮提示信息展示框
trigger = "hover" 鼠标移上去触发
placement="left" 悬浮框显示位置在左边
-->
<el-popover v-for="role in scope.row.roles" trigger="hover" placement="left">
<!-- 前两个p标签是提示信息, div标签是展示信息 -->
<p style="font-size: 10px;color: blue">角色编号: {{ role.id }}</p>
<p style="font-size: 10px;color: blue">角色描述: {{ role.description }}</p>
<div slot="reference" class="name-wrapper">
<el-tag size="medium">{{ role.name }}</el-tag>
</div>
</el-popover>
</template>
</el-table-column>
<el-table-column label="操作" width="180">
<template slot-scope="scope">
<!--
TODO: 修改和删除
v-if 判断如果是admin用户就不要出现修改和删除按钮
-->
<div class="operation" v-if="scope.row.username != 'admin'">
<el-button type="primary" size="mini" @click="handleUpdate(scope.row)">修改
</el-button>
<el-button size="mini" type="danger" @click="handleDeleted(scope.row)"> 删除
</el-button>
</div>
</template>
</el-table-column>
</el-table>
<!--
TODO: 分页组件
@size-change: 当改变每页条数时触发的函数
@current-change:当改变页码时触发的函数
current-page :默认的页码
:page-sizes:每页条数选择框中显示的值
:page-size : 默认的每页条数
layout: 分页组件的布局
total(总条数), sizes(每页条数), prev(上一页), pager(所有的页码), next(下一页), jumper(跳转页码)
:total: 总条数
-->
<div class="pagination-container">
<el-pagination
class="pagiantion"
v-show="pagination.total>0"
@size-change="handleSizeChange"
@current-change="handleCurrentChange"
:current-page="pagination.pageNum"
:page-sizes="[3, 5, 10, 15]"
:page-size="pagination.pageSize"
layout="total, sizes, prev, pager, next, jumper"
:total="pagination.total">
</el-pagination>
</div>
</div>
<!--TODO: 新增用户弹层
:visible.sync 是否显示 (dialogFormVisible=true 显示, =false隐藏)
-->
<el-dialog title="新增用户" align="left" :visible.sync="dialogFormVisible" width="40%" top="8vh">
<!--
model 表单数据对象
rules 表单验证规则
-->
<el-form label-width="120px" :model="addUser" :rules="rules" ref="form">
<!--
prop 表单域 model 字段,在使用 validate、resetFields 方法的情况下,该属性是必填的
-->
<el-form-item label="用户名称:" prop="username">
<!-- v-model 双向数据绑定 autocomplete=off 取消自动补全功能-->
<!--
当我们在浏览器中输入表单信息的时候,往往input文本输入框会记录下之前提交表单的信息,
以后每次只要双击 input文本输入框就会出现之前输入的文本,这样有时会觉得比较方便,
但有时也会暴露用户的隐藏数据,那么如何让input表单输入框不记录输入过信息的方法呢?
在不想使用缓存的input中添加 autocomplete=”off”
-->
<el-input v-model="addUser.username" autocomplete="off"></el-input>
</el-form-item>
<el-form-item label="邮箱:" prop="email">
<el-input v-model="addUser.email" autocomplete="off"></el-input>
</el-form-item>
<el-form-item label="密码:" prop="password">
<el-input type="password" v-model="addUser.password" autocomplete="off"></el-input>
</el-form-item>
<!--
TODO: 动态获取角色
-->
<el-form-item label="角色: " prop="roleIds">
<!--
value / v-model 绑定值 (双向数据绑定)
multiple 是否多选
注意: 这是多选组件, addUser.roleIds是数组!!!
-->
<el-select v-model="addUser.roleIds" multiple placeholder="请选择至少一个角色">
<!--
v-for : 遍历, roleList是被遍历的数组
value 选项的值 string/number/object
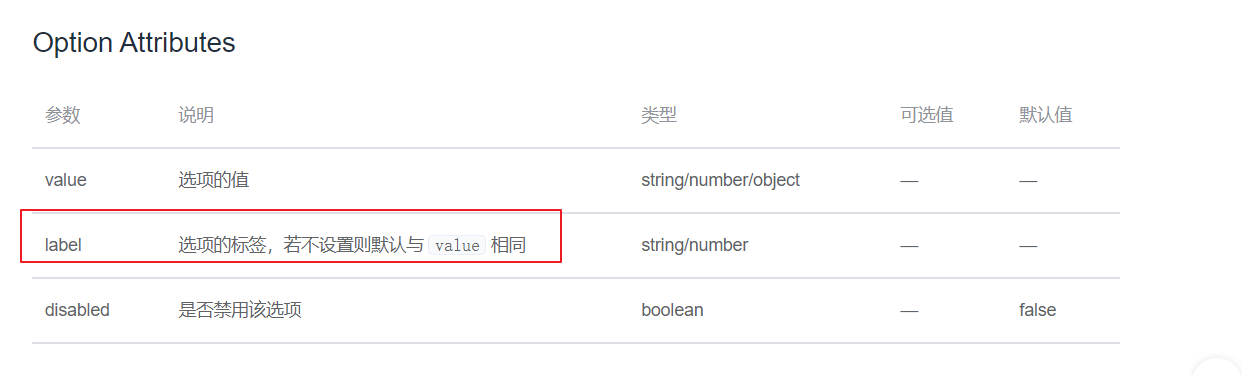
label 选项的标签,若不设置则默认与 value 相同 (显示出来的标签名)
key 文档中没有说明, 就是取值跟value相同,删除也不影响本组件使用
-->
<el-option
v-for="role in roleList"
:key="role.id"
:label="role.name"
:value="role.id">
</el-option>
</el-select>
</el-form-item>
<el-form-item label="备注:" prop="remark">
<el-input v-model="addUser.remark" autocomplete="off"></el-input>
</el-form-item>
</el-form>
<div slot="footer" class="dialog-footer">
<el-button @click="handleCreateCancel">取 消</el-button>
<el-button type="primary" @click="handleCreateConfirm">确 定</el-button>
</div>
</el-dialog>
<!-- end -->
<!-- 修改用户弹层 -->
<el-dialog title="修改用户" align="left" :visible.sync="dialogUptFormVisible" width="40%" top="8vh">
<el-form label-width="120px" :model="updateUser" :rules="rules" ref="uptForm">
<el-form-item label="用户名称:" prop="username">
<el-input v-model="updateUser.username" autocomplete="off"></el-input>
</el-form-item>
<el-form-item label="邮箱:" prop="email">
<el-input v-model="updateUser.email" autocomplete="off"></el-input>
</el-form-item>
<el-form-item label="密码:" prop="password">
<el-input type="password" v-model="updateUser.password" autocomplete="off"></el-input>
</el-form-item>
<el-form-item label="角色: " prop="roleIds">
<el-select v-model="updateUser.roleIds" multiple placeholder="请选择至少一个角色">
<el-option
v-for="role in roleList"
:key="role.id"
:label="role.name"
:value="role.id">
</el-option>
</el-select>
</el-form-item>
</el-form>
<div slot="footer" class="dialog-footer">
<el-button @click="handleUpdateCancel">取 消</el-button>
<el-button type="primary" @click="handleUpdateConfirm">确 定</el-button>
</div>
</el-dialog>
<!-- end -->
</div>
</div>
</template>
<script>
import axios from 'axios'
export default {
data(){
return {
pagination: {
total: 0, //总条数
pageNum: 1, // //当前页
pageSize: 5 //每页显示条数
},
userList: [], //用户列表数据
roleList: [], // 角色列表数据
queryParams: { // 搜索条件
username: ''
},
dialogFormVisible: false, // 添加窗口显示状态
dialogUptFormVisible: false,//修改窗口显示状态
addUser: { // 用户数据
username: '',
email: '',
password: '',
remark: '',
roleIds: []
},
updateUser: { //用户的修改数据
id: "",
username: '',
email: '',
password: '',
roleIds: []
},
rules: { //校验规则
username: [
{required: true, message: '请填写', trigger: 'blur'}
],
email: [
{required: true, message: '请填写', trigger: 'blur'},
{type: 'email', message: '请输入正确的邮箱地址', trigger: ['blur', 'change']}
],
password: [
{required: true, message: '请填写', trigger: 'blur'}
]
}
}
},
created() {
//分页查询用户列表
this.getUserList()
//查询所有的角色 TODO ?
// (添加用户和修改用户的时候要展示所有角色以供选择)
this.getRoleList()
},
methods: {
//TODO: 获取用户分页数据
getUserList() {
// TODO: 以下是伪数据(用作参考,真实数据需要从服务器获取)
// let response = {
// data:{
// "flag": true,
// "message": "获取用户列表成功",
// "result": {
// "rows": [
// {
// "createTime": "2020-05-20 00:00:00.0",
// "updateTime": "2020-05-20 00:00:00.0",
// "id": 1,
// "username": "zs",
// "password": "123",
// "remark" : "管理员",
// "email" : "zs@itcast.cn",
// "roles" : [
// {
// "id": "1",
// "name": "A管理员",
// "description" : "A模块的管理员"
// },
// {
// "id": "3",
// "name": "B管理员",
// "description" : "B模块的管理员"
// }
// ]
// },
// {
// "createTime": "2020-05-20 00:00:00.0",
// "updateTime": "2020-05-20 00:00:00.0",
// "id": 1,
// "username": "zs",
// "password": "123",
// "remark" : "管理员",
// "email" : "zs@itcast.cn",
// "roles" : [
// {
// "id": "1",
// "name": "A管理员",
// "description" : "A模块的管理员"
// },
// {
// "id": "3",
// "name": "B管理员",
// "description" : "B模块的管理员"
// }
// ]
// }
// ],
// "total": 15
// }
// }
// };
// // 指定总记录数
// this.pagination.total = response.data.result.total;
// // 执行分页显示的数据
// this.userList = response.data.result.rows;
let url = "/user/find";
// let param = {
// currentPage : this.pagination.pageNum,
// pageSize : this.pagination.pageSize,
// 模糊查询输入的参数
// queryParams : this.queryParams
// }
let param = {
// 当前页码
currentPage : this.pagination.pageNum,
//每页显示数据的条数
pageSize : this.pagination.pageSize
}
axios.post(url,param).then(response=>{
//指定总记录数
this.pagination.total = response.data.result.total;
//执行分页显示的数据
this.userList = response.data.result.rows;
})
},
//TODO: 查询角色表
getRoleList() {
//以下是伪数据
// let response = [
// {
// "id": "1",
// "name": "管理员"
// } ,
// {
// "id": "2",
// "name": "会员"
// },
// {
// "id": "3",
// "name": "游客"
// }
// ]
//
// this.roleList = response
let url = "role/query"
axios.post(url).then(response=>{
this.roleList = response.data
})
},
//将查询条件置空
handleRest() {
this.queryParams = {
username: ''
}
},
//搜索
handleSearch() {
//将当前页码设置为1
this.pagination.pageNum = 1;
this.getUserList();
},
//每页数量改变的时候
handleSizeChange(val) {
this.pagination.pageSize = val;
this.pagination.pageNum = 1;
this.getUserList();
},
//当前页码改变的时候
handleCurrentChange(val) {
this.pagination.pageNum = val;
this.getUserList();
},
// 新增用户
handleCreate() {
/*
Vue 为简化DOM获取方法提出了ref 属性和$ refs 对象。
一般的操作流程是:ref 绑定控件,$refs 获取控件
ref 绑定控件:
<el-form label-width="120px" :model="addUser" :rules="rules" ref="form">
this.$refs['form']表示获取上面的整个添加用户的form表单控件
*/
if (this.$refs['form']) {
this.$refs['form'].resetFields();
}
this.dialogFormVisible = true;
},
//新增用户确定 TODO:
handleCreateConfirm() {
this.$refs['form'].validate((valid) => {
if (valid) {
//添加用户表单校验通过,向后台请求添加用户的servlet
let url = "/user/add";
let param = this.addUser;
axios.post(url,param).then(response=>{
console.log(response.data);
if(response.data.flag){
//添加成功隐藏添加窗口
this.dialogFormVisible = false;
//提示添加成功
this.$message.success(response.data.message)
}else{
//提示添加失败
this.$message.error(response.data.message)
}
}).finally(()=>{
//无论添加成功还是失败都要性后台查询用户
this.getUserList()
})
}
});
},
//新增用户取消
handleCreateCancel() {
this.dialogFormVisible = false;
},
//修改用户 数据回显
handleUpdate(row) {
var t = this;
if (t.$refs['uptForm']) {
t.$refs['uptForm'].resetFields();
}
t.updateUser.id = row.id;
t.updateUser.username = row.username;
t.updateUser.password = row.password;
t.updateUser.email = row.email;
//遍历取出此用户所有的角色id
let roleIds = [];
for(let i=0;i< row.roles.length; i++){
roleIds[i] = row.roles[i].id;
}
t.updateUser.roleIds = roleIds;
t.dialogUptFormVisible = true;
},
//修改用户确定 TODO
handleUpdateConfirm() {
this.$refs['uptForm'].validate((valid) => {
if (valid) {
let url = "/user/update";
let param = this.updateUser;
axios.post(url,param).then(response=>{
console.log(response.data);
if(response.data.flag){
//隐藏修改弹出框
this.dialogUptFormVisible = false;
this.$message.success(response.data.message)
}else{
this.$message.error(response.data.message)
}
}).finally(()=>{
this.getUserList()
})
}
});
},
//修改用户取消
handleUpdateCancel() {
this.dialogUptFormVisible = false;
},
// 删除 TODO:
handleDeleted(row) {
//点击确认走then,点击取消走catch
this.$confirm('此操作将永久删除用户 ' + ', 是否继续?', '提示', {
type: 'warning'
}).then(() => {
let url = "/user/delete"
let param = `uid=${row.id}`
axios.post(url,param).then(response=>{
console.log(response.data);
if(response.data.flag){
this.$message.success(response.data.message)
}else{
this.$message.error(response.data.message)
}
}).finally(()=>{
this.getUserList()
})
}).catch(() => {
this.$message.info('已取消操作!')
});
}
}
}
</script>
<style>
</style>
3. SPI机制(为马上学习框架做思想和技术铺垫)
1. SPI引入
# 1. 标准/规范
1. 工程 spi_interface
2. 只有一个接口car
# 2. 具体的实现
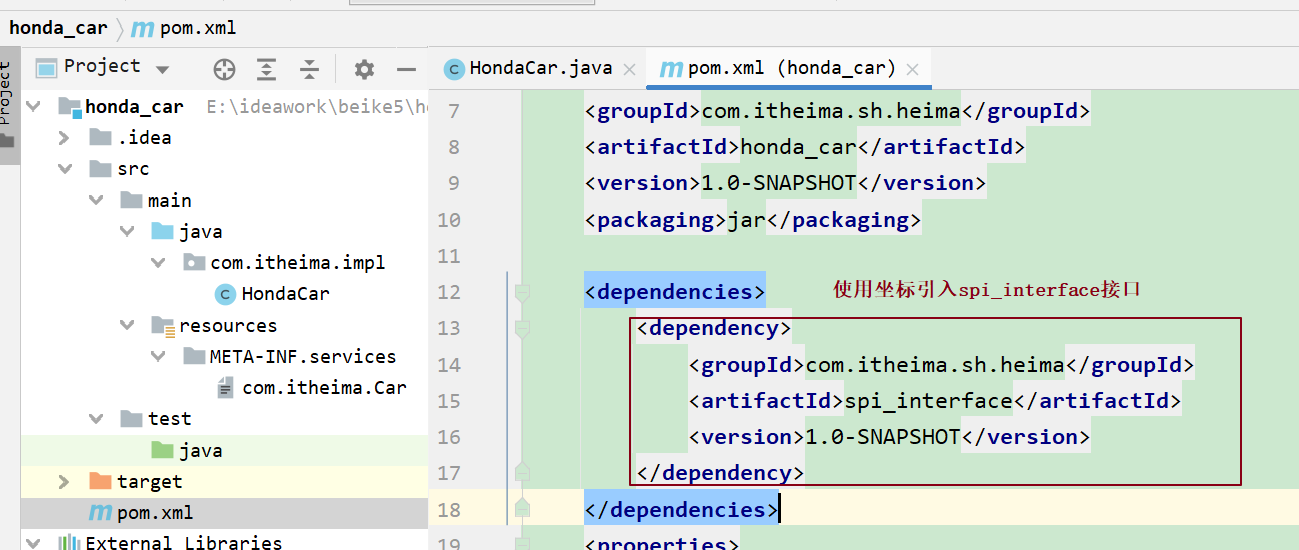
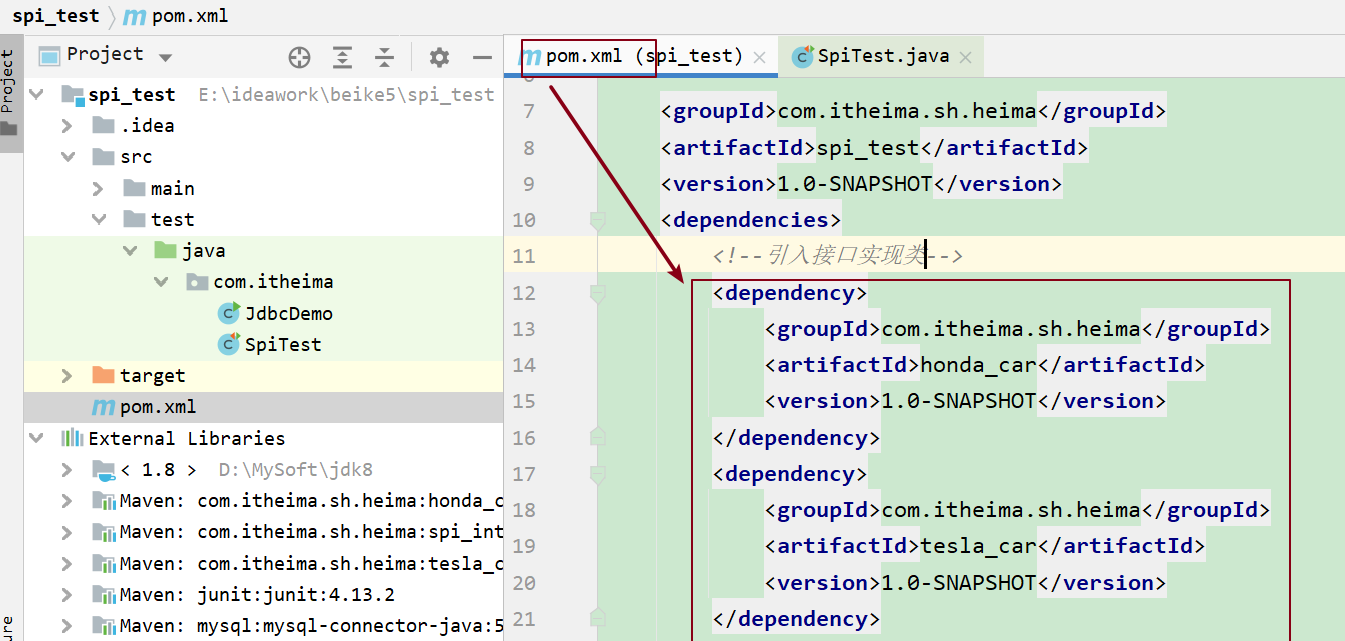
1. 工程 honda_car 和 tesla_car
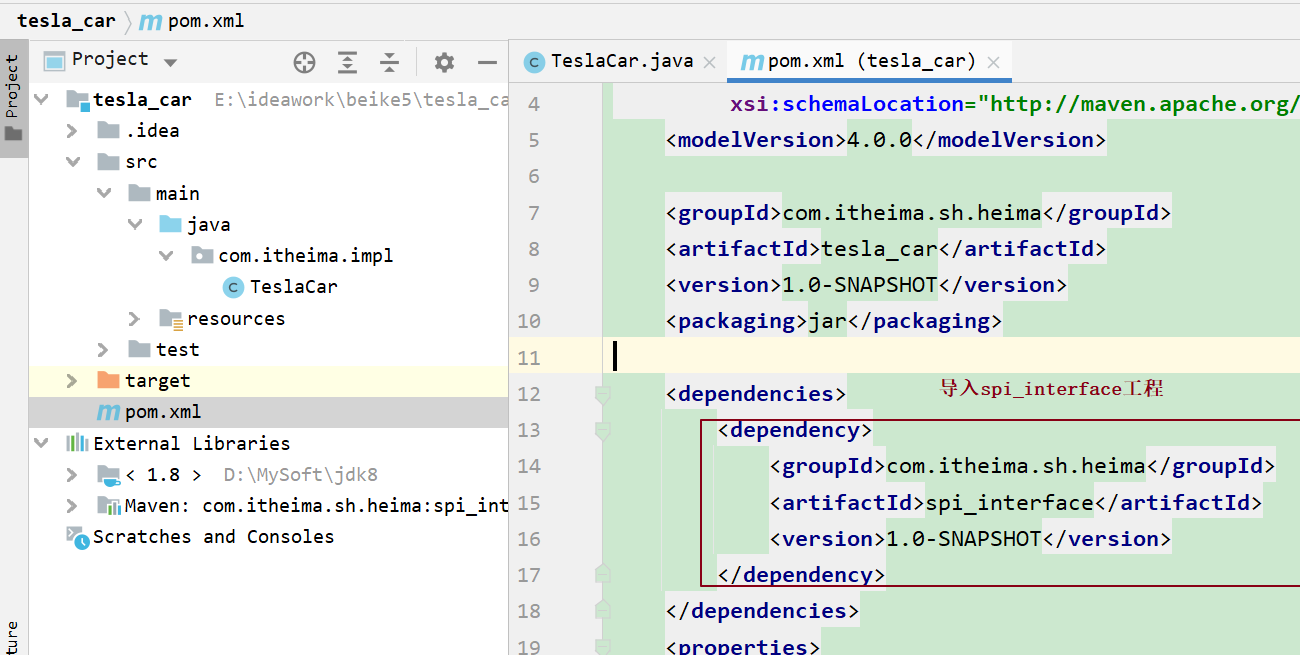
2. 工程依赖了spi_interface
pom.xml
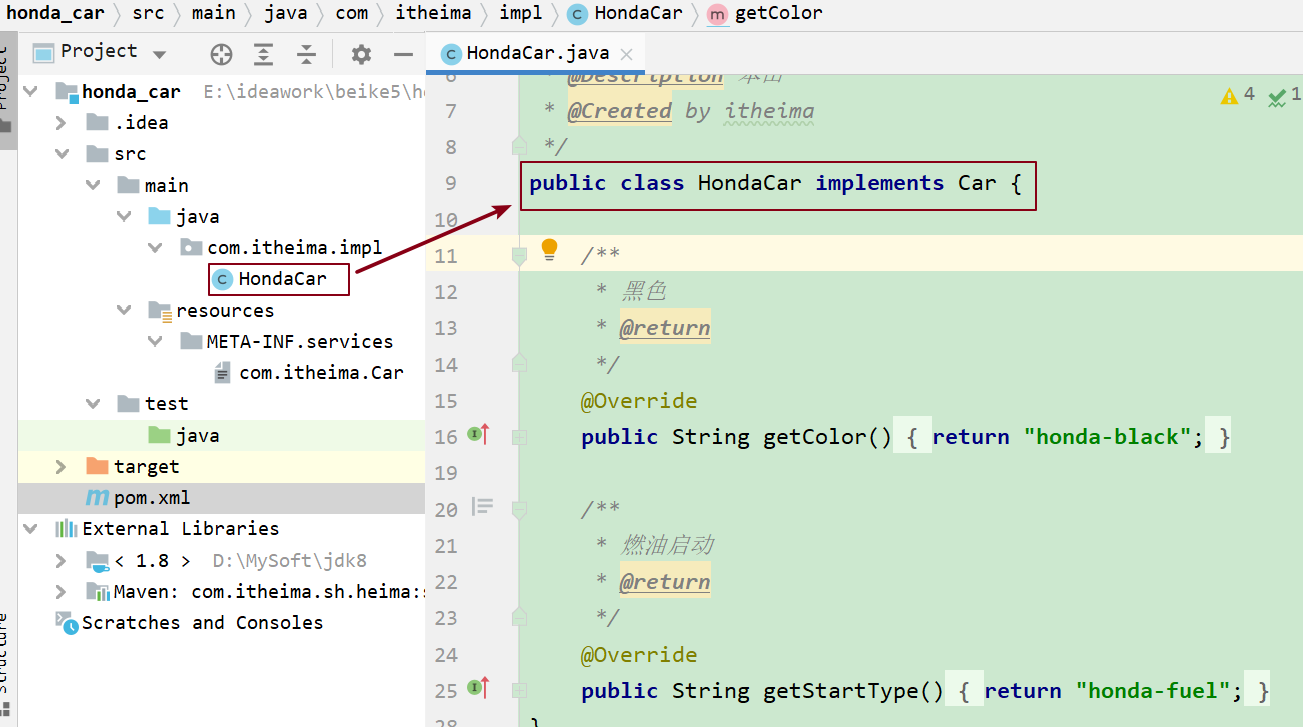
3. 有一个实现类,实现了标准
HondaCar implements Car
TeslaCar implements Car
4. 还有一个配置文件
1). 在类路径classpath下
resources/META-INF/services
2). 文件名: 接口的全限定名
com.itheima.Car
3). 文件内容: 实现类的全限定名
com.itheima.impl.HondaCar
# 3. 调用
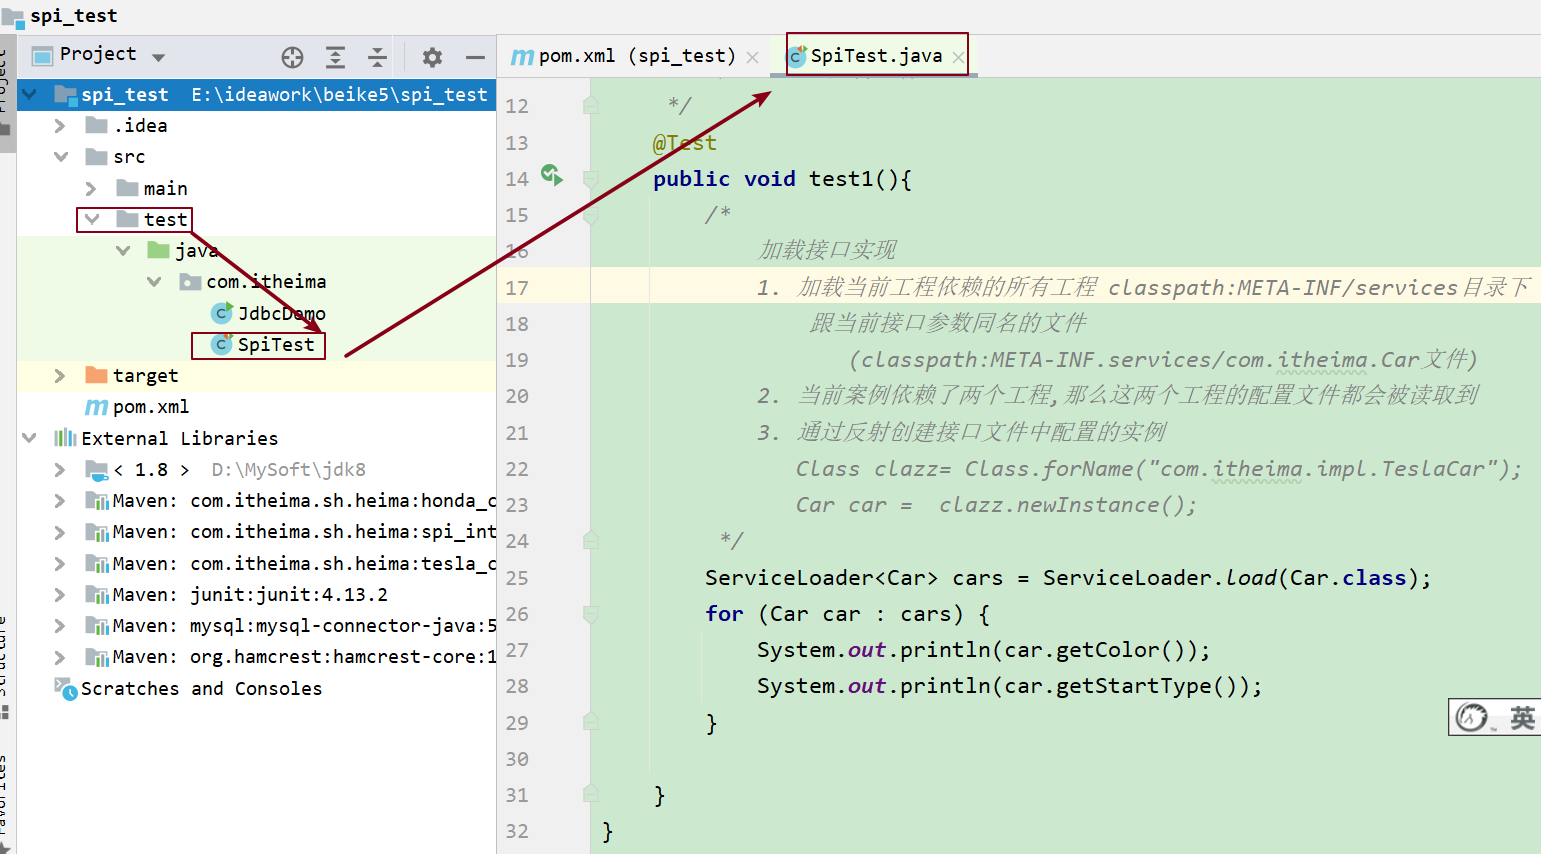
1. 工程 spi_test
2. 工程依赖了 honda_car 和 tesla_car
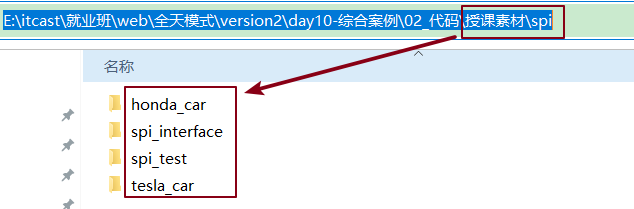
3. 测试类 SpiTest
【1】将 02_代码\授课素材\spi文件夹下的 四个工程分别导入idea中
注意:别忘记修改maven地址。
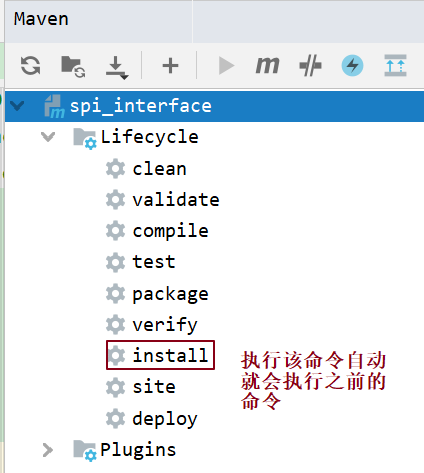
【2】spi_interface工程
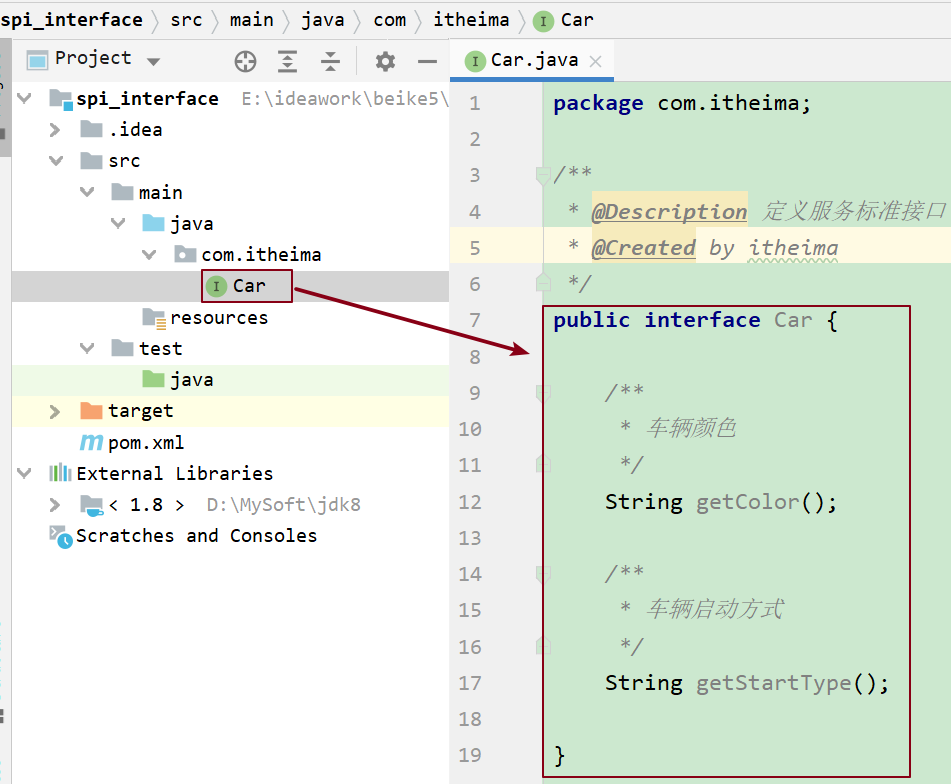
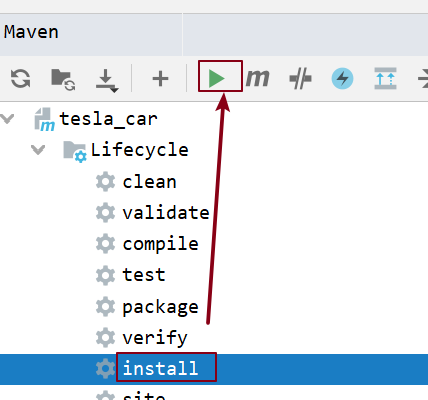
注意:由于其他工程需要使用坐标方式导入该工程,所以需要将该工程进行打包
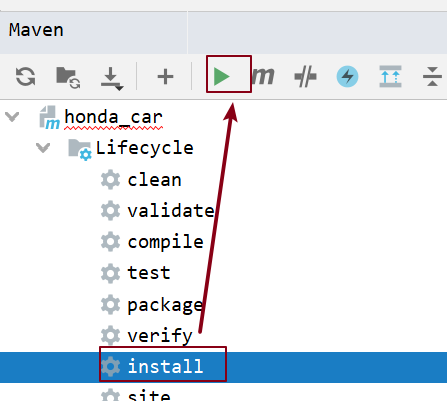
【3】honda_car工程
注意:由于其他工程需要使用坐标方式导入该工程,所以需要将该工程进行打包
【4】tesla_car工程
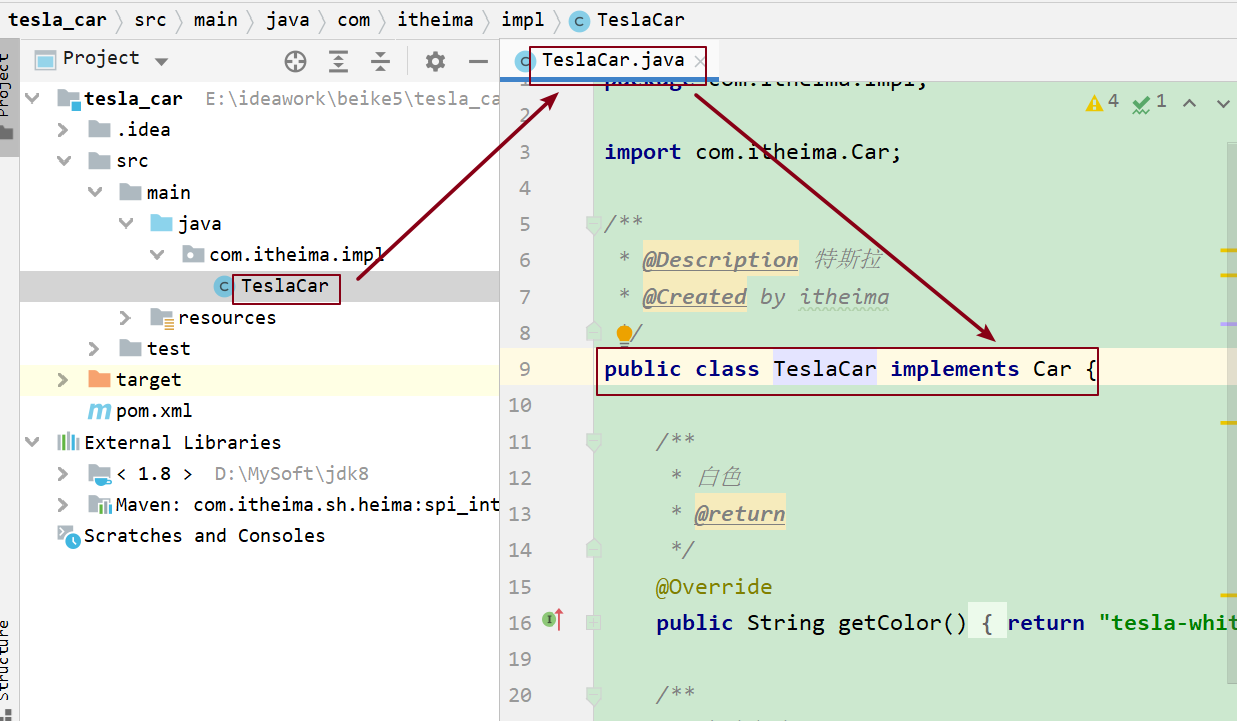
注意:由于其他工程需要使用坐标方式导入该工程,所以需要将该工程进行打包
【5】spi_test工程
【6】运行spi_test工程并解释相关内容
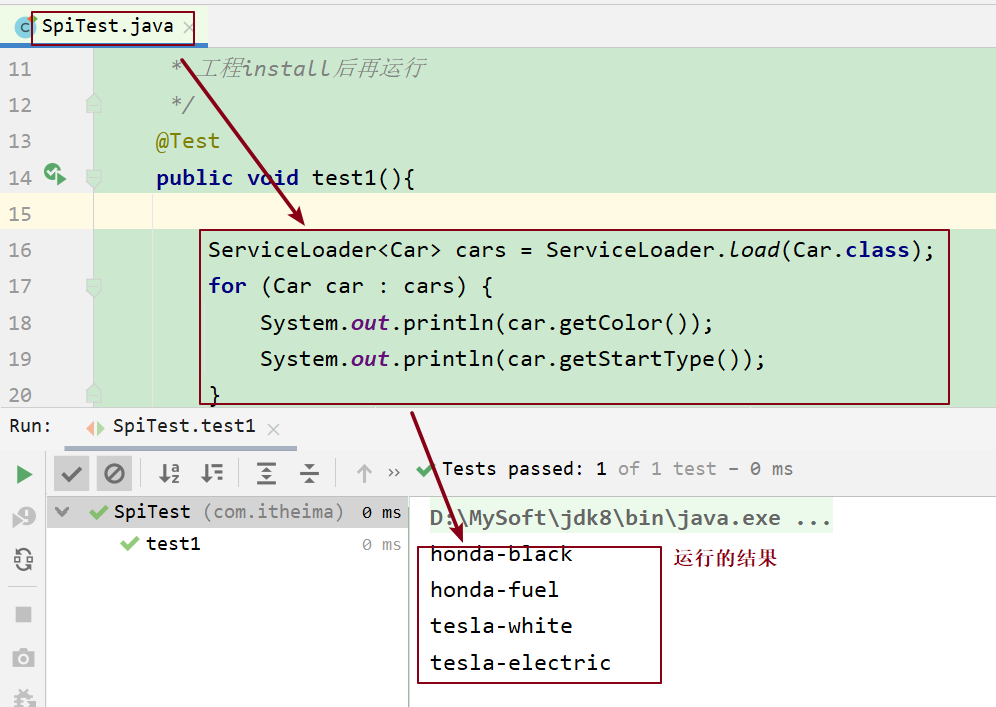
代码:
 # ServiceLoader<Car> cars = ServiceLoader.load(Car.class);加载接口实现
            1. 加载当前工程依赖的所有工程 classpath:META-INF/services目录下
                跟当前接口参数同名的文件
                   (classpath:META-INF.services/com.itheima.Car文件)
            2. 当前案例依赖了两个工程,那么这两个工程的配置文件都会被读取到
            	honda_car===META-INF.services/com.itheima.Car文件中的com.itheima.impl.HondaCar
            	tesla_car===META-INF.services/com.itheima.Car文件中的com.itheima.impl.TeslaCar
            	注意:配置文件名必须是实现的接口全路径,配置文件中书写实现类的全路径
            3. 通过反射创建接口文件中配置的实例
               Class clazz= Class.forName("com.itheima.impl.TeslaCar");
               Car car =  clazz.newInstance();
package com.itheima;

import org.junit.Test;

import java.util.ServiceLoader;


public class SpiTest {
    /**
     * @Description 测试SPI
     * 工程install后再运行
     */
    @Test
    public void test1(){
        /*
             ServiceLoader<Car> cars = ServiceLoader.load(Car.class);加载接口实现
            1. 加载当前工程依赖的所有工程 classpath:META-INF/services目录下
                跟当前接口参数同名的文件
                   (classpath:META-INF.services/com.itheima.Car文件)
            2. 当前案例依赖了两个工程,那么这两个工程的配置文件都会被读取到
            	honda_car===META-INF.services/com.itheima.Car文件中的com.itheima.impl.HondaCar
            	tesla_car===META-INF.services/com.itheima.Car文件中的com.itheima.impl.TeslaCar
            	注意:配置文件名必须是实现的接口全路径,配置文件中书写实现类的全路径
            3. 通过反射创建接口文件中配置的实例
               Class clazz= Class.forName("com.itheima.impl.TeslaCar");
               Car car =  clazz.newInstance();
         */
         //Car.class 是接口Car的Class对象
        //使用ServiceLoader.load接收接口Class对象。那么该方法底层就会获取Car
        //接口所有实现类的对象放到ServiceLoader容器中
        ServiceLoader<Car> cars = ServiceLoader.load(Car.class);
        for (Car car : cars) {
            System.out.println(car.getColor());
            System.out.println(car.getStartType());
        }
    }
}
【7】ServiceLoader类介绍

说明:
1.ServiceLoader功能和ClassLoader功能类似,能装载类文件,但是使用时是有区别的
2.ServiceLoader装载的是一系列有某种共同特征的实现类,即这些类实现接口或者抽象类。而ClassLoader是可以加载任何类的类加载器;
3.ServiceLoader加载时需要特殊的配置:
1)在类路径:classpath:META-INF/services/接口全路径文件
2)在文件中配置实现类全路径com.itheima.impl.HondaCar

4.ServiceLoader还实现了Iterable接口,可以进行迭代
Iterator<S> iterator()
5.原理:在ServiceLoader.load的时候,根据传入的接口Class对象,遍历META-INF/services目录下的以该接口命名的文件中的所有类,将创建实现类的对象返回。
2. SPI介绍
SPI全称Service Provider Interface,是Java提供的一套用来被第三方实现或者扩展的API,它可以用来启用框架扩展和替换组件。
Java的SPI机制就是将一些类信息写在约定的文件中,然后由特定的类加载器ServiceLoader加载解析文件获取资源。
Java SPI 基于 “接口编程+策略模式+配置文件(约定)”组合实现的动态加载机制。
以下是SPI的一些运用场景:
| 场景 | 说明 |
|---|---|
| 数据库驱动 | 数据库驱动加载接口实现类的加载 JDBC加载不同类型数据库的驱动 |
| 日志门面SLF4J接口实现类加载 | SLF4J加载不同提供商的日志实现类 |
| Spring | Spring中大量使用了SPI,比如:对servlet3.0规范对ServletContainerInitializer的实现、自动类型转换Type Conversion SPI(Converter SPI、Formatter SPI)等 |
| Dubbo | Dubbo中也大量使用SPI的方式实现框架的扩展, 不过它对Java提供的原生SPI做了封装,允许用户扩展实现Filter接口 |
| SpringBoot | SpringBoot基于SPI思想实现自动装配 |
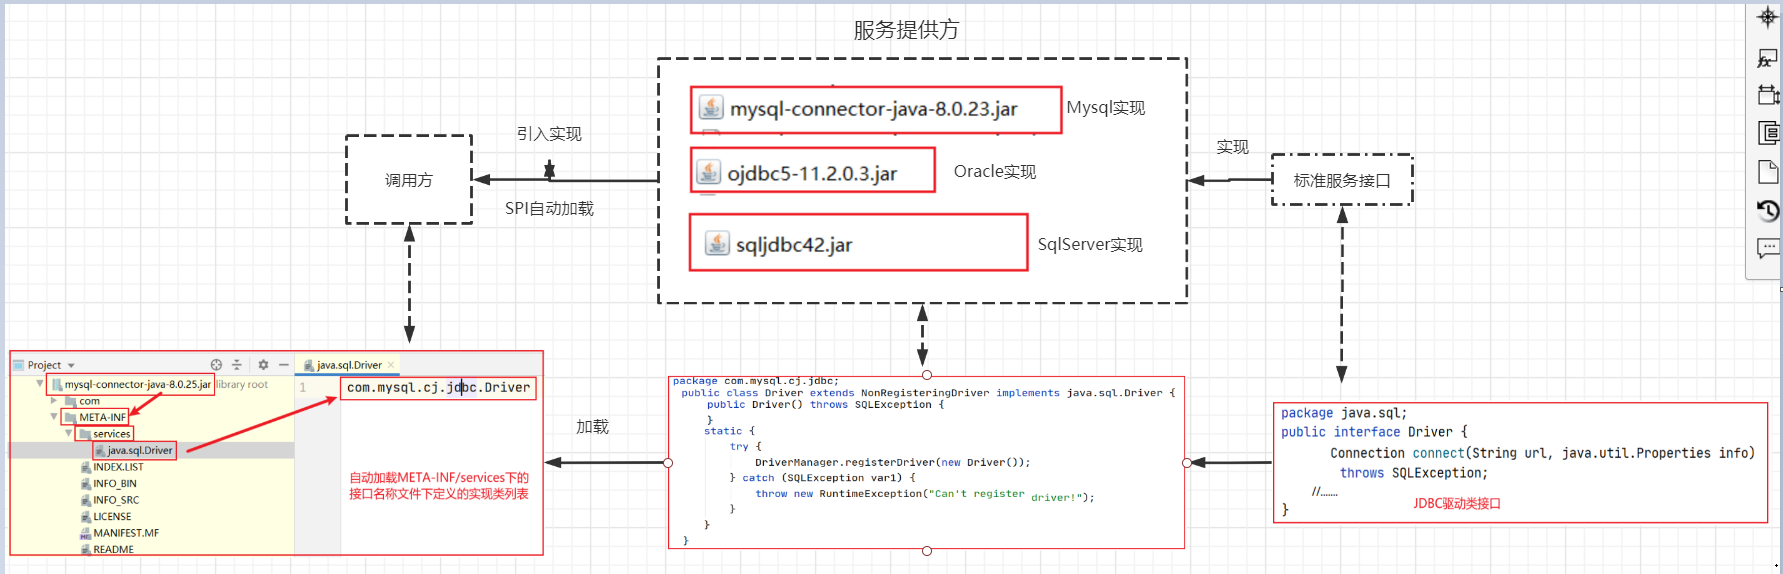
3. SPI练习 JDBC4.0免注册驱动原理
package com.itheima;
import java.sql.Connection;
import java.sql.DriverManager;
public class JdbcDemo {

    public static void main(String[] args) throws Exception {
        //1.加载驱动
//        Class.forName("com.mysql.jdbc.Driver");
        //2.获取连接
        Connection connection = DriverManager.getConnection("jdbc:mysql:///dbvue", "root", "1234");
        System.out.println(connection);
    }
}
//DriverManager类源码:
public class DriverManager {
    //静态代码块
    static {
        loadInitialDrivers();
        println("JDBC DriverManager initialized");
    }

    private static void loadInitialDrivers() {
        .....
               AccessController.doPrivileged(new PrivilegedAction<Void>() {
            public Void run() {
				//spi

                /*
                	1.java.sql.Driver 是一个接口
                	2.java.sql.Driver接口实现类,com.mysql.jdbc.Driver
                */
                ServiceLoader<Driver> loadedDrivers = ServiceLoader.load(java.sql.Driver.class);
                Iterator<Driver> driversIterator = loadedDrivers.iterator();

                /* Load these drivers, so that they can be instantiated.
                 * It may be the case that the driver class may not be there
                 * i.e. there may be a packaged driver with the service class
                 * as implementation of java.sql.Driver but the actual class
                 * may be missing. In that case a java.util.ServiceConfigurationError
                 * will be thrown at runtime by the VM trying to locate
                 * and load the service.
                 *
                 * Adding a try catch block to catch those runtime errors
                 * if driver not available in classpath but it's
                 * packaged as service and that service is there in classpath.
                 */
                try{
                    while(driversIterator.hasNext()) {
                        driversIterator.next();
                    }
                } catch(Throwable t) {
                // Do nothing
                }
                return null;
            }
        });
        ......
    }
}
mysql驱动包:

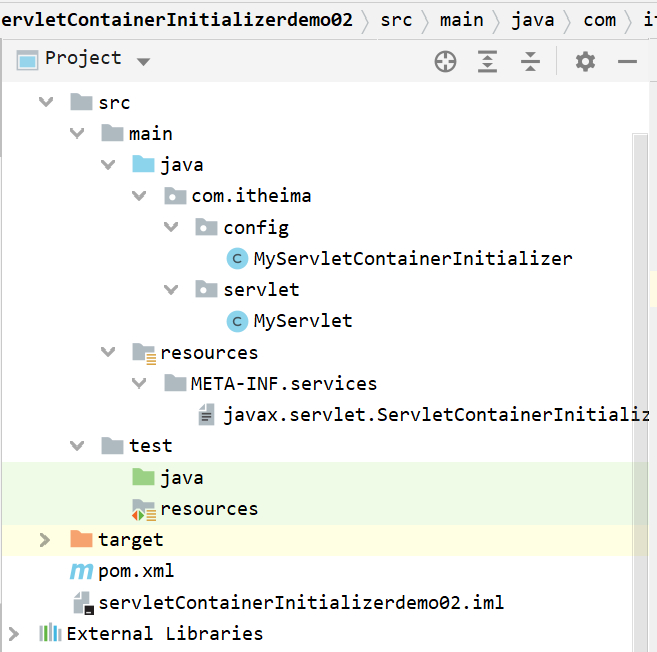
4. Servlet实现方式三_ServletContainerInitializer
之前学习实现servlet有两种:1)注解 2)web.xml
其实Servlet还有一种实现方式就是spi方式。后面学习的框架底层就是采用这种方式。
ServletContainerInitializer 是 Servlet 3.0 新增的一个接口,主要用于在容器启动阶段通过编程风格注册Filter, Servlet以及Listener,以取代通过web.xml配置注册。这样就利于开发内聚的web应用框架.
将 素材\ServletContainerInitializer代码中的工程导入idea
# 运行原理:
1. ServletContainerInitializer接口的实现类通过java SPI声明自己是ServletContainerInitializer 的提供者.

2. web容器启动阶段依据java spi获取到所有ServletContainerInitializer的实现类,然后执行其onStartup方法.
3. 在onStartup中通过编码方式将组件servlet加载到ServletContext
小结:
ServletContainerInitializer 在web容器启动时为提供给第三方组件机会做一些初始化的工作,例如注册servlet或者filter等,servlet规范中通过ServletContainerInitializer实现此功能。每个框架要使用ServletContainerInitializer就必须在对应的jar包的META-INF/services 目录创建一个名为javax.servlet.ServletContainerInitializer的文件,文件内容指定具体的ServletContainerInitializer实现类,那么,当web容器启动时就会运行这个初始化器做一些组件内的初始化工作
复习:泛型
package com.itheima.case2.test;
/*
    自定义泛型有三种:
        1.自定义泛型类---创建对象  Demo<String> d = new Demo<>();
        2.自定义泛型接口---实现类实现接口 或者泛型传递
            1)实现类实现接口确定泛型的具体类型
                public interface Inter<T> {}
                public class InterImpl implements Inter<String>
           2)泛型传递确定泛型的具体类型
                public interface Inter<T> {}
                public class InterImpl<E> implements Inter<E> {}
               InterImpl<Integer> ip = new InterImpl<Integer>();
               集合:
               public interface Collection<E> {}
               public interface List<E> extends Collection<E> {}
               public class ArrayList<E> implements List<E>{}
               ArrayList<String> list = new ArrayList<String>();

        3.自定义泛型方法:调用的时候
             public <ABC> ABC show1(ABC x){}
              Integer i = d.show1(10);
 */
public class Demo<IT> {

    IT name;

    public IT getName() {
        return name;
    }

    public void setName(IT name) {
        this.name = name;
    }
    /*
        1.<ABC> :声明泛型
        2.ABC show1 这里的ABC表示方法返回值类型
        3.show1(ABC x) 表示参数类型
     */
    public <ABC> ABC show1(ABC x){

        return x;
    }


}
package com.itheima.case2.test;

public interface Inter<T> {

    T show(T t);
}


package com.itheima.case2.test;

//public class InterImpl implements Inter<String> {
public class InterImpl<E> implements Inter<E> {

    @Override
    public E show(E e) {
        return null;
    }
}


package com.itheima.case2.test;

import com.sun.org.apache.bcel.internal.generic.NEW;

public class Test01 {
    public static void main(String[] args) {
        Demo<String> d = new Demo<>();
        d.setName("abc");
        String name = d.getName();
        System.out.println("name = " + name);

        Demo<Integer> d2 = new Demo<>();
        d2.setName(10);


//        InterImpl<Integer> ip = new InterImpl<Integer>();
//        ip.show(10);

        //使用对象d调用Demo类中的自定义泛型方法的方法
        Integer i = d.show1(10);
        String i2 = d.show1("abc");
    }
}

 浙公网安备 33010602011771号