
SpringBoot
SpringBoot-day01
01_SpringBoot概述
目标
- 理解SpringBoot存在的意义是什么
路径
- SpringBoot是什么
- 什么是约定优于配置
SpringBoot是什么
官网参考:https://spring.io/projects/spring-boot
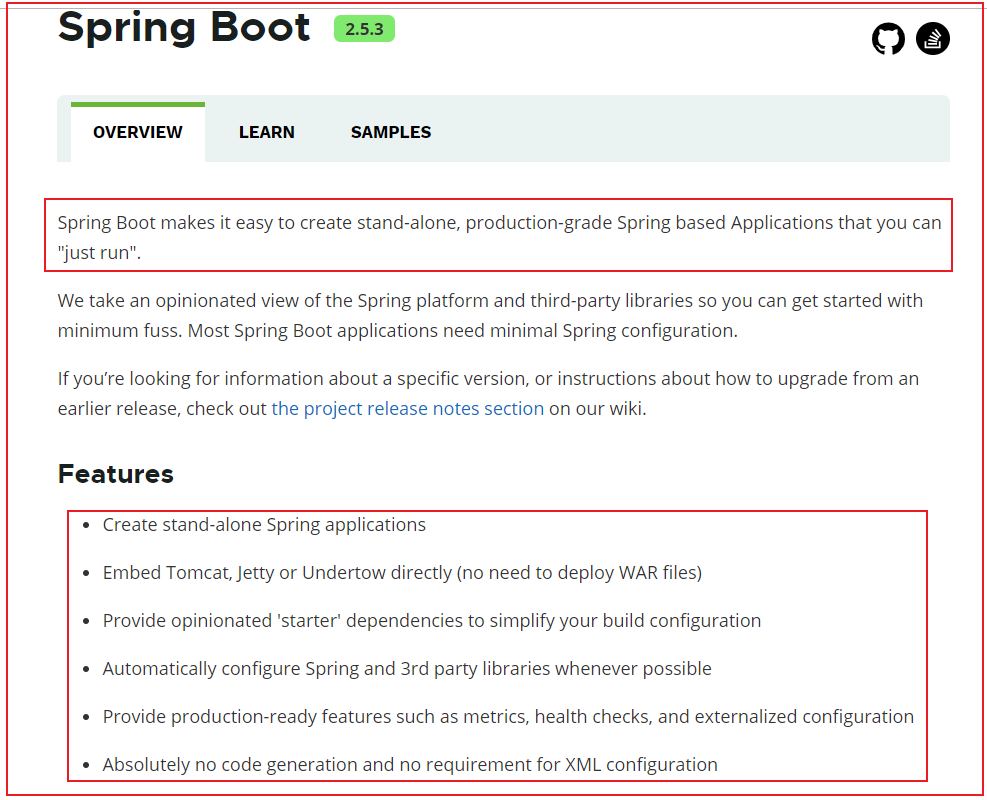
SpringBoot可以非常简单的快速构建独立的、基于Spring应用的生产级应用程序。
SpringBoot基于约定优于配置的思想,可以让开发人员不必在配置与逻辑业务之间进行思维的切换,使我们可以全身心的投入到业务代码开发中,从而大大提高了开发的效率。
SpringBoot主要特点:
- SpringBoot可以快速创建独立的Spring应用程序
- SpringBoot直接嵌入Tomcat、Jetty或Undertow(不需要部署WAR文件)
- SpringBoot提供了大量可供选择的场景依赖starter,大大简化工程配置的工作量
- SpringBoot提供了Spring应用的自动化配置和常见第三方库的自动化配置
- SpringBoot提供了大量生产级的特性,比如健康检查、外部化配置等
- SpringBoot在简化配置的过程中不会生成代码,也不需要XML繁杂的配置
可以先初步认为:使用SpringBoot可以简化及快速开发SSM框架程序
什么是约定优于配置
约定优于配置(convention over configuration),也称按约定编程,是一种软件设计范式,旨在减少软件开发人员需做决定的数量,简化开发流程,说白了就是按照开发人员的通用习惯(约定)进行开发,尽量减少程序员做决策带来的时间成本的开销
日常开发中有哪些基于约定的配置习惯?
| 配置 | 说明 |
|---|---|
| 系统环境变量:JAVA_HOME | 基于约定,方便维护 |
| maven工程结构 | main包下: java包存放项目源码 resource包存放项目配置等公用资环 test包: 存放项目测试源码 target包: 存放编译后文件、打包后文件等 默认打包方式:jar |
| Tomcat配置 | 默认开启端口8080 |
| SpringBoot配置文件 | 默认application.properties 或 application.yml文件; |
| Redis | 默认端口6379,默认可以不使用密码登录,默认配置文件名称为redis.conf等 |
小结
问题:SpringBoot是对Spring功能上的增强么?
答案
Spring Boot 并不是Spring功能上的增强,而是提供了一种快速使用Spring的方式问题:做为程序员我们选择SpringBoot的原因是什么?
答案
使用Spring Boot可以提高开发效率(简化SSM框架开发)02_SpringBoot快速入门
目标
- 能够基于SpringBoot快速开发web程序
路径
- 使用SpringMVC开发web程序
- 使用SpringBoot开发web程序步骤
- 使用SpringBoot开发web程序
使用SpringMVC开发web程序
pom.xml:
<!--依赖管理-->
<dependencies>
    <!-- SpringMV-->
    <dependency>
        <groupId>org.springframework</groupId>
        <artifactId>spring-webmvc</artifactId>
        <version>5.2.10.RELEASE</version>
    </dependency>
    <!-- Servlet -->
    <dependency>
        <groupId>javax.servlet</groupId>
        <artifactId>javax.servlet-api</artifactId>
        <version>3.1.0</version>
    </dependency>
</dependencies>
Web容器配置类
public class ServletInitConfig extends AbstractAnnotationConfigDispatcherServletInitializer {
    @Override
    protected Class<?>[] getRootConfigClasses() {
        return new Class[0];
    }

    @Override
    protected Class<?>[] getServletConfigClasses() {
        //加载SpringMVC配置类
        return new Class[]{SpringmvcConfig.class};
    }

    @Override
    protected String[] getServletMappings() {
        //配置SpringMVC控制器处理所有请求
        return new String[]{"/"};
    }
}
SpringMVC配置类
@Configurable
@ComponentScan("com.itheima.controller")
public class SpringmvcConfig {
}
Controller控制器
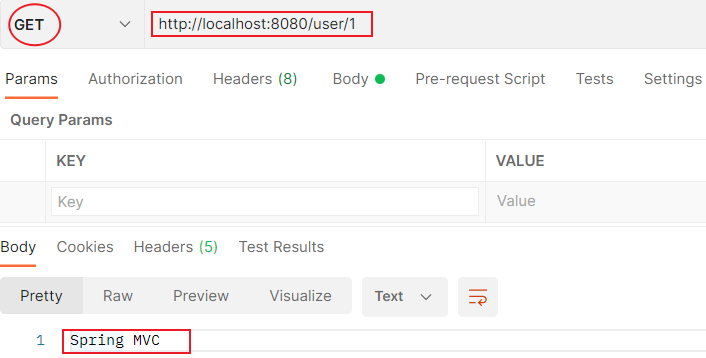
@RestController
@RequestMapping("/user")
public class UserController {
    @GetMapping("/{id}")
    public String getById(@PathVariable Integer id){
        System.out.println("id => "+id);
        return "Spring MVC";
    }
}
使用SpringBoot开发web程序步骤
开发步骤:
- 创建Maven项目
- 导入SpringBoot起步依赖
- 编写SpringBoot引导类
- 编写UserController类及请求方法
- 启动测试
使用SpringBoot开发web程序
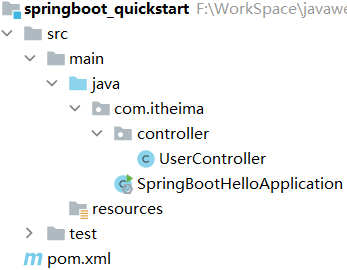
- 创建Maven项目
- 导入SpringBoot起步依赖
    <!-- springboot工程需要继承的父工程 -->
    <parent>
        <groupId>org.springframework.boot</groupId>
        <artifactId>spring-boot-starter-parent</artifactId>
        <version>2.3.10.RELEASE</version>
    </parent>


    <dependencies>
        <!-- web开发的起步依赖:场景启动器依赖 -->
        <dependency>
            <groupId>org.springframework.boot</groupId>
            <artifactId>spring-boot-starter-web</artifactId>
        </dependency>
    </dependencies>
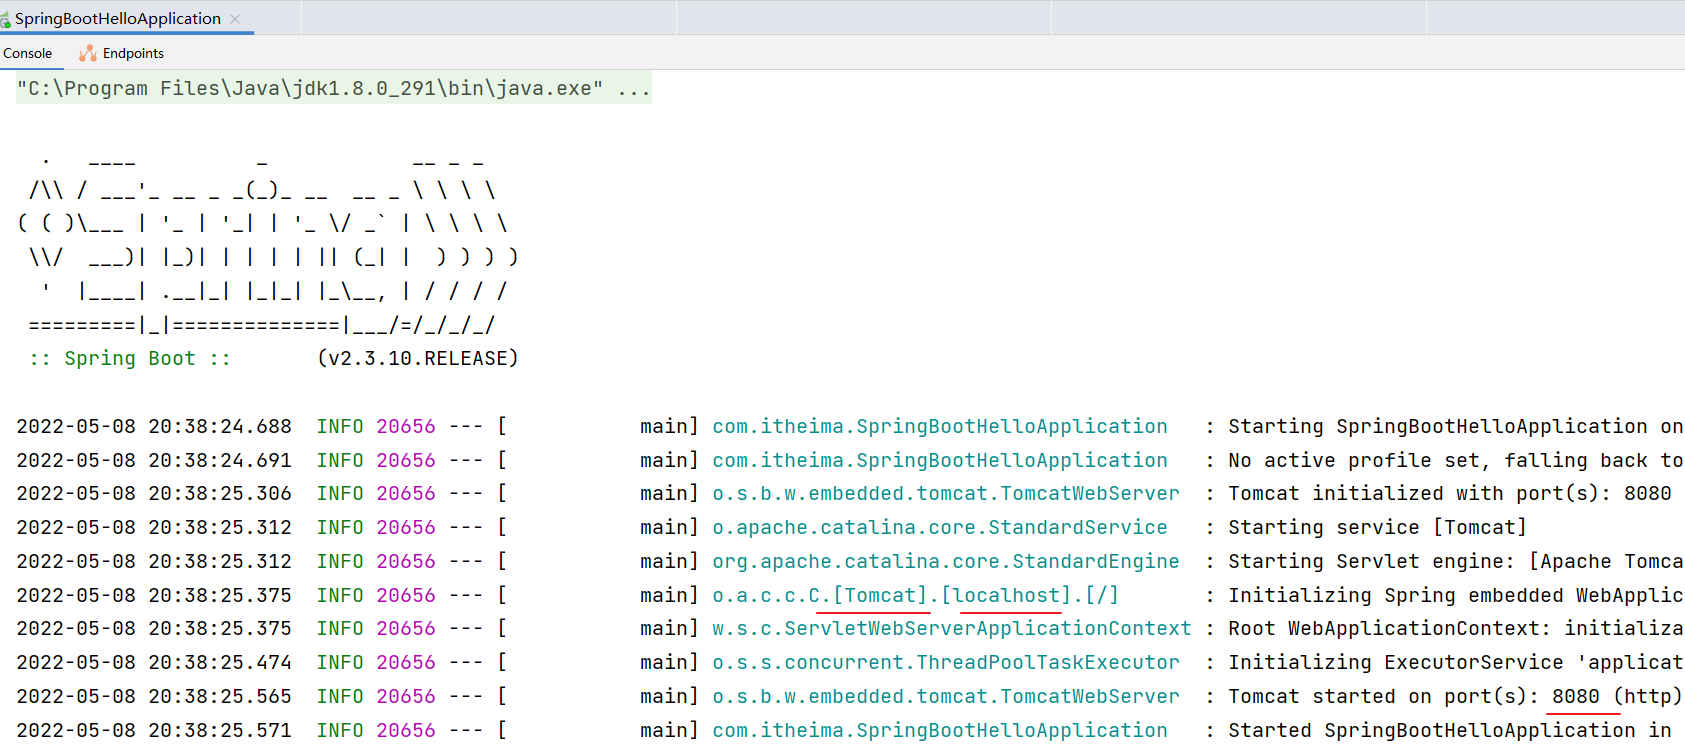
- 编写SpringBoot引导类
//SpringBoot引导类
@SpringBootApplication
public class SpringBootHelloApplication {
        public static void main(String[] args) {
            // 启动引导类,搭建相关环境
            SpringApplication.run(SpringBootHelloApplication.class, args);
        }
}
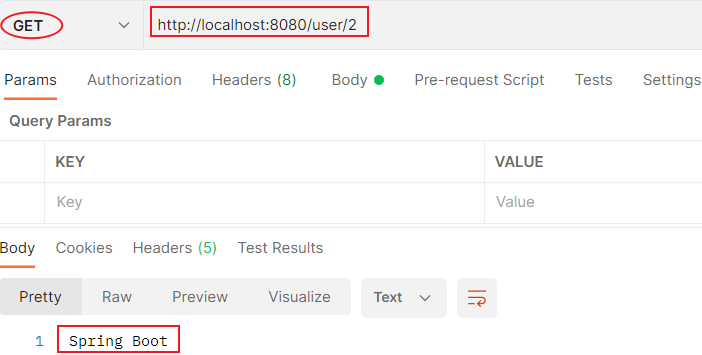
- 编写UserController类及请求方法
@RestController
@RequestMapping("/user")
public class UserController {
    @GetMapping("/{id}")
    public String getById(@PathVariable Integer id){
        System.out.println("id => "+id);
        return "Spring Boot";
    }
}
- 启动测试
03_IDEA快速构建SpringBoot
目标
- 使用idea快速构建SpringBoot
路径
- IDEA快速构建SpringBoot
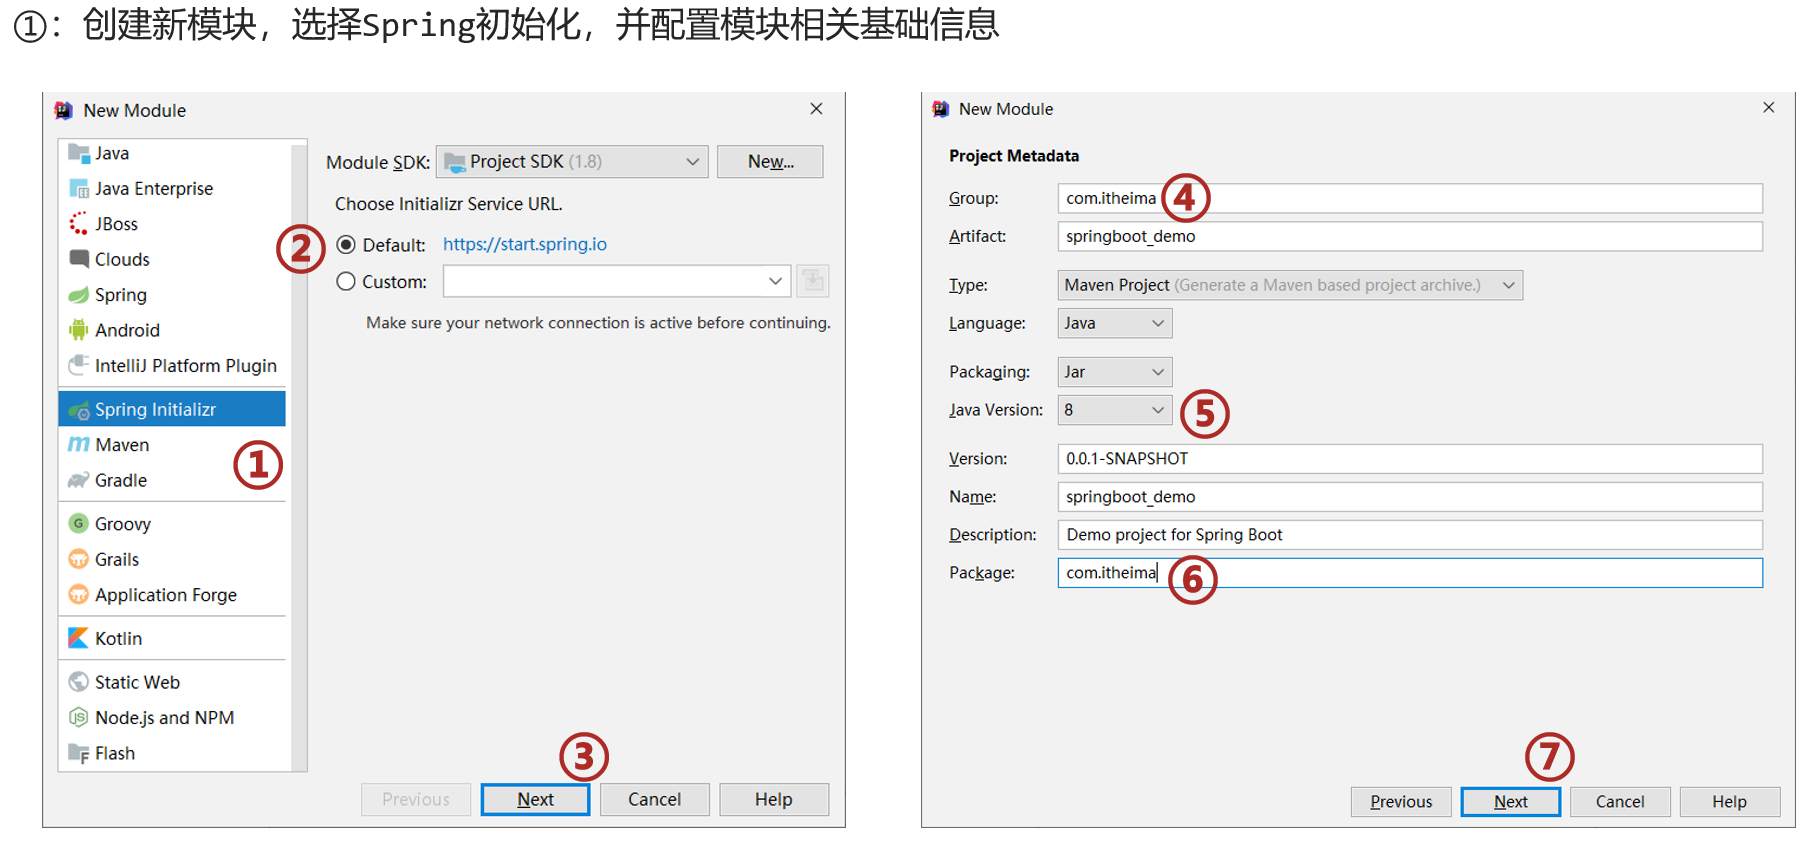
IDEA快速构建SpringBoot
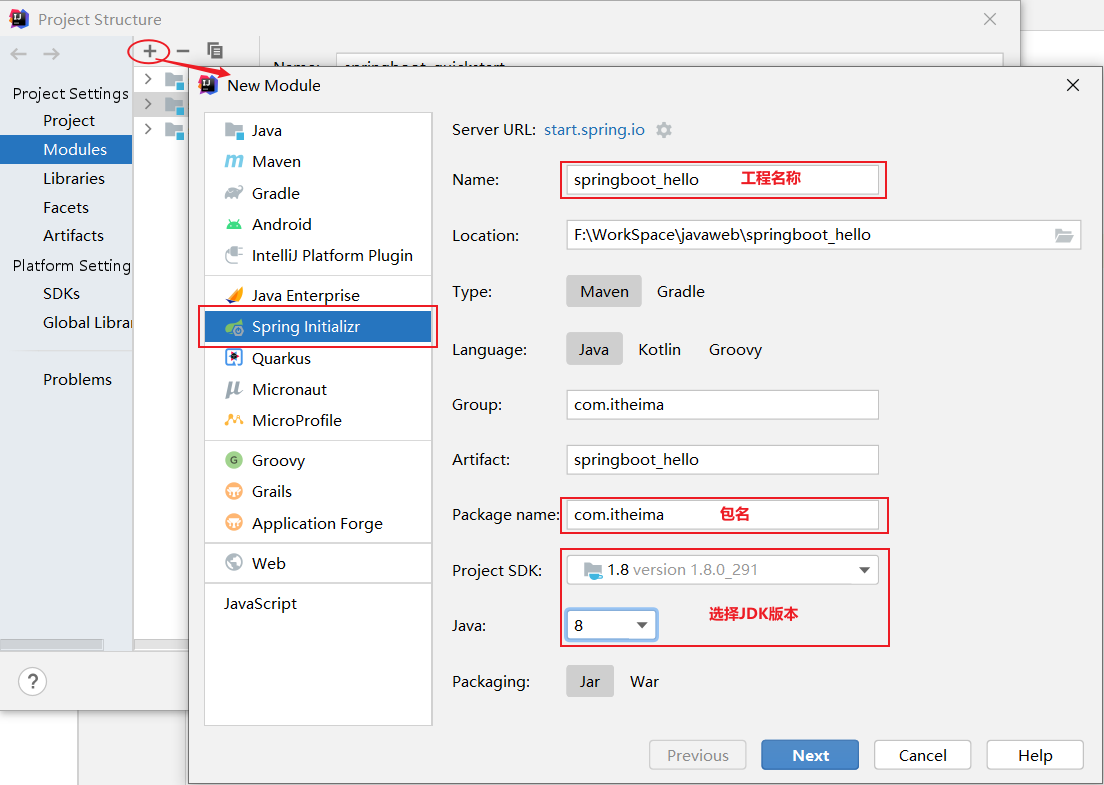
第1步:选择Spring初始化,并配置相关基础信息
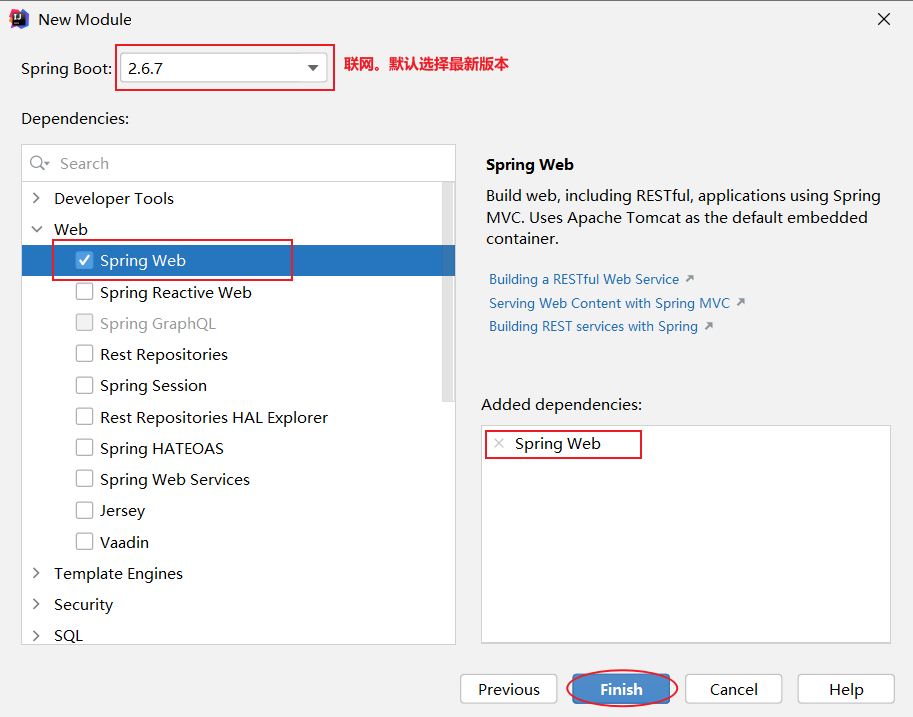
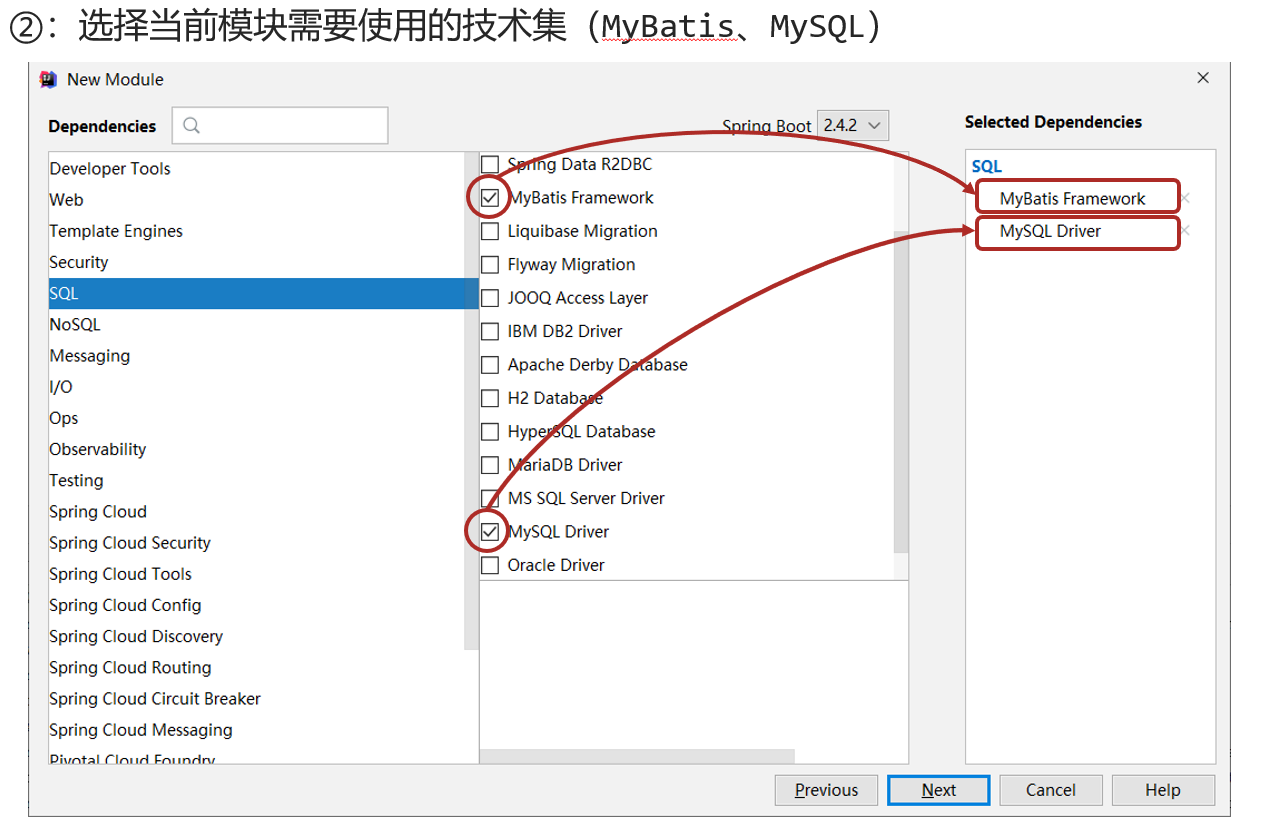
第2步:选择要使用的技术集
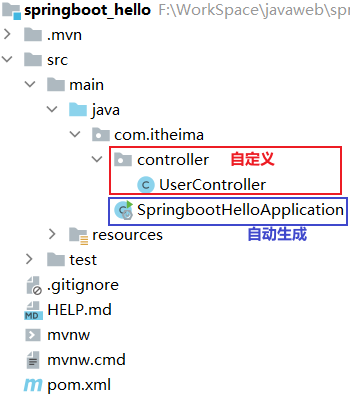
第3步:创建Controller类,编写请求方法
@RestController
@RequestMapping("/user")
public class UserController {
    @GetMapping("/{id}")
    public String getById(@PathVariable Integer id){
        System.out.println("id => "+id);
        return "Hello Spring Boot";
    }
}
第4步:启动SpringBoot引导类
@SpringBootApplication
public class SpringbootHelloApplication {
    public static void main(String[] args) {
        SpringApplication.run(SpringbootHelloApplication.class, args);
    }
}

04_SpringBoot入门案例分析
目标
- 理解SpringBoot项目的pom依赖
路径
- SpringBoot工程pom依赖关系
- SpringBoot场景依赖starter介绍
- Spring-boot-starter-web场景依赖说明
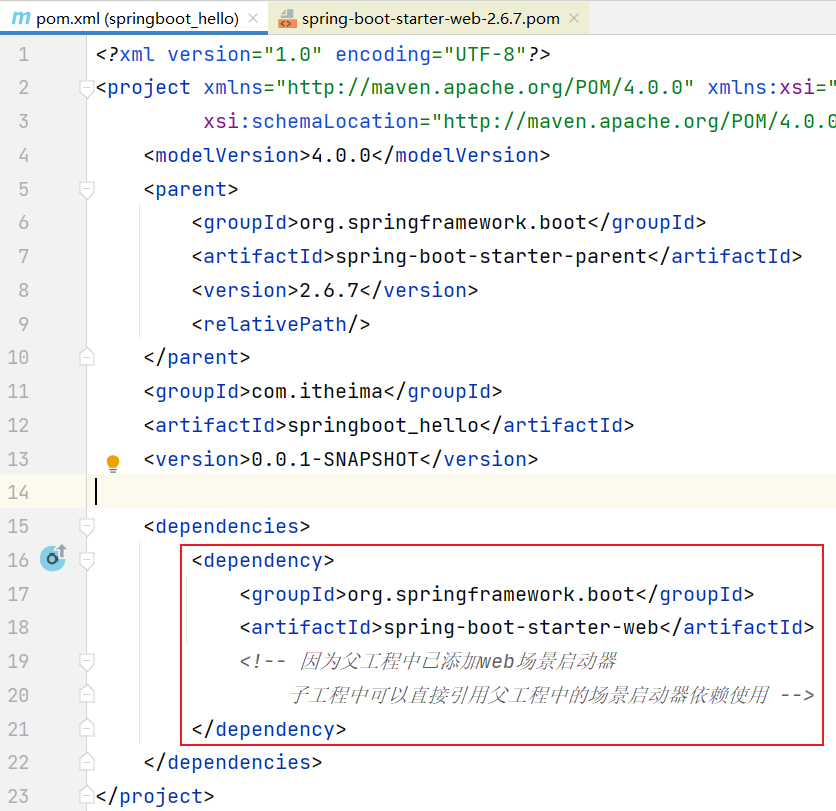
去除pom.xml文件中不必要的内容后,保留的核心内容:
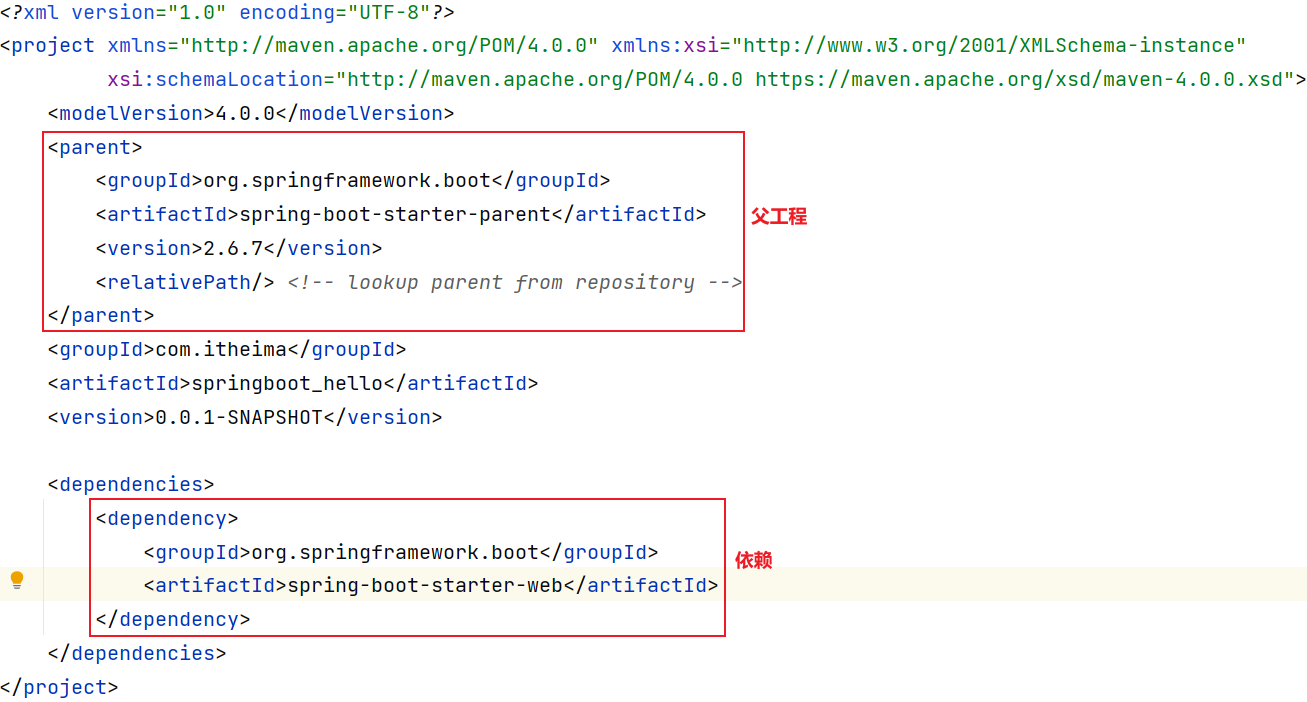
SpringBoot工程pom依赖关系
点击查看spring-boot-starter-parent工程
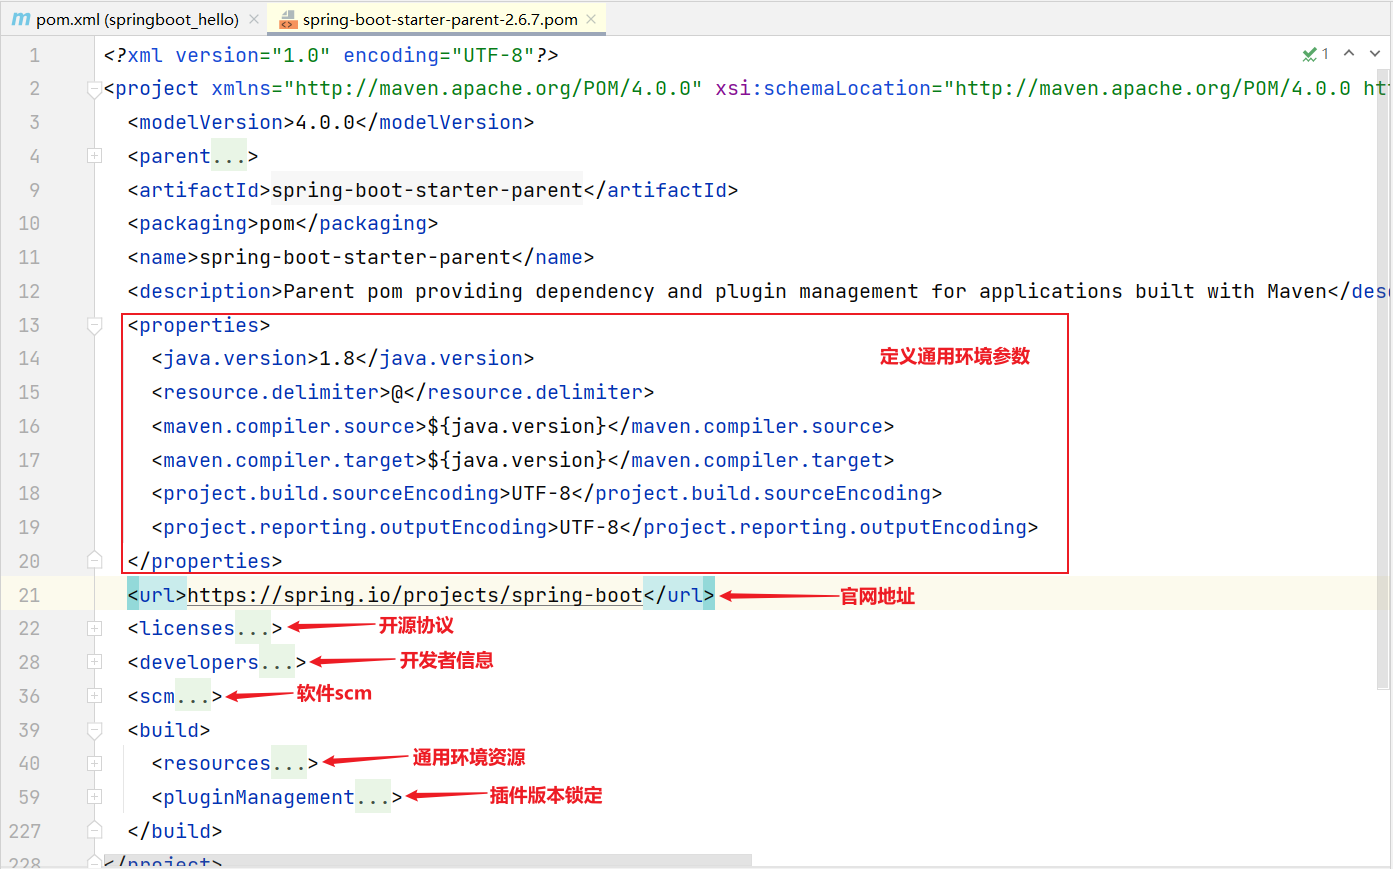
整体来看,spring-boot-starter-parent父工程仅仅定义了工程相关的描述信息,至于依赖资源配置方面,没有做过多参与,不过我们发现spring-boot-starter-parent工程也有自己的父工程
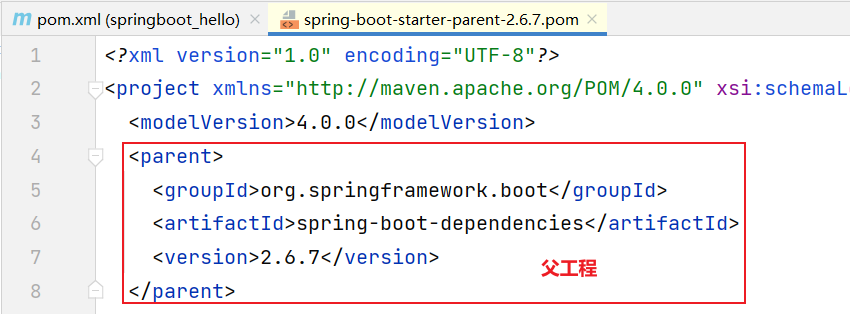
进入到 spring-boot-dependencies 工程中发现:
- 工程中声明了几乎所有开发中常用的依赖版本号并通过dependencyManagement进行版本控制

SpringBoot场景依赖starter介绍
在spring-boot-dependencies父工程中,发现大量以 spring-boot-starter-开头的依赖:
这是SpringBoot已经封装好的场景启动器:
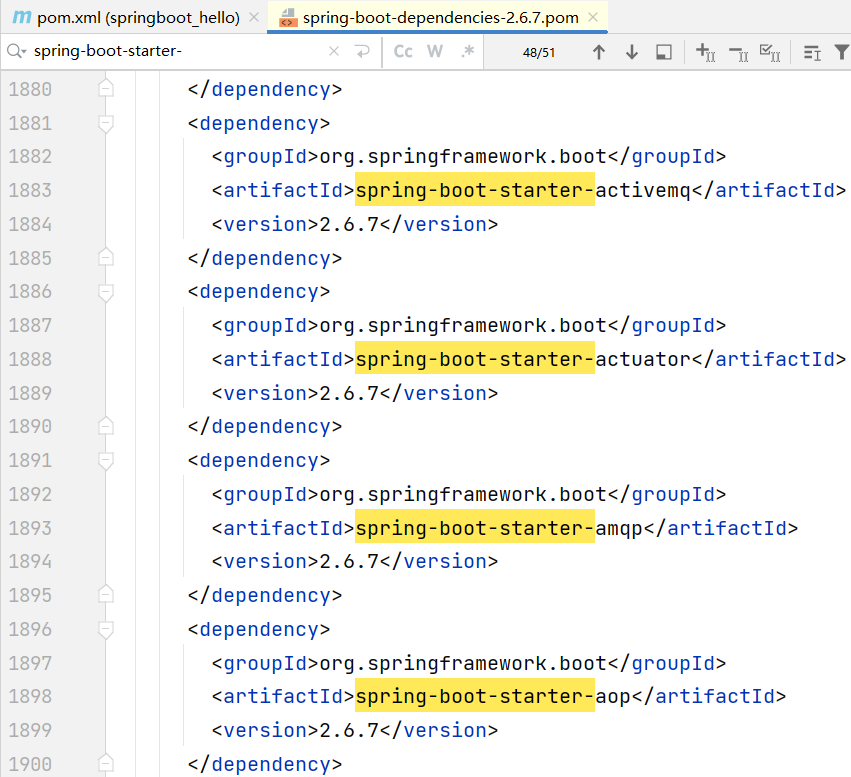
由于父工程中已经存在web场景启动器,子工程中可以直接引用(不用添加版本号)
Spring-boot-starter-web场景依赖说明
Spring-boot-starter-web场景依赖:
<!-- 依赖 -->
<dependencies>
    <dependency>
      <groupId>org.springframework.boot</groupId>
      <artifactId>spring-boot-starter</artifactId>
      <version>2.6.7</version>
      <scope>compile</scope>
    </dependency>
    <dependency>
      <groupId>org.springframework.boot</groupId>
      <artifactId>spring-boot-starter-json</artifactId>
      <version>2.6.7</version>
      <scope>compile</scope>
    </dependency>
    <dependency>
      <groupId>org.springframework.boot</groupId>
      <artifactId>spring-boot-starter-tomcat</artifactId>
      <version>2.6.7</version>
      <scope>compile</scope>
    </dependency>
    <dependency>
      <groupId>org.springframework</groupId>
      <artifactId>spring-web</artifactId>
      <version>5.3.19</version>
      <scope>compile</scope>
    </dependency>
    <dependency>
      <groupId>org.springframework</groupId>
      <artifactId>spring-webmvc</artifactId>
      <version>5.3.19</version>
      <scope>compile</scope>
    </dependency>
  </dependencies>
分析spring-boot-starter-web依赖发现:内部把关于Web MVC开发所有的依赖都已经导入并且指定了版本,只需引入 spring-boot-starter-web 依赖就可以实现Web MVC的功能
小结
问题:在SpringBoot环境中引入通用依赖,是否需要自己维护依赖的版本?
答案
SpringBoot父工程对通用的依赖进行了版本锁定,开发人员引入依赖时则无需关注依赖冲突和版本兼容问题问题:SpringBoot提供的场景启动器有什么好处?
提示
1、场景启动器可以快速引入指定场景下所依赖的资源(不必做资源冲突处理)2、场景启动器简化资源环境配置,让开发人员将重点放在业务逻辑上
05_依赖示例:切换web服务器
目标
- 能够使用pom父工程中已有依赖,切换web服务器
路径
- 修改pom文件切换web服务器
修改pom文件切换web服务器
我们理解了springboot之后,也可以不使用其默认配置的一些选项,改用我们想要的选项。
例如:排除Tomcat,引入jetty服务器组件
web应用需要在web容器中运行。web容器有:Tomcat、Jetty、WebSphere、WebLogic
Jetty比Tomcat更轻量级,可扩展性更强(相较于Tomcat),谷歌应用引擎(GAE)已经全面切换为Jetty
当然大型的应用还是tomcat为主
修改pom.xml文件:
<?xml version="1.0" encoding="UTF-8"?>
<project xmlns="http://maven.apache.org/POM/4.0.0" xmlns:xsi="http://www.w3.org/2001/XMLSchema-instance"
         xsi:schemaLocation="http://maven.apache.org/POM/4.0.0 https://maven.apache.org/xsd/maven-4.0.0.xsd">
    <modelVersion>4.0.0</modelVersion>
    <parent>
        <groupId>org.springframework.boot</groupId>
        <artifactId>spring-boot-starter-parent</artifactId>
        <version>2.6.7</version>
        <relativePath/>
    </parent>
    <groupId>com.itheima</groupId>
    <artifactId>springboot_hello</artifactId>
    <version>0.0.1-SNAPSHOT</version>

    <dependencies>
        <dependency>
            <groupId>org.springframework.boot</groupId>
            <artifactId>spring-boot-starter-web</artifactId>
            <!--排除tomcat依赖-->
            <exclusions>
                <exclusion>
                    <artifactId>spring-boot-starter-tomcat</artifactId>
                    <groupId>org.springframework.boot</groupId>
                </exclusion>
            </exclusions>
        </dependency>

        <!--引入jetty的依赖-->
        <dependency>
            <groupId>org.springframework.boot</groupId>
            <artifactId>spring-boot-starter-jetty</artifactId>
        </dependency>
    </dependencies>
</project>
06_SpringBoot配置文件入门
目标
- 掌握SpringBoot配置文件的基本使用
路径
- SpringBoot配置分类
- SpringBoot配置文件使用入门
SpringBoot配置分类
通过spring-boot-starter-parent依赖发现:
SpringBoot配置文件分为:
- yaml文件(简写:yml)
- properties文件
SpringBoot配置文件使用入门
以修改Tomcat端口号为例:
-
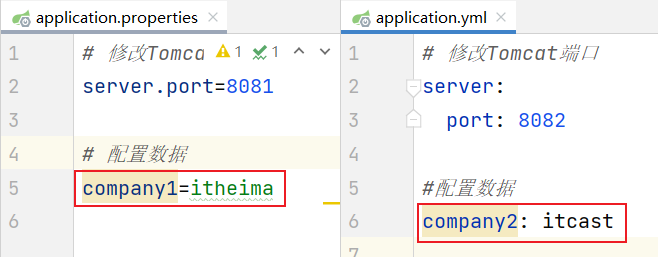
在resources目录下新建application.properties 配置文件,添加端口号:
server.port=8081 # 修改tomcat端口启动项目发现端口修改为 8081
-
在resources目录下新建application.yml配置文件(暂时注释掉application.properties中的端口设置)
server:
  port: 8082  #语法规则:当冒号后面有指定配置参数时,必须在冒号后添加空格
启动项目发现端口修改为 8082
测试验证:properties和yaml文件的优先级
-
验证1:
- 如果把application.properties中的注释取消,即两种配置文件同时存在,启动项目发现项目的端口是8081,说明是application.properties配置文件优先级更高
-
验证2:
-
分别在application.properties和application.yml 里添加:company1=itheima、company2: itcast
-
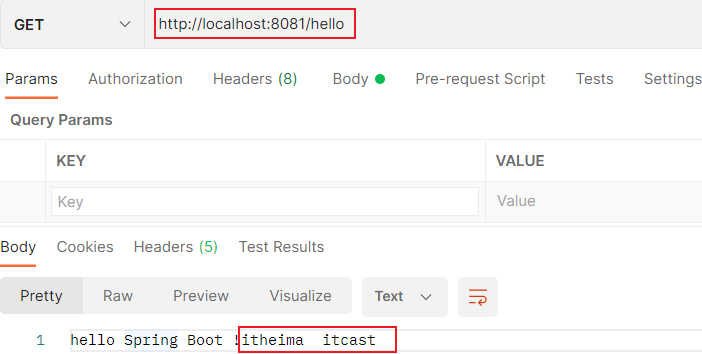
通过 @value注解注入读取配置
@RestController
@RequestMapping("/hello")
public class HelloController {
    //注入配置文件中属性值
    @Value("${company1}")
    private String company1;

    @Value("${company2}")
    private String company2;

    @GetMapping
    public String hello(){
        return "hello Spring Boot !" + company1 +"  " + company2;
    }
}
使用postman访问:
-
小结
问题1:SpringBoot配置文件有哪些?
答案
常见2种:properties文件和yml文件,实际开发中yml使用居多问题2:在同级路径下SpringBoot两种类型的配置文件同时存在时,配置优先级如何处理?
答案
properties和yaml配置文件如果同时存在,若key相同则properties配置文件优先级高,若key不同则合并加载07_YAML基本使用
目标
- 掌握yaml语法的基本数据类型的配置
路径
- 基本介绍
- 语法规则
- 数据读取
基本介绍
YAML(YAML Ain't Markup Language):是一种数据序列化格式
- YAML在开发中又有另外一层意思:Yet Another Markup Language(仍是一种标记语言)
- YAML非常适合用来做以数据为中心的配置文件
- 扩展名:xxx.yaml 或 xxx.yml(主流)

优点:
- 容易阅读
- 容易与脚本语言交互
- 以数据为核心,重数据轻格式
语法规则
- 大小写敏感(区分大小写)
- 属性值前面必须有空格,作为分隔符(属性名与属性值之间使用冒号+空格作为分隔)
- 属性层级关系使用多行描述,每行结尾使用冒号结束
- 使用缩进表示层级关系,同层级左侧对齐,只允许使用空格(不允许使用Tab键)
- 字符串无需加引号,如果要加,
""与''表示字符串内容会被转义/不转义 #表示注释
核心规则:数据前面要加空格与冒号隔开
示例:
enterprise:
  name: itcast     # String
  age: 16          # int
  tel: 4006184000  # long
  subject:         # 数组/集合
    - Java
    - 前端
    - 大数据

msg1: 'hello \n world'  # 单引忽略转义字符
msg2: "hello \n world"  # 双引识别转义字符
数据读取
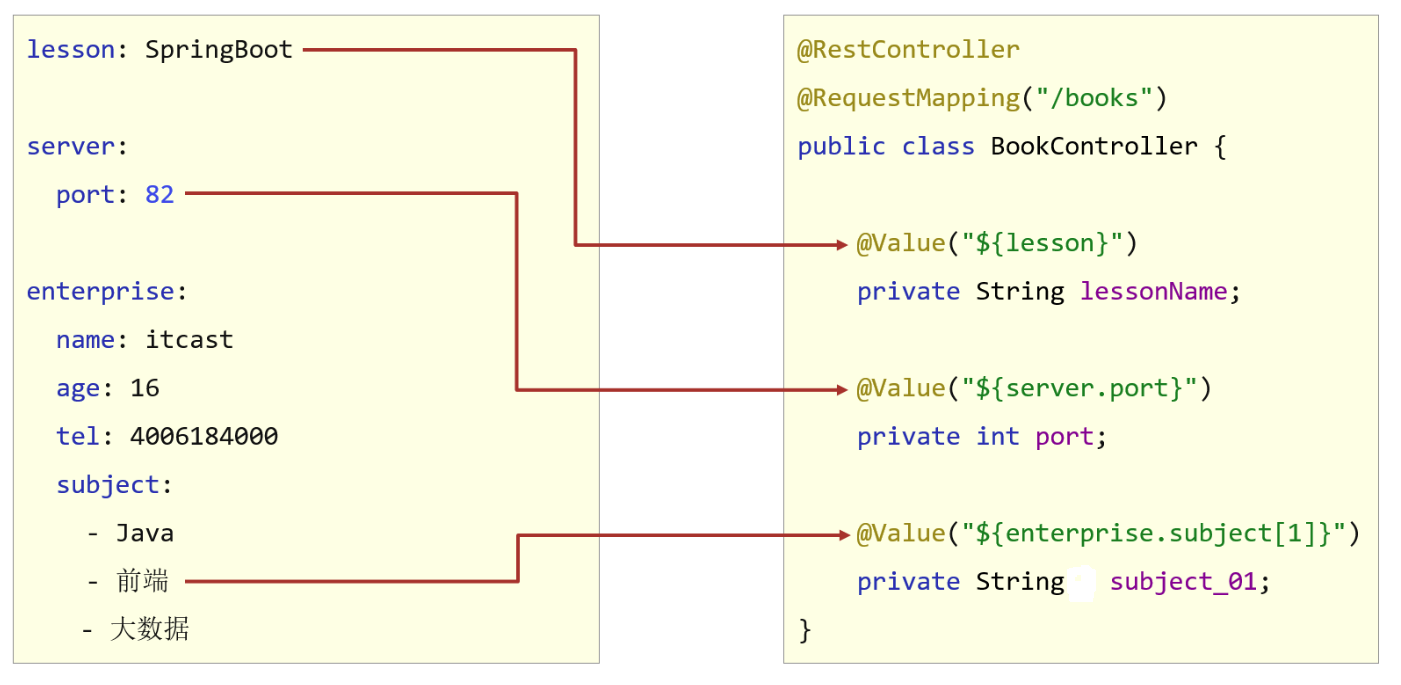
使用@Value读取数据
-
引用方式:
${一级属性名}
${一级属性名.二级属性名}
代码示例:
- yaml配置文件
enterprise:
  name: itcast
  age: 16
  tel: 4006184000
  subject:
    - Java
    - 前端
    - 大数据

msg1: 'hello \n world'  # 单引忽略转义字符
msg2: "hello \n world"  # 双引识别转义字符
- Controller
@RestController
@RequestMapping("/heima")
public class HeimaController {
    @Value("${enterprise.name}")
    private String name;
    @Value("${enterprise.age}")
    private Integer age;
    @Value("${enterprise.tel}")
    private Long tel;
    @Value("${enterprise.subject[0]}")
    private String subject;
    @Value("${msg1}")
    private String message1;
    @Value("${msg2}")
    private String message2;

    @GetMapping
    public void itheima(){
        System.out.println(name);
        System.out.println(age);
        System.out.println(tel);
        System.out.println(subject);
        System.out.println(message1);
        System.out.println(message2);
    }
}
08_YAML高级配置
目标
- 掌握YAML配置参数映射对象属性功能
路径
- YAML配置参数映射到对象属性
- 配置文件自动提示
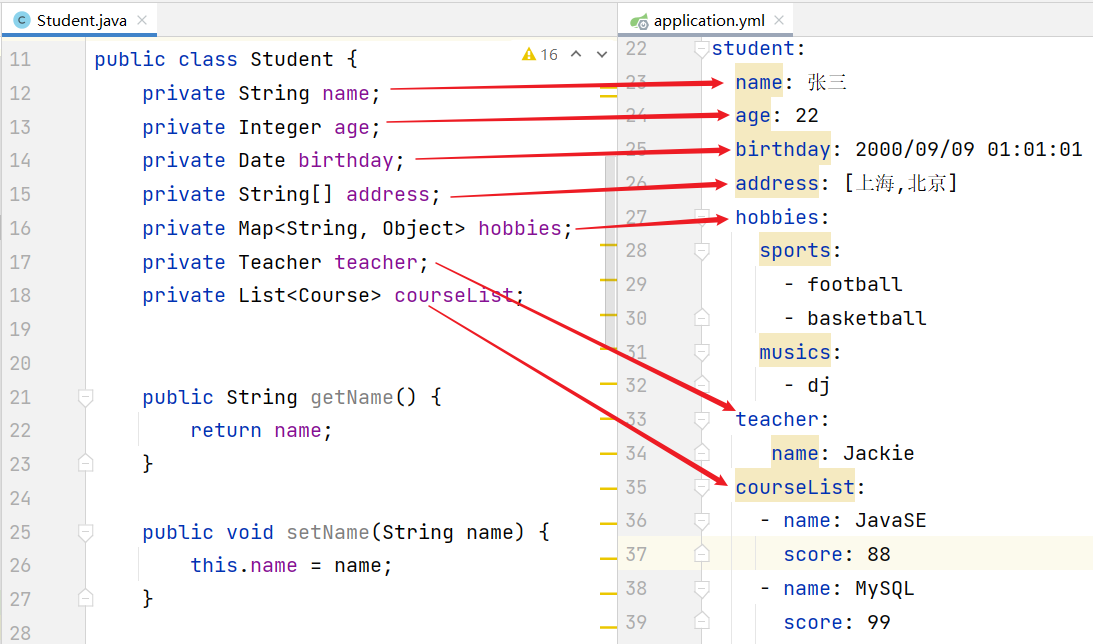
YAML配置参数映射到对象属性
代码示例:
- 实体类
//老师类
public class Teacher {
    private String name;

    public String getName() {
        return name;
    }
    public void setName(String name) {
        this.name = name;
    }
}


//课程类
public class Course {
    private String name;
    private Double score;

    public String getName() {
        return name;
    }
    public void setName(String name) {
        this.name = name;
    }
    public Double getScore() {
        return score;
    }
    public void setScore(Double score) {
        this.score = score;
    }
}


//学生类
public class Student {
    private String name;
    private Integer age;
    private Date birthday;
    private String[] address;
    private Map<String, Object> hobbies;
    private Teacher teacher;
    private List<Course> courseList;

    public String getName() {
        return name;
    }
    public void setName(String name) {
        this.name = name;
    }
    public Integer getAge() {
        return age;
    }
    public void setAge(Integer age) {
        this.age = age;
    }
    public Date getBirthday() {
        return birthday;
    }
    public void setBirthday(Date birthday) {
        this.birthday = birthday;
    }
    public String[] getAddress() {
        return address;
    }
    public void setAddress(String[] address) {
        this.address = address;
    }
    public Map<String, Object> getHobbies() {
        return hobbies;
    }
    public void setHobbies(Map<String, Object> hobbies) {
        this.hobbies = hobbies;
    }
    public Teacher getTeacher() {
        return teacher;
    }
    public void setTeacher(Teacher teacher) {
        this.teacher = teacher;
    }
    public List<Course> getCourseList() {
        return courseList;
    }
    public void setCourseList(List<Course> courseList) {
        this.courseList = courseList;
    }
}
- yml配置文件
student:
  name: 张三
  age: 22
  birthday: 2000/09/09 01:01:01
  address: [上海,北京]
  hobbies:
    sports:
      - football
      - basketball
    musics:
      - dj
  teacher:
     name: Jackie
  courseList:
    - name: JavaSE
      score: 88
    - name: MySQL
      score: 99
- 依赖注入
@Component
@ConfigurationProperties(prefix = "student")
public class Student {
    private String name;
    private Integer age;
    private Date birthday;
    private String[] address;
    private Map<String, Object> hobbies;
    private Teacher teacher;
    private List<Course> courseList;

    /* 省略: setter()、getter()方法 */
}

/*
两种注入属性方式:
方式1:在实体类Student上添加@ConfigurationProperties(prefix = "student”)
	  然后在SpringBoot启动类上添加@EnableConfigurationProperties(student.class)

方式2:在实体类Student上添加@ConfigurationProperties(prefix = "student”)
      在实体类Student上添加@Component
*/
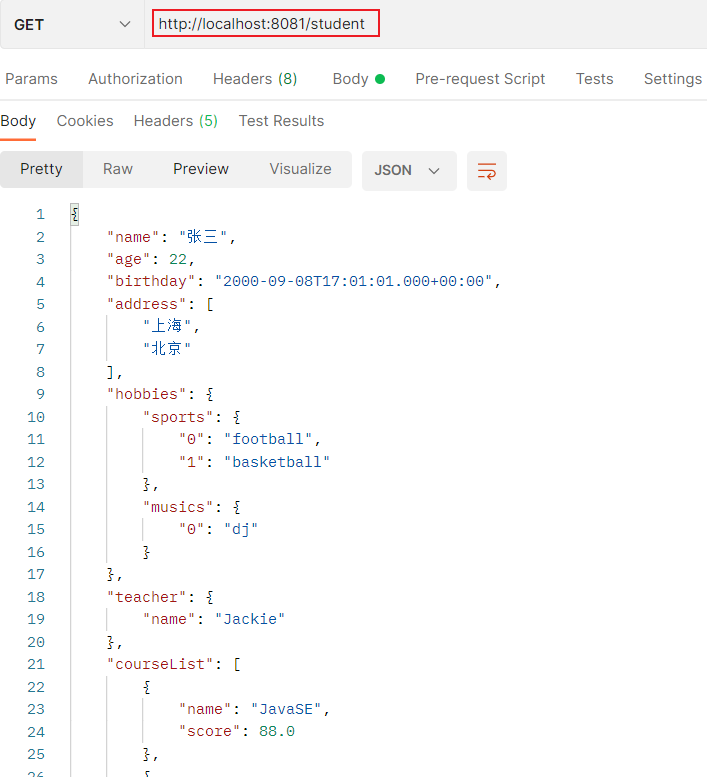
- Controller类
@RestController
@RequestMapping("/student")
public class StudentController {
    @Autowired
    private Student student;

    @GetMapping
    private Student getStudent(){
        return  student;
    }
}
使用postman测试:
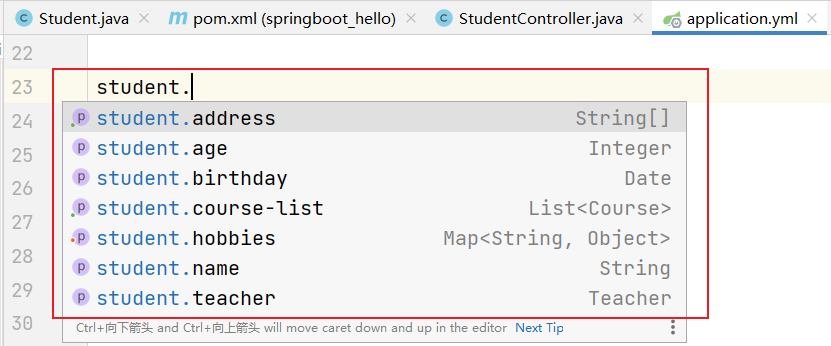
配置文件自动提示
idea中存在的问题:
- 如果idea提示以下警告,可以忽略它,不影响运行,也可以在pom文件添加依赖
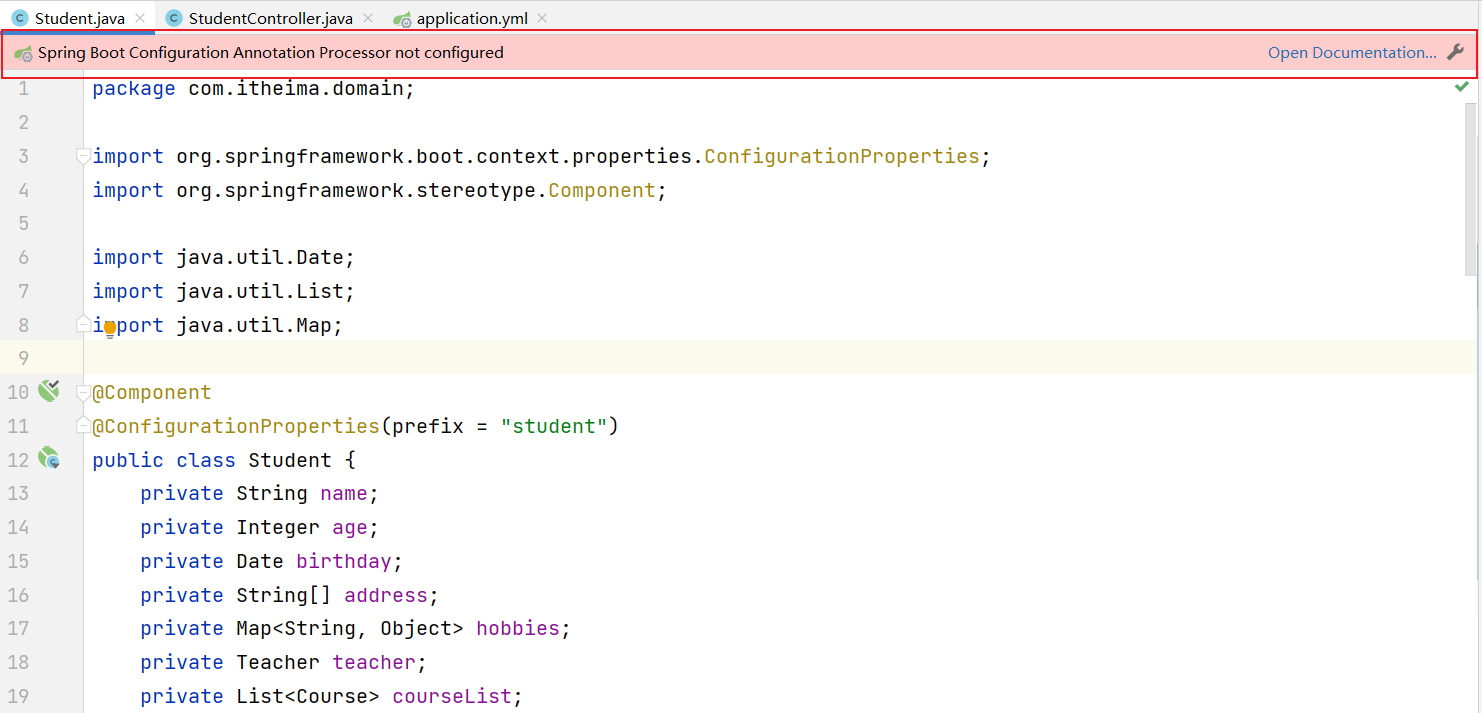
解决方案: 在pom.xml文件中添加依赖
<!-- 解决SpringBoot自定义配置提示问题 -->
<dependency>
  <groupId>org.springframework.boot</groupId>
  <artifactId>spring-boot-configuration-processor</artifactId>
  <optional>true</optional>
</dependency>

<build>
  <plugins>
    <plugin>
      <groupId>org.springframework.boot</groupId>
      <artifactId>spring-boot-maven-plugin</artifactId>
      <configuration>
        <excludes>
          <!--插件运行时排除依赖-->
          <exclude>
            <groupId>org.springframework.boot</groupId>
            <artifactId>spring-boot-configuration-processor</artifactId>
          </exclude>
        </excludes>
      </configuration>
    </plugin>
  </plugins>
</build>
在pom.xml文件中添加以上依赖和插件后,在yaml文件书写配置参数时,就有了自动提示功能
小结
问题:获取配置文件中数据方式?
答案
第1种:直接获取数据。 使用:@Value("${key}")第2种:通过映射对象获取。 使用:@ConfigurationProperties(prefix="前缀")+@Component
09_YAML应用:多环境配置
目标
- 能够使用yaml配置文件,解决企业开发中多环境配置问题
路径
- 应用场景介绍
- 多个profile文件实现环境配置切换(掌握)
- 单个 profile文件实现环境配置切换(了解)
- profile激活方式
应用场景介绍
在程序开发完成要进入到部署阶段的时候,往往就会遇到需要把程序发布到不同环境(多环境):
- 开发环境(windows) 。 俗称:development
- 测试环境(linux) 。 俗称:test
- 生产环境(linux) 。 俗称:produce
以上每个环境的数据库、服务器端口、密钥等信息可能会存在差异,这时开发人员需要频繁修改配置来切换不同的环境,维护性相当差。
在这种情况下,我们就可以使用SpringBoot多环境配置方案,解决上述出现的问题。
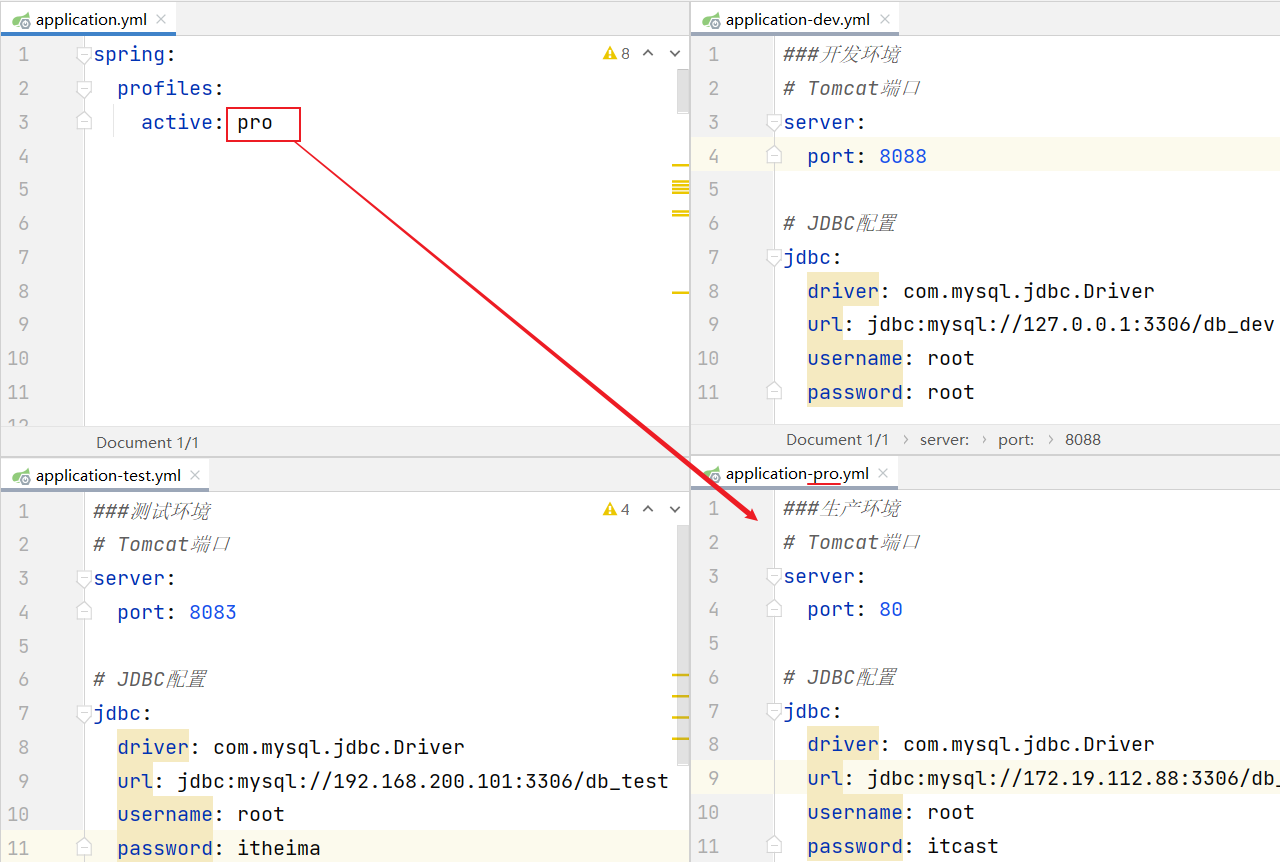
多个profile文件实现环境配置切换
profile配置方式:
- 多个profile文件方式:提供多个配置文件,每个代表一种环境
- application-dev.yml (开发环境) 也可以是:application-dev.properties
- application-test.yml (测试环境) 也可以是:application-test.properties
- application-pro.yml (生产环境) 也可以是:application-pro.properties
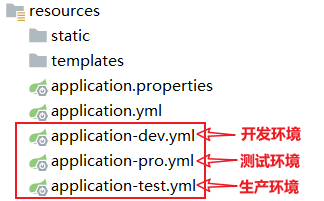
好处: 解耦
- 不同的环境使用不同的文件,这样修改时,仅仅修改对应配置文件的数据,无需修改其他环境的配置文件
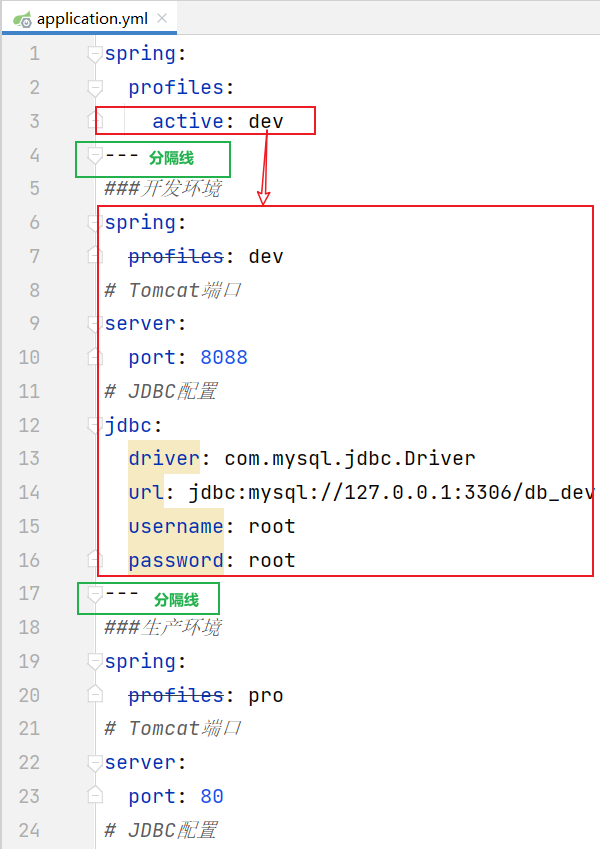
单个profile文件实现环境配置切换
profile配置方式:
- 在application.yml文件中使用: --- 分隔不同配置
profile激活方式
使用idea自带的maven打包工具,对项目工程进行打包
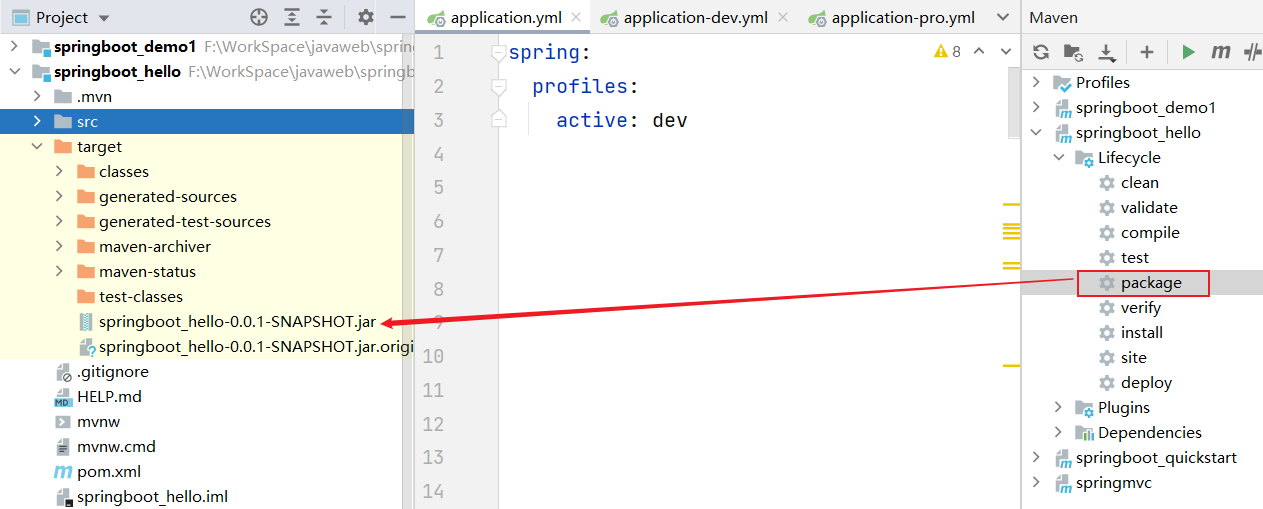
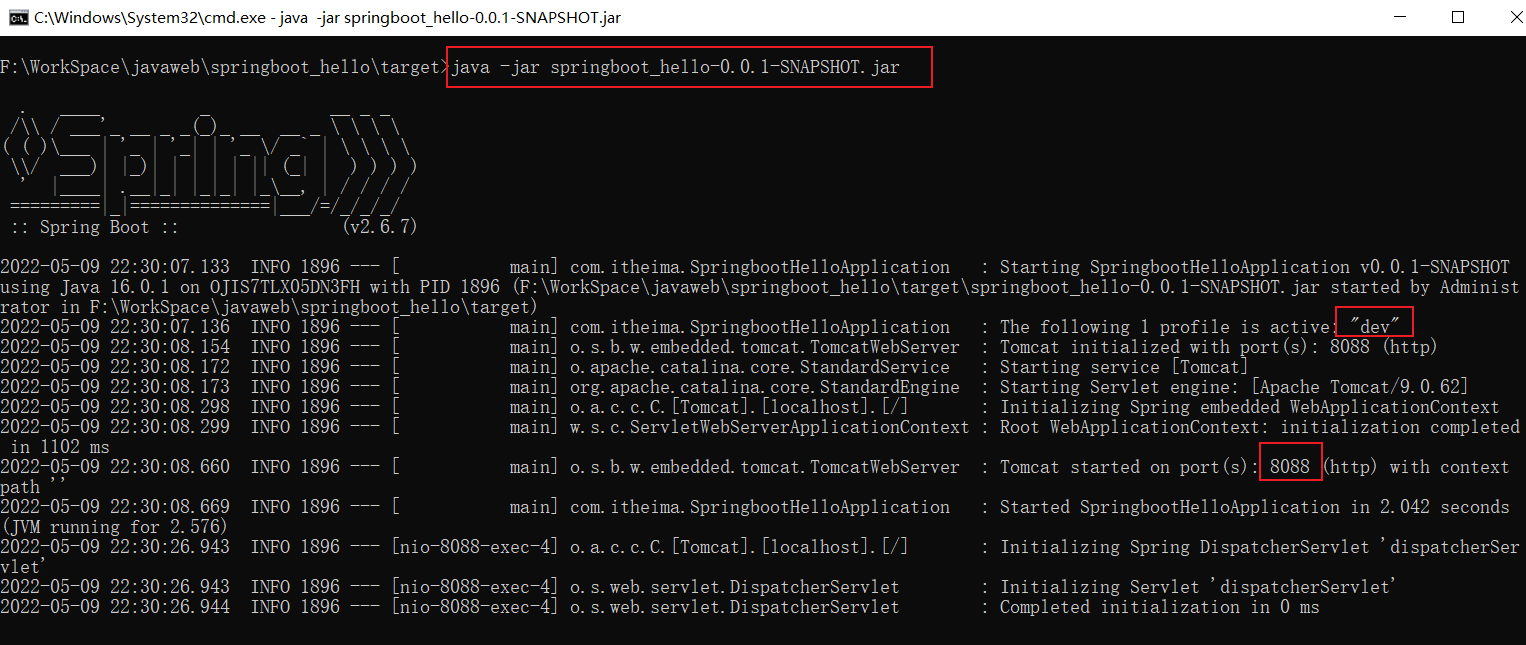
进入DOS执行命令: 启动某个jar包
java -jar XXX.jar
利用DOS启动某个jar包时,可能会遇到的问题:

-
说明:启动后报没有主清单属性问题
-
解决方案:添加打包插件
<build>
    <plugins>
        <plugin>
            <groupId>org.springframework.boot</groupId>
            <artifactId>spring-boot-maven-plugin</artifactId>
        </plugin>
    </plugins>
</build>
小結
问题:SpringBoot多环境配置方式?
答案
配置多个yml环境文件使用:spring.profiles.active="环境标识" (eg:标识来自于yml文件dev中:application-dev.yml)
10_配置文件加载顺序
目标
- 了解配置文件加载顺序
路径
- 项目外配置加载顺序
- 项目内配置加载顺序
项目外配置加载顺序
# 启动并读取dev环境
java -jar XXX.jar --spring.profiles.active=dev

# 启动时使用端口9000
java -jar XXX.jar --server.port=9000

# 启动时使用端口9000,其余配置读取dev环境
java –jar XXX.jar --server.port=9000 --spring.profiles.active=dev
加载优先级: jar包外 > jar包内
项目内配置加载顺序
SpringBoot中有4级配置文件: (配置优先级:由高到底)
- 1级 ==> file:config/application.yml 【最高】
- 当前项目project下的/config目录下
- 2级 ==> file:application.yml
- 当前项目project的根目录
- 3级 ==> classpath:config/application.yml
- classpath的/config目录
- 4级 ==> classpath:application.yml 【最低】
- classpath的根目录
file : 指的是当前project所在目录
classpath : 指的是maven模块的resources目录
小结
问题:SpringBoot配置文件的加载顺序?
答案
按文件类型:properties > yml > yaml按路径分类:当前project/config > 当前project > classpath/config > classpath
按命令行设置:jar包外的参数 > jar包内的参数
11_SpringBoot整合Junit
目标
- 能够完成SpringBoot整合Junit单元测试
路径
- 整合Junit4
- 整合Junit5
整合Junit4
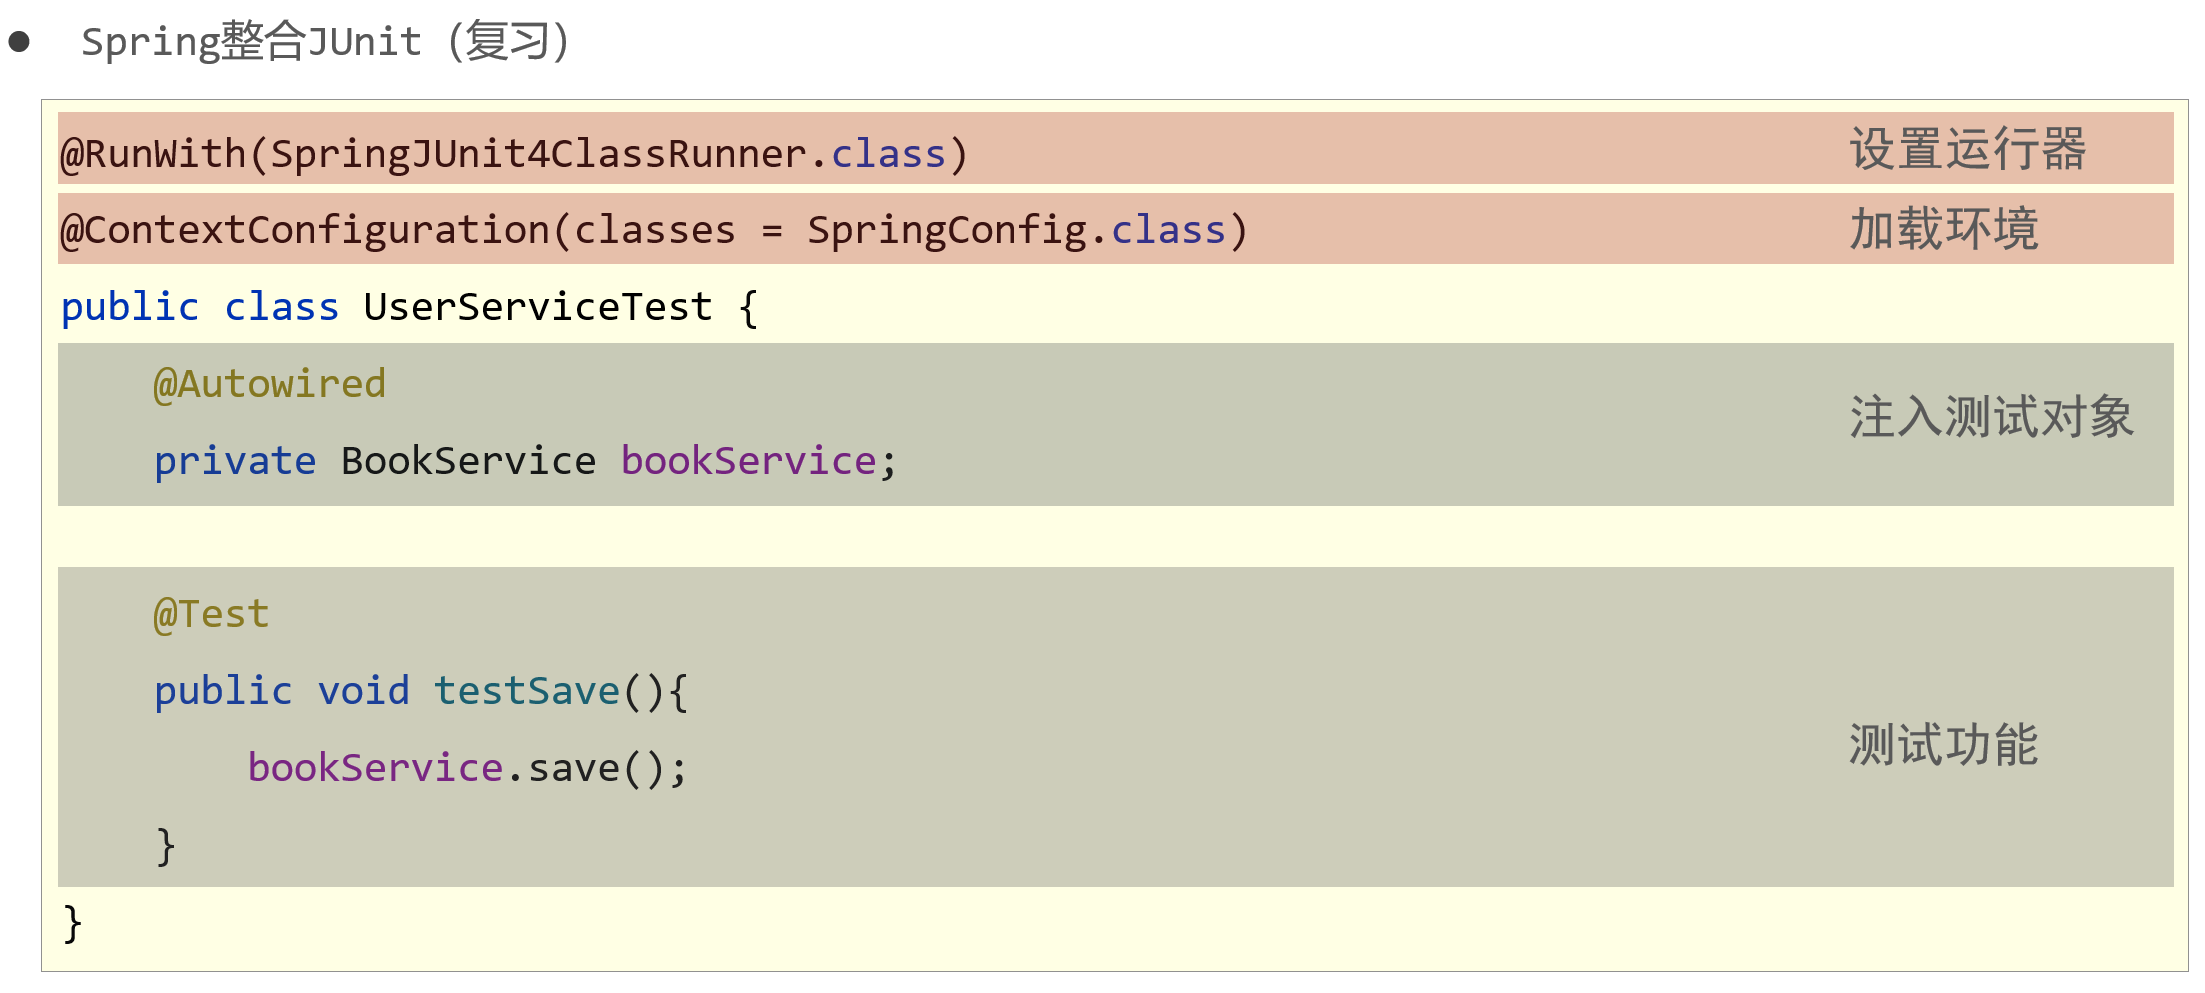
之前我们编写spring整合Junit,首先要导入两个依赖(junit、spring-test),然后编写如下测试类:
而在springboot中整合junit的实现步骤:
- 引入场景(test)依赖
- 编写测试类,添加注解
pom.xml:
<!-- SpringBoot中test场景依赖 -->
<dependency>
    <groupId>org.springframework.boot</groupId>
    <artifactId>spring-boot-starter-test</artifactId>
</dependency>

<dependency>
    <groupId>junit</groupId>
    <artifactId>junit</artifactId>
    <scope>test</scope>
</dependency>
编写测试类,添加注解@SpringBootTest和@RunWith(SpringRunner.class)
import com.itheima.domain.Student;
import com.itheima.service.StudentService;
import org.springframework.beans.factory.annotation.Autowired;
import org.springframework.boot.test.context.SpringBootTest;
import org.springframework.test.context.ContextConfiguration;
import org.springframework.test.context.junit4.SpringRunner;
import org.junit.runner.RunWith;
import org.junit.Test;


@SpringBootTest //指定当前类为springboot环境下的测试类
@RunWith(SpringRunner.class) //指定加载容器上下文的加载类
//如果当前测试类与启动类不在同级或其子目录下,那么需要显式指定启动配置类
//@ContextConfiguration(classes = SpringJunitApp.class)
public class SpringBootJunit4Test {
    @Autowired
    private StudentService studentService;

    @BeforeClass
    public static void beforeClasRun(){
        System.out.println("beforeClasRun ...");
    }

    /**
     * 测试方法运行几次,就执行几次
     */
    @Before
    public void before01(){
        System.out.println("before01 run....");
    }

    @Test
    public void test1(){
       studentService.saveStudent();
    }

    @After
    public void after01(){
        System.out.println("after01 run....");
    }

    @AfterClass
    public static void afterClasRun(){
        System.out.println("afterClasRun ...");
    }
}
- 注意事项:
如果测试类不在启动类同级或者子目录下,则需要通过@ContextConfiguration(classes=xxx.class)注解指定启动类的位置
整合Junit5
Spring Boot 2.2.0 版本开始引入JUnit5作为单元测试默认版本,2.3.X版本还保留了Junit4版本测试,但是在2.4.X则不再支持Junit4
作为最新版本的JUnit框架,JUnit5与之前版本的Junit框架有很大的不同。
JUnit5由三个不同子项目的几个不同模块组成
- JUnit 5 = JUnit Platform + JUnit Jupiter + JUnit Vintage
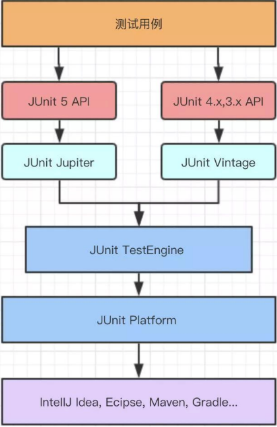
JUnit Platform:Junit Platform是在JVM上启动测试框架的基础,不仅支持Junit自制的测试引擎,其他测试引擎也都可以接入。

JUnit Jupiter:JUnit Jupiter提供了JUnit5的新的编程模型,是JUnit5新特性的核心。内部 包含了一个测试引擎*,用于在Junit Platform上运行。

JUnit Vintage:由于JUint已经发展多年,为了照顾老的项目,JUnit Vintage提供了兼容JUnit4.x、Junit3.x的测试引擎。
使用Springboot整合JUnit5的实现:
pom.xml:
<!-- SpringBoot的test场景依赖 -->
<dependency>
    <groupId>org.springframework.boot</groupId>
    <artifactId>spring-boot-starter-test</artifactId>
</dependency>
测试类:
import com.itheima.domain.Student;
import com.itheima.service.StudentService;
import org.springframework.beans.factory.annotation.Autowired;
import org.springframework.boot.test.context.SpringBootTest;
import org.junit.jupiter.api.Test;


@SpringBootTest //设置JUnit加载的SpringBoot启动类
//如果当前测试类与启动类不在同级或其子目录下,那么需要显式指定启动配置类
//@ContextConfiguration(classes = SpringJunitApp.class)
//@SpringBootTest(classes = SpringJunitApp.class)
public class SpringBootJunit5Test {
    @Autowired
    private StudentService studentService;

    @BeforeAll //等价于junit4:@BeforeClass
    public static void beforeClasRun(){
        System.out.println("beforeClasRun ...");
    }

    @BeforeEach //等价于junit4:@Before
    public void before01(){
        System.out.println("before01 run....");
    }

    @Test
    public void test1(){
       studentService.saveStudent(null);
    }

    @AfterEach //等价于junit4:@After
    public void after01(){
        System.out.println("after01 run....");
    }

    @AfterAll //等价于junit4:@AfterClass
    public static void afterClasRun(){
        System.out.println("afterClasRun ...");
    }
}
小结
问题1:SpringBoot中如何整合JUnit5?
答案
步骤1:导入springboot的test场景依赖步骤2:设置JUnit加载的SpringBoot启动类 (在测试类上添加@SpringBootTest)
问题2:如果测试类与SpringBoot启动类不在同级或其子目录下怎么解决?
答案
方式1:在测试类上添加@ContextConfiguration(classes = 启动类.class)方式2:使用@SpringBootTest(classes = 启动类.class)
12_SpringBoot静态资源访问
目标
- 了解SpringBoot中静态资源的访问方式
路径
- SpringBoot整合SMM的思路
- SpringBoot中静态资源访问
- 自定义静态资源访问路径
SpringBoot整合SMM的思路
由于springboot跟和spring,springmvc出于同一团队,所以springboot中已经自动配置好spring和springmvc环境。
SpringBoot实现SSM整合的思路:
-
SpringBoot整合Spring(不需要)
-
SpringBoot整合SpringMVC(不需要)
-
SpringBoot整合MyBatis(需要)
在SpringBoot环境下,整合SSM框架只需要完成以下两点即可:
- 解决SpringBoot环境下静态资源访问
- 实现SpringBoot环境下Mybatis的整合
SpringBoot中静态资源访问
问题:SpringBoot工程中没有webapp目录,静态资源存放在哪里呢?
答案:在默认情况下,Spring Boot从类路径中名为/static(/public或/resources或/META-INF/resources)的目录中提供静态内容
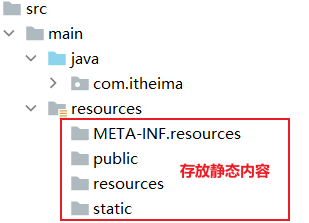
- 注意:
META-INF.resources是两级目录
SpringBoot环境下静态资源访问:
-
添加web场景依赖
<dependency> <groupId>org.springframework.boot</groupId> <artifactId>spring-boot-starter-web</artifactId> </dependency> -
静态资源存放到springboot工程默认目录下
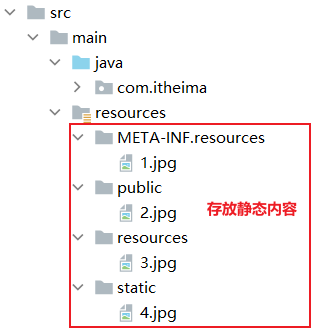
浏览器访问:http://localhost:8080/4.jpg
自定义静态资源访问路径
在application.yml配置文件中修改默认配置:
spring:
  mvc:
    static-path-pattern: /imgs/**   #配置静态资源的映射路径

  web:
    resources:
      static-locations: [classpath:/images/] #自定义静态资源存放位置
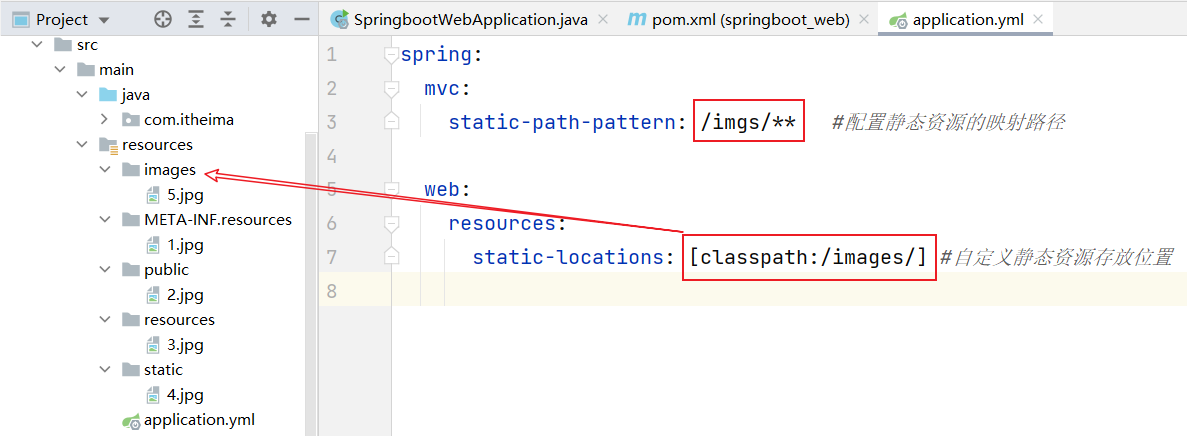
使用浏览器访问:

13_SpringBoot整合Mybatis
目标
- 能够使用SpringBoot整合Mybatis框架
路径
- SpringBoot整合Mybatis的步骤
- SpringBoot整合Mybatis
- 整合Mybatis的细节调整
SpringBoot整合Mybatis的步骤
整合Mybatis的步骤:
- 创建maven模块项目
- 配置数据源
- 编写Mapper接口
- 编写Mapper映射文件
SpringBoot整合Mybatis
代码示例:
- pom.xml
<?xml version="1.0" encoding="UTF-8"?>
<project xmlns="http://maven.apache.org/POM/4.0.0" xmlns:xsi="http://www.w3.org/2001/XMLSchema-instance"
         xsi:schemaLocation="http://maven.apache.org/POM/4.0.0 https://maven.apache.org/xsd/maven-4.0.0.xsd">
    <modelVersion>4.0.0</modelVersion>
    <parent>
        <groupId>org.springframework.boot</groupId>
        <artifactId>spring-boot-starter-parent</artifactId>
        <version>2.6.7</version>
        <relativePath/>
    </parent>
    <groupId>com.itheima</groupId>
    <artifactId>springboot_mybatis</artifactId>
    <version>0.0.1-SNAPSHOT</version>

    <properties>
        <java.version>1.8</java.version>
    </properties>
    <dependencies>
        <!-- web场景 -->
        <dependency>
            <groupId>org.springframework.boot</groupId>
            <artifactId>spring-boot-starter-web</artifactId>
        </dependency>
        <!-- Mybatis场景 -->
        <dependency>
            <groupId>org.mybatis.spring.boot</groupId>
            <artifactId>mybatis-spring-boot-starter</artifactId>
            <version>2.2.2</version>
        </dependency>
        <!-- MySQL驱动-->
        <dependency>
            <groupId>mysql</groupId>
            <artifactId>mysql-connector-java</artifactId>
            <scope>runtime</scope>
        </dependency>
        <dependency>
        <!-- Druid数据源 -->
        <dependency>
            <groupId>com.alibaba</groupId>
            <artifactId>druid-spring-boot-starter</artifactId>
            <version>1.1.24</version>
        </dependency>
        <!-- test场景 -->
        <dependency>
            <groupId>org.springframework.boot</groupId>
            <artifactId>spring-boot-starter-test</artifactId>
            <scope>test</scope>
        </dependency>
    </dependencies>

    <build>
        <plugins>
            <plugin>
                <groupId>org.springframework.boot</groupId>
                <artifactId>spring-boot-maven-plugin</artifactId>
            </plugin>
        </plugins>
    </build>
</project>
-
application.yml (配置数据源)
-
springboot整合的mybatis默认使用连接池HikariDataSource,这里切换为DruidDataSource
-
HikariDataSource:快
-
DruidDataSource:功能比较多
-
-
# 配置数据源
spring:
  datasource:
    type: com.alibaba.druid.pool.DruidDataSource #Druid连接池
    driver-class-name: com.mysql.jdbc.Driver #驱动
    url: jdbc:mysql://127.0.0.1:3306/ssm_db  #URL连接字符串
    username: root     #登录名
    password: itheima  #密码
- Book类
public class Book {
    private Integer id;
    private String type;
    private String name;
    private String description;

    public Book() {
    }
    public Book(Integer id, String type, String name, String description) {
        this.id = id;
        this.type = type;
        this.name = name;
        this.description = description;
    }
    public Integer getId() {
        return id;
    }
    public void setId(Integer id) {
        this.id = id;
    }
    public String getType() {
        return type;
    }

    public void setType(String type) {
        this.type = type;
    }
    public String getName() {
        return name;
    }
    public void setName(String name) {
        this.name = name;
    }
    public String getDescription() {
        return description;
    }
    public void setDescription(String description) {
        this.description = description;
    }
    @Override
    public String toString() {
        return "Book{" +
                "id=" + id +
                ", type='" + type + '\'' +
                ", name='" + name + '\'' +
                ", description='" + description + '\'' +
                '}';
    }
}
- 编写dao层
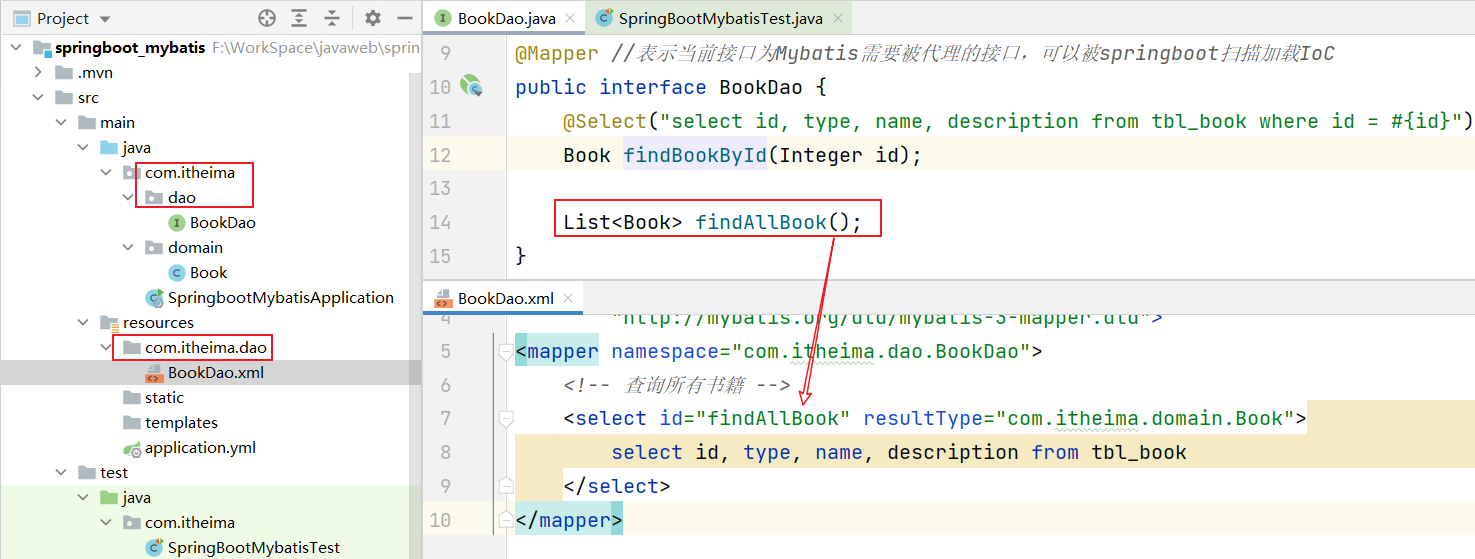
@Mapper //表示当前接口为Mybatis需要被代理的接口,可以被springboot扫描加载IoC
public interface BookDao {
    @Select("select id, type, name, description from tbl_book where id = #{id}")
    Book findBookById(Integer id);

    List<Book> findAllBook();
}
- 测试类
@SpringBootTest
public class SpringBootMybatisTest {
    @Autowired
    private BookDao bookDao;

    @Test
    public void testFindBookById(){
        Book book = bookDao.findBookById(1);
        System.out.println(book);
    }
}

//输出结果:
//Book{id=1, type='编程', name='Spring实战', description='spring入门经典教程'}
整合Mybatis的细节调整
细节1:添加Mapper映射文件
细节2:改变Mapper映射文件存放位置
-
在
resources路径下创建 mapper 文件夹,并且将BookDao.xml放在mapper文件夹下 -
#指定Mapper映射文件存放位置
mybatis:
  mapper-locations: classpath:mapper/**Dao.xml  #mapper映射文件位置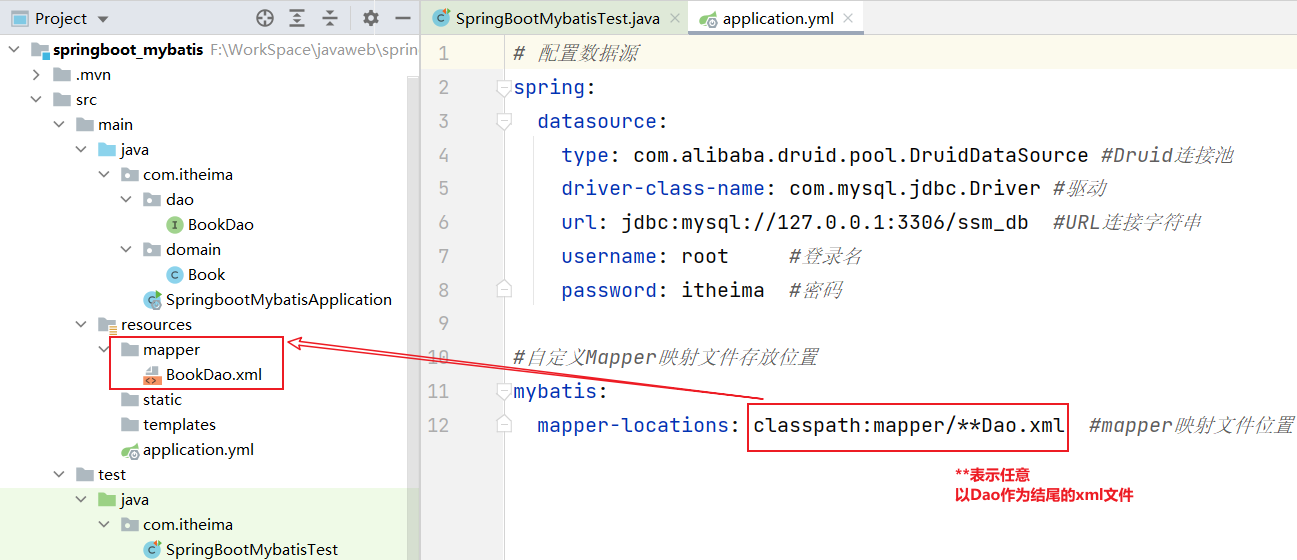
细节3:省略@Mapper注解
-
public interface BookDao {
    @Select("select id, type, name, description from tbl_book where id = #{id}")
    Book findBookById(Integer id);

    List<Book> findAllBook();
}
如果接口上省略@Mapper注解,那么启动项目后出现异常错误
-
解决方案:在引导类上添加
@MapperScan注解@SpringBootApplication @MapperScan("com.itheima.dao") //批量加载Mapper接口 (推荐) public class SpringbootMybatisApplication { public static void main(String[] args) { SpringApplication.run(SpringbootMybatisApplication.class, args); } }
细节4:驼峰命名映射、别名
-
#Mybatis配置
mybatis:
  type-aliases-package: com.itheima.domain  #扫描指定包下的类,并取别名

  configuration:
    map-underscore-to-camel-case: true  #开启驼峰命名映射( user_name => username )
14_整合Mybatis的分页插件
目标
- 能够在SpringBoot环境下添加Mybatis分页插件,实现分页查询
路径
- 传统分页查询的弊端
- 整合Mybatis分页插件
- 使用Mybatis分页插件实现分页查询
传统分页查询的弊端
分页查询,是在企业开发中是最常用的技术之一
之前学习Mybatis时,使用的分页查询技术:limit
//SQL语句:
     select * from  表 ...  LIMIT 起始位置,查询条数
//要计算起始位置
     起始位置 = (页码-1)*查询条数
存在的弊端:
- 如果更换数据库,就无法使用limit方式进行分页查询。 例:Oracle数据库中没有limit
解决方案:
- 使用第三方组织已经封装好的分页组件(如:PageHelper)
整合Mybatis分页插件
整合Mybatis分页插件步骤:
-
添加mybatis页面插件依赖
<dependency> <groupId>com.github.pagehelper</groupId> <artifactId>pagehelper-spring-boot-starter</artifactId> <version>1.4.1</version> </dependency> -
配置分页插件
#配置分页插件
pagehelper:
  # mysql支持的方言
  helperDialect: mysql
  # sql合理化
  reasonable: true
使用Mybatis分页插件实现分页查询
PageHelper:第三方分页助手。将复杂的分页操作进行封装,从而让分页功能变得非常简单
- 需要明确当前是第几页,这一页中显示多少条结果
代码示例:
@SpringBootTest
public class SpringBootMybatisTest {
    @Autowired
    private BookDao bookDao;

    @Test
    public void testFindBookByPage(){
        //PageHelper:是mybatis的分页插件,简化mybatis的分页开发
        //设置分页: 页码 、 每页条数
        PageHelper.startPage(2,3);

        //执行:查询所有书籍功能
        List<Book> allBook = bookDao.findAllBook(); //切入点

        //实例化PageInfo对象
        PageInfo<Book> pageInfo = new PageInfo<>(allBook);
        //获取总记录数
        long total = pageInfo.getTotal();
        //获取总页数
        int pages = pageInfo.getPages();
        //获取当前页
        int pageNum = pageInfo.getPageNum();
        //获取当前页数据
        List<Book> bookList = pageInfo.getList();

        for (Book book : bookList) {
            System.out.println(book);
        }
    }
}
15_SpringBoot整合SSM小结
SpringBoot整合SSM的步骤:
-
在pom.xml文件中添加依赖
web场景: spring和springmvc mybatis场景: mybatis mysql驱动 druid连接池 -
在application.yml文件中设置数据源
-
编写dao层
Mapper接口上添加@Mapper 或 在启动类上添加@MapperScan -
静态资源
放置在resources目录下的static目录中
SpringBoot应用
- springboot是快速构建spring应用的脚手架
- springboot提供了场景启动器 (场景启动器自己封装了配置,开发者可以少做配置)
- 开发者导入场景依赖时,不需要关心有哪些jar包以及什么版本号
- springboot封装了一些常用的场景(50个左右)
- spring-boot-stater-场景名
- 场景名:web 、 test 、.....
- spring-boot-stater-场景名
- springboot也提供了开发场景启动器的规范
- 场景名-spring-boot-starter
- Mybatis参照规范自定义了自己的场景:mybatis-spring-boot-starter
- Druid、PageHelper等场景
- 场景名-spring-boot-starter
- springboot使用约定大于配置的理念
- springboot帮开发者封装了常见的配置,让开发者省略很多默认的配置
我们之前使用SpringBoot整合SSM框架时,根本没有用到:Spring配置文件、SpringMVC配置文件
16_SpringBoot自动装配原理
目标
- 了解SpringBoot自动装配原理
路径
- 什么是自动装配
- SpringBoot自动装配原理
什么是自动装配
问题:场景启动器starter的底层封装了配置,那么springboot是如何自动加载它们?
答案:Springboot的自动装配
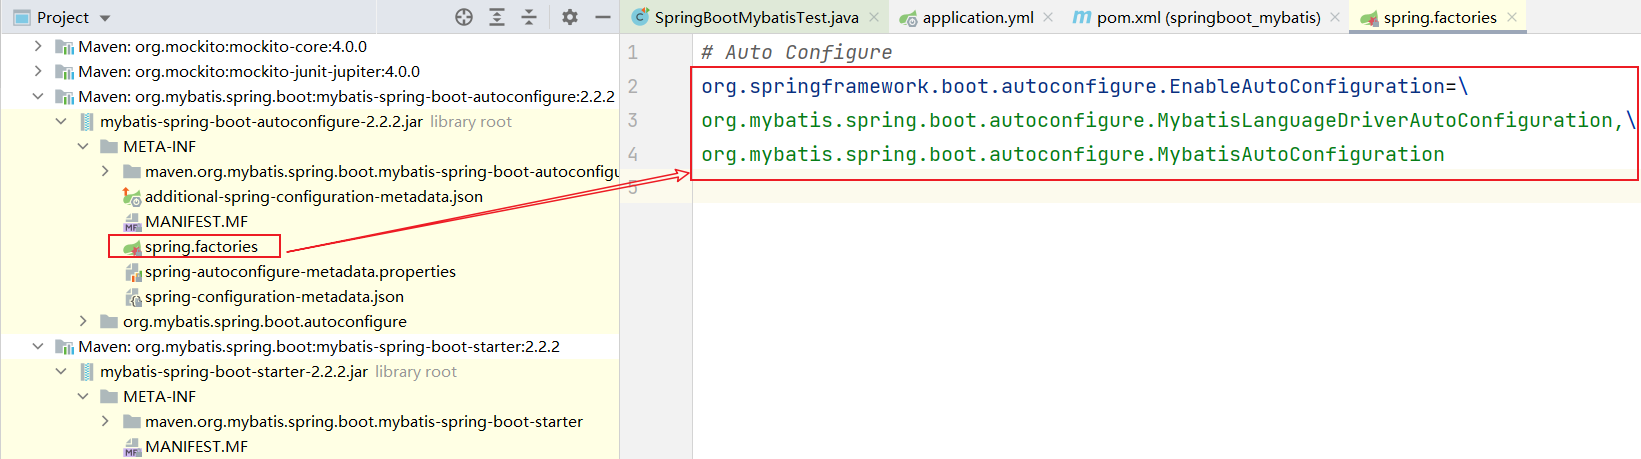
SpringBoot定义了一套接口规范,这套规范规定:SpringBoot 在启动时会扫描外部引用 jar 包中的META-INF/spring.factories文件(类似于SPI机制),将文件中配置的类型信息加载到 Spring 容器,并执行类中定义的各种操作。
- 对于外部jar来说,只需要按照SpringBoot定义的标准,就能将自己的功能装置进SpringBoot
没有Spring Boot的情况下,如果我们需要引入第三方依赖,需要手动配置,非常麻烦。但是在SpringBoot 中,我们直接引入一个 starter 即可。
比如你想要在项目中使用 redis 的话,直接在项目中引入对应的 starter 即可
<dependency>
    <groupId>org.springframework.boot</groupId>
    <artifactId>spring-boot-starter-data-redis</artifactId>
</dependency>
引入starter之后,通过少量注解和一些简单的配置就能使用第三方组件提供的功能了
自动装配可以简单理解为:通过注解或者一些简单的配置就能在Spring Boot的帮助下实现某块功能
SpringBoot自动装配原理
SpringBoot启动类:
@SpringBootApplication //SpringBootApplication是SpringBoot的核心注解(复合注解)
public class App {
    public static void main(String[] args) {
        /*
          run(Class cls , String[] args)
          参数1:有@SpringBootApplication注解的类的Class对象
                目的:为了让SpringBoot底层解析@@SpringBootApplication
          参数2:命令行启动时传入的参数。最终要给SpringBoot
        */
        SpringApplication.run(App.class, args);
    }
}
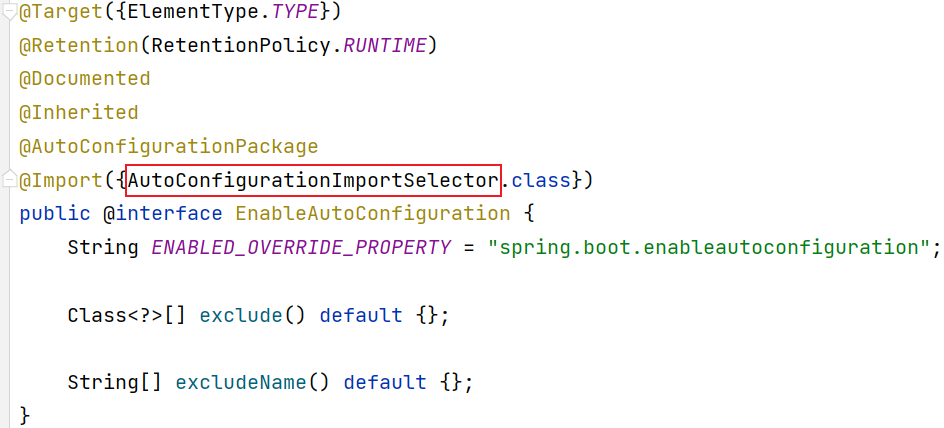
要搞清楚SpringBoot的自动装配原理,要从SpringBoot的核心注解@SpringBootApplication开始分析,下面有张图, 包含了这个注解的核心内容:

@SpringBootApplication注解属于复合注解,包含:
- @SpringBootConfiguration:标识是一个配置类(是对@Configuration注解的包装)
- 允许在上下文中注册额外的bean或导入其他配置类
- @EnableAutoConfiguration:启用SpringBoot的自动配置机制
- @ComponentScan:组件扫描
- 默认扫描的规则:引导类所在的包及其子包所有带Spring注解的类
- 扫描被@Component(@Service、@Controller)注解的 bean
@EnableAutoConfiguration是实现自动装配的重要注解,我们从这个注解入手分析:
-
@EnableAutoConfiguration 只是一个简单地注解,自动装配核心功能的实现实际是通过AutoConfigurationImportSelector类
-
AutoConfigurationImportSelector的
selectImports()方法会读所有SpringBoot Starter下的META-INF/spring.factories文件(SPI机制)- selectImports()方法底层调用getAutoConfigurationEntry()方法
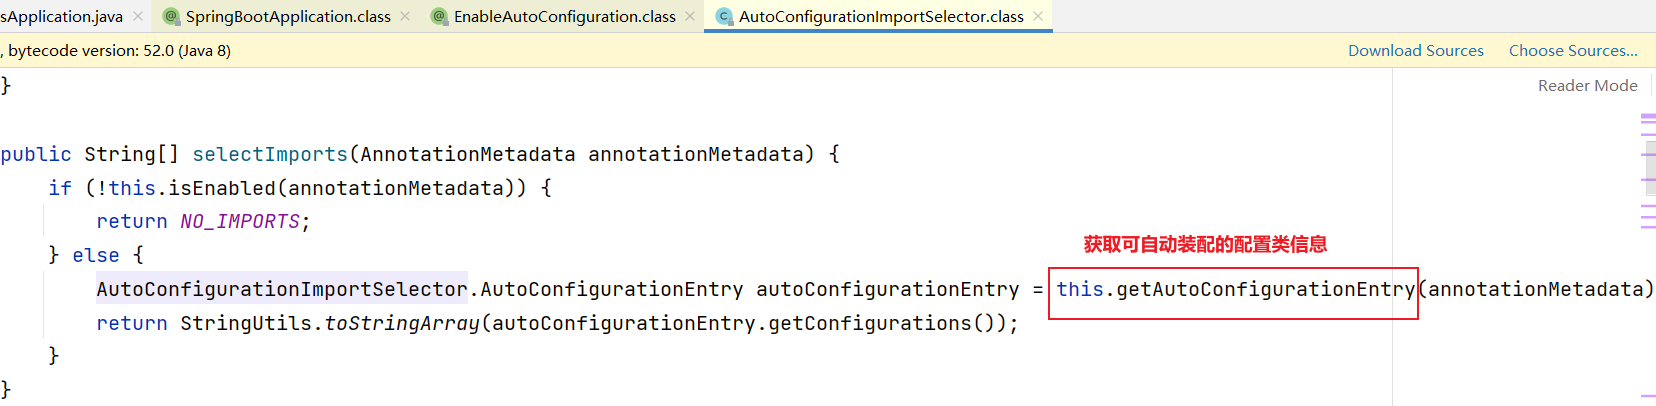
- getAutoConfigurationEntry()方法调用getCandidateConfigurations(annotationMetadata, attributes)方法获取所有基于META-INF/spring.factories文件下的自动配置类的集合
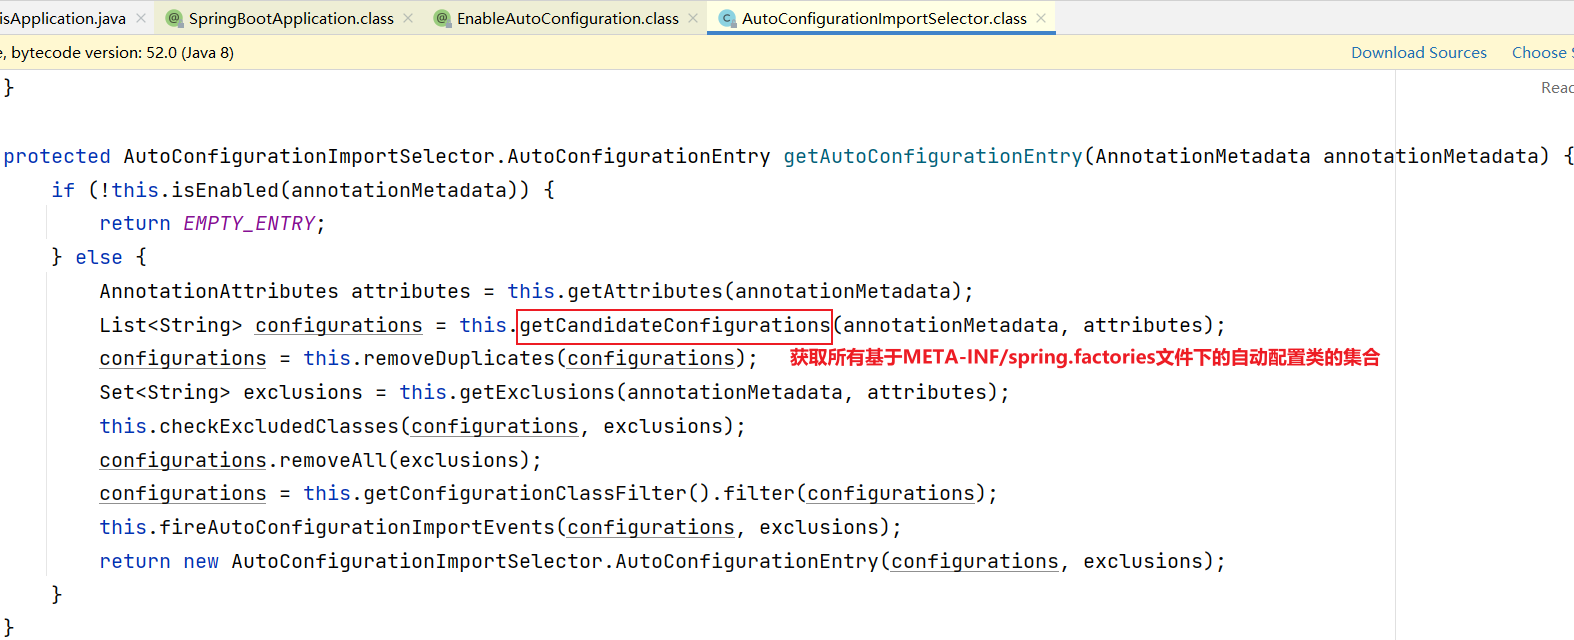
- getCandidateConfigurations方法底层利用Spring工厂加载器调用loadSpringFactories()方法扫描当前系统中所有META-INF/spring.factories文件,并加载获取自动配置类信息
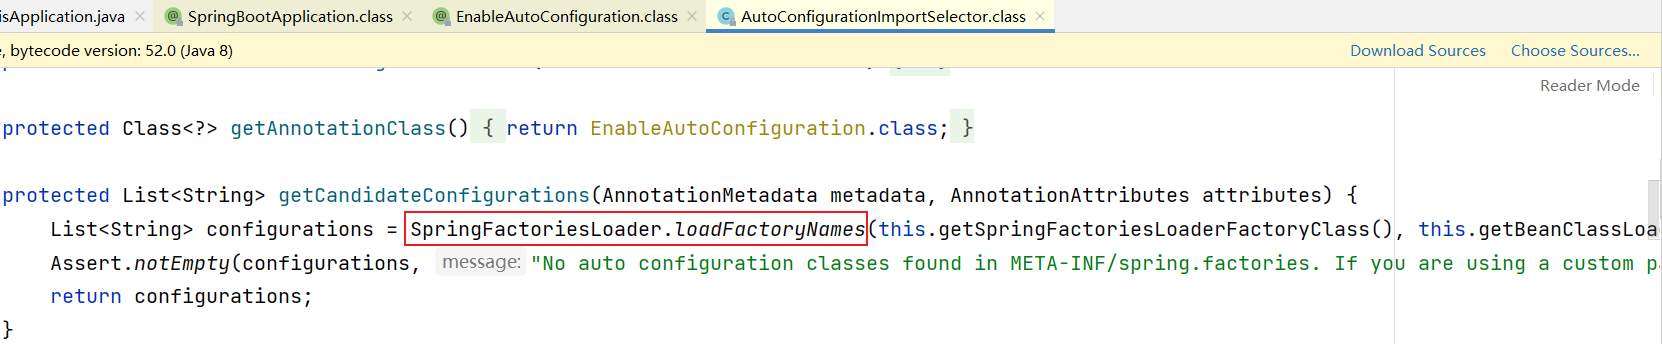
默认扫描当前系统里面所有META-INF/spring.factories位置的文件
说明:在spring.factories中有很多配置,但是只有满足一定条件的配置才会被自动装配
- 举例:添加Mybatis场景依赖,查看底层装配信息
小结
问题1:SpringBoot默认自动加载的配置文件路径是哪里?
答案
当前项目系统路径下的所有META-INF/spring.factories文件问题2:简述SpringBoot自动装配流程?
答案
1. 通过@Import注解调用AutoConfigurationImportSelector类中的selectImports方法;2. selectImports方法底层调用getAutoConfigurationEntry()方法获取可自动装配的配置类信息集合;
3. getAutoConfigurationEntry()方法调用getCandidateConfigurations(annotationMetadata, attributes)方法获取所有基于META-INF/spring.factories文件下的自动配置类的集合;
4. 底层利用Spring工厂加载器调用 loadSpringFactories()方法扫描当前系统中所有META-INF/spring.factories文件,并加载获取自动配置类信息;
5.根据@Conditional条件过滤,获取最终自动装配类,最后被IOC容器加载;
17_SpringBoot自定义starter
目标
- 能够自定义starter场景启动依赖,并成功集成到新项目
路径
- 自定义starter场景步骤
- 自定义starter场景实现
- 测试使用自定义starter场景
自定义starter场景步骤
既然明白了SpringBoot自动装配的原理,那么我们可以自己写一个starter玩一玩
自定义starter场景的步骤:
- 创建starter场景工程
- 导入坐标:spring-boot-autoconfigure
- 编写自定义类
- 编写配置文件:spring.factories
- 在resources下定义META-INF/spring.factories文件
- 安装到本地仓库
- 测试使用
自定义starter场景实现
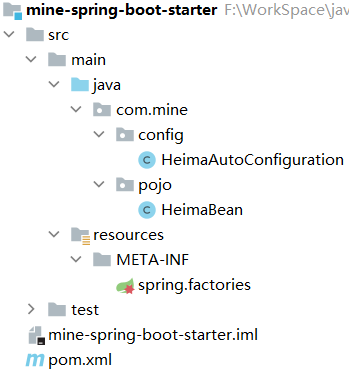
步骤1:创建starter场景工程
-
自定义starter的命名规则: xxx-spring-boot-starter
- SpringBoot官方提供的starter以:
spring-boot-starter-xxx的方式命名 - 官方建议自定义的starter使用:
xxx-spring-boot-starter命名规则- 用以区分SpringBoot生态提供的starter
- SpringBoot官方提供的starter以:
步骤2:导入坐标
<dependencies>
    <dependency>
        <groupId>org.springframework.boot</groupId>
        <artifactId>spring-boot-autoconfigure</artifactId>
        <version>2.6.7</version>
    </dependency>
</dependencies>
步骤3:编写自定义类
- HeimaBean
//使用@ConfigurationProperties   注解的类生效
@EnableConfigurationProperties(HeimaBean.class)
@ConfigurationProperties(prefix ="heimabean") //prefix 在application.yml文件中体现
public class HeimaBean {
    private int id;
    private String name;

    public int getId() {
        return id;
    }

    public void setId(int id) {
        this.id = id;
    }

    public String getName() {
        return name;
    }

    public void setName(String name) {
        this.name = name;
    }
}
- HeimaAutoConfiguration
@Configuration
public class HeimaAutoConfiguration {
    @Bean
    public HeimaBean getHeimaBean(){
        return new HeimaBean();
    }
}
步骤4:编写配置文件(spring.factories)
- 在resources下定义META-INF/spring.factories文件,并配置自动装配信息,让SpringBoot自动加载
org.springframework.boot.autoconfigure.EnableAutoConfiguration=\
com.mine.config.HeimaAutoConfiguration
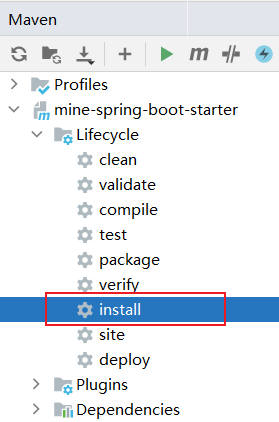
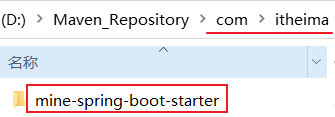
步骤5:安装到本地库
- 到步骤4为止,我们的自定义starter就算是写完了。接着就是使用maven安装到本地仓库,方便其它工程引用
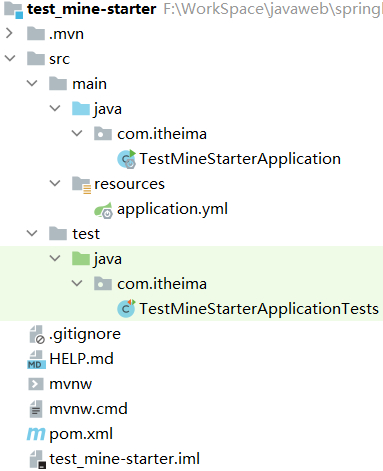
测试使用自定义starter场景
新建一个springboot工程,来测试自定义的starter场景
导入依赖:
 <dependencies>
        <dependency>
            <groupId>org.springframework.boot</groupId>
            <artifactId>spring-boot-starter</artifactId>
        </dependency>

        <dependency>
            <groupId>org.springframework.boot</groupId>
            <artifactId>spring-boot-starter-test</artifactId>
            <scope>test</scope>
        </dependency>

        <!--导入自定义starter-->
        <dependency>
            <groupId>com.itheima</groupId>
            <artifactId>mine-spring-boot-starter</artifactId>
            <version>1.0-SNAPSHOT</version>
        </dependency>

</dependencies>
编写配置文件:application.yml
heimabean:
  id: 1
  name: itheima
测试类:
@SpringBootTest
class TestMineStarterApplicationTests {

    @Autowired
    private HeimaBean heimaBean;

    @Test
    void contextLoads() {
        System.out.println(heimaBean.getName());
    }
}
//运行结果:
itheima
附录:MySQL 8.0的url连接字符串
在SpringBoot中,默认引入的MySQL驱动包是8版本
# 配置数据源
spring:
  datasource:
    username: root
    password: root
    url: jdbc:mysql://localhost:3306/ssm_db?serverTimezone=UTC  #mysql8.0字符串
    driver-class-name: com.mysql.cj.jdbc.Driver  #mysql8.0驱动

附录:Mybatis使用PageHelper实现分页查询
PageHelper
在企业级开发中,分页也是一种常见的技术。而目前使用的MyBatis是不带分页功能的,如果想实现分页的功能,需要我们手动编写LIMIT语句。但是不同的数据库实现分页的SQL语句也是不同的,所以手写分页成本较高。这个时候就可以借助分页插件来帮助我们实现分页功能。
PageHelper:第三方分页助手。将复杂的分页操作进行封装,从而让分页功能变得非常简单
- 需要明确当前是第几页,这一页中显示多少条结果。
分页插件的使用
MyBatis可以使用第三方的插件来对功能进行扩展,分页助手PageHelper是将分页的复杂操作进行封装,使用简单的方式即可获得分页的相关数据
开发步骤:
1、导入与PageHelper的jar包 (第三方开发的)
2、在mybatis核心配置文件中配置PageHelper插件
<!-- 配置插件 -->
<plugins>
    <!-- 注意:分页助手的插件  配置在通用mapper之前 -->
    <plugin interceptor="com.github.pagehelper.PageInterceptor">
        <!-- 使用MySQL方言的分页 -->
        <property name="helperDialect" value="mysql"/><!--如果使用oracle,这里value为oracle-->
    </plugin>
</plugins>
3、分页数据获取
@Test
public void testPageHelper(){
    //设置分页参数
    PageHelper.startPage(1,3); //第1页, 每页显示3条数据

    //省略....

    //调用Mapper接口中的方法,查询所有用户信息
    List<User> userList = userMapper.queryAllUsers();


    for(User user : userList){
        System.out.println(user);
    }
}
分页插件的参数获取
//其他分页的数据
PageInfo<User> pageInfo = new PageInfo<User>(userList);
System.out.println("总条数:"+pageInfo.getTotal());
System.out.println("总页数:"+pageInfo.getPages());
System.out.println("当前页:"+pageInfo.getPageNum());
System.out.println("每页显示长度:"+pageInfo.getPageSize());
System.out.println("是否第一页:"+pageInfo.isIsFirstPage());
System.out.println("是否最后一页:"+pageInfo.isIsLastPage());
System.out.println("查询的数据:");
List<User> users = pageInfo.getList();
for(User user : users){
    System.out.println(user);
}
分页插件知识小结
分页:可以将很多条结果进行分页显示
-
分页插件jar包: pagehelper-5.1.10.jar、 jsqlparser-3.1.jar
-
在MyBatis核心配置文件中使用
标签集成PageHelper插件 -
分页助手相关API
1.PageHelper:分页助手功能类
- startPage():设置分页参数 (静态方法)
- PageInfo:分页相关参数功能类
- getTotal():获取总条数
- getPages():获取总页数
- getPageNum():获取当前页
- getPageSize():获取每页显示条数
- getPrePage():获取上一页
- getNextPage():获取下一页
- isIsFirstPage():获取是否是第一页
- isIsLastPage():获取是否是最后一页
- getList():获取查询的数据
使用PageHelper实现分页
前置操作
-
导入PageHelper所需的jar文件到当前项目工程
-
在mybatis核心配置文件中添加PageHelper插件
<?xml version="1.0" encoding="UTF-8" ?>
<!DOCTYPE configuration
        PUBLIC "-//mybatis.org//DTD Config 3.0//EN"
        "http://mybatis.org/dtd/mybatis-3-config.dtd">
<configuration>
    <!--加载外部的配置文件-->
    <properties resource="db.properties"></properties>

    <!--别名-->
    <typeAliases>
        <package name="com.itheima.sh.domain"></package>
    </typeAliases>


    <!-- 配置插件 -->
    <plugins>
        <!-- 注意:分页助手的插件  配置在通用mapper之前 -->
        <plugin interceptor="com.github.pagehelper.PageInterceptor">
            <!-- 使用MySQL方言
                 如果使用oracle,这里value为oracle
            -->
            <property name="helperDialect" value="mysql"/>
        </plugin>
    </plugins>


    <!--mybatis环境的配置
        一个核心配置文件,可以配置多个运行环境,default默认使用哪个运行环境
    -->
    <environments default="development">
        <!--id是环境的名字 -->
        <environment id="development">
            <!--事务管理器:由JDBC来管理-->
            <!--
                事务管理器type的取值:
                1. JDBC:由JDBC进行事务的管理
                2. MANAGED:事务由容器来管理,后期学习Spring框架的时候,所有的事务由容器管理
            -->
            <transactionManager type="JDBC"/>
            <!--数据源的配置:mybatis自带的连接池-->
            <!--
                数据源:
                1. POOLED:使用mybatis创建的连接池
                2. UNPOOLED:不使用连接池,每次自己创建连接
                3. JNDI:由服务器提供连接池的资源,我们通过JNDI指定的名字去访问服务器中资源。
            -->
            <dataSource type="POOLED">
                <property name="driver" value="${jdbc.driver}"/>
                <property name="url" value="${jdbc.url}"/>
                <property name="username" value="${jdbc.username}"/>
                <property name="password" value="${jdbc.password}"/>
            </dataSource>
        </environment>
    </environments>

    <!--映射器-->
    <mappers>
        <package name="com.itheima.sh.dao"></package>
    </mappers>
</configuration>
dao层:UserMapper
public interface UserMapper {
    //查询所有用户
    @Select("select id,name,sex,age,address,qq,email from t_user where isdelete=0")
    List<User> queryAllUsers();
}
service层:UserService
    /**
     * 功能: 分页查询用户数据
     * @param currentPage    页码
     * @return
     */
    public PageInfo<User> findUserByPage(int currentPage) {

        int pageSize = 5; //每页显示条数

        //获取UserMapper的代理类对象
        SqlSession session = SessionFactoryUtils.getSession();
        UserMapper userMapper = session.getMapper(UserMapper.class);

        //设置分页查询
        PageHelper.startPage(currentPage,pageSize);

        //执行UserMapper中的方法: 查询所有用户
        List<User> users = userMapper.queryAllUsers();

        //释放资源
        session.close();

        //实例化PageInfo对象
        PageInfo<User> pageInfo = new PageInfo<>(users);
        //System.out.println("总记录数:"+ pageInfo.getTotal());
        //System.out.println("总页数:"+pageInfo.getPages());
        //System.out.println("当前页:"+pageInfo.getPageNum());
        //System.out.println("每页显示长度:"+pageInfo.getPageSize());
        //System.out.println("是否第一页:"+pageInfo.isIsFirstPage());
        //System.out.println("是否最后一页:"+pageInfo.isIsLastPage());
        //System.out.println("查询数据:");
        //List<User> userList = pageInfo.getList();
        //for(User user : userList){
        //    System.out.println(user);
        //}

        return pageInfo;//返回PageInfo对象
    }
web层 - 控制器:PageServlet
@WebServlet("/page")
public class PageServlet extends HttpServlet {
    protected void doPost(HttpServletRequest request, HttpServletResponse response) throws ServletException, IOException {
        doGet(request, response);
    }

    protected void doGet(HttpServletRequest request, HttpServletResponse response) throws ServletException, IOException {

        //获取当前页码
        String currentPage = request.getParameter("currentPage");

        int curPage = 1;    //第一次获取用户数据时,没有发送当前页码 (初始化为1)

        //有获取到当前页码
        if (currentPage != null) {
            curPage = Integer.parseInt(currentPage);
        }

        //实例化service层
        UserService userService = new UserService();
        //调用业务层功能:分页查询用户数据
        PageInfo<User> pageInfo = userService.findUserByPage(curPage);

        //请求域对象中存储:分页信息对象(含查询的用户数据)
        request.setAttribute("pageInfo", pageInfo);

        //转发
        request.getRequestDispatcher("/pageList.jsp").forward(request, response);
    }
}
web层 - 视图:pageList.jsp
<%@ page contentType="text/html;charset=UTF-8" language="java" %>
<%@ taglib prefix="c" uri="http://java.sun.com/jsp/jstl/core" %>
<!DOCTYPE html>
<!-- 网页使用的语言 -->
<html lang="zh-CN">
<head>
<!-- 指定字符集 -->
<meta charset="utf-8">
<!-- 使用Edge最新的浏览器的渲染方式 -->
<meta http-equiv="X-UA-Compatible" content="IE=edge">
<!-- viewport视口:网页可以根据设置的宽度自动进行适配,在浏览器的内部虚拟一个容器,容器的宽度与设备的宽度相同。
width: 默认宽度与设备的宽度相同
initial-scale: 初始的缩放比,为1:1 -->
<meta name="viewport" content="width=device-width, initial-scale=1">
<!-- 上述3个meta标签*必须*放在最前面,任何其他内容都*必须*跟随其后! -->
<title>用户信息管理系统</title>
<!-- 1. 导入CSS的全局样式 -->
<link href="css/bootstrap.min.css" rel="stylesheet">
<!-- 2. jQuery导入,建议使用1.9以上的版本 -->
<script src="js/jquery-2.1.0.min.js"></script>
<!-- 3. 导入bootstrap的js文件 -->
<script src="js/bootstrap.min.js"></script>
<style type="text/css">
td, th {
text-align: center;
}
</style>
</head>
<body>
<div class="container">
<h3 style="text-align: center">用户信息列表</h3>
<div style="float: left;">
<%-- 搜索 --%>
<input id="keyword" type="text" name="keyword">
<input class="btn btn-default btn-sm" type="button" value="搜索" onclick="searchKey()">
</div>
<div style="float: right;">
<%-- 新增联系人 --%>
<a class="btn btn-primary" href="add.jsp">添加联系人</a>
</div>
<table border="1" class="table table-bordered table-hover">
<tr class="success">
<th>编号</th>
<th>姓名</th>
<th>性别</th>
<th>年龄</th>
<th>籍贯</th>
<th>QQ</th>
<th>邮箱</th>
<th>操作</th>
</tr>
<c:forEach items="${requestScope.pageInfo.list}" var="user">
<tr>
<td>${user.id}</td>
<td>${user.name}</td>
<td>${user.sex}</td>
<td>${user.age}</td>
<td>${user.address}</td>
<td>${user.qq}</td>
<td>${user.email}</td>
<td>
<a class="btn btn-default btn-sm" href="update.jsp">修改</a>
<a class="btn btn-default btn-sm" href="">删除</a>
</td>
</tr>
</c:forEach>
<tr>
<td colspan="8" align="right">
<%--
分页栏
--%>
<nav>
<ul class="pagination">
<%-- 上一页 --%>
<c:if test="${requestScope.pageInfo.isFirstPage == true}">
<li class="disabled">
<a href="#">
<span>«</span>
</a>
</li>
</c:if>
<c:if test="${requestScope.pageInfo.isFirstPage == false}">
<li>
<a href="/page?currentPage=${requestScope.pageInfo.prePage}">
<span>«</span>
</a>
</li>
</c:if>
<%-- 页码显示区
begin="1" 表示从第一页开始
end="最后一页"
var="num" 表示每一页
--%>
<c:forEach begin="1" end="${requestScope.pageInfo.pages}" var="num">
<c:if test="${requestScope.pageInfo.pageNum == num}">
<li class="active">
<span style="background-color: blue">${num}</span>
</li>
</c:if>
<c:if test="${requestScope.pageInfo.pageNum != num}">
<li class="active">
<a href="/page?currentPage=${num}">${num}</a>
</li>
</c:if>
</c:forEach>
<%-- 下一页 --%>
<c:if test="${requestScope.pageInfo.isLastPage==true}">
<li class="disabled">
<a href="#">
<span>»</span>
</a>
</li>
</c:if>
<c:if test="${requestScope.pageInfo.isLastPage==false}">
<li>
<a href="/page?currentPage=${requestScope.pageInfo.nextPage}">
<span>»</span>
</a>
</li>
</c:if>
</ul>
</nav>
</td>
</tr>
</table>
</div>
</body>
</html>

 浙公网安备 33010602011771号