微信小程序自定义Tabbar,附详细源码
1,前言
分享一个完整的微信小程序自定义Tabbar,tabbar按钮可以设置为跳转页面,也可以设置为功能按钮。懒得看文字的可以直接去底部,博主分享了GitHub地址。
2,说明
由于微信小程序自带的Tabbar功能比较单一,比如要做到中间是一个突出的圆形扫一扫按钮,就需要自定义Tabbar了。

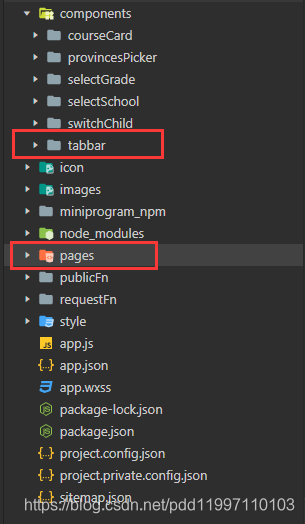
博主创建了一个Tabbar组件,自己写的样式,在需要用到的页面引入组件。
组件使用了position: fixed定位到底部,所以在用到组件的页面,需要给page加上margin-bottom样式。
交互是通过在组件上定义的bindtap事件,来进行跳转页面或者触发功能模块,其中路由跳转是用的wx.switchTab。事件以及传参可以通过triggerEvent;
3,核心代码
文件目录

引用组件
//在页面json中
{
  "usingComponents": {
    "Tabbar":"../../components/tabbar/tabbar"
  }
}
//在wxml中
<Tabbar nowIndex="0" bind:switchDialog="switchDialog"/>
组件的data
data: {
  tabbarList:[
    {
      index:0,
      pagePath:'../index/index',
      title:"首页",
      icon: "../../images/home.png",
      onIcon: "../../images/home1.png",
      color: "#9B9B9B",
      onColor: "#19C29C",
    },
    {
      index:1,
      pagePath:'',
      icon: "../../images/look.png",
      onIcon: "../../images/look.png",
    },
    {
      index:2,
      pagePath:'../userCenter/userCenter',
      title:"个人中心",
      icon: "../../images/my.png",
      onIcon: "../../images/my1.png",
      color: "#9B9B9B",
      onColor: "#19C29C",
    }
  ],
}
组件的路由跳转
// 切换
changePage(e){
  let { path,index } = e.currentTarget.dataset;
  if(index === 1){
    this.chickLook();
    return false;
  };
  wx.switchTab({
    url: path
  });
}
源码GitHub地址:https://github.com/pdd11997110103/ComponentWarehouse
如果看了觉得有帮助的,我是@上进的鹏多多,欢迎 点赞 关注 评论;
END
往期文章
个人主页
接受失败,但不选择放弃!


 浙公网安备 33010602011771号