golang slice 源码解读
本文从源码角度学习 golang slice 的创建、扩容,深拷贝的实现。
内部数据结构
slice 仅有三个字段,其中array 是保存数据的部分,len 字段为长度,cap 为容量。
type slice struct {
  array unsafe.Pointer  // 数据部分
  len   int          // 长度
  cap   int             // 容量
}
通过下面代码可以输出空slice 的大小:
package main

import "fmt"
import "unsafe"

func main() {
  data := make([]int, 0, 3)

  // 24  len:8, cap:8, array:8
  fmt.Println(unsafe.Sizeof(data))

    // 我们通过指针的方式,拿到数组内部结构的字段值
  ptr := unsafe.Pointer(&data)
  opt := (*[3]int)(ptr)

  // addr, 0, 3
  fmt.Println(opt[0], opt[1], opt[2])

    data = append(data, 123)

    fmt.Println(unsafe.Sizeof(data))

    shallowCopy := data[:1]

    ptr1 := unsafe.Pointer(&shallowCopy)

    opt1 := (*[3]int)(ptr1)

    fmt.Println(opt1[0])
}
创建
创建一个slice,其实就是分配内存。cap, len 的设置在汇编中完成。

下面的代码主要是做了容量大小的判断,以及内存的分配。
func makeslice(et *_type, len, cap int) unsafe.Pointer {
  // 获取需要申请的内存大小
  mem, overflow := math.MulUintptr(et.size, uintptr(cap))
  if overflow || mem > maxAlloc || len < 0 || len > cap {
    mem, overflow := math.MulUintptr(et.size, uintptr(len))
    if overflow || mem > maxAlloc || len < 0 {
      panicmakeslicelen()
    }
    panicmakeslicecap()
  }

  // 分配内存
  // 小对象从当前P 的cache中空闲数据中分配
  // 大的对象 (size > 32KB) 直接从heap中分配
  // runtime/malloc.go
  return mallocgc(mem, et, true)
}
append
对于不需要内存扩容的slice,直接数据拷贝即可。

上面的DX 存放的就是array 指针,AX 是数据的偏移. 将 123 存入数组。
而对于容量不够的情况,就需要对slice 进行扩容。这也是slice 比较关心的地方。 (因为对于大slice,grow slice会影响到内存的分配和执行的效率)
func growslice(et *_type, old slice, cap int) slice {
    // 静态分析, 内存扫描
    // ...

  if cap < old.cap {
    panic(errorString("growslice: cap out of range"))
  }

    // 如果存储的类型空间为0,  比如说 []struct{}, 数据为空,长度不为空
  if et.size == 0 {
    return slice{unsafe.Pointer(&zerobase), old.len, cap}
  }

  newcap := old.cap
  doublecap := newcap + newcap
  if cap > doublecap {
        // 如果新容量大于原有容量的两倍,则直接按照新增容量大小申请
    newcap = cap
  } else {
    if old.len < 1024 {
            // 如果原有长度小于1024,那新容量是老容量的2倍
      newcap = doublecap
    } else {
            // 按照原有容量的1/4 增加,直到满足新容量的需要
      for 0 < newcap && newcap < cap {
        newcap += newcap / 4
      }
            // 通过校验newcap 大于0检查容量是否溢出。
      if newcap <= 0 {
        newcap = cap
      }
    }
  }

  var overflow bool
  var lenmem, newlenmem, capmem uintptr
    // 为了加速计算(少用除法,乘法)
    // 对于不同的slice元素大小,选择不同的计算方法
    // 获取需要申请的内存大小。

  switch {
  case et.size == 1:
    lenmem = uintptr(old.len)
    newlenmem = uintptr(cap)
    capmem = roundupsize(uintptr(newcap))
    overflow = uintptr(newcap) > maxAlloc
    newcap = int(capmem)
  case et.size == sys.PtrSize:
    lenmem = uintptr(old.len) * sys.PtrSize
    newlenmem = uintptr(cap) * sys.PtrSize
    capmem = roundupsize(uintptr(newcap) * sys.PtrSize)
    overflow = uintptr(newcap) > maxAlloc/sys.PtrSize
    newcap = int(capmem / sys.PtrSize)
  case isPowerOfTwo(et.size):
        // 二的倍数,用位移运算
    var shift uintptr
    if sys.PtrSize == 8 {
      // Mask shift for better code generation.
      shift = uintptr(sys.Ctz64(uint64(et.size))) & 63
    } else {
      shift = uintptr(sys.Ctz32(uint32(et.size))) & 31
    }
    lenmem = uintptr(old.len) << shift
    newlenmem = uintptr(cap) << shift
    capmem = roundupsize(uintptr(newcap) << shift)
    overflow = uintptr(newcap) > (maxAlloc >> shift)
    newcap = int(capmem >> shift)
  default:
    // 其他用除法
    lenmem = uintptr(old.len) * et.size
    newlenmem = uintptr(cap) * et.size
    capmem, overflow = math.MulUintptr(et.size, uintptr(newcap))
    capmem = roundupsize(capmem)
    newcap = int(capmem / et.size)
  }

    // 判断是否会溢出
  if overflow || capmem > maxAlloc {
    panic(errorString("growslice: cap out of range"))
  }

    // 内存分配

  var p unsafe.Pointer
  if et.kind&kindNoPointers != 0 {
    p = mallocgc(capmem, nil, false)
        // 清空不需要数据拷贝的部分内存
    memclrNoHeapPointers(add(p, newlenmem), capmem-newlenmem)
  } else {
    // Note: can't use rawmem (which avoids zeroing of memory), because then GC can scan uninitialized memory.
    p = mallocgc(capmem, et, true)
    if writeBarrier.enabled {   // gc 相关
      // Only shade the pointers in old.array since we know the destination slice p
      // only contains nil pointers because it has been cleared during alloc.
      bulkBarrierPreWriteSrcOnly(uintptr(p), uintptr(old.array), lenmem)
    }
  }

    // 数据拷贝
  memmove(p, old.array, lenmem)

  return slice{p, old.len, newcap}
}
切片拷贝 (copy)
切片的浅拷贝
    shallowCopy := data[:1]

    ptr1 := unsafe.Pointer(&shallowCopy)

    opt1 := (*[3]int)(ptr1)

    fmt.Println(opt1[0])
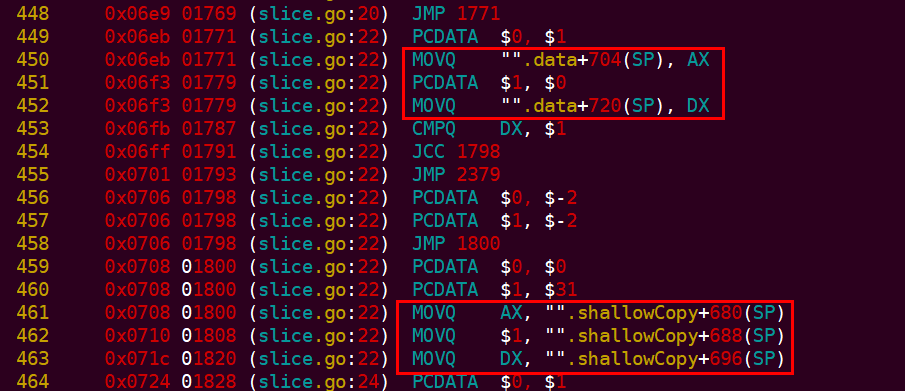
下面是上述代码的汇编代码:

上面,先将 data 的成员数据拷贝到寄存器,然后从寄存器拷贝到shallowCopy的对象中。(注意到只是拷贝了指针而已, 所以是浅拷贝)
切片的深拷贝
深拷贝也比较简单,只是做了一次内存的深拷贝。
func slicecopy(to, fm slice, width uintptr) int {
  if fm.len == 0 || to.len == 0 {
    return 0
  }

  n := fm.len
  if to.len < n {
    n = to.len
  }

    // 元素大小为0,则直接返回
  if width == 0 {
    return n
  }

    // 竟态分析和内存扫描
    // ...

  size := uintptr(n) * width
    // 直接内存拷贝
  if size == 1 { // common case worth about 2x to do here
    *(*byte)(to.array) = *(*byte)(fm.array) // known to be a byte pointer
  } else {
    memmove(to.array, fm.array, size)
  }
  return n
}

// 字符串slice的拷贝
func slicestringcopy(to []byte, fm string) int {
  if len(fm) == 0 || len(to) == 0 {
    return 0
  }

  n := len(fm)
  if len(to) < n {
    n = len(to)
  }

    // 竟态分析和内存扫描
    // ...

  memmove(unsafe.Pointer(&to[0]), stringStructOf(&fm).str, uintptr(n))
  return n
}
其他
- 汇编的生成方法
go tool compile -N -S slice.go > slice.S
-
需要了解unsafe.Pointer 的使用
-
slice.go 位于 runtime/slice.go
-
上述代码使用 go1.12.5 版本
-
还有一点需要提醒, type 长度为0的对象。比如说 struct{} 类型。(所以,很多使用chan struct{} 做channel 的传递,节省内存)
package main

import "fmt"
import "unsafe"

func main() {
  var data [100000]struct{}
  var data1 [100000]int

  // 0
  fmt.Println(unsafe.Sizeof(data))
  // 800000
  fmt.Println(unsafe.Sizeof(data1))
}

搬砖程序员带你飞


