
Java 线程的创建和使用
线程与进程
这个涉及到操作系统的知识,可以自行查阅。
创建线程的三种方式
1、继承Thread类
2、实现Runnable接口
3、实现Callable接口
下面对这三种方式进行举例说明。
方式1:继承Thread类
注意事项:
1、某个类,继承Thread之后,需要重写run()方法,在run()方法中定义要进行的操作。
2、然后实例化该类,通过对象调用start()方法,那么在run方法中定义的操作就会开一个线程去执行。
3、如果直接通过对象调用run()方法,则并不会以线程的方式去执行run()方法中定义的操作。
4、可以调用从Thread继承过来的getName()方法,来获取当前线程的名称。
5、因为Java是单继承,所以这种方式并不推荐,因为如果一个类早期继承Thread类之后,之后如果需要继承其他类,则需要进行重构代码,不利于维护。
代码实例
public class Test{
	public static void main(String[] args) {
		Actor act1 = new Actor(1);
		Actor act2 = new Actor(2);
		Actor act3 = new Actor(3);

		act1.start();
		act2.start();
		act3.start();
	}
}

class Actor extends Thread {
	private int i;
	public Actor(int i) {
		this.i= i;
	}
	public void run() {
		System.out.println("run " + this.i + " thread");
	}
}
方式2:实现Runnable接口
注意事项:
1、某个类实现Runnable接口之后,仍旧要重写run()方法,其实Thread类也实现了Runnable接口。
2、通过Thread代理类,调用start()方法,因为Runnable接口中未定义start()方法。
3、实现Runnable接口可以避免单继承一起的问题。
4、通过Thread代理,可以实现资源共享。
代码实例:
public class Test{
	public static void main(String[] args) {
		Actor act1 = new Actor(1);
		Actor act2 = new Actor(2);
		Actor act3 = new Actor(3);

		// Thread类此时是代理类
		Thread t1 = new Thread(act1);
		Thread t2 = new Thread(act2);
		Thread t3 = new Thread(act3);

		t1.start();
		t2.start();
		t3.start();

		// 上面的代码等价于:
		//new Thread(new Actor(4)).start();
	}
}

class Actor implements Runnable{
	private int i;
	public Actor(int i) {
		this.i= i;
	}
	public void run() {
		System.out.println("run " + this.i + " thread");
	}
}
使用匿名类方式
new Thread(new Runnable(){
	@Override
	public void run() {
		for (int i = 0; i < 10; i++) {
			System.out.println("mythread print " + i);
		}
	}
}).start();
使用匿名类 + Lambda方式
new Thread(() -> {
		for (int i = 0; i < 10; i++) {
			System.out.println("mythread print " + i);
		}
}).start();
资源共享的例子:
public class Test{
	public static void main(String[] args) {
		Ticket ticket = new Ticket();

		// 通过多个Thread共享一个ticket对象的数据
		new Thread(ticket, "aaaaaa").start();
		new Thread(ticket, "bbbbbb").start();
		new Thread(ticket, "cccccc").start();
		new Thread(ticket, "dddddd").start();
	}
}

/**
 * Ticket 售票机
 */
class Ticket implements Runnable{
	private int ticket_sum = 100;
	public void run() {
		while (true) {
			if (ticket_sum < 0) {
				break;
			}
			String notice = Thread.currentThread().getName() + " buy ticket number " + this.ticket_sum--;
			System.out.println(notice);
		}
	}
}
模仿龟兔赛跑
public class Demo implements Runnable{
	private static String winner = null;

	@Override
	public void run() {
		for (int step = 1; step <= 100; step++) {
			System.out.println(Thread.currentThread().getName() + " 走了 " + step + " 步");
			if (isOver(step)) {
				break;
			}
			if (Thread.currentThread().getName().equals("兔子") && step % 10 == 0) {
				try {
					Thread.sleep(10);
				} catch (InterruptedException e) {
					e.printStackTrace();
				}
			}
		}
	}

	public boolean isOver(int step) {
		if (this.winner != null) {
			return true;
		} else if (step == 100) {
			winner = Thread.currentThread().getName();
			return true;
		} else {
			return false;
		}
	}

	public static void main(String[] args) {
		Demo d = new Demo();
		new Thread(d, "乌龟").start();
		new Thread(d, "兔子").start();
	}
}
方式3:实现Callable接口
使用Callable的优点:可以抛出异常,可以有返回值(注意Runnable方法的run方法是不能抛出异常,并且返回值为void)。
import java.util.concurrent.Callable;
import java.util.concurrent.ExecutorService;
import java.util.concurrent.Executors;
import java.util.concurrent.Future;

public class Demo implements Callable<Boolean> {

	@Override
	public Boolean call() throws Exception {
		System.out.println(Thread.currentThread().getName());
		return true;
	}

	public static void main(String[] args) throws Exception {
		Demo d1 = new Demo();
		Demo d2 = new Demo();
		Demo d3 = new Demo();

		// 创建执行服务
		ExecutorService ser = Executors.newFixedThreadPool(3);

		// 提交执行
		Future<Boolean> result1 = ser.submit(d1);
		Future<Boolean> result2 = ser.submit(d2);
		Future<Boolean> result3 = ser.submit(d3);

		// 获取结果
		Boolean r1 = result1.get();
		Boolean r2 = result2.get();
		Boolean r3 = result3.get();

		// 关闭服务
		ser.shutdown();
	}
}
理解Java的线程代理类
这其实是一个设计模式:代理模式。可以使用一个简单的代码来理解。
代理类和真实类都实现同一个接口。
public class Demo {
	public static void main(String[] args) {
		new BirthdayCompany(new HappyBirthday("ganlixin")).Congratulation();
	}
}

interface Happy{
	public void Congratulation();
}

//真实的目标
class HappyBirthday implements Happy {
	public String name;

	public HappyBirthday (String name) {
		this.name = name;
	}

	@Override
	public void Congratulation() {
		System.out.println("Happy Birthday To You");
	}
}

//代理类
class BirthdayCompany implements Happy {
	private Happy obj;

	public BirthdayCompany(Happy O) {
		this.obj = O;
	}

	@Override
	public void Congratulation() {
		this.before();
		this.obj.Congratulation();
		this.after();
	}
	public void before () {
		System.out.println("前期准备");
	}
	public void after () {
		System.out.println("后期打扫");
	}
}
利用Lambda表达式来创建线程
使用Lambda表达式的前提条件就是,实现一个接口,该接口中有且仅有1个方法必须被重写。
这里的Runnable接口,刚好需要重写一个run()方法,且只需要重写这1个方法。
所以,可以这样写:
public class Test{
	public static void main(String[] args) {

		// 方式1
		Runnable r = () -> {
			//code....写run()方法中要执行的操作
			System.out.println(Thread.currentThread().getName());
		};
		new Thread(r, "Thread-aaaa").start();

		// 方式2
		new Thread(() -> {
			//code....写run()方法中要执行的操作
			System.out.println(Thread.currentThread().getName());
		}, "Thread-bbbb").start();

	}
}
Thread.sleep()
使用Thread.sleep(millis)可以让当前线程休眠多少毫妙。
sleep()操作会将进程状态从运行态转换为阻塞状态。
Thread.sleep(1000)让线程休眠1秒,之后继续执行后续操作。
注意,Thread.sleep()可能会抛出InterruptedException异常,所以需要使用try/catch 或者 throws结构。
public class Test{
	public static void main(String[] args) {
		try {
			int i = 10;
			while (i > 0) {
				System.out.println(i--);
				Thread.sleep(1000);
			}
		} catch (InterruptedException e) {
			e.printStackTrace();
		}
	}
}
Thread.yield()
yield()的功能是让出当前线程所占用的时间片,也就是说,当前线程主动让出CPU,然后当前线程由运行状态转换为就绪状态。
注意yield()和sleep()的区别。
public class Test{
	public static void main(String[] args) {
		new Thread(() -> {
			for (int i = 0; i < 10; i++) {
				System.out.println(Thread.currentThread().getName() + "----> " + i);
				if (i % 2 == 0) {
					Thread.yield();
				}
			}
		}, "aaaa").start();
		new Thread(() -> {
			for (int i = 0; i < 10; i++) {
				System.out.println(Thread.currentThread().getName() + "----> " + i);
				if (i % 3 == 0) {
					Thread.yield();
				}
			}
		}, "bbbbb").start();
	}
}
Thread.join()
join()的字面意思是合并线程,但是准确的说,可以认为是插入线程,表示当前线程阻塞,需要等待另外某个线程执行完毕后,当前线程才可以转换为就绪状态,进而再次运行。
注意。sleep()和yield()都是静态方法(类方法),而join()是成员方法(实例方法)。
方法声明:
// 指定的线程运行完毕之后再运行当前线程
void java.lang.Thread.join() throws InterruptedException

// 在指定的时间内,如果指定的线程还没有运行完毕,那么当前线程继续运行。
void java.lang.Thread.join(long millis) throws InterruptedException
join()的示例用法如下:
public class Test{
	public static void main(String[] args) {
		Thread t = new Thread(() -> {
			for (int i = 0; i < 100; i++) {
				System.out.println(Thread.currentThread().getName() + " ----> " + i);
			}
		}, "Thread A");

		t.start();

		new Thread(() -> {
			for (int i = 0; i < 100; i++) {
				System.out.println(Thread.currentThread().getName() + " ----> " + i);

				// 当i小于10时,两个线程交替执行。
				// 当i等于10时,当前线程阻塞,然后等待线程t执行完毕,然后本线程再恢复为就绪,再运行
				if (i == 10) {
					try {
						t.join();
					} catch (InterruptedException e) {
						e.printStackTrace();
					}
				}
			}
		}, "Thread B").start();
	}
}
以父亲叫儿子去买烟为例
public class Test{
	public static void main(String[] args) {
		new Thread(new Father()).start();
	}
}

class Father implements Runnable {
	public void run() {
		System.out.println("想抽烟了,叫儿子去买烟");
		Thread t = new Thread(new Son());
		t.start();

		// 如果没有t.join(),那么,当前线程和线程t都各自执行,并没有先后顺序
		// 所以“接过烟,把零钱给儿子” 会在 “ 儿子出门买烟” 之前运行
		// 但是加入了join就规定了先后顺序,要在t线程执行完之后,才会继续当前线程
		try {
			t.join();
		} catch (InterruptedException e) {
			e.printStackTrace();
		}
		System.out.println("接过烟,把零钱给儿子");
	}
}

class Son implements Runnable {
	public void run() {
		System.out.println("接过钱,出门");
		System.out.println("路过游戏厅");
		try {
			Thread.sleep(3 * 1000);
		} catch (InterruptedException e) {
			e.printStackTrace();
		}
		System.out.println("想起买烟了");
		System.out.println("买了烟回家");
	}
}
Thread.stop()
stop()方法已经被废弃了,不再推荐使用。
但是可以使用其他方式来实现:设置一个标志,将该标志设定为线程是否继续运行的判断条件,通过修改该标志来决定线程是否继续运行。
public class Test {
	public static void main(String[] args) throws InterruptedException {
		MyThread t = new MyThread();
		new Thread(t, "aaaaaaa").start();

		Thread.sleep(1000 * 5);
		//主线程修改5秒钟后,手动去停止子线程

		// 通过调用t的方法,修改标志位,达到停止线程的目的
		t.stopThread();
	}
}

class MyThread implements Runnable {
	private boolean needStop = false;

	public void run() {
		while (!needStop) {
			int i = 0;
			System.out.println(Thread.currentThread().getName() + " ---> " + i++);
		}
	}

	public void stopThread() {
		this.needStop = true;
	}
}
线程的五个状态
五个状态分别是:创建、就绪、运行、阻塞、死亡。状态的转换过程如下如所示:
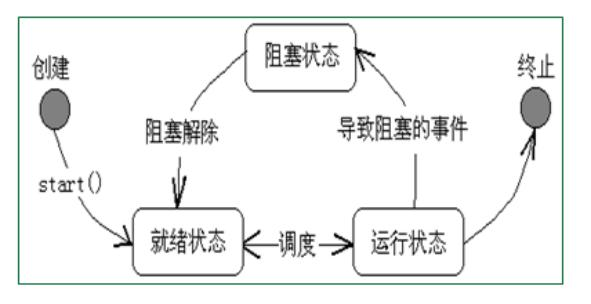
创建状态(Thread.State.NEW)
一个线程经过new Thread()之后,就变成了创建状态。
就绪状态(Thread.State.RUNNABLE)
1、处于创建状态的线程,调用start()方法之后,就会变成就绪状态。
2、线程从阻塞状态中解除,会转换为就绪状态,注意并不会立即变为运行状态。
3、时间片轮转调度是,线程所分得的时间片用完,则会转换为就绪状态。
4、调用Thread.yield()主动让出时间片(让出CPU),则会转换为就绪状态。
阻塞状态(Thread.State.BLOCKED、Thread.State.WAITING)
1、线程处于运行状态,如果需要I/O(文件IO,网络IO),在IO完成之前就会转换为阻塞状态(Thread.State.BLOCKED;)。
2、调用Thread.sleep()、Thread.wait()方法,让线程由运行状态转换为阻塞状态(Thread.State.WAITING;)。
运行状态(Thread.State.RUNNABLE)
1、由就绪状态转换为运行状态,注意,阻塞状态不能直接转换为运行状态。
死亡状态(Thread.State.TERMINATED)
1、线程完成指定的操作,正常结束
2、被强制性地终止
3、线程抛出异常,但是没有捕获异常。
等待其他线程完成 (Thread.State.TIMED_WAITING)
1、等待其他线程完成,此时本线程处于Thread.State.TIMED_WAITING状态
线程的优先级
首先声明:
1、优先级并不等于执行先后顺序,优先级只是一个概率、可能性,优先级高的线程,更有可能执行的机会越大。
2、线程在创建的时候,要在调用start()前设置优先级(不是调用start()方法后才设置)
3、优先级最低为1,最高为10,初始默认为5,可以手动修改优先级。
public class Test {
	public static void main(String[] args) throws InterruptedException {
		/*
		Thread.MIN_PRIORITY 	-->默认为1;
		Thread.NORM_PRIORITY 	-->默认为5;
		Thread.MAX_PRIORITY     -->默认为10;
		*/

		Thread t = new Thread(()->{});

		//Thread.getPriority 获取线程的优先级
		System.out.println(t.getPriority());  // 5

		//Thread.setPriority(int newPriority)
		//t.setPriority(Thread.MIN_PRIORITY);
		t.setPriority(7);
		System.out.println(t.getPriority());

		t.start();

		t.setPriority(Thread.MAX_PRIORITY);
		System.out.println(t.getPriority());
	}
}
守护线程
主要注意几点:
1、线程分为用户线程和守护线程
2、JVM必须确保用户线程执行完毕后,JVM才会停止
3、JVM不用等待守护线程执行完毕,也就是说,即使守护线程还在执行,JVM也会停止,不关心守护线程。
4、默认所有线程都是用户线程,必须调用setDaemon()来显式说明线程是守护线程,在start()之前设置 。
守护线程比如:操作日志,监控内存使用等,他们都是为用户线程服务的。
public class Test {
	public static void main(String[] args) throws InterruptedException {
		God god = new God();
		Person person = new Person();

		// 如果没有将god线程设置为守护线程,那么god线程将会被认为是用户线程。
		// 即使person线程已经结束,但是god线程并没有结束,所以程序会一直运行,不会结束。

		// 将用户线程设置为守护线程
		god.setDaemon(true);

		god.start();
		person.start();

		// 所有的用户线程结束后,即使守护线程没有结束,JVM就停止了,并不会关心守护进程是否结束
	}
}


class Person extends Thread{
	public void run() {
		for (int i = 0; i < 10; i++) {
			System.out.println("Still alive, the " + i + " day");
		}
		System.out.println("Game Over");
	}
}

class God extends Thread {
	public void run() {
		// 注意,该线程是一个死循环
		while (true) {
			System.out.println("I will bless you");
		}
	}
}
代理线程的名称和真实线程的名称
如果实现Runnable接口后,利用Thread代理类来启动线程,传递给代理类的线程名称是代理类线程名称,而真实线程的名称可以使用真实线程的属性来实现。
public class ThreadName implements Runnable {
	private String threadName;

	public ThreadName() {
		super();
	}

	public ThreadName(String threadName) {
		super();
		this.threadName = threadName;
	}

	public String getThreadName() {
		return threadName;
	}

	public void setThreadName(String threadName) {
		this.threadName = threadName;
	}

	@Override
	public void run() {
		System.out.println("真实线程的名称 -> " + this.getThreadName());
		System.out.println("代理类线程的名称 -> " + Thread.currentThread().getName());
	}

	public static void main(String[] args) {
		new Thread(new ThreadName("real threadName"), "proxy threadName").start();
	}
}
Thread类的常用方法
| 方法名 | 功能 |
| public void run() | 线程所要执行的代码,子类需要重写该方法 |
| public void start() | 启动线程,将线程的状态切换为就绪状态 |
| public static Thread currentThread() | 返回当前正在执行的线程对象的引用 |
| public static sleep([long mills]) | 指定当前所在线程休眠多少毫秒 |
| public final boolean isAlive() | 判断指定线程是否终止 |
| public final void setName(String name) | 改变线程的名称 |
| public final String getName() | 返回线程的名称 |
| public final void join() | 阻塞当前线程,等待指定的线程执行结束后,再运行当前线程 |
| public static void yield() | 让出时间片 |
| public final void setPriority(int newPriority) | 设置线程优先级 |
| public final int getPriority() | 获取线程的优先级 |

 浙公网安备 33010602011771号